• Skip to main content
  • Skip to primary sidebar
  • Skip to secondary sidebar

Sixth Street Sundries

Emily Midgett

  • Home
  • About Me
  • Contact
  • OLO Marker Color Swatch Chart
  • Shop

A7 card

April Showers Bring May Flowers: Celebrate Rose Corner Edition!

May 13, 2024

This post was sponsored by Simon Says Stamp. Thanks, Simon!

Hi friends! After a whirlwind of fun teaching at a Simon Says Stamp booth at CREATE, I am back home and trying to get back into the swing of things at a little bit less frantic pace. (I spent several days prior energetically prepping to be gone from my family for four days) I meant to blog this project while I was gone, but I had too much fun teaching and was exhausted by the end of the days, so there’s been a bit of a lull here on my blog as a result. But I’m back with some fun inspiration for my April Showers Bring May Flowers series, this time using my Celebrate Rose Corner illustration for Simon Says Stamp. This was one of my first illustrations for Simon Says Stamp, and it’s still one of my favorites! It’s such fun to play with older supplies using different mediums and color palettes. I chose to use a soft peach melba color combination for today’s project. Let’s get started with the details!

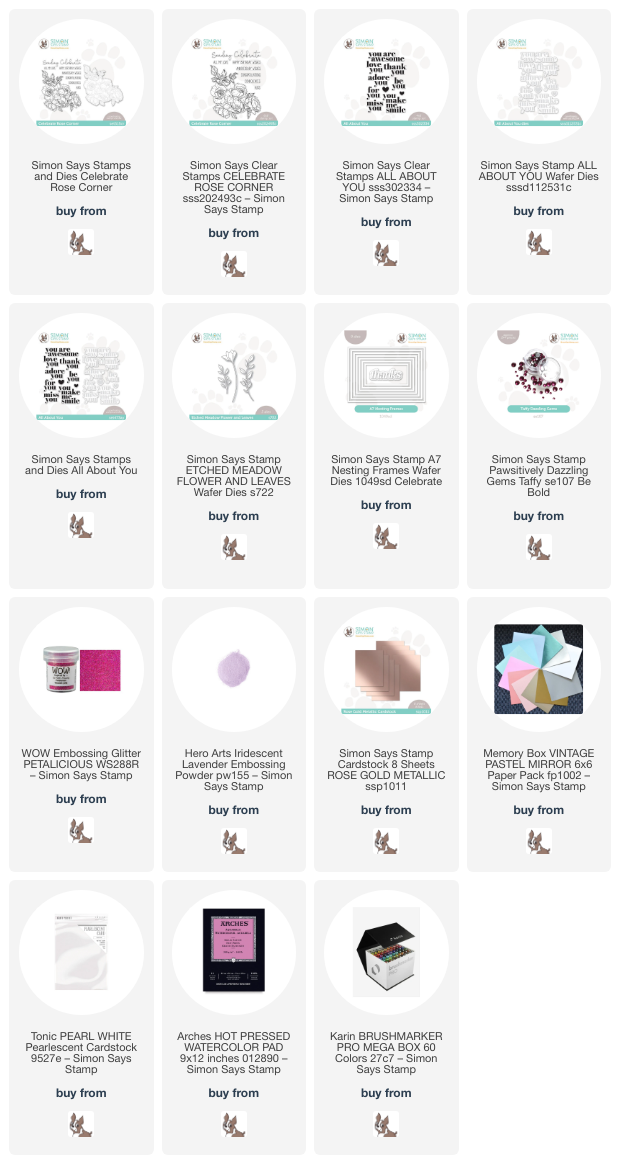
To begin my project, I stamped the large Celebrate Rose Corner stamp on an A7 panel of Arches Hot Press watercolor paper, then heat embossed the image with Hero Arts’s Iridescent Lavender embossing powder. This embossing powder is gorgeous and creates a subtle iridescent sheen on your embossed image. It looks marvelous on both colored cardstock and white cardstock alike. I like to use white or clear embossing powder when I want to create a semi-no-line-coloring look. The white lines are a bit softer than the stark black lines created with typical stamping. However, because of these white lines on the white paper, I do like to start watercoloring the background first so that I have a better visual on where the flowers are located.

To begin my watercoloring, I taped my panel down to my watercolor board to reduce warping, then used Karin Brushmarker Pro markers to add soft peach and pink around the edges of my embossed image. To create that dreamy watercolor look, I scribble the color on my glass craft mat, then dilute the color with lots of water. I add lots of layers of color, allowing each layer to dry between applications, which helps create the subtle layers of color. I used the same colors for the roses to create these pretty peachy roses, paying extra attention to the shadowed areas. Once I had finished adding color to the image, I allowed it to dry completely before beginning to assemble my card front.

After allowing my watercolor panel to dry completely, I die cut a frame using the A7 Nesting Frame Dies and Rose Gold Metallic foil cardstock from Simon Says Stamp. The soft rosy foil cardstock complements the peach and pink tones in the watercolored image. I trimmed the watercolored panel down to 4″ x 6″, then selected a coordinating frame and adhered it to the watercolor panel using liquid adhesive. I added the framed watercolored panel to a full size A7 panel of pearlescent white cardstock, creating a shimmery white mat around the edge. I heat embossed a sentiment from All About You onto some heavyweight vellum using pink glitter embossing powder, then die cut the sentiment with the coordinating die. To add a little extra interest to the sentiment, I die cut some foliage from the Etched Meadow Flower and Leaves using pale pink brushed foil cardstock. I nestled the foliage behind the sentiment, then added some Taffy Pawsitively Dazzling Gems for extra sparkle!

Well, that’s all for my project today. Thank you so much for stopping by, and have a marvelous day!
Filed Under: simon says stamp Tagged With: A7 card, A7 nesting frames, all about you, celebrate rose corner, etched meadow flower and leaves, karin brushmarker pro, watercolor

Altenew 10th Anniversary Blog Hop Day 1 + Giveaway (over $3,500 in Total Prizes)

April 1, 2024

Hi friends! I am so excited to be part of Day 1 for Altenew’s Tenth Anniversary Blog Hop!! How thrilling is that? What a fantastic milestone! I have loved Altenew’s designs for almost as long as they’ve been around, and so being a part of their design team for the last three years has been nothing short of a dream come true. You should have arrived here from the Scrapbook & Cards Today blog, and your next stop is Svitlana Shayevich. You can also start at the beginning over at the Altenew Blog. (I highly encourage you to start at the beginning, because there are masses upon masses of prizes to be had throughout the hop!!) I have two projects to share with you today, so let’s get started with the details!

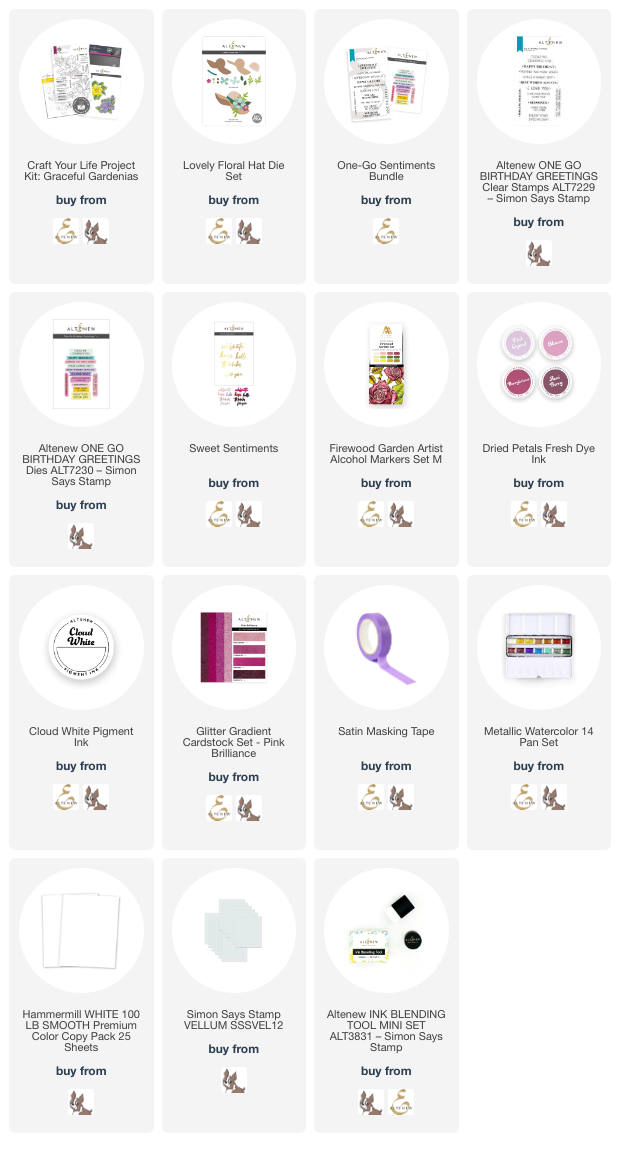
When I was perusing my Altenew bins to figure out which products to use for today’s hop, I realized that I had not put the incredibly lovely Craft Your Life Project Kit: Graceful Gardenia to use yet. These kits come with such wonderful coordinating products, from traditional stamps and dies to embossing folders and coordinating stencils that work with both the stamps and the embossing folder images. I employed some of my most favorite of the new Fresh Dye Inks and the new Firewood Garden alcohol markers to create these pretty pink cards. The embossing folders are great to use as a focal point or to add texture to the background!

For my first project, I started by embossing a panel of white cardstock using the embossing folder from the Craft Your Life Project Kit: Graceful Gardenia kit. I then used some of the colors from the Dried Petals Fresh Dye Ink set to blend around the edge of the card front. Embossing the panel first and then ink blending over the top enhances the incredible embossed details. To further enhance the details, I swiped the Cloud White pigment ink pad over the raised areas to help them stand out even more.

On top of my embossed background, I die cut a large scale sentiment from the new Timeless Sentiments 2 die set using the Rhodolite Garnet glitter paper from the Pink Brilliance Glitter Gradient cardstock set. I enhanced the die cut sentiment with some sparkly, shimmery flowers from the Lovely Floral Hat die set, which I cut with some specialty papers, including more Rhodolite Garnet glitter paper and some iridescent white mirror paper, paired with vellum foliage. I tucked a greeting from the One Go Sentiments Bundle around the glitter die cut sentiment and arranged the flowers and foliage around the sentiment. Finally, I added a few shimmering gems for sparkle!

For my second project, I used one of my favorite techniques with embossing folders: alcohol marker coloring! The Craft Your Life Project Kit: Graceful Gardenia kit comes complete with dies that coordinate with both the stamped image as well as the embossed image. I die cut the floral image that coordinated with the embossing folder using the correct die, then lined it up on the embossing folder and ran it through my die cutting machine. I then used the Firewood Garden alcohol markers to add lots of vibrant color to the embossed image. I am always amazed at how much dimension you can achieve when you combine coloring with the embossed images!!

Because this embossed, colored image was on such a large scale, I decided to create an A7 card. I trimmed down an A7 card front, then masked the edges with Satin Masking Tape and blended some mauve inks around the edges using inks from the Dried Petals Fresh Dye Ink set. While the masking tape was still in place on my card front, I used the stamps included in the Graceful Gardenia kit to stamp a tone-on-tone background around the corner of my masked area. I also splattered the blended and stamped background with some metallic watercolors for added texture and shimmer. I removed the masking tape around the edges, revealing a crisp white frame around my blended background. I popped up the embossed colored sentiment with some foam adhesive, then added a glittery greeting cut from the Sweet Sentiments set and an ethereal vellum sentiment from the new One Go: Words & Banners set. I finished the project off with a few sparkling gems!!

Well, that’s all for my projects today! Now for tons of fun giveaway information:

Over $3,500 in total prizes! We are giving away a $50 Altenew gift certificate to 10 winners, a $20 ArtistrybyAltenew gift certificate to 5 winners, and an online papercrafting class($39.99 value) from Altenew Academy Online Class to 14 winners. There are also 28 awesome companies/crafty friends who are celebrating with us, and they are offering the following prizes:

  • Altenew: 10 x $50 Altenew Gift Certificates
  • ArtistrybyAltenew: 5 x $20 ArtistrybyAltenew Gift Certificates
  • Altenew Academy: 14 x Online Papercrafting Classes($39.99 value each)
  • Crafter’s Companion: 1 x Gemini II Die Cutting and Embossing Machine ($329 value)
  • LDRS Creative: 4 x $50 LDRS Creative Gift Certificates
  • Online Card Classes: 5 x Online Card Classes ($25 value each)
  • Jennifer McGuire Ink: 1 Share Handmade Kindness goodies bag ($100 value)
  • Honey Bee Stamps: $100 Gift Certificate
  • Hero Arts: $100 Gift Certificate
  • Lawn Fawn: $100 Gift Certificate
  • Pink and Main: $100 Gift Certificate
  • Scrapbook & Cards Today: $100 Gift Certificate
  • Taylored Expressions: $100 Gift Certificate
  • Gina K. Designs: $100 Gift Certificate
  • CraftStash: $100 Gift Certificate
  • Brutus Monroe: $100 Gift Certificate
  • Picket Fence Studios: $50 Gift Certificate
  • Pelletier Craft Studio: 3 x $25 Gift Certificates
  • Michelle’s Cards and Stamps: AUD $100 Gift Certificate
  • Spellbinders Paper Arts: 2 x $25 Gift Certificates
  • Scrapbook.com: $50 Gift Certificate
  • My Craft Room: $50 Gift Certificate
  • Krafters Cart: $50 Gift Certificate
  • A Cherry on Top: $50 Gift Certificate
  • Simon Says Stamp: $50 Gift Certificate
  • My Favorite Things: $50 Gift Certificate
  • Pinkfresh Studio: $50 Gift Certificate
  • Bumbleberry Papercrafts: £25 Gift Certificate
  • Seize the Stamp: CHF 25 Gift Certificate
  • MarkerPop: $25 Gift Certificate
  • Auzz Trinklets N Krafts: AUD $25 Gift Certificate

Be sure to leave comments by 04/16/2024 for a chance to win one of 68 prizes! To make the hop more exciting, start your comment with “Hi from (city or country where you’re from)!” 68 winners will be chosen at random from the comments left on any of the blogs listed below and will be announced on the Altenew Card Blog on 04/19/2024.

Anniversary Special Offers

  • 20% Off Crafter’s Must-Have: Stampwheel on 04/01/2024 from 12:01 am EDT until 11:59 pm EDT. Shop here: https://altenew.com/products/stampwheel
  • Receive a FREE Zip ‘n’ Stash – Teal (1/pack) ($6.99 value) on orders over $69 on 04/01/2024 from 12:01 am EDT until 11:59 pm EDT. While supplies last, the free gift will be added to your cart automatically. Shop here → https://altenew.com/
  • Plus, get FREE U.S. shipping on orders over $29 (no code needed) or $10 OFF international shipping on orders over $129 with code HAPPY10TH at checkout. Valid from 04/01/2024 at 12:01 am EDT until 04/05/2024 at 11:59 pm EDT. Not valid on prior purchases. Shop here → https://altenew.com/

Here’s the full hop list in case you get lost:

You are invited to the Inlinkz link party!

Click here to enter

Filed Under: altenew Tagged With: A7 card, alcohol markers, craft your life, craft your life graceful gardenia, fresh dye inks, lovely floral hat, masking, one-go sentiments, sweet sentiments

Songs of the Season: Silver and Gold!

October 25, 2023

This post is sponsored by Simon Says Stamp. Thanks, Simon!

Hi friends. I know that we are in full-blown holiday mode around here, so I don’t really need to do a Songs of the Season post for October (it’s my excuse for playing with my holiday supplies all year round, ha!)… but I really love the inspiration that the Songs of the Season series brings to my creative process, so I couldn’t let the month pass without a new installment to the series! This month, we’re focusing on a beautiful song from Rudolph the Red-Nosed Reindeer: Silver and Gold, sung by Burl Ives. Listen to it below:

Christmas always conjures plenty nostalgia for me (I would imagine that to be true for most people), as my childhood Christmas memories are some of my most cherished. We had a VHS tape of Rudolph the Red-Nosed Reindeer, as well as Frosty, Mickey’s Christmas, Garfield’s Christmas, and a few other child-friendly holiday videos that were on repeat for most of December. As an adult and a parent, I now find some of the themes in the Rudolph story to be a bit sad and not necessarily ideals to which I want my children to subscribe, but the music is still something that I cherish, including the song Silver and Gold. Both of my cards today were inspired by that piece, so let’s get started with the details!

Both of my projects feature the beautifully detailed Snowflake Season stamp set from Simon Says Stamp. This is an older set, but the elegance and detail of these snowflake stamps is absolute perfection. I wanted to showcase these beautiful details with some sparkling metallic embossing powder to create gorgeous, festive holiday cards!

I began my first project by heat embossing nearly all of the snowflakes from the Snowflake Season set onto some heavyweight vellum using gold glitter embossing powder and silver glitter embossing powder, then die cutting them with the coordinating dies. The vellum allows the snowflakes to “float” on the card front so gracefully!

I wanted to create a larger A7 card, so I die cut the A7 Thin Frames dies from some brushed gold foil cardstock. (I keep my Thin Frames dies connected so that I can get tons of frame die cuts in various sizes and thicknesses with just one pass through my die cut machine! I save the extras for a rainy day, which makes it super easy to add one to my projects!) I blended some Gravel ink around the edges of my white A7 card front, then splattered the blended areas with some shimmering metallic gold watercolor, keeping the center of the card front nice and clean. I adhered one of the shiny gold frames to the card front using liquid adhesive.

With the conflict and violence currently happening in the Middle East, I have had the phrase “peace on earth, goodwill to men” stuck in my head, and wanted to use it on a project to try to send some peaceful energy into the world. This large A7 card was the perfect size for the generously-sized Peace on Earth Script die, which I die cut from some glittery gold cardstock and backed with a vellum background layer to soften it and add stability to the delicate sentiment die cut. I adhered it to the center of my framed, blended panel using clear foam adhesive, then bracketed the greeting with the glittery vellum snowflake die cuts. I added a few glittering Sparkle and Shine Ombré Glitter Drops from Pinkfresh Studio to fill in the gaps and add one last touch of “silver and gold”!

My second card was borne out of an idea that came to me while working with the vellum for my first card… I love the look of embossed vellum and thought it would be a beautiful background for one of the intricate snowflakes in the Snowflake Season set. What luck that the snowflakes on the Filigree Snowflakes Embossing Folder match the Snowflake Season images so perfectly! But, to allow the embossed vellum to be as much the star of the card as the glittering embossed snowflake image, I used it as a window for my background, so that the details of the embossed image would not be lost and, when standing up, would allow the vellum to create a soft glow! I embossed a panel of vellum using the Filigree Snowflakes Embossing Folder and used my Fiskars trimmer to cut a window from the front of my A2 card base. (A rectangle die would also have done the job, but my cutting plates are pretty beaten up, and I didn’t want to ruin the inside of my card!)

I adhered the embossed vellum panel to the back of the window using super strong double-sided tape, creating a beautiful lacy window to enhance my card front. I heat embossed the largest individual snowflake from Snowflake Season using gold glitter embossing powder and die cut it with the coordinating die. I popped up the snowflake with foam adhesive to give it extra height on my embossed background. For the greeting, I selected a simple sentiment from the Typed Christmas Sentiment Strips pack. Because these sentiment strip panels are printed with toner, they can be foiled using a Minc machine and rolls of heat-reactive foil! I used some gold foil to create a coordinating gold sentiment strip, again with that theme of “peace” that feels so apropos right now. I popped it up using a double layer of foam tape to help it pop even more from the intricate snowflake background, then added some more Sparkle and Shine Ombré Glitter Drops to the tips of the snowflake for one last fun textural element!

Well, that’s all for the October 2023 installment of Songs of the Season. I hope you will join me in praying for and wishing for peace throughout our world. This year has seen so much violence and destruction in so many places that my heart hurts with it. It is such a comfort to have a creative outlet, and I’m so grateful. The world can use all of the love and peaceful energy it can get, I think! Thanks so much for stopping by, and have a marvelous day!

Filed Under: simon says stamp Tagged With: A7 card, A7 thin frames, christmas card, embossing folder, filigree snowflakes, holiday card, peace on earth, snowflake season, songs of the season

STAMPtember Blog Party!

September 2, 2023

This post is sponsored by Simon Says Stamp. Thanks, Simon!

Hi friends! STAMPtember is here, and we’re celebrating in a big way with an amazing blog party, filled with inspiration, free gifts with purchase, and a scavenger hunt!! Each stop on the blog party has it’s own unique free gift with purchase, so be sure to check out each of the stops (listed HERE on the Simon Says Stamp blog) to see all of the fabulous gifts with purchase that are up for grabs! My followers and blog readers have the option to receive the fantastic Detail Round Blending Brush Set as their free gift with purchase! Simply follow the instructions in the graphic above to receive your free gift with any purchase of $100 or more.

Today, we’re celebrating the start of STAMPtember with a blog party, and what’s a party without balloons?? I used the marvelous new Party Balloons embossing folder and coordinating die along with a bunch of other goodies from Simon Says Stamp to create this pair of soft, shimmering birthday cards. Let’s get started with the details!

Both of my projects feature some soft ink blending using the gorgeous Thistle, Twirling Tutu, and Maliblue inks. I kept the color palette pale, with lovely pastel colors, changing things up from my normal bold and vibrant color schemes! Both of my cards feature the new Party Balloons embossing folder, which comes with an individual balloon die so that you can create dimensional balloon bouquets!

My first card features just the Party Balloons embossing folder to create a subtle-but-festive background for my large scale sentiment components! I began by blending Thistle, Twirling Tutu, and Maliblue inks on a panel of A2 white cardstock using Large Blending Brushes. I ran the blended panel through my die cutting machine using the Party Balloons embossing folder, then spritzed the entire panel with some Hero Arts Iridescent Shimmer Spray. The shimmer spray helps to soften the blend and even out the colors even more, while also adding a gorgeous pearlescent shine to the panel!

To add to the party atmosphere of the balloon background, I die cut the Streamer Ribbons dies from some Lawn Fawn Pearlescent Vellum and some more plain white cardstock. I again used blending brushes to blend Thistle and Maliblue inks on the plain white streamers so that they perfectly coordinated with the colors of the background. I arranged them so that they were artfully hanging from the “ceiling,” popping the solid streamers up with foam adhesive for extra dimension.

For the sentiment, I die cut the gorgeous detailed layer of the Scripty Happy Birthday die three times; once from shimmering white pearl cardstock and twice from plain cardstock, layering the three pieces together with liquid adhesive to create a dimensional die cut greeting. To this, I added a sentiment strip embossed using a greeting from the Birthday Sentiments stamp set and some silver embossing powder. The last touch was to add a few shimmering gems for some sparkle!

My second project coordinates with the first, using the same color scheme, but with a bit cleaner aesthetic! I began my project by centering one of the A7 Scalloped Rectangles Stencils over an A7 panel of white cardstock. I then used Large Blending Brushes to blend Thistle, Twirling Tutu, and Maliblue inks over the open area of the stencil, creating a colorful area upon which I could build my focal point. I again spritzed the blended area with Hero Arts Iridescent Shimmer Spray to add some extra shimmer and shine to the background. I trimmed the panel down slightly and mounted it in the center of a full size A7 panel of Sea Glass cardstock.

For the focal point, I wanted to create a coordinating bunch of 3D balloons using the die included in the Party Balloons embossing folder set. I die cut several balloons from white cardstock, then placed them inside the embossing folder in the coordinating shaped openings and ran them through my die cut machine. I find it easiest to die cut first and emboss last in order to ensure that the die cut shapes maintain as much dimension and shape as possible. I also prefer to nestle the die cuts inside the negative side of the embossing folder, rather than on the raised side, because they sit perfectly inside the negative spaces without shifting! After I had added shape to my balloon die cuts, I used the same three ink colors with the Small Blending Brushes to blend coordinating ink colors.

Next, I die cut the Large Fancy Happy Birthday die from some white pearlescent mirror cardstock and popped it up towards the bottom of the blended, shimmering scalloped rectangle using foam adhesive. I arranged the balloon die cuts in a little bouquet, using foam and liquid adhesive and adding the balloon strings using a sparkly gray gel pen. After I had adhered all of my die cuts, I added some Trinity Stamps Rock Candy Confetti, which I think makes it look like party time!!

Well, that’s all for today’s projects! Be sure that you check out all of the different blogs participating in today’s blog party over on the Simon Says Stamp blog. Each stop has a fabulous different Gift With Purchase code, so you can find the one that works best for you and your crafting desires! My code (details shared in the graphic at the top of the post!) allows you to receive the Detail Round Blending Brush Set as your free gift with purchase of $100 or more… a $29.99 value, which is absolutely incredible!! Thanks so much for reading today, and Happy STAMPtember!!! Enjoy the party!

Filed Under: simon says stamp Tagged With: 3D embossing folder, A7 card, birthday card, die cutting, ink blending, party balloons, streamers

  • « Go to Previous Page
  • Page 1
  • Page 2

Primary Sidebar

  • Facebook
  • Instagram
  • Pinterest
  • YouTube

Favorite Shops

Secondary Sidebar

Subscribe

Enter your email address to subscribe to this blog and receive notifications of new posts by email.

Instagram
Something is wrong.
Instagram token error.
Follow
Load More

Archives

Tags

3D embossing folder alcohol markers better press birthday birthday card blog hop card kit christmas christmas card christmas tag colored pencil copic copic coloring Daniel Smith die cutting embossing folder embroidery felt giveaway holiday holiday card hot foil ink blending karin brushmarker pro layered stencil masculine my monthly hero new release no line coloring no line watercolor OLO marker olo markers original illustration pawsitively saturated rainbow shaker card slimline stamping stamptember stencil thank you thinking of you valentine's day video watercolor

Popular Posts

Simon Says Stamp October 2026 Card Kit of the Month: Homespun Gratitude!
February 2018 My Monthly Hero Blog Hop!
Altenew Craft A Flower: Poppy Blog Hop+Giveaway!
Felted Gourd Wall Hanging with Simon Says Stamp!
Sunflower Home Decor with Simon Says Stamp!
Craft Your Life Project Kit: Feathered Lilies Blog Hop+Giveaway!
Simon Says Stamp October 2025 Card Kit of the Month!
Altenew Standalone Die Blog Hop+Giveaway!
The Ton Anniversary Release- Day 2
Honey Bee Stamps Cheerful Love Blog Hop!

Disclosure

Some affiliate links are used in my posts. This means that, should you click on one of my links and purchase something from that company, I will receive a small portion of the sale at no extra cost to you. I use the money earned from these sales to help maintain my blog. I so appreciate you visiting and, if you do choose to use one of my affiliate links, thank you so much for your support!
Copyright © 2026 ·Brunch Pro Theme · Genesis Framework by StudioPress · WordPress · Log in
Loading Comments...