• Skip to main content
  • Skip to primary sidebar
  • Skip to secondary sidebar

Sixth Street Sundries

Emily Midgett

  • Home
  • About Me
  • Contact
  • OLO Marker Color Swatch Chart
  • Shop

acrylic markers

Painted Holiday Heart with Poinsettia Swag from Simon Says Stamp!

November 22, 2024

This post was sponsored by Simon Says Stamp. Thanks, Simon!

Hi friends! I am back with another project featuring my Poinsettia Swag illustration, this time with some different and unique-to-me mediums. I have been really enjoying creating things other than cards lately, and raided my local dollar store to find different items that I could pair with my stamps and dies. I found these birch wood heart cutouts and thought they’d make perfect ornaments or little wall hangings! I used the Altenew Acrylic Markers to add some color to my Poinsettia Swag illustration from the new Festive Fun release from Simon Says Stamp. Let’s get started with all of the details!

*I have gathered links to all of the products used at the bottom of the post for your convenience, using affiliate links. Thank you for shopping with my links! I truly appreciate your support for my work!*

I began my project by painting the entire heart with some pearlescent white paint. I did paint it with multiple coats of this white pearl paint, allowing some dry time between each coat to allow for maximum coverage. After I had allowed the white pearl paint to dry overnight, I used Nocturne ink to stamp the floral image directly onto the painted wooden heart. I used my heat gun to dry the ink a bit, then began coloring.

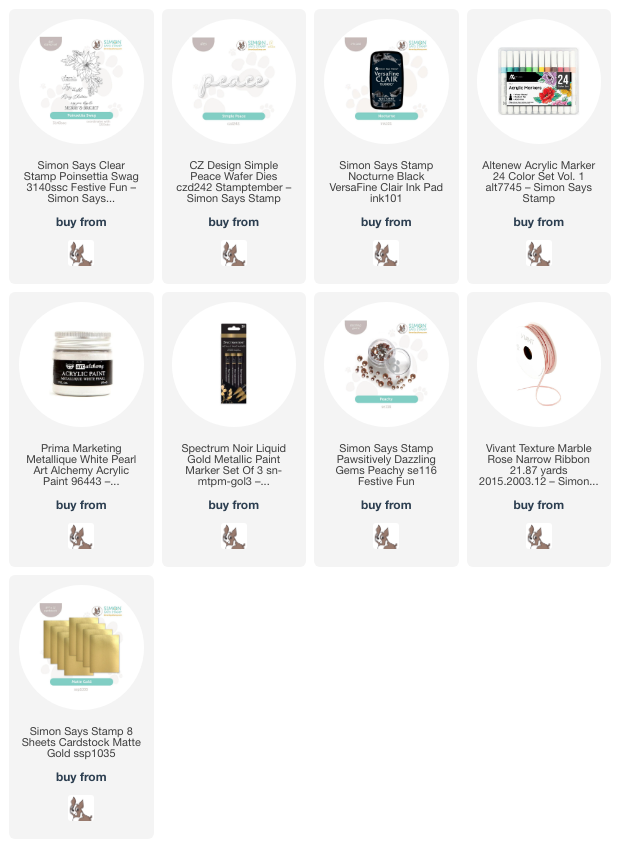
The Altenew Acrylic Markers are great fun for projects like this; their opacity and viscous nature means that they can be applied to a variety of surfaces, including this painted wood! I used the markers in shades of coral-y red, peach, and minty greens to add vibrant color to the poinsettia images, then used the Spectrum Noir Liquid Gold markers to enhance the details on the individual petals. The addition of this golden metallic marker helps to add a level of luxuriousness to the project and helps to further define each individual petal. I also used the gold marker to add some little dots here and there around the bouquet, almost like I would with sequins or gems! I think it helps to balance out the images a bit.

Once I had finished coloring the image, I die cut the detail layer of the Simple Peace Die from Simon Says Stamp’s Matte Gold Metallic cardstock once and twice more from plain white cardstock, adhering the three layers together with liquid adhesive. I added the simple sentiment to the painted wooden panel with liquid adhesive, then added a few Peachy Pawsitively Dazzling Gems around the bouquet. Finally, I threaded some coordinating ribbon through the holes at the top of the wooden heart to create a hanger.

Well, that’s all for my project today. I love creating things that are a bit more tangible and purposeful than cards… things that hopefully would be kept for a bit longer than a card, ha. (I can’t be the only one who struggles thinking about their hard work getting tossed in the trash!) This would be so pretty on a Christmas tree as an ornament, or even on a door knob or just as a wall hanging, I think! Thanks so much for stopping by today, and have a marvelous day!
Filed Under: simon says stamp Tagged With: acrylic markers, altenew acrylic marker, christmas, home decor, liquid gold, metallic paint, no line coloring, original illustration, poinsettia swag, simple peace

New Simon Says Stamp Cheering For You Inspiration!

July 25, 2024

This post was sponsored by Simon Says Stamp. Thanks, Simon!

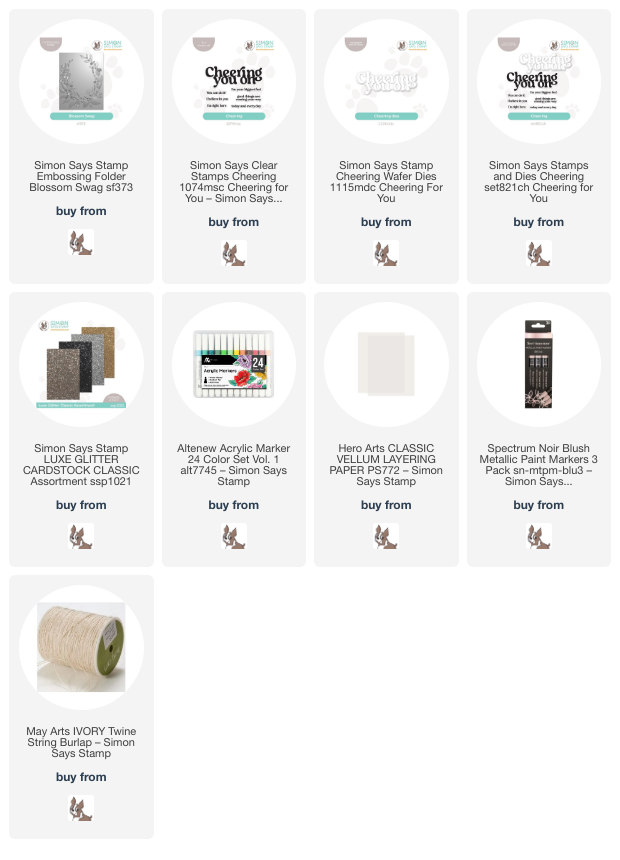
Hi friends! The new Cheering For You release is now live from Simon Says Stamp, and I have another project to share with you using some of the fabulous new goodies from this release! I have a mild obsession with the utterly luscious embossing folders that Simon Says Stamp does so beautifully, and the new Blossom Swag Embossing Folder is so exquisitely delicate that I knew it required special attention. I love the boldness of opaque coloring on a dark background, so I pulled out some dark chocolate cardstock and my Altenew Acrylic Markers and got to work. Let’s get started with the details!

To start, I embossed a panel of deep brown cardstock (so brown that it looks almost black, but I promise, it’s dark brown!) using the Blossom Swag Embossing Folder. After I had embossed those crisp, delicate details, I pulled out some pretty pastel markers from the Altenew Acrylic Markers set. If you’ve ever watched the show Outlander, you might remember one of the impeccably elegant gown that the main character, Claire, wore to Versailles: a stunning brown silk that had been painted with beautiful pink and yellow florals. I channeled that gown with my color selections, allowing those pretty pastel florals to pop from the deep brown backdrop. After adding the colorful markers, I used a white marker to add some highlights to the individual petals and leaf sections. The opacity of the Altenew Acrylic Markers make them perfect for use with intensely-colored cardstock; the colors are bright and crisp without having to work too hard, as you might with colored pencils. I’m hopeful that Altenew will offer more colors in the future!

After I had finished coloring the individual images with their appropriate pastel colors, I used a metallic blush marker to add some details to the image, dotting the centers of the flowers and the berries with this shimmery marker. I also used some handmade glitter watercolors to add highlights and sparkle to the edges of the petals and leaves. The acrylic paint on the fairly porous cardstock helps to create a bit of a barrier for the sparkly watercolors, allowing me to apply them without the paper disintegrating at all.

For the greeting, I heat embossed one of the sentiment strips from the new Cheering Stamp set using Platinum embossing powder on a leftover strip of the same deep chocolate cardstock, then die cut the coordinating sentiment die (you can purchase a bundle HERE) from champagne Luxe Glitter Classic cardstock. I adhered the sparkly detail layer to the vellum shadow layer, then adhered both pieces with some foam adhesive for added dimension. I tucked a twine bow near the sentiment pieces and added a few shimmering gems for added sparkle!

Well, that’s all for my project today. You can check out the entire Cheering For You release by clicking HERE. Be sure to stop by again tomorrow for Day 1 of the Simon Says Stamp Cheering For You blog hop! These blog hops are sure to pique your crafty interest, so I hope you will join us. Thanks so much for stopping by today, and have a marvelous day!

Filed Under: simon says stamp Tagged With: acrylic markers, blossom swag, cheering, embossing folder, encouragement, luxe glitter

Altenew April 2024 Release Blog Hop + Giveaway!

April 11, 2024

Hi friends! Altenew is hosting a blog hop to celebrate their latest release of fabulous stamps, dies, Press Plates, stencils, supplies, and more! You should have arrived here from Agnieszka, and your next stop is Jaycee. You can also start back at the beginning of the hop at the Altenew Blog. The April 2024 release is filled with more of the beautiful florals, textures, sentiments, and design elements that you’ve come to expect from Altenew each month; I find the new Press Plates to be particularly thrilling! I have been really leaning into blue lately, in lots of different intensities and in different color combinations. I have a pair of crisp blue and white cards using the new goodies to share with you today, so let’s get started with the details!

My color combination was inspired by the beautiful blues in the newer Woodland Garden alcohol markers set. I find myself reaching for blues frequently in the springtime; I find something about their crispness and vivid colors to be so clean and a great palate cleanser for the intense and rich colors to which I’ve been drawn during the fall and winter months.

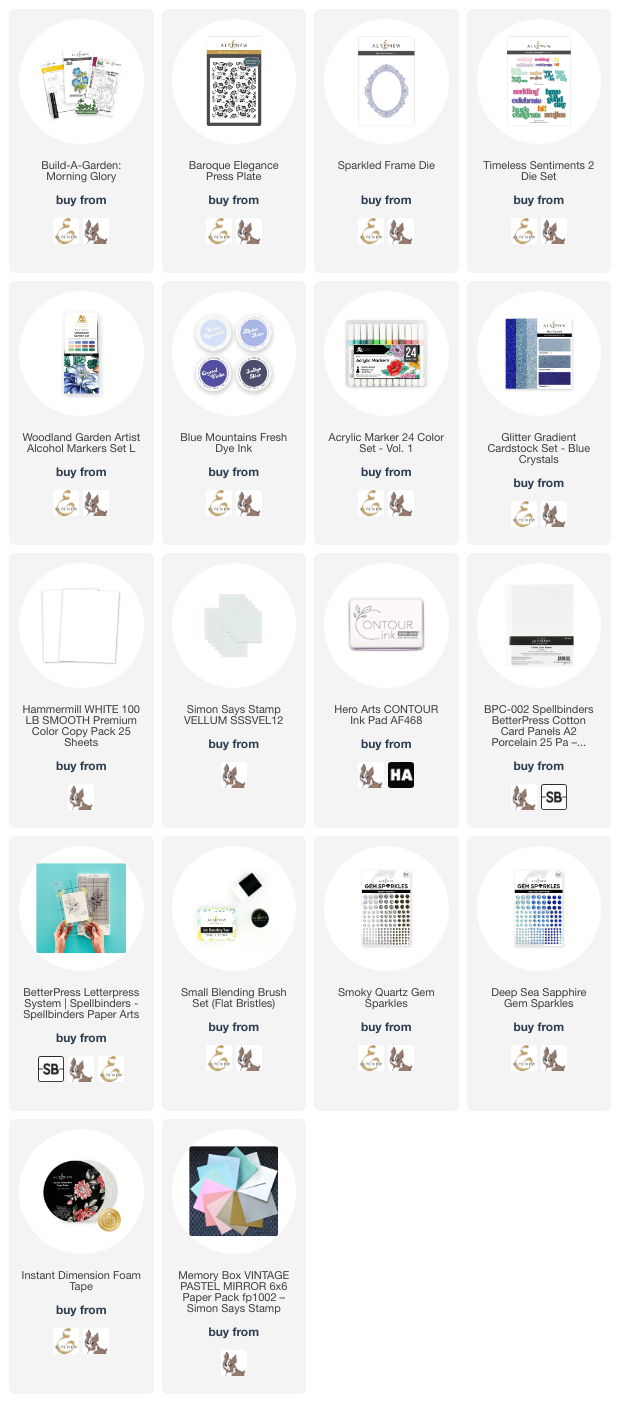
For this first project, I used the newer Woodland Garden alcohol markers to do some no-line coloring with the Build-A-Garden: Morning Glory set. I stamped the image on some alcohol marker-friendly white cardstock using a very pale gray ink, then colored the image with the blues and greens in the Woodland Garden alcohol marker set. I always struggle getting the details of the flower centers perfect, but I used the yellow and tan Acrylic Markers after I had finished my alcohol marker coloring to add those tiny details. The opacity of the Acrylic Markers worked perfectly for the flower centers! I die cut the finished image with the coordinating die, included in the Build-A-Garden: Morning Glory set.

After I had finished my floral focal point, I used the Blue Mountains Fresh Dye Ink quartet with the background stencil included in the Build-A-Garden: Morning Glory set. This background image reminds me of a fence along which the morning glory vines can creep! I kept my color palette crisp and clean, adding some blue “sky” by lightly blending the lightest blue from the Blue Mountains set on the opposite corner of the panel. I trimmed off the edge of the stenciled and blended panel and added a strip of coordinating blue glitter paper from the Blue Crystals glitter cardstock pack to add some glitz to my card front. I popped up the floral die cut with some foam adhesive, allowing it to spill over the side and onto the “fence,” then heat embossed a greeting from Build-A-Garden: Morning Glory using white embossing powder onto some vellum, popping it up with a double layer of clear foam adhesive. Finally, I added some extra sparkle using some iridescent clear gems from the new Smokey Quartz Gems pack!

My second card features the beautiful new Baroque Elegance Press Plate. The Fresh Dye Ink line has one other fabulous facet besides its vibrant color palette: its thicker viscosity works beautifully with the Better Press! I used the Alpine Aster ink from the Blue Mountains Fresh Dye Ink quartet to press the Baroque Elegance image onto some letter press paper, then trimmed the panel down to slightly smaller than A2 size and blended Crystal Violet around the edges of the background. I mounted it on a panel of coordinating blue A2 cardstock, leaving a thin darker blue frame around the edge.

After I had created my background, I die cut the new Sparkled Frame die from some creamy white foil cardstock. The warmth of this foil cardstock worked very nicely with the creamy letter press paper! I also die cut a greeting from the new Timeless Sentiments 2 die, cutting the detail layer from some Blue Crystals glitter cardstock pack and the coordinating shadow from some lightweight vellum to allow that pretty letter press pattern to show through. I oriented the frame so that it was hanging off the side of the card front and trimmed the excess, then popped the frame up with some foam adhesive. I adhered the greeting within the confines of the frame, then embellished the frame with some new Deep Sea Sapphire gems. Such a simple, crisp, clean card!

Well, that’s all for my projects today! Now for some fun giveaway information:

$300 in total prizes! To celebrate this release, Altenew is giving away a $100 gift certificate to 1 lucky winner and a $50 gift certificate to 4 winners! Please leave a comment on the Altenew Card Blog and/or each designer’s blog post on the blog hop list below by 04/17/2024 for a chance to win. Altenew will draw 5 random winners from the comments left on each stop of this blog hop and announce the winners on the Altenew Winners Page on 04/19/2024.
*The winner of the $100 gift certificate will be chosen from comments left on the Altenew blog.

Here’s the full hop list in case you get lost:

You are invited to the Inlinkz link party!

Click here to enter

Thanks so much for stopping by today, and happy hopping!

Filed Under: altenew Tagged With: acrylic markers, baroque elegance, better press, build-a-garden: morning glory, fresh dye inks, layering stencil, no line coloring, sparkled frame, timeless sentiments 2, woodland garden alcohol markers

  • « Go to Previous Page
  • Page 1
  • Page 2

Primary Sidebar

  • Facebook
  • Instagram
  • Pinterest
  • YouTube

Favorite Shops

Secondary Sidebar

Subscribe

Enter your email address to subscribe to this blog and receive notifications of new posts by email.

Instagram
Something is wrong.
Instagram token error.
Follow
Load More

Archives

Tags

3D embossing folder alcohol markers better press birthday birthday card blog hop card kit christmas christmas card christmas tag colored pencil copic copic coloring Daniel Smith die cutting embossing folder embroidery felt giveaway holiday holiday card hot foil ink blending karin brushmarker pro layered stencil masculine my monthly hero new release no line coloring no line watercolor OLO marker olo markers original illustration pawsitively saturated rainbow shaker card slimline stamping stamptember stencil thank you thinking of you valentine's day video watercolor

Popular Posts

Simon Says Stamp Sending Cheer Blog Hop- Day 2 + Freebie + Giveaway!
Altenew October 2026 Release Blog Hop + Giveaway!
Rustic Monochromatic Stars for Christmas with Rainbow Splash!
December 2018 My Monthly Hero Blog Hop + Giveaway!
March 2020 Essentials By Ellen Blog Hop+Giveaway!
The Ton Stamps Summer Release: Day 1
Hero Arts Partners Blog Hop: Lawn Fawn!
Waffleflower July Release Blog Hop!
Simon Says Stamp STAMPtember Tim Holtz Collaboration: Festive Holidays!
Honey Bee Stamps Autumn Blessings Blog Hop-Day 2!

Disclosure

Some affiliate links are used in my posts. This means that, should you click on one of my links and purchase something from that company, I will receive a small portion of the sale at no extra cost to you. I use the money earned from these sales to help maintain my blog. I so appreciate you visiting and, if you do choose to use one of my affiliate links, thank you so much for your support!
Copyright © 2026 ·Brunch Pro Theme · Genesis Framework by StudioPress · WordPress · Log in
Loading Comments...