• Skip to main content
  • Skip to primary sidebar
  • Skip to secondary sidebar

Sixth Street Sundries

Emily Midgett

  • Home
  • About Me
  • Contact
  • OLO Marker Color Swatch Chart
  • Shop

blackout technique

Use Your Leftovers Week: Peachy Mother’s Day with New Simon Says Stamp!

April 13, 2026

This post was sponsored by Simon Says Stamp. Thanks, Simon! *I have gathered links to all of the products used at the bottom of the post for your convenience, using affiliate links at no extra cost to you. Thank you for shopping with my links! I truly appreciate your support for my work!*

Hi friends! This week on my blog, I thought I would share some inspiration featuring “leftovers.” Using leftover die cuts is one of the ways that I can streamline my cardmaking process; with four kids, a house renovation, and full time crafting job, I am sometimes pressed for time in my craft room, as we all are occasionally, so I try to make the most out of every die cut and leftover that I can! Sometimes the mess of leftovers on my desk can be a little overwhelming, but being inspired to create an entirely new card using a leftover piece from a previous project is kismet! This week, I will show multiple cards created using positive and negative spaces, fun papers, and generally showing you that leftovers are a great way to jumpstart your creativity. Let’s get started with the details on my first project!

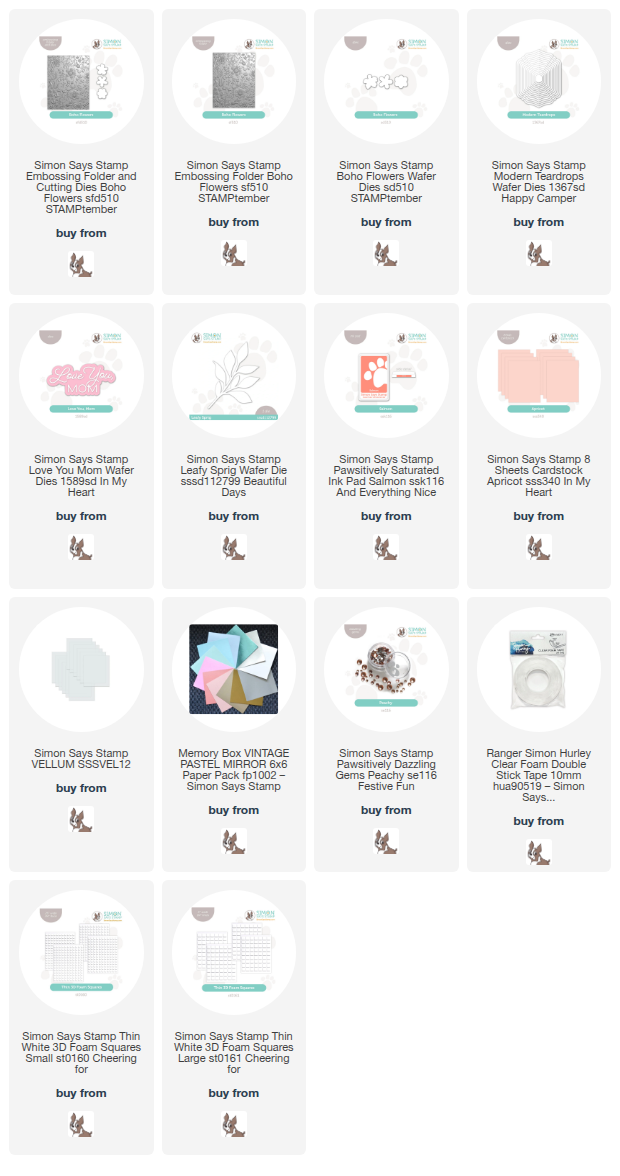
I wanted to use the new Boho Flowers embossing folder with some of the gorgeous new blushy-peach cardstock that Simon Says Stamp released with their In My Heart release! (Click HERE to see the entire new release!). I began by running an A2 panel of Apricot cardstock through my die cutting machine using the new Boho Flowers embossing folder, then flipped the panel over so that it showed the debossed side (with the pattern impressed down in the paper rather than raised up) and swiped my Pawsitively Saturated Ink Pad in Salmon directly onto the paper. The result is a beautiful coral patterned panel with lots of gorgeous texture and enhanced, debossed details! I splattered the entire panel with some glittery copper watercolors and set it aside to dry.

After I had created the patterned background, I decided to create a coordinating frame to draw they eye to the center of the card. I die cut one of the Modern Teardrops nested dies from the center of another panel of A2 Apricot cardstock, reserving the positive die cut for another project! I popped up the frame on my debossed blackout (coral-out?) panel using Simon Says Stamp’s Thin Foam Adhesive Squares. I took advantage of the individual floral dies that coordinate with the Boho Flowers embossing folder to die cut a trio of blooms from some pearlescent peach cardstock, adding texture to the die cuts with the coordinating embossing folder. I adhered the trio of blooms to the top of my frame, then added a few Leafy Sprig die cuts, cut from Apricot cardstock, to add some extra texture and visual weight to my floral swag.

For the greeting, I die cut the detail layer of the new Love You, Mom die set from Apricot Simon Says Stamp cardstock, creating the shadow die cut with vellum and adhering the die cuts together with liquid adhesive. I used some clear dimensional adhesive to add the finished die cut to the interior opening of my frame. Finally, I added some more sparkle to the project by adding some Peachy Pawsitively Dazzling Gems to the point of the bottom of the frame, as well as to the flower centers, creating lots of sparkle and fun texture.

Well, that’s all for my project today! Be sure to come back tomorrow to see more inspiration using leftovers. Thanks so much for stopping by today, and have a marvelous day!
Filed Under: simon says stamp Tagged With: blackout technique, boho flowers, die cutting, embossing folder, leafy sprig, love you mom, modern teardrops, mother's day

Warm Thoughts in the Snow with New Simon Says Stamp!

January 16, 2026

This post was sponsored by Simon Says Stamp. Thanks, Simon!

Hi friends! Happy Friday! My kiddos were ecstatic to wake up to an inch of pristine white snow this morning, and so I thought it was the perfect day to share this snowy, pale blue “blackout” card with you using new goodies from the Heart to Heart Release  from Simon Says Stamp (click HERE to check out the entire release!). Embossing folders never cease to amaze me with their versatility, made even better by their diminutive price point. I used the new Wonderland Snowflakes with the “blackout” technique, this time using a pale blue to create that wintry background. Let’s get started with the details on my project!

*I have gathered links to all of the products used at the bottom of the post for your convenience, using affiliate links at no extra cost to you. Thank you for shopping with my links! I truly appreciate your support for my work!*

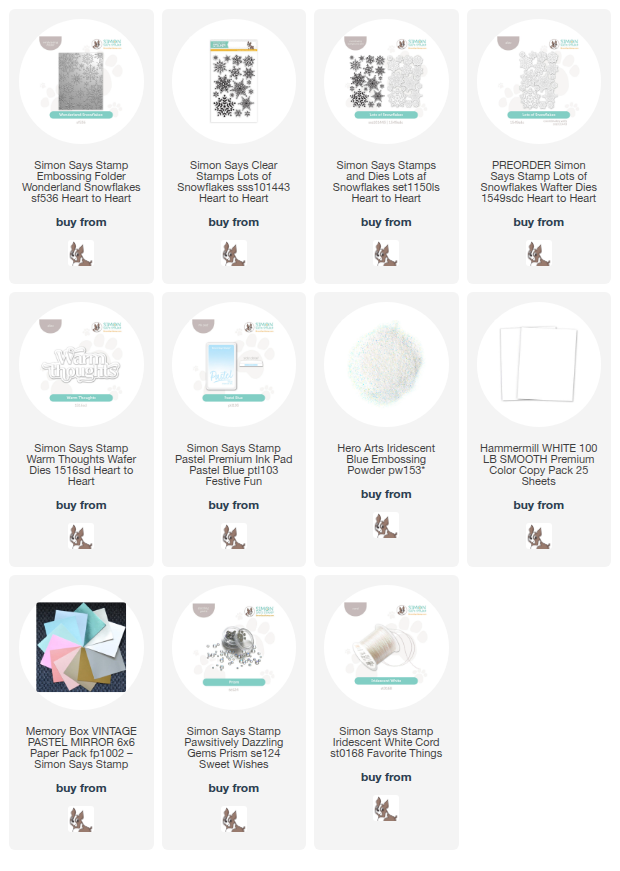
To start, I embossed a panel of plain white cardstock using the new Wonderland Snowflakes embossing folder. I flipped the panel over so that the details were debossed down into the cardstock rather than raised embossing. Because the cardstock is already white, all I had to do to enhance those exquisitely detailed white snowflakes was gently swipe the Simon Says Stamp Pastel Blue Pigment Ink pad directly onto the cardstock. It adds subtle wintry color to the background without taking away any of those gorgeous debossed snowflake details! For good measure, I splattered the entire background with some gorgeous glittering watercolors to add extra texture and shimmer.

One of my favorite ways to use colored ink these days is as a base layer for iridescent embossing powder. I stamped several snowflakes from the Lots of Snowflakes stamp set with Pastel Blue pigment ink onto some more white cardstock, then stamped again using sticky embossing ink and added translucent iridescent embossing powder over the top. This embossing powder adds the most beautiful shimmer while still keeping that base color true to the original. I used the new coordinating dies to cut the stamped and embossed snowflakes out.

For the greeting, I die cut the detail layer of the Warm Thoughts die set (I think the juxtaposition of the sentiment with the imagery on the card is so fun!) from iridescent white foil cardstock, then cut the shadow layer from more white cardstock. On the shadow layer, I again placed the Pastel Blue pigment ink pad directly to the die cut and swiped, continuing the color palette through each element of the card. I adhered the detail layer to the newly-pastel blue shadow layer with liquid adhesive, then arranged the sentiment and individual snowflakes on the card front, adhering them with foam adhesive squares. Finally, I added some Prism Pawsitively Dazzling Gems to the snowflakes and tucked an Iridescent White Cord bow beneath the sentiment for one last touch of texture on this super detailed card!

Well, that’s all for my project today! This card could easily be customized to create a winter birthday card or even a thinking of you card. Snowflakes don’t just have to be for Christmas, I think! We are in for some bitter cold temperatures this weekend, so I hope you’re staying warm in your craft room. Thanks so much for stopping by today, and have a marvelous day!

Filed Under: simon says stamp Tagged With: 3D embossing, blackout technique, die cutting, embossing folder, ink blending, ink swiping, lots of snowflakes, warm thoughts, winter, wonderland snowflakes

Let Us Adore Him with Nordic Inspiration from Simon Says Stamp!

November 12, 2025

This post was sponsored by Simon Says Stamp. Thanks, Simon!

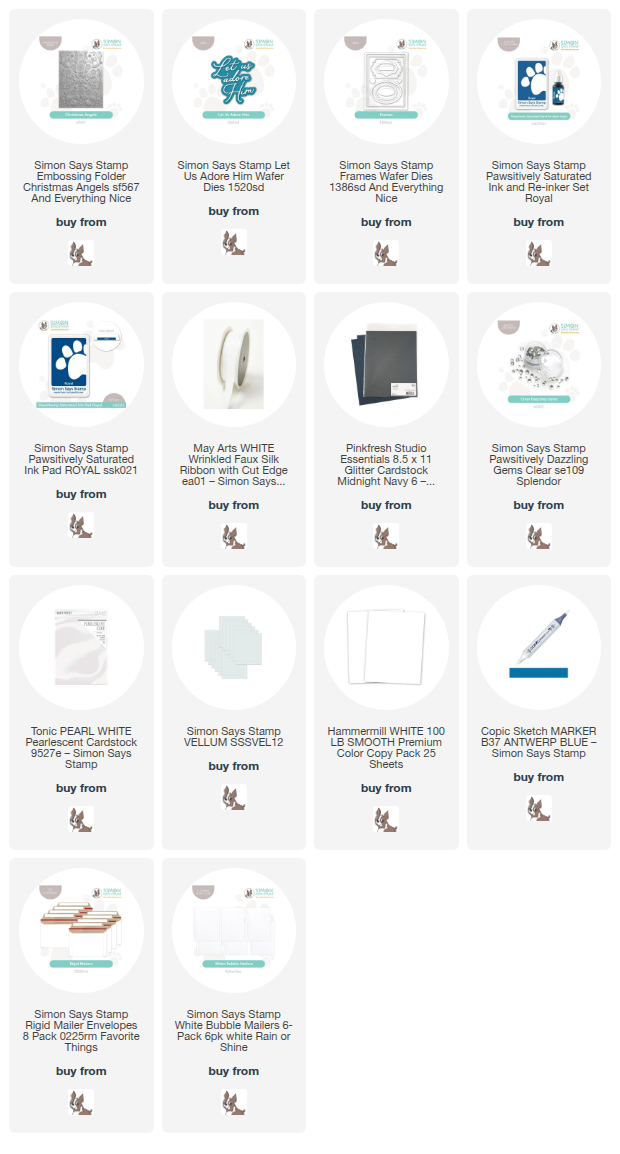
Hi friends! My husband and I are currently working on remodeling his grandfather’s house to make it better fit our family, and while perusing Pinterest for design ideas, I have noticed that blue and white is having a renaissance in the design world. That most classic of color palettes is everywhere, from detailed illustrations on dishes to chintzy armchairs, vases, and curtains to Christmas decor! I decided to apply that gorgeous color palette to the Nordic-inspired Christmas Angels Embossing Folder from the And Everything Nice release ((click HERE to see the entire release!) to create a classy and elegant, while also super quick to create, holiday card. Let’s get started with the details!

*I have gathered links to all of the products used at the bottom of the post for your convenience, using affiliate links at no extra cost to you. Thank you for shopping with my links! I truly appreciate your support for my work!*

To begin, I ran an A2 panel of plain white cardstock through my die cutting machine using the new Christmas Angels embossing folder. The level of detail and intricacy on this folder is magnificent; it truly does so much of the design work for you! After embossing, I flipped my panel over so that the raised, embossed side was face down and the debossed side was facing me. I then swiped my Royal Pawsitively Saturated Ink pad directly on the card front, allowing those beautiful details to shine through in crisp white on a vibrant blue background using the “blackout technique.” Such a fun technique that creates unique, detailed, multi-colored backgrounds so quickly!

I love the font in the newer Let Us Adore Him die set, and thought it perfectly matched the elegant aesthetic on the religious imagery featured on the Christmas Angels embossing folder. I die cut the detail layer from Midnight Navy glitter cardstock from Pinkfresh Studio, then backed it with the vellum shadow layer. I die cut a pearly white tag image from the new Frames die set (this set is super verstaile and definitely worth the investement!) and placed the sentiment at a jaunty angle on the die cut.

Before adhering the die cut sentiment pieces, I trimmed down the panel 1/4″ on each side of the debossed background, keeping the main focal point centered nicely. It’s important to take a little off of each side due to the symmetry of the design. The images in the center will be slightly off if you aren’t careful!

I wanted a fluffy bow to accent the beautiful sentiment, so before I adhered the embossed panel, I wrapped a navy blue satin ribbon around the embossed panel. If you don’t want to have tons of individual shades of ribbon, you can easily create your own custom ribbon by using an alcohol marker on faux silk ribbon so that your bow perfectly matches your color palette! I mounted this panel on a full size A2 panel of Midnight Navy Glitter Cardstock from Pinkfresh Studio, centering it so that the background was surrounded by a glimmering frame. I added the greeting pieces, offsetting it slightly so that it hangs off of the side a touch, then tucked that shiny satin bow next to the sentiment. Finally, I added a few Clear Pawsitively Dazzling Gems for added sparkle!

This card does have a bit of heft to it, with that fluffy bow and sentiment hanging over the side, so I would recommend mailing it in a Simon Says Stamp Rigid Mailer or Bubble Envelope to keep it safe!

Well, that’s all for my project today! Thanks so much for stopping by today, and have a marvelous day!

Filed Under: simon says stamp Tagged With: blackout technique, christmas angels, christmas card, embossing folder, frames dies, holiday card, let us adore him, pawsitively saturated, ribbon

So Lovely to See You In Sunny Yellow with Simon Says Stamp!

January 22, 2025

This post was sponsored by Simon Says Stamp. Thanks, Simon!

Hi friends! We are at the end of another stretch of bitterly cold weather, as most of the country is, I think, and I thought I’d brighten things up with a tropical-themed card using some warm greens and yellows! I’ve been to Mexico a few times, and I am always astounded by the vibrancy of the colors everywhere, from the flora to the fabrics to the decor…. it’s a visual feast! I channeled some of that into this project using some dies that I had not yet had a chance to use, along with the blackout technique on the Feathery Fronds embossing folder, so let’s get started with the details!

*I have gathered links to all of the products used at the bottom of the post for your convenience, using affiliate links. Thank you for shopping with my links! I truly appreciate your support for my work!*

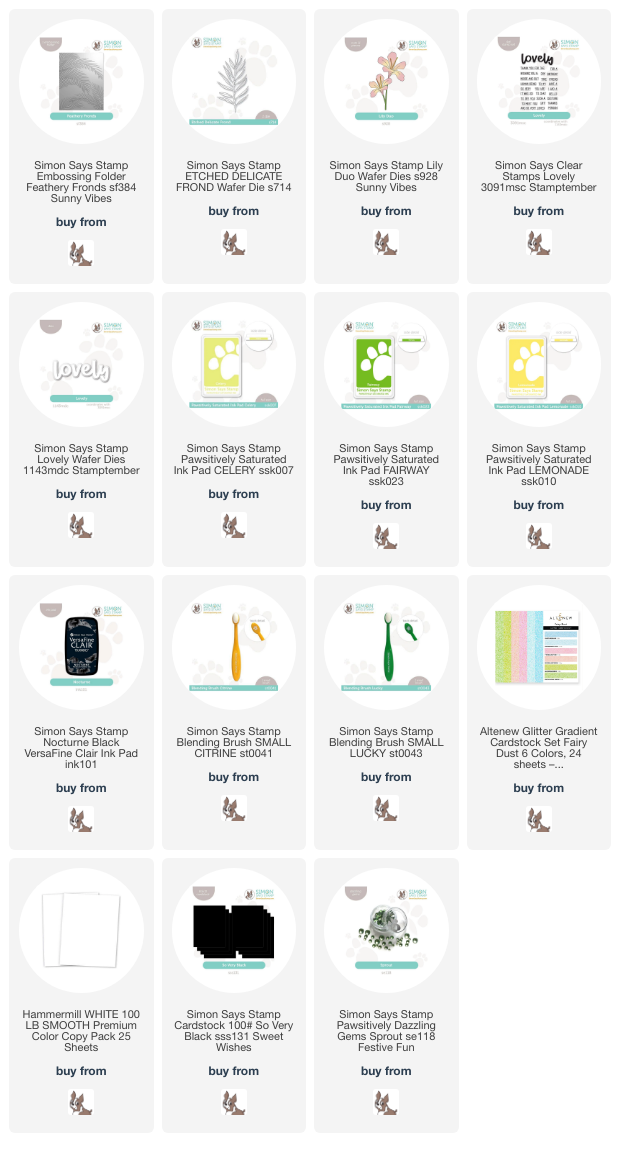
I began by running an A2 panel of white cardstock through my die cutting machine using the Feathery Fronds embossing folder, then flipping the cardstock over so that the debossed side was facing up. I used blending brushes to blend Celery and Fairway inks over the debossed foliage, concentrating the darker green in the center and brushing the tips of the fronds with the lighter green to create a bit of gradation and interest on the foliage. After I had finished blending, I put the Nocturne Pigment Ink pad directly to the cardstock and gently swiped the black ink over the raised areas, highlighting the debossed pattern while still allowing the ink blending to peek through. I love the dramatic effect this creates!

For my focal point, I die cut the Lily Duo die and the Etched Delicate Frond die sets from white cardstock, then used blending brushes with Celery, Fairway, and Lemonade Pawsitively Saturated Inks to blend some beautiful and vivid color on the individual die cuts. I don’t frequently use yellow for a focal point, so it was fun to step outside of my color comfort zone for this card!

For the greeting, I stamped the coordinating sentiment strips onto some black cardstock using the Lovely stamp set, then die cut the large scale coordinating sentiment die from some sparkling lime green Altenew Fairy Dust Glitter Cardstock, adding the shadow layer with some more black cardstock. I arranged the flowers and foliage on the debossed and blended card front using both liquid and foam adhesive, then tucked the sentiment pieces amongst the arrangement with a double layer of foam adhesive to give it some extra height. Finally, I added some extra shimmer to the card with a few Sprout Pawsitively Dazzling Gems.

Well, that’s all for my project today! While it is frigid outside, I am dreaming of a warm tropical paradise with drinks decorated with little umbrellas, delicious fresh fruit, sunglasses, and sparkling pool waters. Thanks so much for stopping by today, and have a marvelous day! Stay warm, friends!
Filed Under: simon says stamp Tagged With: blackout technique, die cutting, etched delicate frond, feathery frond, ink blending, ink swiping, lily duo, lovely, tropical

Primary Sidebar

  • Facebook
  • Instagram
  • Pinterest
  • YouTube

Favorite Shops

Secondary Sidebar

Subscribe

Enter your email address to subscribe to this blog and receive notifications of new posts by email.

Instagram
Something is wrong.
Instagram token error.
Follow
Load More

Archives

Tags

3D embossing folder alcohol markers better press birthday birthday card blog hop card kit christmas christmas card christmas tag colored pencil copic copic coloring Daniel Smith die cutting embossing folder embroidery felt giveaway holiday holiday card hot foil ink blending karin brushmarker pro layered stencil masculine my monthly hero new release no line coloring no line watercolor OLO marker olo markers original illustration pawsitively saturated rainbow shaker card slimline stamping stamptember stencil thank you thinking of you valentine's day video watercolor

Popular Posts

Simon Says Stamp Sending Cheer Blog Hop- Day 2 + Freebie + Giveaway!
Altenew October 2026 Release Blog Hop + Giveaway!
Rustic Monochromatic Stars for Christmas with Rainbow Splash!
Waffleflower July Release Blog Hop!
Hero Arts Partners Blog Hop: Lawn Fawn!
March 2020 Essentials By Ellen Blog Hop+Giveaway!
December 2018 My Monthly Hero Blog Hop + Giveaway!
The Ton Stamps Summer Release: Day 1
The Ton Anniversary Release: Day 1!
Altenew Paint A Flower: Carnation Blog Hop+Giveaway!

Disclosure

Some affiliate links are used in my posts. This means that, should you click on one of my links and purchase something from that company, I will receive a small portion of the sale at no extra cost to you. I use the money earned from these sales to help maintain my blog. I so appreciate you visiting and, if you do choose to use one of my affiliate links, thank you so much for your support!
Copyright © 2026 ·Brunch Pro Theme · Genesis Framework by StudioPress · WordPress · Log in
Loading Comments...