• Skip to main content
  • Skip to primary sidebar
  • Skip to secondary sidebar

Sixth Street Sundries

Emily Midgett

  • Home
  • About Me
  • Contact
  • OLO Marker Color Swatch Chart
  • Shop

bridgerton

Bridgerton Week Finale: Penelope’s Emerald and Copper Dress!

July 12, 2024

This post was sponsored by Simon Says Stamp. Thanks, Simon!

Hi friends! I am back with my final installment for Bridgerton Week! If you’ve watched the most recent season of Bridgerton, you will have seen the utterly magnificent dress that main character Penelope wears after her “glow up,” a stunning emerald gown with coppery accents that beautifully complement her vibrant auburn hair. I adore the combination of deep emerald green with metallics, particularly with copper and rose gold, so thought I would use that incredible dress as my inspiration starting point for these two cards! Let’s get started with the details.

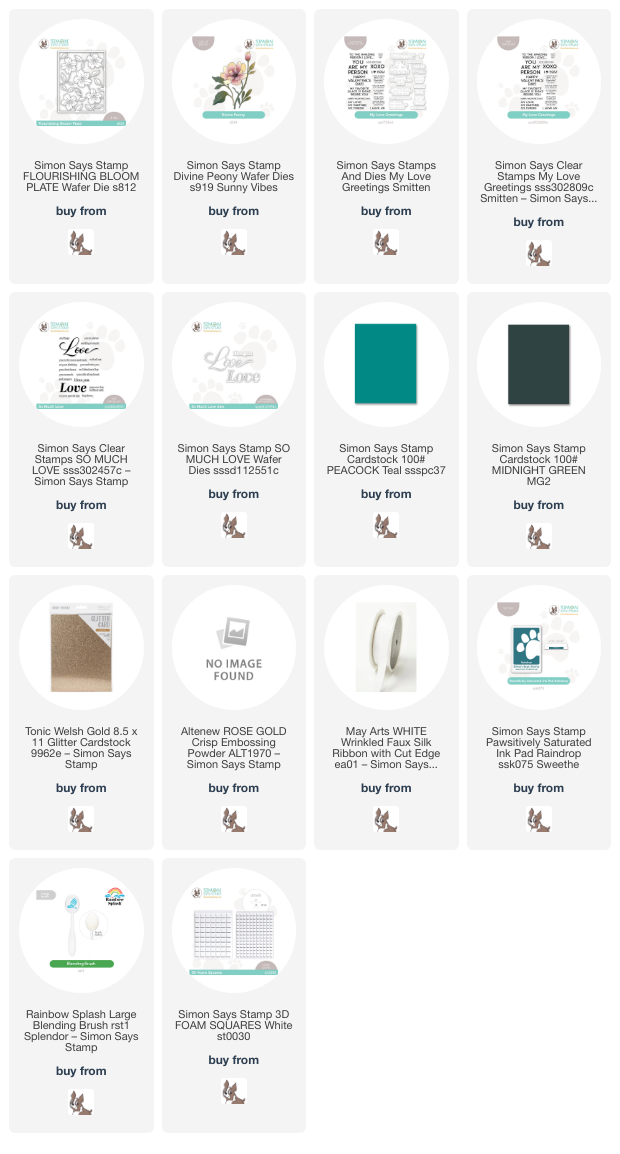
To start, I selected some lush green cardstocks from the Simon Says Stamp line: Peacock Teal and Midnight Green, accented with a beautiful coppery rose gold glitter cardstock. The combination of these three shades of cardstock created an increidbly striking color palette for these intense cards!

I wanted to emulate some more of that gorgeous embroidery that is so prevalent on the clothing in Bridgerton and from the Regency period, and I thought that a metallic floral pattern would definitely have been apropos for the time period, especially on that elegant emerald satin and netting! I started by die cutting the older-but-still-exquisite Flourishing Bloom Plate from some Welsh Gold glitter cardstock. The plate is detailed, but still die cut beautifully from this sturdy glitter cardstock. I then trimmed down an A2 panel of Simon Says Stamp Peacock Teal cardstock and used a blending brush to blend Raindrop Pawsitively Saturated Ink around the edge of the card front, creating a bit of a vignette in the background. The deep, intense background helps that shimmery coppery rose gold die cut pop beautifully! I adhered the die cut to the blended background with some liquid adhesive.

For the greeting, I heat embossed some sentiments from the So Much Love stamp set onto some Midnight Green cardstock using Altenew Rose Gold embossing powder. The contrast between these two colors is just incredible; the sentiment practically glows on the deep green cardstock! I die cut the large “love” sentiment with the coordinating die and trimmed the strip with my trimmer, adhering them to the center of the floral card front with some foam squares. I accented the centers of the flowers with some shimmering gems, then created a custom-colored bow by using a coordinating alcohol marker to dye a length of faux silk ribbon, tucking it beneath the greeting with some strong liquid adhesive.

For my second project, I maintained the same color palette with the deep emerald greens and sparkling coppery gold accents, this time creating a whimsical teal peony with the Divine Peony die. I die cut this peony die three times: once each from Simon Says Stamp Peacock Teal and Midnight Green cardstock and once from Welsh Gold glitter cardstock, then used a combination of all three colors to create the lush bouquet. Before adhering my bouquet to the Peacock Teal card front, I used a blending brush to blend some Raindrop Pawsitively Saturated Ink in the center of the A2 card front, then splattered the blended area with some coordinating glittery watercolors.

For the greeting, I stamped and embossed a sentiment from My Love Greetings using Altenew Rose Gold embossing powder on some more Peacock Teal cardstock, which I die cut with the coordinating die. I used liquid and foam adhesive to add the bouquet to my card front, adding varying heights to keep things interesting, then used a double layer of foam adhesive to add the sentiment die cut. Finally, I added a few shimmering coordinating gems and a coordinating rose gold metallic twine bow!

Well, that’s all for my projects today! I hope you’ve enjoyed delving into the world of Bridgerton with me; I think these cards today are some of my favorite cards that I’ve made recently! Thanks so much for stopping by today, and be sure to come back next week for Christmas in July! Have a marvelous day!
Filed Under: simon says stamp Tagged With: bridgerton, die cutting, divine peony, flourishing bloom, my love greetings, so much love

Video: Bridgerton Inspired White Velvet Flowers with Simon Says Stamp!

July 11, 2024

This post was sponsored by Simon Says Stamp. Thanks, Simon!

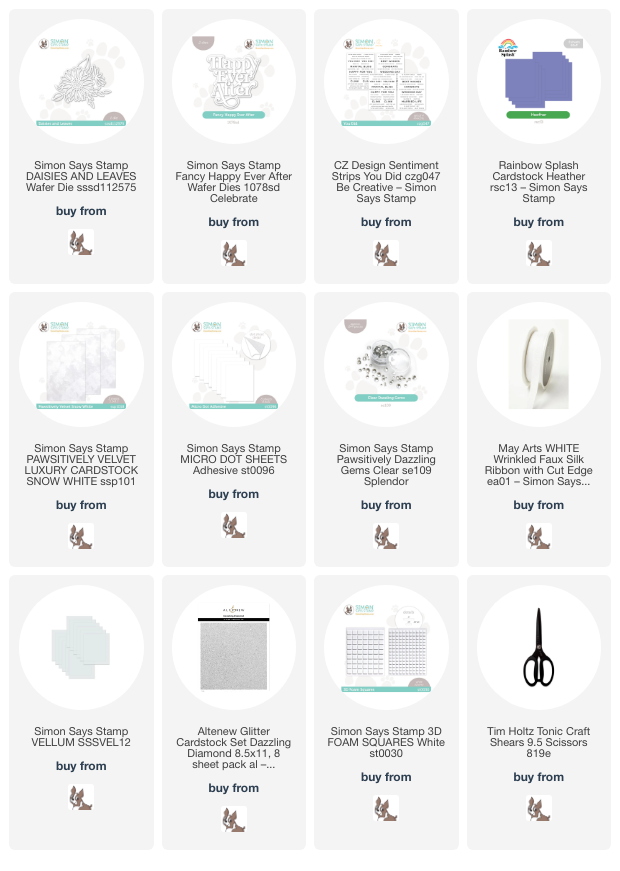
Hi friends! I have a new video featuring a fun background building technique, created to look like some of the beautifully embroidered dresses from the show Bridgerton! The exquisite details from the elegant dresses of the 19th century adds an element of luxury that is simply not found in typical modern clothes. I wanted to channel those elegant embroidered details with some textured velvet cardstock and an intricate floral die from Simon Says Stamp. You can see me bring this card to life below or HERE on YouTube!

In case you can’t watch the video, I will share some of the details on my project below:

The delicate lines and intricacy of the Daisies & Leaves reminded me so much of the intricate embroidered patterns on the clothing in the Bridgerton world that I couldn’t resist creating an equally beautifully intricate background! You could easily replicate this technique using plain white cardstock, but I wanted to add a bit more textural interest and luxuriousness to the card, so I die cut a bunch of these delicate daisies using the Pawsitively Velvet Snow White cardstock. This velvet cardstock adds that little extra detail that takes the card from pretty to gorgeous and channels the luxurious hand embroidery from the show’s wardrobe perfectly!

To more easily adhere these super delicate die cuts to my slimline panel (3.5″ x 8.5″) of Rainbow Splash Heather cardstock (the perfect Bridgerton Blue!), I used Micro Dot Adhesive Sheets. After arranging my die cuts in their approximate location, I simply placed the back of the velvet die cuts on the sticky side of the Micro Dot Adhesive Sheets, replace the release paper on the top, flip it over, burnish the back to make sure that the adhesive is really stuck on there, then remove the now-sticky die cut from the Micro Dot Adhesive Sheets. This quick process creates a multitude of stickers that are perfect for these super intricate die cuts!

I placed the sticky die cuts on the blurple background, rotating them as I went to ensure that they didn’t look “cookie cutter,” which helps to create a cohesive, continuous pattern. I used some anti-stick shears to trim the excess from around the edges, using some of the leftovers to fill out some of the leftover open spots. The feel of this background with the velvet cardstock is simply divine!

After I had created the background, it was time to add a sentiment. I die cut the Fancy Happy Ever After from some super sparkly and opulent Altenew Dazzling Diamond glitter cardstock. I also added the shadow layer, cut from some vellum to soften the pattern behind the die cut and make the sentiment more visible. I popped up the sentiment die cut with some foam squares, then added a complementary greeting from some older wedding sentiment cards. Finally, I accented this lovely card with some Clear Pawsitively Dazzling Gems and a bow (a Bridgerton bow!) using some white faux silk ribbon.

Well, that’s all for my project today! Feminine, detailed, luxurious… attributes of the Bridgerton world, to be sure! Thanks so much for stopping by today, and have a marvelous day!

Filed Under: simon says stamp Tagged With: bridgerton, daisies and leaves, fancy happy ever after, micro dot sheets, pawsitively velvet, rainbow splash, video, you did sentiment strips

Bridgerton Week Begins!

July 8, 2024

This post was sponsored by Simon Says Stamp. Thanks, Simon!

Hi friends! So, like lots of people, I have been eagerly awaiting the newest season of the Bridgerton series on Netflix. I have not read the books, but disappearing into the colorful and romantic Bridgerton world provides a few hours of pleasant diversion from the day to day. I happened to be sick when the first part of the season came out, which provided a welcome distraction from being sick. The fashion is one of the reasons that I love watching Bridgerton; I always find lots of inspiration from fashion in general, but the elegant color palettes and elements of sparkle and shimmer in the Bridgerton world are right up my alley. The Bridgerton ladies frequently wear shades of blue, and flowers are everywhere throughout the series, so I thought I would devote my blog posts this week to projects that are inspired by the fashions of Bridgerton! I have a pair of cards using two different Lily of the Valley products from Simon Says Stamp, so let’s get started with the details!

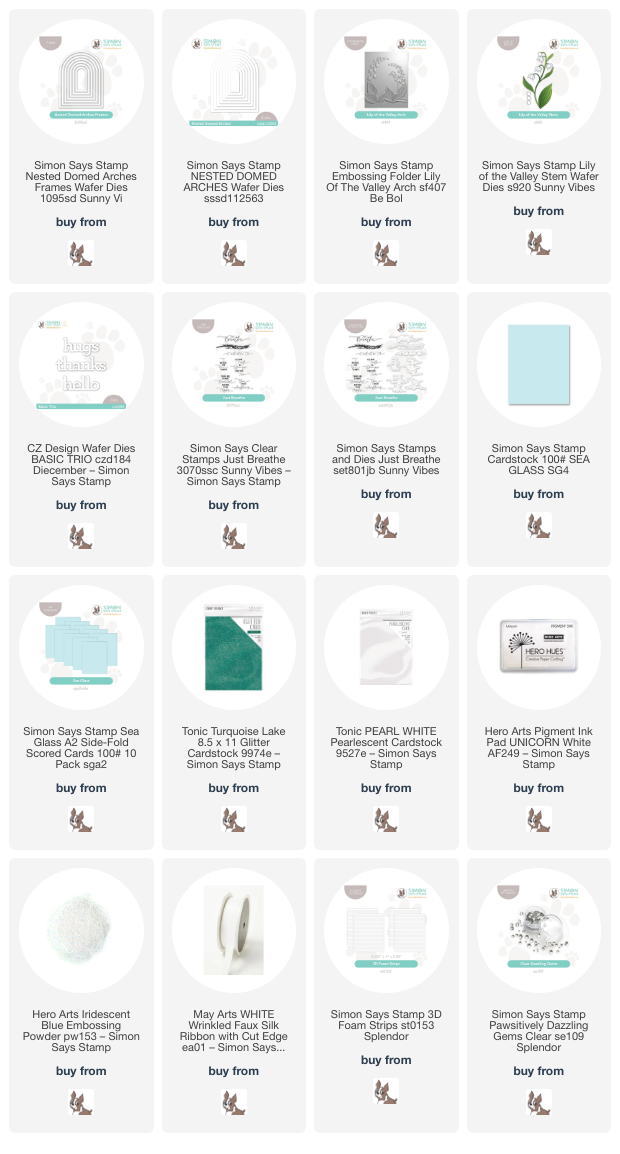
The Bridgerton Family’s “family color” is blue in all varieties and mixtures, whether it is rich French blue to a paler, more pastel aqua to elegant hyacinth purple. I chose to focus my attentions on one of my most favorite shades today: Simon Says Stamp’s Sea Glass. This shade of pale pool blue is the most perfect color, in my opinion, working beautifully as the main color for a lighter color palette or as an accent color. It was the perfect back drop for some beautiful lily of the valley blooms, created using both the older Lily of the Valley Embossing Folder and the new Lily of the Valley die.

For my first project, I paired the new Nested Domed Arches Frames with their companion solid Nested Domed Arches dies. I die cut a large solid die from some white pearl cardstock, then ran the panel through my die cutting machine using the Lily of the Valley Embossing Folder. This coated specialty cardstock works beautifully with these detailed embossing folders to create incredible detail with a hint of shimmer! I also die cut a coordinating arch frame from some turquoise glitter cardstock using the Nested Domed Arches Frames. I used some thin foam strips to add dimension to the delicate glittery frame, then adhered both arched pieces to the center of an A2 Sea Glass folded card using liquid adhesive.

For the greeting, I created a coordinating turquoise sentiment using a greeting from Just Breathe, stamping it first on turquoise cardstock using white pigment ink, then again with embossing ink, finally adding some beautiful Iridescent Blue embossing powder for extra shimmer iridescent sparkle. I die cut the sentiment with its coordinating die and popped it up over the embossed background with some more foam adhesive. Finally, I used a coordinating Copic marker to add some pretty pale aqua to a length of white faux silk ribbon, which I tucked beneath the die cut sentiment. Finally, I adhered a smattering of Clear Pawsitively Dazzling Gems for added sparkle!

For my second card, I decided to create a sweet sprig of flowers using the Lily of the Valley die that reminded me very much of the delicate floral designs throughout the Bridgerton homes and clothing. I die cut the Nested Domed Arches Frames from some turquoise glitter cardstock and adhered it to the center of another Sea Glass folded card. I used some beautiful deep jade and white pearl cardstock to die cut the elements of the Lily of the Valley die. I did create two different floral sprigs, then did some creative trimming to create this one lush bouquet of flowers, which I adhered in the center of the glittery arch.

For the greeting, I die cut the “hugs” from the Basic Trio dies and heat embossed another sentiment from Just Breathe onto some more deep jade cardstock in order to create a custom sympathy/ thinking of your sentiment. I adhered them with a double layer of foam adhesive, then added a thin white silk bow beneath to create a “bouquet” effect. I finally added a few Clear Pawsitively Dazzling Gems for some more sparkle and shine!

Well, that’s all for my projects today. Have you watched Bridgerton? The storyline is not the most intellectually stimulating one that I’ve ever experienced, but it is certainly entertaining and full of visual inspiration! I have more projects in mind featuring Bridgerton inspiration, so stay tuned! Thanks so much for stopping by today, and have a marvelous day!

Filed Under: simon says stamp Tagged With: bridgerton, folded cards, just breathe, lily of the valley, lily of the valley embossing folder, nested domed arches, nested domed arches frames, sea glass

Primary Sidebar

  • Facebook
  • Instagram
  • Pinterest
  • YouTube

Favorite Shops

Secondary Sidebar

Subscribe

Enter your email address to subscribe to this blog and receive notifications of new posts by email.

Instagram
Something is wrong.
Instagram token error.
Follow
Load More

Archives

Tags

3D embossing folder alcohol markers better press birthday birthday card blog hop card kit christmas christmas card christmas tag colored pencil copic copic coloring Daniel Smith die cutting embossing folder embroidery felt giveaway holiday holiday card hot foil ink blending karin brushmarker pro layered stencil masculine my monthly hero new release no line coloring no line watercolor OLO marker olo markers original illustration pawsitively saturated rainbow shaker card slimline stamping stamptember stencil thank you thinking of you valentine's day video watercolor

Popular Posts

Simon Says Stamp Sending Cheer Blog Hop- Day 2 + Freebie + Giveaway!
Altenew October 2026 Release Blog Hop + Giveaway!
Simon Says Stamp Sending Cheer Release: Now Available!
Simon Says Stamp October 2026 Card Kit of the Month: Homespun Gratitude!
A Double Leftovers Card Set with New Simon Says Stamp Stencils and Dies!
Simon Says Stamp November 2025 Card Kit: Give Thanks!
Joyful Snowman with New Simon Says Stamp Sending Cheer Release!
Hero Arts Partners Blog Hop: Lawn Fawn!
Altenew Paint A Flower: Carnation Blog Hop+Giveaway!
Simon Says Stamp October 2025 Card Kit of the Month!

Disclosure

Some affiliate links are used in my posts. This means that, should you click on one of my links and purchase something from that company, I will receive a small portion of the sale at no extra cost to you. I use the money earned from these sales to help maintain my blog. I so appreciate you visiting and, if you do choose to use one of my affiliate links, thank you so much for your support!
Copyright © 2026 ·Brunch Pro Theme · Genesis Framework by StudioPress · WordPress · Log in
Loading Comments...