• Skip to main content
  • Skip to primary sidebar
  • Skip to secondary sidebar

Sixth Street Sundries

Emily Midgett

  • Home
  • About Me
  • Contact
  • OLO Marker Color Swatch Chart
  • Shop

christmas tag

Hero Arts My Monthly Hero October 2020 Blog Hop+Giveaway!

October 5, 2020

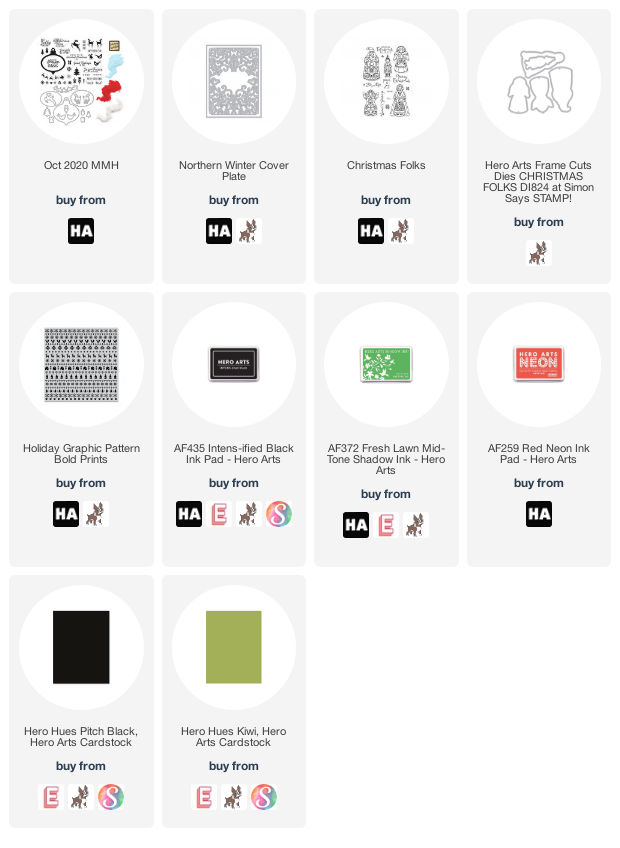
Hi there! Hero Arts’s My Monthly Hero kit for October 2020 launches today, and we are celebrating this gorgeous kit and fantastic add-ons with a fun blog hop! You should have arrived here from Debi Adams, and your next stop is Ilina Crouse. This month’s kit has a beautiful holiday-theme, filled with traditional holiday silhouettes with a Nordic/folksy twist, a gorgeous ornament, and some super fun dies to create tags, ornaments, shakers…. so many options with this kit! The kit includes:

• 6″ x 8″ Clear Stamp Set
• 12 Coordinating Frame Cuts
• 1 Ornament Shape Die
• 2 Inner Ornament Dies
• 3 Embossing Powders (Red, Glacier Blue, White Sparkle), 1/2 oz. each
• 1 Watermark & Embossing Ink Cube

This individual items in this kit are valued at over $75, but is priced at only $34.99! Don’t wait too long on this one… I predict it will sell like hotcakes. You can also subscribe to be guaranteed your My Monthly Hero kit each month. And don’t forget to check out the add-ons; this month’s extras have a fantastic folksy theme, and I love all of them. I have a two projects using the main kit and one with some of the add-ons, so let’s get started with the details!

I tend to only use red at Christmas, and for these projects I thought I’d make things super fun and modern with a bright, lime-y green and super vibrant firetruck red. I created a tag and a card using the same color scheme, but these would be super pretty in shades of blue or aqua, as well!

For the tag, I began by die cutting the solid tag from the kit from white cardstock, then again with the oval insert in the center to create a frame. (There are SO many fun things that you can do with these ornament die cuts. Hello, shaker ornament with a family portrait!?) I stamped the greeting using Intens-ified Black ink, then added the folksy accents using Fresh Lawn, Neon Red, and Silver Dye inks in symmetrical pattern. I popped up the white frame using foam adhesive, then added some red and white twine to finish it off.

For the matching card, I used the new Northern Winter Cover Plate add-on die as a backdrop for the oval labels included in the kit. I die cut it from some Kiwi cardstock and layered it on an A2 panel of glittery white cardstock. I love the sparkle and subtle texture the glittery cardstock adds to the background!

I die cut one of the scalloped ovals from the main kit, then blended Neon Red ink around the edges to create a colorful mat for the sentiment oval (the leftovers from the ornament made earlier!). I stamped the greeting, again using Intens-ified Black ink, then stamped the Christmas trees included in the kit with Fresh Lawn ink, stamping off once to keep the tree images from overwhelming the sentiment. I popped everything up with some foam adhesive, then added some bright red gems to the Northern Winter Cover Plate die cut for a bit of extra texture and sparkle!

My next project uses the new Christmas Folks stamps and dies, as well as the new Holiday Graphic Patterns Bold Prints. I began by stamping the Santa and Mrs. Claus from Christmas Folks on some white cardstock using Intens-ified Black ink, then colored them using Copic markers in the same fire-engine red and neon green color scheme used previously, this time adding in some black accents, as well. I die cut the finished images using the coordinating frame cuts.

Next, I heat embossed the Holiday Graphic Patterns Bold Prints on some plain white cardstock using the white sparkle embossing powder included in the kit for some subtle, sparkling, tone-on-tone texture for the background.

I trimmed the embossed panel down just slightly, then mounted it on an A2 panel of Cherry cardstock. I popped up Santa and the Mrs. using foam adhesive, then stamped a greeting from Christmas Folks (love that font!) and matted it with some Pitch Black cardstock and popped it up, too. Clean and bright but with lots of texture and dimension!

Well, that’s all for my projects today. To celebrate this release, Hero Arts is giving away a $50 gift certificate to their online store! All you have to do to enter is leave a comment on participating blogs. The more comments you leave, the more chances you have to win! Your next stop is Ilina Crouse. Thanks so much for stopping by, and have a marvelous day!
Filed Under: Hero Arts Tagged With: christmas, christmas tag, cover plate, holiday card, my monthly hero, nordic, santa

Ellen Hutson 12 Tags of Christmas: Day 12

December 12, 2019

Hi there! Today is the final day of the 12 Tags of Christmas for 2019. (Insert sadface here.) I hope you’ve enjoyed all of the Christmas-carol inspiration over the last 12 days! I love the idea of basing your project around a song. Today’s theme is Santa Claus is Coming To Town, and I’ve got a quick, but pretty, tag for you today! Let’s get started with the details.

I’ve used quite a few new products from Honey Bee Stamps for these tag projects, because Honey Bee’s holiday release had some incredible sentiment stamp sets and dies that are perfect for creating tags! I started by die cutting a scalloped tag from some bright red foil.

I die cut the dotted square from some plain white cardstock and added a “from Santa” greeting from Season to Sparkle. I adhered the dotted square sentiment die cut to the foil tag using foam adhesive, then added some white gems around the edge of the scallops to create some cute white polka dots. The final touch was to add a twine loop and a pretty double twine bow.

Well, that’s all for my tag today. Be sure to check out the 12 Tags of Christmas over on the Ellen Hutston Blog. There are several ways to win some amazing prizes! Thanks so much for stopping by today, and have a marvelous day!

Filed Under: Ellen Hutson Tagged With: 12 tags of christmas, christmas tag, season to sparkle, square scalloped tags, tag

Ellen Hutson 12 Tags of Christmas: Day 11

December 11, 2019

Hi there! I’m back with another tag for the Ellen Hutson 12 Tags of Christmas. Today, we’re using the song White Christmas as our inspiration. I thought about using white-on-white (I love the subtlety of white background with white die cuts) but I thought I’d add a touch of icy blue to help make the sparkly snowflakes pop! Let’s get started with the details!

I started by die cutting a white tag using the Happy Christmas label die from Honey Bee Stamps. I heat embossed a sentiment from Season to Sparkle, also from Honey Bee Stamps, using silver embossing powder. I blended a bit of Misty Morning ink using a blending brush around the bottom of the panel. I stamped a few snowflakes from the Season to Sparkle stamp set around the edge of the tag.

Next, I die cut several snowflakes from the Honey Bee Stamps Layering Snowflakes die set using sparkly white cardstock. I layered this over the top of the ink blended and stamped tag.

My die cutter plates are looking a little worse for wear, so the backs of my die cuts have quite a few dents and dings. In order to have a nice smooth writing surface, I die cut another Happy Christmas label and adhered it to the back. The final step was to punch a small hole and add a loop of white ribbon!

Well, that’s all for my tag today. Be sure to check out the 12 Tags of Christmas over on the Ellen Hutston Blog. There are several ways to win some amazing prizes! Thanks so much for stopping by today, and have a marvelous day!

Filed Under: Ellen Hutson, Honey Bee Stamps Tagged With: 12 tags of christmas, christmas tag, happy christmas, layering snowflakes, season to sparkle

25 Days of Christmas Tags with Ellen Hutson!

November 5, 2019

Good morning! Today, I have the pleasure of helping represent Ellen Hutson for Tracey McNeeley’s 25 Days of Christmas Tags event! Each year, Tracey hosts a month of fantastic tag inspiration, focusing on a different company each day, and today we are focusing on the gorgeous holiday products from Ellen Hutson!

I love using non-traditional colors for holiday projects, especially intense jewel tones. For today’s project, I’ve combined the adorable Hard Candy Christmas stamp set from Ellen Hutson with a few other craft room staples to create this fun shaker tag in a jewel-toned rainbow! Let’s get started with the details!

I began by stamping the apothecary jar from Hard Candy Christmas using Intens-ified Black ink on some white, Copic-friendly cardstock. I then did a little simple masking with a Post-It note to add several pieces of ribbon and hard candy, coloring the images with my Copic markers. I die cut the image using the coordinating dies.

Next, I stamped the Concord and 9th Woven Plaid background on a panel of white cardstock using Magenta ink from Altenew. I then used the new Scallop Square Gift Tag dies from Honey Bee Stamps to die cut the background and a frame, backing the frame with acetate and filling it with sequins.

I white embossed a greeting from Retro Holiday Greetings on some deep magenta cardstock. I adhered the die cut and greeting strip on the shaker tag. Finally, I created a loop using some silk ribbon.

Well, that’s all for this project! I hope you’ll check out the other inspiration on Tracey McNeeley’s blog! Thanks so much for stopping by today, and have a marvelous day!

Filed Under: christmas card, Ellen Hutson, holiday card Tagged With: 25 days of Christmas tags, christmas tag, copic, copic coloring, hard candy christmas, shaker, shaker tag

More Essentials By Ellen+SALE!

September 15, 2019

Hi there! I wanted to share another couple of projects using the September Essentials By Ellen release, as well as let you all know that there is a 20% off stamps sale going on at Ellen Hutson from 9/15/19-9/17/19!! I have two holiday projects to share with you today using some of the new products from September’s release, so let’s get started with the details!

For my first projects today, I wanted to share this cute pair of tags that I created using the new Dinomite Christmas stamps and dies, which I paired with the Shipping Tags dies (released last month!). I love that you get four tags with one pass of your die cutting machine. My plates are starting to look a littler worse for wear, and so to avoid the recipient of my tags seeing how scratched up the back of the tags are, I simply adhered two tags together to hide the back! Easy peasy, and it makes the tags extra sturdy!

I stamped them with Intensified Black ink, then colored them with my Copic markers in bright primary colors. I particularly loved the “fa ra ra ra rawr” greeting included in the Dinomite Christmas stamps; it reminds me of the end of A Christmas Story, when the family goes to the Chinese restaurant to have their Christmas dinner! I tied the tags up with a bit of twine to make them easy to attach to a holiday gift.

For my second project today, I used the Hard Candy Christmas set to create this clean card with pops of color! I began by stamping several pieces of candy on some white cardstock using Intensified Black ink, then coloring them with my Copic markers and die cutting them using their coordinating dies. I also silver embossed the candy jar from Hard Candy Christmas on some vellum cardstock to look like an old fashioned candy jar!

I stamped the greeting from Hard Candy Christmas on a scalloped rectangle die cut, as well as on a strip of white cardstock. I die cut just the center section of the candy jar from white cardstock, then arranged the die cut candy pieces on it, adhering them with liquid adhesive. I then adhered the piece to the scalloped rectangle, adhering the sentiment strip over the top of the vellum candy jar to hide the adhesive. Sometimes you have to be sneaky with vellum so you don’t make a mess with the adhesive!

For the backdrop, I used the Plaid Maker stamp set from Essentials By Ellen stamped in a light gray ink. I adhered all of the die cuts on the plaid panel using foam adhesive. A few bright green gems (that almost look like candy themselves!) finished off the card!

Now, for some really exciting news! Ellen Hutson is having a 20% off stamps sale from 9/15-9/17!!! Take 20% off of (almost all) stamps by using code stamps19 at checkout! All of the stamps that I’ve used for today’s post are included in the sale, and there are some absolutely fabulous new holiday and floral sets in the “new” category, as well!

Thanks so much for stopping by today, and happy shopping!

Filed Under: Ellen Hutson, holiday card Tagged With: christmas tag, dinomite christmas, dinosaurs, essentials by ellen, hard candy christmas, holiday card, plaid

  • « Go to Previous Page
  • Page 1
  • Interim pages omitted …
  • Page 4
  • Page 5
  • Page 6
  • Page 7
  • Go to Next Page »

Primary Sidebar

  • Facebook
  • Instagram
  • Pinterest
  • YouTube

Favorite Shops

Secondary Sidebar

Subscribe

Enter your email address to subscribe to this blog and receive notifications of new posts by email.

Instagram
Something is wrong.
Instagram token error.
Follow
Load More

Archives

Tags

3D embossing folder alcohol markers better press birthday birthday card blog hop card kit christmas christmas card christmas tag colored pencil copic copic coloring Daniel Smith die cutting embossing folder embroidery felt giveaway holiday holiday card hot foil ink blending karin brushmarker pro layered stencil masculine my monthly hero new release no line coloring no line watercolor OLO marker olo markers original illustration pawsitively saturated rainbow shaker card slimline stamping stamptember stencil thank you thinking of you valentine's day video watercolor

Popular Posts

Simon Says Stamp Joy For You Blog Hop- Day 1!
Vibrant Poinsettia Holiday Wishes with Simon Says Stamp!
March 2020 My Monthly Hero Blog Hop+Giveaway!
Simon Says Stamp Bright Christmas December 2025 Card Kit of the Month- Now Available for Preorder!
Simon Says Stamp Glory to the Newborn King Holiday Kit-Now Available!
Charity Blog Hop!
Vintage Peach Ornament with New Simon Says Stamp Joy For You Release!
2018 Autism Awareness Hop!
April 2018 My Monthly Hero Blog Hop+Giveaway!
Honey Bee Stamps Birthday Blog Hop, Day 2!

Disclosure

Some affiliate links are used in my posts. This means that, should you click on one of my links and purchase something from that company, I will receive a small portion of the sale at no extra cost to you. I use the money earned from these sales to help maintain my blog. I so appreciate you visiting and, if you do choose to use one of my affiliate links, thank you so much for your support!
Copyright © 2026 ·Brunch Pro Theme · Genesis Framework by StudioPress · WordPress · Log in
Loading Comments...