• Skip to main content
  • Skip to primary sidebar
  • Skip to secondary sidebar

Sixth Street Sundries

Emily Midgett

  • Home
  • About Me
  • Contact
  • OLO Marker Color Swatch Chart
  • Shop

cocoa and joy

Songs of the Season for March 2024: Marshmallow World!

March 25, 2024

This post was sponsored by Simon Says Stamp. Thanks, Simon!

Hi friends! I am back with this month’s installment of my Songs of the Season series, in which I use a holiday song as inspiration for a coordinating holiday card (or two!). This month, I used that classic “Marshmallow World” as my inspiration piece, drawing from the beautiful, somewhat whimsical, snowy imagery to create both a playful A2 card and a more elegant and serene slimline card using goodies from Simon Says Stamp’s vast collection of holiday stamps and dies. Let’s get started with the details!

This song has always immediately taken me back to my childhood, as this Johnny Mathis album was one that we would have on repeat while doing all of the Christmas activities, from wrapping presents to making cookies, and while listening to it for my projects today, I was struck by the difference in mood the two sections have. The song starts out playfully, with a cheerful walking bass line under the melody and discussing the whipped cream day, and then the overall feeling shifts to be a bit more dramatic as you move into the second “world is your snowball” section. I wanted to play on those two contrasting tonalities with my two projects today.

For both projects, I kept things as white as I could to conjure up the sparkling winter wonderland that the song conjures up for me, using lots of white cardstock and sparkling accents, with just a touch of color on the cute little critters to break up the monochromatic palette.

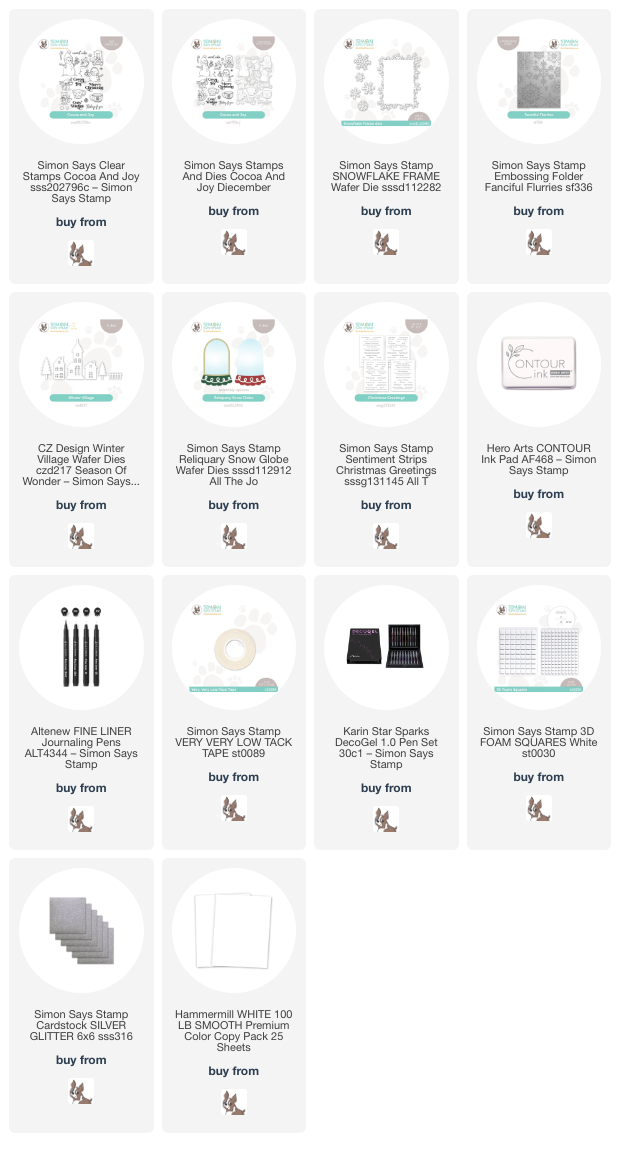
I started my first project by stamping a few of the images from the sweet Cocoa & Joy set, quite literally conjuring the “marshmallow” imagery with the cup of cocoa covered with whipped cream and marshmallows that the adorable little bear is holding! I stamped the images on Hammermill cardstock using Contour Ink, then used my Copic markers to do some no-line coloring with a warm gray, mint, and coral-red color palette, adding a few little details with a black fineline pen.

After I had colored and cut the images with their coordinating dies, I die cut the large Snowflake Frame die using white cardstock, then die cut the individual snowflakes from some sparkling silver glitter cardstock. I used some of Simon Says Stamp’s Very Very Low Tack Tape to mask the detailed snowflakes around the rectangular frame in the center so that I could splatter some “snowflakes” with silver glitter watercolors in the center of the die cut. I removed the mask, then added the silver glitter snowflakes with some liquid adhesive. I also used a silver sparkle pen to add some extra snowflakes on the background.

For the card base, I ran a panel of white cardstock through my die cut machine with the Fanciful Flakes Embossing Folder. I popped up the glittery snowflake die cut with foam squares, then added the sweet bear and mouse friends. A sentiment from Sentiment Strips Christmas Greetings finished the project off!

For my second project, I wanted to conjure that more somber shift in tonality from the second section of the song with a simple monochromatic shaker, adding some of the “evergreen trees” in the song with the Winter Village Dies. I started by trimming down a slimline card front, then trimming it even a little smaller by taking 1/8″ off of each side, making the final panel size 3 1/4″ x 8 1/4″. I centered the open shaped die from the Reliquary Snow Globe die set on this panel and die cut it, then eyeballed the center of each side, creating a line of snowglobe windows on my slimline card front. Before I backed the panels with acetate, I used a pencil to lightly mark the openings on my slimline card front so that I knew where to place my village elements. I backed the window panel with acetate and embellished the snowglobe bases with the bases and silver sparkle swirl die cuts.

I die cut the Winter Village Dies from some more white cardstock and arranged them on the areas that I marked with a pencil, adhering them with foam squares. Before adhering the frame windows, I added some snowflake sequins from my stash to create the shaker. For the greeting, I added a sentiment from the Sentiment Strips Christmas Greetings to create this sweet “marshmallow world” shaker card, made more special with a slimline size!

Well, that’s all for my projects today! I hope you are enjoying the Songs of the Season posts, even if it feels a little strange to see holiday projects this side of the Christmas season. I am enjoying stretching my creativity and putting products to use that I didn’t have a chance to play with during the Christmas season. Thanks so much for stopping by, and have a marvelous day!
Filed Under: simon says stamp Tagged With: christmas card, cocoa and joy, copic, copic coloring, fanciful flurries, holiday card, no line coloring, reliquary snow globe, shaker card, snowflake frame, songs of the season, winter village

Sweet Snowman Hugs for 2024!

January 2, 2024

This post was sponsored by Simon Says Stamp. Thanks, Simon!

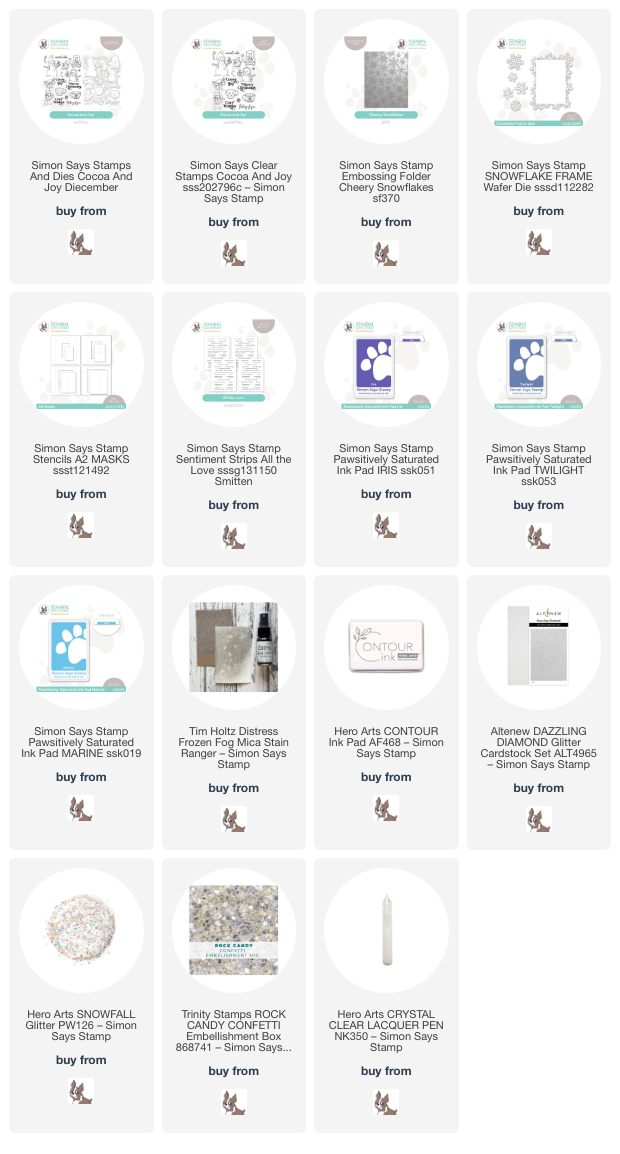
Hi friends! Happy New Year! I am flabbergasted that we are already at the dawn of a new year; I sometimes still feel like I haven’t finished processing 2020! Anyway, I have a project featuring some gorgeous newer products from Simon Says Stamp, perfect for those icy days that we’ve been experiencing after the warmth that we had on Christmas Day. We even woke up to a bit of snow on the ground last week…. as you can imagine, my kiddos were beside themselves with joy even if the snow only lasted until 10 am! For today’s project, I paired the utterly precious Cocoa and Joy stamps and dies with the new Cheery Snowflakes embossing folder. Let’s get started with the details!

To start my project, I stamped the adorable snowman from Cocoa and Joy (which is back in stock- HOORAY!!! Right?) onto some Hammermill white cardstock using Contour Ink. I used my Copic markers to add some subtle shading on the “white” snowman, giving him a vivid blue hat and scrumptious-looking hot cocoa! I used a fine tip black pen to enhance some of the finer details on the snowman, like the steam from the hot chocolate, his smile, and his little poufs on his hat. I die cut the finished image with the coordinating die, as well as one of the sentiments. For a finishing touch, I also added some black gems for his “coal” buttons and eyes.

For the background, I began by masking off the center of a panel of white cardstock using a stencil from the A2 Stencils and Masks set. I then used blending brushes to blend Iris, Twilight, and Marine Pawsitively Saturated inks in the open area on the white cardstock. While the stencil was still in place, I spritzed the finished background with Frozen Fog Mica Spray to add some extra wintry-looking shimmer behind my snowman. Once my blended and shimmering background was dry, I removed the stencil and ran the entire panel through my die cutting machine using the Cheery Snowflakes embossing folder from the Smitten release!

After I had adhered my snowman to my embossed background using foam tape, I wanted to add some sparkling snowflakes to enhance the icy feeling of the card. I die cut the standalone snowflakes from the Snowflake Frame dies from some Dazzling Diamond glitter cardstock. I tucked the snowflakes behind snowman on the blended area, allowing the white frame to draw the eye to the snowman. I added some extra sparkly glitter “snow” using Clear Lacquer and Snowfall Glitter from Hero Arts. For the greeting, I added the stamped greeting die cut from Cocoa and Joy and a coordinating sentiment strip from the All the Love sentiment cards pack. I added a few shimmering confetti for one last addition of snowy texture and sparkle!

Well, that’s all for my project today! I hope your 2024 is off to an amazing start! Thanks so much for stopping by today, and have a marvelous day!

Filed Under: simon says stamp Tagged With: A2 masks, all the love sentiment strips, cheery snowflakes, cocoa and joy, copic, copic coloring, ink blending, mica stain, no line coloring, snowflake, snowman

Fiesta For Christmas!

December 14, 2023

This post was sponsored by Simon Says Stamp. Thanks, Simon!

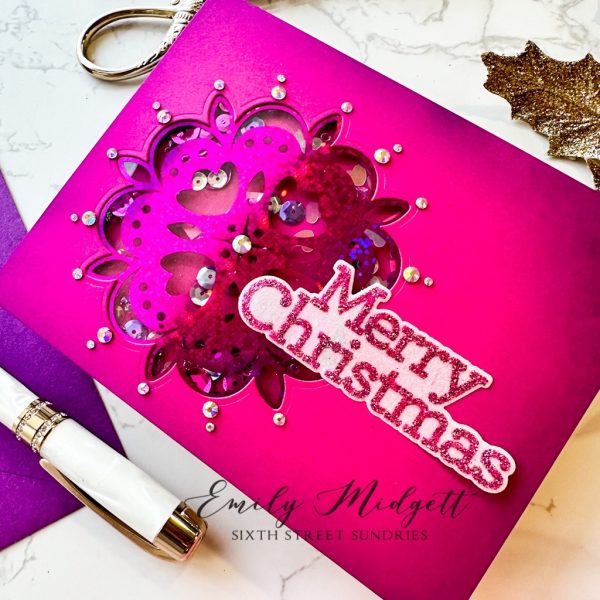
Hi friends! I am back today with a pair of technicolor holiday cards using the beautiful new Folk Art Floral Medallion hot foil plate and die from the Simon Says Stamp DieCember release! Hot foiling is such fun for me; I have been enamored with hot foiling on different surfaces beyond regular white cardstock for awhile now, and one of my favorite combinations was vivid magenta cardstock with bright orange foil! I also love hot foiling on glossy cardstocks, especially heat-resistant acetate, and so couldn’t resist using the coordinating die from the Folk Art Floral Medallion to create a shaker window with the hot foiled image. Let’s get started with the details on my projects!

Both of my cards feature the unbelievably gorgeous Dragonfruit cardstock from Concord and 9th. This pink cardstock is without a doubt one of my favorite shades from the Concord and 9th color range; it is a most unique shade of cool magenta, and it works beautifully with so many different colors, as both an accent and as the star!

For my first card, I hot foiled the Folk Art Floral Medallion onto a sheet of Spellbinders’s heat-resistant acetate using Sparkle Magenta hot foil. The super smooth surface of this acetate makes it an absolute dream to use with larger images like this medallion.

To create my shaker, I die cut the large medallion image from an A2 panel of Dragonfruit cardstock, backing this window with my hot foiled acetate panel, making sure to perfectly line up the image with the window! I also blended some Pawsitively Saturated Amethyst ink around the edge of my shaker topper, picking up the cool sparkles in the hot foiled image.

After I had filled my shaker with coordinating magenta sequins and sealed it up with foam adhesive, I heat embossed a greeting from Good Cheer onto some vellum using pink glitter embossing powder. (The bundle is out of stock at the moment, but you can sign up for email notification for when it comes back in stock! The Good Cheer set is a fabulous all-purpose holiday sentiment set, and the coordinating dies make it even better!) I added the greeting to the shaker card front using tiny dots of liquid adhesive, then finished the project off with some super sparkly gems.

My second card is an homage to my favorite fiesta color scheme of striking magenta and vibrant orange. I recently saw a white Christmas tree decorated with hot pink and orange ornaments, and my life has never been the same, ha! I started this card by hot foiling the Folk Art Floral Medallion onto some more Dragonfruit cardstock using Tangerine hot foil. This slightly-adjacent-of-monochromatic combination makes my heart flutter! I die cut the image using the coordinating dies, including the smaller center medallion. I also cut the center medallion three more times from scraps of Dragonfruit cardstock, layering them together to be able to pop the center up more effectively.

For the background, I used a technique that Jennifer McGuire recently shared putting cover plate background dies to use as hot foil plates. The detail in the gorgeous Dazzling Ornament die is stunning enough as a die cut, but it created the most luscious subtle foiled pattern when used as a hot foil plate! It’s difficult to capture the shimmer in a photograph, but it picks up the orange hot foiled medallion so nicely. I trimmed down the hot foiled background piece slightly using my trimmer, then blended Taffy Pawsitively Saturated ink around the edges to help make those beautiful hot foiled details a bit more visible. I nestled the hot foiled and blended panel in the corner of an orange A2 card front, then popped up my medallion with some foam adhesive.

For the greeting, I heat embossed a greeting from Cocoa and Joy onto some more Dragonfruit cardstock using Iridescent Gold embossing powder from Hero Arts, then die cut it with the coordinating die and popped it up with a double layer of foam tape. Finally, I embellished the card with some sparkling orange gems for one last hint of shine!

Well, that’s all for my project today! I am in disbelief that Christmas is less than two weeks away. I have so many holiday card ideas that I want to create still… and I still have to address and mail my own Christmas cards…. yikes! Thanks so much for stopping by today, and have a marvelous day!

Filed Under: simon says stamp Tagged With: christmas card, cocoa and joy, dazzling ornament, folk art floral medallion, good cheer, holiday card

Primary Sidebar

  • Facebook
  • Instagram
  • Pinterest
  • YouTube

Favorite Shops

Secondary Sidebar

Subscribe

Enter your email address to subscribe to this blog and receive notifications of new posts by email.

Instagram
Something is wrong.
Instagram token error.
Follow
Load More

Archives

Tags

3D embossing folder alcohol markers better press birthday birthday card blog hop card kit christmas christmas card christmas tag colored pencil copic copic coloring Daniel Smith die cutting embossing folder embroidery felt giveaway holiday holiday card hot foil ink blending karin brushmarker pro layered stencil masculine my monthly hero new release no line coloring no line watercolor OLO marker olo markers original illustration pawsitively saturated rainbow shaker card slimline stamping stamptember stencil thank you thinking of you valentine's day video watercolor

Popular Posts

Simon Says Stamp Sending Cheer Blog Hop- Day 2 + Freebie + Giveaway!
Altenew October 2026 Release Blog Hop + Giveaway!
Simon Says Stamp Sending Cheer Release: Now Available!
Simon Says Stamp October 2026 Card Kit of the Month: Homespun Gratitude!
A Double Leftovers Card Set with New Simon Says Stamp Stencils and Dies!
Joyful Snowman with New Simon Says Stamp Sending Cheer Release!
Simon Says Stamp November 2025 Card Kit: Give Thanks!
Hero Arts Partners Blog Hop: Lawn Fawn!
Altenew Standalone Die Blog Hop+Giveaway!
March 2020 My Monthly Hero Blog Hop+Giveaway!

Disclosure

Some affiliate links are used in my posts. This means that, should you click on one of my links and purchase something from that company, I will receive a small portion of the sale at no extra cost to you. I use the money earned from these sales to help maintain my blog. I so appreciate you visiting and, if you do choose to use one of my affiliate links, thank you so much for your support!
Copyright © 2026 ·Brunch Pro Theme · Genesis Framework by StudioPress · WordPress · Log in
Loading Comments...