• Skip to main content
  • Skip to primary sidebar
  • Skip to secondary sidebar

Sixth Street Sundries

Emily Midgett

  • Home
  • About Me
  • Contact
  • OLO Marker Color Swatch Chart
  • Shop

copic markers

Accentuate Embossing Folder Details with Metallic Cardstock and Alcohol Markers!

April 30, 2024

This post was sponsored by Simon Says Stamp. Thanks, Simon!

Hi friends! I have been crafting for nearly 15 years, and when I first started, I was primarily a Cricut-crafter, making scrapbooks and home decor pieces, with the occasional card thrown in. Cricut’s companion die cutting machine, the Cuttlebug, was also in my arsenal of tools to use with embossing folders, though the embossing folders fell to the wayside when I found stamps and dies. I was delighted when embossing folders began making their resurgence a couple of years ago. We now have so many amazing options to add incredible dimension and texture, including coordinating dies and layering stencils! I don’t mind admitting that as I get older, I can take a longer view on how things evolve, and it’s such fun to see what’s old become new again. Simon Says Stamp has been releasing month after month of exceptional embossing folder designs, with geometric patterns, fun and unique textures, and (my favorites) luscious florals. The new Celebrate release from Simon Says Stamp features an abundance of lovely embossing folders, and my favorite by far was the new Chelsea Floral Embossing Folder. I am always on the lookout for gorgeous florals to color, and the graceful florals with this embossing folder/die combo did not disappoint! I have a pair of cards to share with you today, so let’s get started with the details.

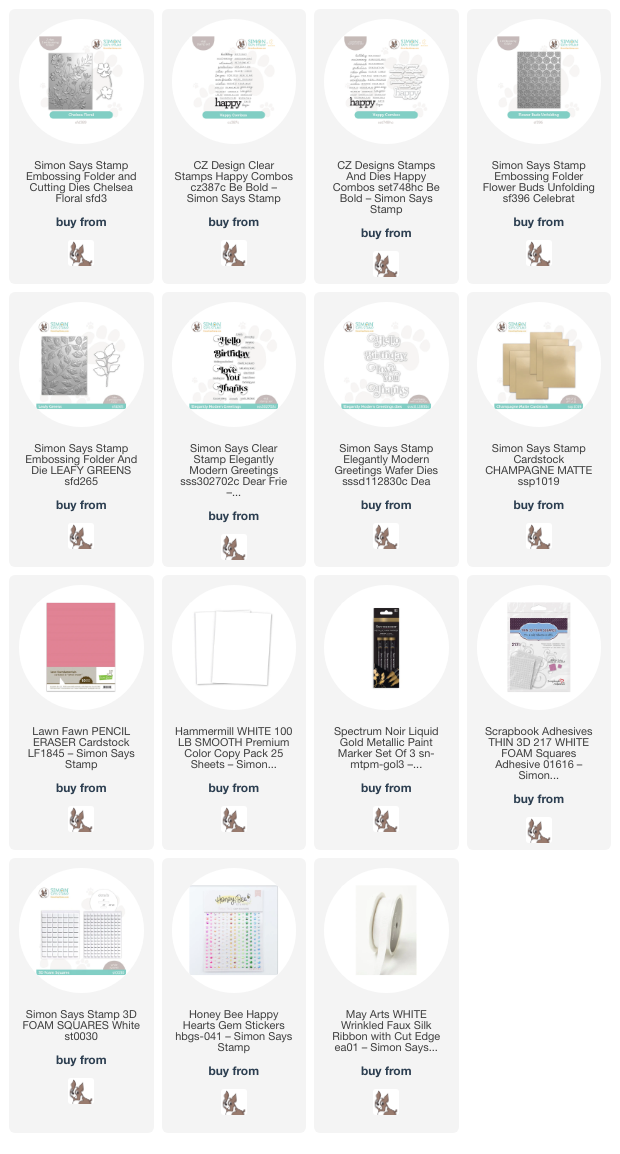
I was recently reminded during the latest Simon Says Stamp Live (you can watch the replay HERE) of how utterly stunning Champagne Matte cardstock is when paired with a super detailed embossing folder. I love to use specialty cardstocks with embossing folders; the coating on these unique cardstocks seem to highlight the intricate details of the raised images even more. I pulled out my pack of the beautiful Champagne Matte cardstock and looked to Pinterest for some color palettes that would complement it. I found a combination with a lovely rosy mauve, peach, and pale sage green that I thought would work beautifully with the softness of the Champagne Matte cardstock.

For my first project, I die cut several of the blooms Chelsea Floral Embossing Folder/die combo, as well as some foliage from the Leafy Greens Embossing Folder/die combo using Hammermill cardstock. After die cutting the images, I lined them up in the coordinating spots on the embossing folders and ran them through my die cutting machine to add the curvature and debossed details. I pulled some Copic markers to create these unique peach melba florals with some delicate, almost silvery sage foliage. I added some gold to the flower centers with a shiny gold paint pen.

Behind the colored floral die cuts, I wanted to add some delicate texture, so I embossed a panel of pearlescent peach cardstock with the new Flower Buds Unfolding Embossing Folder. The floral die cuts lent themselves well to a delicate spray spilling down the long side of a mini-slimline card, so I trimmed the embossed panel down and matted it with an ever-so-slightly larger piece of coordinating sage green cardstock, then placed both pieces in the center of a mini slimline (3.5″ x 6″) panel of Champagne Matte cardstock.

For the greeting, I heat embossed a few of the sentiments from Happy Combos using white embossing powder onto Pencil Eraser cardstock, which coordinated beautifully with the peach melba tones of the flowers. I arranged the floral die cuts on the textured background, popping them up with thin foam adhesive, then used Simon Says Stamp foam squares, which are slightly thicker, to pop up the sentiment pieces. Finally, I added a few sparkly adhesive gems amongst the florals for extra shine!

For my second card, I wanted to take advantage of the beautiful details on the entirety of the Chelsea Floral Embossing Folder. The individual flower die cuts are lovely, but the design for the full embossing folder is just delightful! I embossed an A2 panel of Champagne Matte cardstock using the Chelsea Floral Embossing Folder, then trimmed some off of the top and bottom of the panel with my trimmer so that I could do some color blocking on the bottom of the panel. I added a very thin strip of the same muted sage green that I used on the first project, then a bolder strip of the Pencil Eraser cardstock at the very bottom, covering a full A2 card front completely.

Next, I heat embossed some sentiments from the Elegantly Modern Greetings stamps onto some more Pencil Eraser cardstock using white embossing powder, then used the coordinating die to die cut the intricately detailed “thanks” sentiment. I popped the two sentiment pieces up on the embossed metallic panel using foam adhesive, then used one of the Copic markers from the previous card to dye a piece of faux silk ribbon so that it coordinated beautifully with the color palette! After tucking the pretty pink bow beneath the sentiment, I added a few more sparkly adhesive gems.

Well, that’s all for my projects today! I can’t believe it is nearly May and summertime is just around the corner. It doesn’t seem possible that my big kids will be 5th graders and my little boys will have completed their first year of preschool. Time flies when you’re having fun! Thanks so much for stopping by today, and have a marvelous day!
Filed Under: simon says stamp Tagged With: champagne matte cardstock, chelsea floral embossing folder, copic coloring, copic markers, elegantly modern greetings, embossing folder, flower buds unfolding, happy combos, happy for you, leafy greens, thanks

Simon Say Stamp Season of Wonder Blog Hop-Day 1!

October 6, 2023

This post was sponsored by Simon Says Stamp. Thanks, Simon!

Hi friends! I am so excited to be a stop on Day 1 of the two day Season of Wonder Release Blog Hop for Simon Says Stamp! You should have arrived here from Suzy Plantamura, and your next stop is Lisa Addesa. You can also start back at the Simon Says Stamp Blog in case you get lost. This month’s Season of Wonder release is filled with stunning, classic autumn and holiday imagery, and I’ve used a few different products to create these two vibrant holiday cards. Let’s get started with the details!

I am a sucker for a gorgeous floral embossing folder, and the new Free Falling Floral Embossing Folder is an absolute stunner. I began by running an A2 sized panel of Hammermill cardstock through my die cutting machine, which was lovely on its own, but I couldn’t resist using my Copic markers to do some no-line coloring on the pretty flowers. I wanted to create a holiday floral background, so I decided to make them a deep red with beautiful jewel bright greenery to emote that holiday aesthetic. I added some white gel pen to the tips of the black stamens, adding a bit more texture and dimension to the image.

For the greeting, I kept things very simple, die cutting the detail layer of the Fancy Tidings of Cheer die from some Black Glitter Paper Basics by Hero Arts and the larger outline layer from Heavyweight Vellum. I popped the sentiment up with some foam tape, allowing it to hang slightly over the edge. I love the decadent feeling that little extra hanging off creates on your card!

To add to the festive feel and add another element of texture to the super textured and detailed card front, I tied a cherry red twine bow and tucked it beneath the sentiment at a jaunty angle. Finally, I added some more shine with some Onyx gems. I love the simplicity and crazy amount of texture on this card!

My second card features the darling new Deck the Halls set designed by my friend Alberto Gava! His illustrations are so adorable and really capture such a sweet attitude. I tend to try to keep my holiday cards a bit simpler, preferring a more graphic style rather than building a detailed scene, but I couldn’t resist creating a sweet holiday scene, perhaps a group of cousins decorating grandma’s Christmas tree. I stamped the images from Deck the Halls onto a panel of Hammermill using Hero Arts Contour Ink, then used my Copic markers to color the image.

In order to create the baubles on the tree, I used shimmery Star Spark Pens to color little glittering circles on the tree. I love that these pens are opaque enough that they can be layered over the top of colorful cardstock or coloring. I also used the Star Spark Pens to add sparkly details to the bows on the gifts! Once I had finished adding my shimmering details, I adhered clear droplet baubles over the top of the glittery circles to create a 3D effect on the tree. I think it adds such a fun textural element to the scene!

After I had finished coloring and die cutting, I used the Soft Plaid Background with Hero Arts Iridescent Blue embossing powder to heat emboss a subtle pattern on the 5″ square card front. This gorgeous embossing powder creates beautiful, subtle shimmer, perfect for allowing the colorful holiday die cuts to be the star of the show! For the greeting, I stamped the large calligraphy sentiment and sentiment block using Altenew Obsidian pigment ink, then covered it with clear embossing powder to make them nice and crisp. I die cut the embossed sentiments, then adhered all of the die cuts on the embossed background panel using both liquid and foam adhesive. Such a fun and festive card, perfect for a special friend or family member!!

Well, that’s all for my projects today! To celebrate the Simon Says Stamp Season of Wonder release, Simon Says Stamp is doing a special gift with purchase promotion:

Simply enter code HOLLY at checkout to receive the Graceful Holly 3D embossing folder with any $25 or more purchase. This gift with purchase will expire 10/8 at 11:59 pm EDT. While supplies last.

Simon Says Stamp is also sponsoring a $25 coupon giveaway at each stop on the hop! Leave a comment at each stop on the hop for maximum opportunities to win. Winners will be announced on the Simon Says Stamp blog on Wednesday the 11th of October. Winners should email Simon Says Stamp to claim his/her prize 🙂

Your next stop on the hop is Lisa Addesa. Thanks so much for stopping by today, and don’t forget to check the Simon Says Stamp blog tomorrow for Day 2 of the hop! Happy hopping!

Filed Under: simon says stamp Tagged With: 3D embossing folder, christmas card, copic markers, deck the hall, fancy tidings of cheer, free falling floral embossing folder, glitter paper, holiday card, iridescent blue embossing powder, soft plaid background, star spark pens

Last Gasps of Summer with Lisianthus and an Autumnal Color Palette!

September 26, 2023

Hi friends! I have had the distinct pleasure of illustrating several stamp sets for Simon Says Stamp, and the Lisianthus stamp set is one of my absolute favorites. These fluffy blooms look like a cross between a rose and a peony, two of the prettiest flowers in existence (in my opinion, anyway!). I’d never seen any in real life, just in photos, and was always enchanted with them. A few weeks ago, my husband very sweetly brought me a bouquet of these gorgeous blooms from a local grower, and my obsession was renewed!! I immediately set out to create an end-of-summer-beginning-of-fall card with a more autumnal color palette, featuring deep magenta and vivid plum as the two main colors. As frequently happens in my craft room, I ended up with enough components to make two separate projects, but I’m not complaining! Let’s get started with the details!

When I started stamping the Lisianthus stamp, I stamped a background pattern on a piece of 5×7 cardstock as well as a separate Lisianthus on a separate piece of cardstock, intending to color all of the images and use them on one card. That ended up looking a bit too busy for my taste, so I created two different cards!

For my first project, I stamped a background pattern on a panel of 5×7 Hammermill cardstock using Intense Black ink from Hero Arts. I then colored the images using Copic markers in a vivacious magenta, lovely jade green, and delicate lavender color palette. I used a very dark maroon and black Copic to color the background, as well, and I just love the subtleties of the maroon and black blending into each other! The warm maroon makes the black a little less stark and, in my opinion, more autumnal! I trimmed the panel down slightly and matted with an ever-so-slightly larger panel of Dragonfruit cardstock from Concord & 9th.

To create a shiny frame around my meticulously-colored blooms, I trimmed down a panel of Tonic Purple Rain cardstock to 5×7, then mounted the colored panel with it’s vivid pink mat in the center. I added a simple, pale celery green die cut Fancy Thinking of You, cut twice and adhered together to create a dimensional die cut greeting. A few coordinating pale celery green gems finished everything off and added some sparkle!

The second project makes use of the standalone Lisianthus that I colored with the intention of adding it to the colored panel, but decided that it would do better as a focal point on a separate project. After I had finished coloring the image and cut it out with the coordinating die, I used the RV99 marker to color around the edge of the die cut. I knew I wanted to have a deep maroon background, and taking away that white edge makes the vivid and bold color palette that much more impactful! I trimmed down an A2 panel of some more Purple Rain cardstock and ran it through my die cutting machine using Simon Says Stamp’s Leaf Tumble embossing folder. If you haven’t tried embossing folders with metallic or mirror cardstock, this is your sign to do it… the results are absolutely exceptional.

I mounted my vivid pink Lisianthus die cut floral spray on the embossed mirror card front using foam adhesive. I then die cut the Fancy Thanks die from some more of that lovely celery green cardstock that complements the jade green eucalyptus leaves so beautifully. Again, I cut the die cut sentiment twice from the pale green cardstock and adhered them together to create a bit of extra height for the greeting to allow it to stand out even more from the bold background. Finally, I added a few more green gems for sparkle!

Well, that’s all for my projects today! I am getting these last few gasps of bright, summery colors in now, because fall and winter crafting will be full of muted tones, traditional red and green, metallics, and icy pastels, and I am so ready for it! Thanks so much for stopping by today, and have a marvelous day!

Filed Under: simon says stamp Tagged With: copic markers, embossing folder, fancy thanks, fancy thinking of you, leaf tumble embossing folder, lisianthus, original illustration

Simon Says Stamp Stamptember Blog Party!

September 2, 2022

STAMPtember is officially in full swing, and we’re celebrating with a blog party! If you’re new to STAMPtember: September is Simon Says Stamp‘s birthday month, so the entire month is filled with fabulous releases, celebrations, prizes, challenges… good, clean, inky fun (and prizes!) for an entire month!! I am so thrilled to have illustrated two of the sets that were released during yesterday’s introductory release:  Floral Frames and Butterfly Ranunculus. I have a previous blog post with some watercolored projects using these new sets, which you can check out HERE. Today’s post again features the Butterfly Ranunculus set, this time with Copic markers! I have a video that you can watch below or HERE on YouTube.

In my cardmaking, I am all about making things as seamless and coordinated as possible. To that end, the white edge on die cut images drives me a little nuts when I am working with a vibrant, saturated, colorful background. I recently saw Dawn from Wplus9 use a pale blue Copic marker around her images before die cutting, and I thought that it would translate well to other colors, too! The beautiful Shamrock cardstock from Hero Arts is such a stunning shade of green, and it reminded me of beautiful brocade fabrics, with intense emerald silk for the background and brilliant blue embroidery. Monochromatic, but not really monochromatic, if you know what I mean. I just had to channel that inspiration into a card!

I began by stamping all of the images from the Butterfly Ranunculus set using Hero Arts Intens-ified Black ink onto some white, Copic-friendly cardstock. I used G07 Copic marker to color a halo around the edge of the images, making sure to extend far enough that the entire edge would be green when die cut. I then colored the images, using BG49, BG53, BG01, B00, B000 for the flower and T7, BG78, G28, G09 for the foliage.

Because I wanted to keep the flower a very light shade of blue, I colored the petals first with the four lightest shades of aqua, then added touches of BG49 wherever the shadows would be deepest, blending them out with the lighter shades to get a smooth blend. A little goes a long way with the darker shades, so don’t add too much, because it’s basically impossible to remove once you put the ink on the paper!

Once I had my flowers colored and die cut, I cut a Nested Domed Arch from the Shamrock cardstock, running it through my die cut machine once more with the Detail Mandala Plate from Simon Says Stamp. This extra step adds just a touch of subtle interest and texture to the background of my flowers. I adhered the domed arch to an A2 Shamrock card base using foam tape, then arranged the colored flowers, adhering them with lots of foam tape, sometimes in double layers to add extra height. I heat embossed a greeting from Butterfly Ranunculus onto a strip of Shamrock cardstock using silver embossing powder, finally adding a smattering of Mirrored Mint pearls for some shine!

Well, that’s all for my project today. To celebrate the beginning of STAMPtember, we have a scavenger hunt of all kinds of great freebies that you can receive with your order!

Enter code EH5M427Q at checkout to receive the darling Party Like a Puffin stamp set free with your purchase of $30 or more! You can also check out the other Blog Party participants to see what other kinds of fabulous free gifts you can receive in addition to utterly amazing inspiration!

Thanks so much for stopping by today, and happy STAMPtember!!

Filed Under: original illustrations, simon says stamp Tagged With: butterfly ranunculus, copic markers, monochromatic, original illustrations, stamptember

May Our Hearts Be Full of Thanks + Giving

October 9, 2021

Hi there! I’m up on the Honey Bee Stamps blog today, and I’ve got some autumnal inspiration for you using some beautiful new goodies from the Autumn Splendor release! I seem to be trying to will fall temperatures into existence by creating fall projects. Isn’t that how it works? It should be, in any case. Maybe the beautiful blue skies and warm temps prompted me to pair the fall sunflowers from Garden Harvest with some bright white die cuts. Let’s get started with the details!

I began by stamping some blooms, foliage, and an acorn (what says fall more than an acorn and an oak leaf?) from Garden Harvest onto some white cardstock using the Honey Bee Stamps Intense Black Ink. I colored them with a variety of yellow Copic markers, adding some touches of deep forest green to keep that little hint of Indian Summer. I die cut the finished images using the coordinating Honey Cuts. I also die cut a Grapevine Wreath and bow from some more white cardstock, arranging the flowers and bow in a little cluster and adhering them to the white wreath.

Next, I created a woodgrain background using the Barn Wood Planks dies. I staggered them so that they would look a bit more rustic than a true shiplap background.

I stamped the beautiful greeting from Sweater Weather using Intense Black Ink on some more white cardstock, then die cut the greeting with the coordinating Honey Cuts. I love that you have the option to die cut the sentiment just as it’s stamped as well as the option to die cut each segment individually so that you can arrange the sentiment however you like! I adhered the wreath and greeting to the woodgrain background using lots of foam adhesive. When using white-on-white (or any tone-on-tone) like this, I like to use lots of adhesive to give extra dimension and definition to the white die cuts.

Well, that’s all for my project today! I hope you’re enjoying some cool crafty time while it’s still warm outside. I can’t wait for the temps to drop… so then I can enjoy crafty time with my windows open, haha! Thanks so much for stopping by today, and have a marvelous day!

Filed Under: Honey Bee Stamps Tagged With: barn wood planks, copic coloring, copic markers, garden harvest, garden harvest florals, grapevine wreath, sweater weather

  • « Go to Previous Page
  • Page 1
  • Page 2
  • Page 3
  • Page 4
  • Go to Next Page »

Primary Sidebar

  • Facebook
  • Instagram
  • Pinterest
  • YouTube

Favorite Shops

Secondary Sidebar

Subscribe

Enter your email address to subscribe to this blog and receive notifications of new posts by email.

Instagram
Something is wrong.
Instagram token error.
Follow
Load More

Archives

Tags

3D embossing folder alcohol markers better press birthday birthday card blog hop card kit christmas christmas card christmas tag colored pencil copic copic coloring Daniel Smith die cutting embossing folder embroidery felt giveaway holiday holiday card hot foil ink blending karin brushmarker pro layered stencil masculine my monthly hero new release no line coloring no line watercolor OLO marker olo markers original illustration pawsitively saturated rainbow shaker card slimline stamping stamptember stencil thank you thinking of you valentine's day video watercolor

Popular Posts

Simon Says Stamp Glory to the Newborn King Holiday Kit-Part II!
Simon Says Stamp December 2026 Card Kit of the Month: Frosted Botanical!
Two Simon Says Stamp Holiday Exclusive Projects with Tim Holtz and Art Impressions!
Warmth and Love at Christmastime with New Simon Says Stamp!
Altenew July Stamp and Die Blog Hop+Giveaway!
Frozen Fractals All Around with New Simon Says Stamp Joy For You Release!
Hero Arts Partners Blog Hop: Lawn Fawn!
Simon Says Stamp Joy For You Blog Hop- Day 1!
Altenew Build-A-Flower: Tree Peony Release Blog Hop + Giveaway
Hero Arts 45th Anniversary Blog Hop+Giveaway, Day 1!

Disclosure

Some affiliate links are used in my posts. This means that, should you click on one of my links and purchase something from that company, I will receive a small portion of the sale at no extra cost to you. I use the money earned from these sales to help maintain my blog. I so appreciate you visiting and, if you do choose to use one of my affiliate links, thank you so much for your support!
Copyright © 2026 ·Brunch Pro Theme · Genesis Framework by StudioPress · WordPress · Log in
Loading Comments...