• Skip to main content
  • Skip to primary sidebar
  • Skip to secondary sidebar

Sixth Street Sundries

Emily Midgett

  • Home
  • About Me
  • Contact
  • OLO Marker Color Swatch Chart
  • Shop

giveaway

Introducing Beautiful Bouquet at Simon Says Stamp+Giveaway!

December 31, 2021

Hi there! I am closing out 2021 with some exciting news. Illustrating several stamp sets has been one of the most personally fulfilling parts of my creative journey over the last year, and I’m utterly thrilled to introduce my first stamp set for Simon Says Stamp, called Beautiful Bouquet! When I am brainstorming new floral designs, I look to Pinterest and Instagram for wedding photography, frequently finding beautiful sprays of flowers on cakes, both natural and those made of sugar! The beautiful sugar paste anemone flower that I found on a wedding cake was so stunning that it became the basis for the Beautiful Bouquet. The graceful curvature of the petals made my heart sing, so I built the rest of my bouquet around it, adding some hydrangeas, a rose, anemone leaves, and some eucalyptus. That anemone has been sitting in my creative subconscious for a few months now, begging to be watercolored, and it was so exciting to finally be able to paint it! I have two watercolored projects to share with you today, so let’s get started with the details.

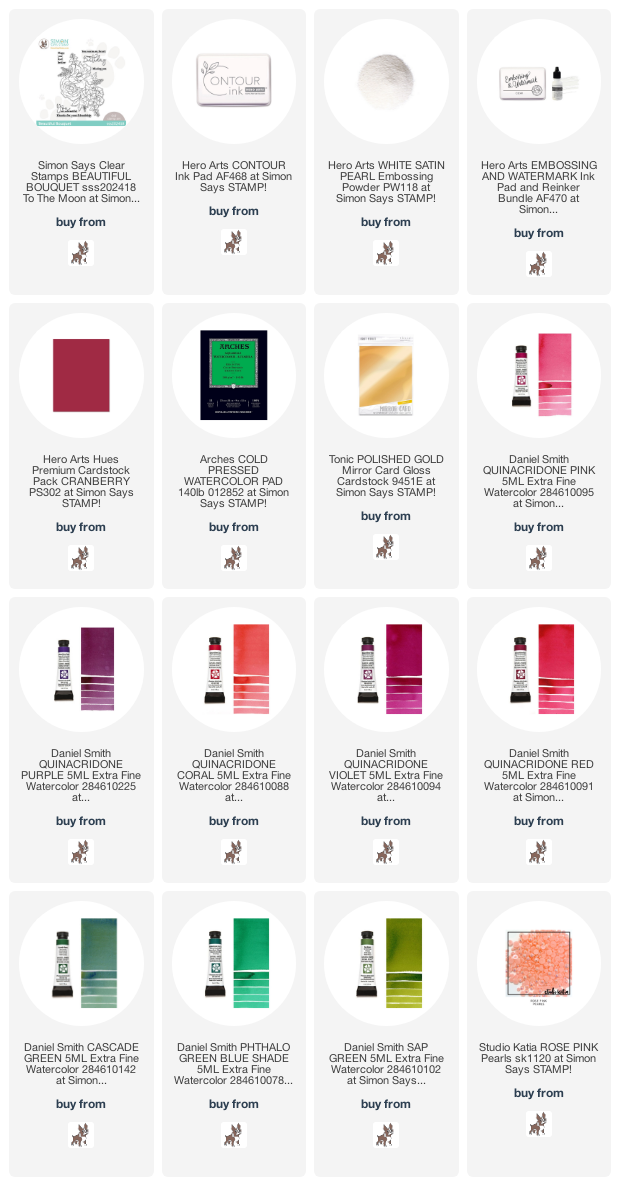
This first project was created using a “tie-dye” technique. I began by heat embossing the main floral image from Beautiful Bouquet in the corner of a large 5×7 panel of Arches Cold Press watercolor paper using white pearl embossing powder. I like to use white embossing powder when I want to give the illusion of no-line coloring. The embossing still creates the little wells, which provide some protection against the petals bleeding into each other. It’s a great way to get that (almost) no-line look but you can finish your project a bit more quickly! Tip: use the “back” side of the Arches Cold Press paper when heat embossing an extremely detailed image. It is still slightly textured, but not so much that the heat embossing is uneven!

After I’d embossed my image onto the watercolor paper, I taped the panel down to my watercolor board using washi tape. I thoroughly wet the bouquet and the surrounding area with clean water, then dropped in some very diluted Daniel Smith paints (specific colors are listed in the photo below), allowing the wet paint and the wet paper to meld the colors with very little help from me. I did mottle the color a bit with my brush to remove any granulation that might have occurred and ensure that there were no harsh lines.

Once my base layer of paint was completely dry, (you can help this along with the aid of a heat gun) I went back in and added some details and shading to the image with more concentrated color. The transparency of the watercolors allows the colors from that base layer of paint to still shine through the darker layers, creating some variation and interest on the flowers, independent of the shading that I added with the concentrated color.

After my image had dried (still taped down to the board to reduce warping from the large amount of water that I used on the paper), I trimmed it down slightly, mounted it on a full size 5×7 Cranberry cardstock base, then added a heat embossed sentiment from the Beautiful Bouquet, mounted to the card front with some foam adhesive. The final step was to add some pretty iridescent pink pearls for some shimmer and shine!

My second project was a labor of love. The massive size of the Beautiful Bouquet stamp set made it perfect for creating some wall art! I am low on wall space, (one of the drawbacks of having a small office with basically every available inch of wall space covered with shelves or bookshelves to accommodate all of my “stuff,” ha) but I wanted to commemorate this particular release with some artwork for my art room!

I stamped the image using Hero Arts’s Contour Ink on a 6.5″ x 8.5″ panel of Arches Cold Press, this time textured side up. I kept the color scheme simple and feminine, sticking to intense pinks and purples. I won’t lie… this piece took me several hours hours over the course of a few days. (Thankful for my mom visiting and hubby being on Christmas vacation to allow me the time to finish this!) I’ve listed the individual colors that I used in the photo below, not accounting for the “palette mud” that I used to add some extra shadows during the final touch-up phase. 😉

No-line coloring can be difficult and time-consuming, mainly because you have to work in sections and layers to prevent the individual elements from bleeding into each other and muddling the edges. Each flower has 3-4 (or more… I kind of lost count haha!) layers of color and shadows, in order to achieve bright highlights and dark shadowed areas. I begin with a light layer of each color on each flower, to help keep the highlighted areas lighter. Each subsequent layer allows me the opportunity to clean up the edges of the petals by adding contrasting shadows to the petal next to it. This requires a steady hand and a nice crisp point on your paintbrush, but it’s worth the effort, I think! I also will use white paint to intensify highlights in certain spots that have become too saturated with color. The contrast of the bright highlights and intense shadows are what give depth and shape to the flower.

I also like to try to pick up the reflections of colors of the flowers around each flower by adding very diluted washes of color on the finished petals, giving the impression of the flowers picking up reflections of the colors around it. Again, trying to add interest to keep things from looking flat.

Once I’d finished my painting, I signed it, mounted the watercolor panel to a slightly larger panel of shiny gold foil cardstock to create a luxurious, shiny border, then mounted that to a full size 8″x10″ panel of Eggplant cardstock from Concord and 9th. I think this is going to be such a pretty addition to my wall! I have framed a few cards from the crafters that I admire most already up on my wall, and I can’t wait to add this piece to the collage.

I could not be more excited about Beautiful Bouquet being added to the lineup at Simon Says Stamp. Seeing my illustrations become stamps has been an absolute dream come true, and it is an honor to have the opportunity to illustrate for these wonderful companies!

Simon Says Stamp generously sent me a few extra stamp sets to give away, and you can find all of the details for the giveaway over on my Instagram post! Please note: the giveaway is only on my Instagram page. I will be pulling the winners from the comments on my Instagram post. Please check out my Instagram page @eamidgett to enter the giveaway!

Thanks so much for reading, and Happy New Year! May your 2022 be peaceful, healthy, and prosperous! Much love to you all.
Filed Under: original illustrations, simon says stamp Tagged With: beautiful bouquet, Daniel Smith, giveaway, no line coloring, no line watercolor, original illustration, watercolor

Altenew Paint-A-Flower: Sweet Pea Outline Stamp Set Release Blog Hop + Giveaway ($200 in Total Prizes)

December 22, 2021

Hi there! Today, Altenew is adding the Sweet Pea to their Paint A Flower family, and we’re celebrating with a blog hop! You should have arrived here from LauraJane, and your next stop is Natasha Davies. You can also start back at the beginning at the Altenew Card Blog. Here’s a peek at this month’s Paint A Flower set:

I love the beauty and grace of sweet peas. They add such a lovely, soft, romantic look to bridal bouquets, and this new Paint-A-Flower Sweet Pea stamp set captures that beautifully! If you love these Paint A Flower sets, you can always subscribe to receive them automatically each month-and at a discount! I have a soft watercolored project for you today, so let’s get started with the details!

I began my project by heat embossing the beautiful Sweet Pea stalk twice onto a slightly-larger-than-A2 panel of watercolor paper using white embossing powder. I recently remembered how lovely white embossing looks with watercoloring; the softness almost creates the illusion of no-line coloring, but with the ease of those little raised embossed areas encapsulating your watercolor and keeping the petals from bleeding into each other. Once I had heat embossed my images onto the watercolor card front, I taped my panel down to a watercolor board to help minimize warping.

Next, I used the Altenew Artist’s 24 Pan Watercolor set to add a wash of very diluted pink and coral to the entire background, going back with dabs of more concentrated color in random spots, but keeping the overall feel very light. (Remember, watercolor always dries lighter than when you lay the color down! It’s easy to add color, but difficult to take it away, so adding an extra layer of color keeps things lighter than if you start with darker, more concentrated color.) Once my background wash was dry, I used more concentrated pink to intensify the colors on the flowers themselves, adding subtle washes of coral around the edges of the petals to add some variation.

Once my watercoloring was completely dry, I splattered some dark pink on the panel, then turned my attention to the greeting. I heat embossed one of the “sweet” greetings from the Sweet Pea set using more white embossing powder on some deep raspberry colored cardstock. I popped the sentiment strip up on the watercolored panel using foam adhesive, then added a few iridescent gems to add some sparkle.

Well, that’s all for my project today! Now for some fun giveaway information:

$200 in total prizes! To celebrate this release, Altenew is giving away a $50 gift certificate to 2 lucky winners and a $20 gift certificate to 5 winners! Please leave a comment on the Altenew Card Blog and/or each designer’s blog post on the blog hop list below by 12/29/2021 for a chance to win. Altenew will draw 7 random winners from the comments left on each stop of this blog hop and announce the winners on the Altenew Winners Page on 12/30/2021.

Your next stop is Natasha Davies. Thanks so much for stopping by today, and happy hopping!

Filed Under: altenew Tagged With: giveaway, paint a flower, watercolor

Altenew Thanks and Blessings Stamps/Dies/Stencils/Embossing Folders Collection Release Blog Hop + Giveaway ($300 in total prizes)

September 3, 2021

Hi again! I’m hopping along with Altenew to help introduce their Thanks and Blessings release. You should have arrived here from Vicky Papaioannou, and your next stop is Jenny Colacicco. You can also start back at the beginning at the Altenew Blog. I’ve been trying to use less pink and expand my colorful horizons… well, they’ve expanded to pretty-in-purple, and we just are not going to discuss how close purple is to pink. 😉 I have two projects for you today, so let’s get started with the details!

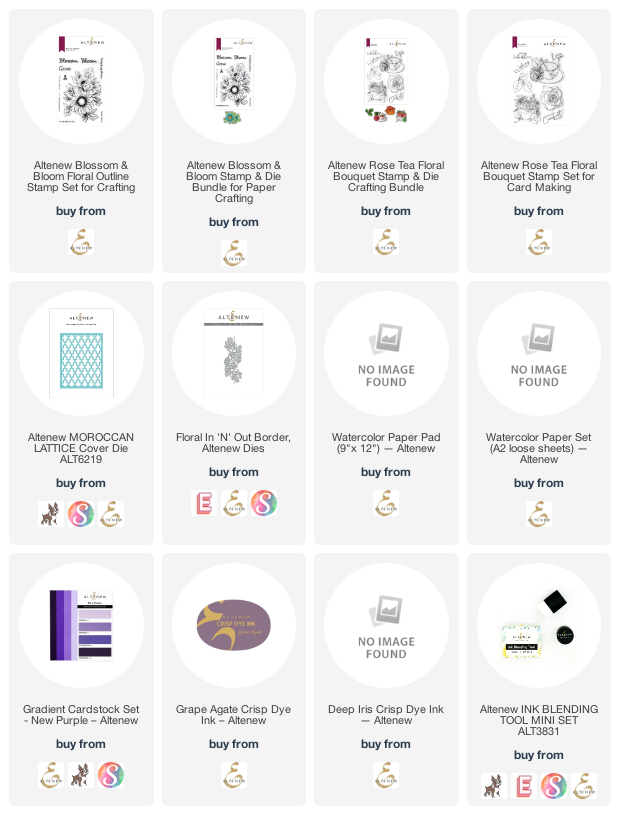
My first project features the new Blossom and Bloom stamps and dies! I heat embossed the main floral image from the stamp set onto some Altenew watercolor paper using silver embossing powder, then used the Artist’s Watercolor 24 Pan set to add some pretty purples and greens to the image. We always see yellow sunflowers, but who says they can’t be purple in your imagination? I die cut the finished watercolored image using the coordinating dies.

I love to use cover plates to create tone-on-tone backgrounds with subtle, elegant texture. I cut the Moroccan Lattice cover plate die from some light gray cardstock to coordinate with the gray center of the large sunflower and layered it on an A2 card base of the same gray cardstock. This adds some subtle texture without taking interest away from the large, busy floral die cut!

I heat embossed a greeting from Blossom and Bloom on some thin strips of New Purple gradient cardstock using more silver embossing powder. I popped up the watercolored die cut and the sentiment strips using Instant Dimension Foam Tape, then added a few shiny silver gems for some sparkle!

My second project also features a large purple bloom, this time from the Rose Tea stamp set. I stamped the large rose and foliage on some white cardstock using no-line coloring ink, then used Copic markers to color the rose in pretty shades of royal purple. I die cut the finished colored flowers with the coordinating dies.

Next, I softly blended some Deep Iris and Grape Agate ink on one side of a white A2 card base using Altenew’s Blending Tools. The pinky purple of the Deep Iris works nicely with the rich, plummy purple of the Grape Agate. I also die cut an edge using the Floral In ‘n Out Border die, which I adhered to the blended panel. I love the way the detailed white die cut pops on the pretty blending!

I adhered the Copic colored rose to the card front using some more foam adhesive, then added a greeting from Rose Tea which I stamped in Grape Agate ink on a rectangle of white cardstock. I finally added a few lavender gems to finish it off!

Well, that’s all for my projects today! Now, Altenew has some fun giveaway information:

$300 in total prizes! To celebrate this release, Altenew is giving away a $50 gift certificate to 2 lucky winners and a $25 gift certificate to 8 winners! Please leave a comment on the Altenew Card Blog and/or each designer’s blog post on the blog hop list below by 09/09/2021 for a chance to win. Altenew will draw 10 random winners from the comments left on each stop of this blog hop and announce the winners on the Altenew Winners Page on 09/11/2021.

The next stop on the hop is Jenny Colacicco. Thanks so much for stopping by today, and happy hopping!


Filed Under: altenew Tagged With: blossom and bloom, copic coloring, die cutting, giveaway, ink blending, no line coloring, rose tea, watercolor

Altenew Build-A-Flower: Bearded Iris Blog Hop + Giveaway!

July 1, 2021

Hi there! Popping in quickly from vacation with all of my little peoples and big redhead for the Altenew Build A Flower: Bearded Iris blog hop! You should have arrived here from Jenny Colacicco, and your next stop is Amanda Baldwin. (You can also start back at the beginning at the Altenew Blog if you get lost.)

I love that Altenew gives you the option to use the layered stamps or take some time to do some coloring. You can always subscribe to the Build A Flower series to receive the sets each month at a discounted rate! Let’s get started on the details!

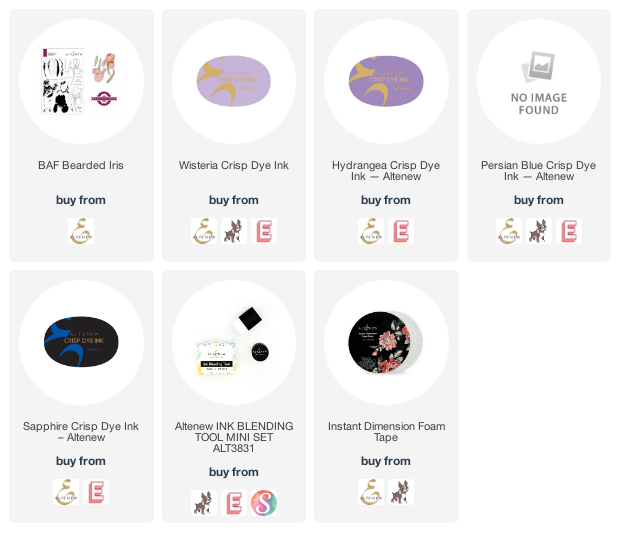
I began by stamping the Bearded Iris flowers using the layering stamps from the Altenew Build A Flower: Bearded Iris set onto some white cardstock using Wisteria, Hydrangea, Persian Blue, Sapphire, Minty Mint, Sweet Leaf, and Just Green inks. I used the coordinating dies to cut all of the stamped pieces out.

On the card base, I blended both Wisteria and Persian Blue inks in the center of the A2 card front, as well as some Persian Blue ink around the outer edge of the card base to create a bit of a halo. I trimmed a rectangle of lavender cardstock down to the same width as the card front, then arranged my stamped Bearded Irises so that they were “growing” out of the cardstock rectangle. I adhered all of the components using foam adhesive.

Finally, I added a cornflower blue hello from the newly released All About You word dies and some iridescent blue gems.

Well, that’s all for my project, now for some fun giveaway information!

$200 in total prizes! To celebrate this release, Altenew is giving away a $50 gift certificate to 2 lucky winners and a $20 gift certificate to 5 winners! Please leave a comment on the Altenew Card Blog and/or each designer’s blog post on the blog hop list below by 07/07/2021 for a chance to win. Altenew will draw 7 random winners from the comments left on each stop of this blog hop and announce the winners on the Altenew Winners Page on 07/09/2021.

Your next stop is Amanda Baldwin. Thanks so much for stopping by today, and have a marvelous day!

*****(If you can’t find the comment box on my post, click on the title of the blog post, then scroll down to the end of the post, where you should see a comment form.)*****

Filed Under: altenew Tagged With: build a flower, build a flower bearded iris, giveaway, ink blending

Hero Arts May 2021 My Monthly Hero Blog Hop + Giveaway!

May 3, 2021

Hi there! Today is the Hero Arts May My Monthly Hero release and blog hop to celebrate it. You should have arrived here from Debi Adams, and your next stop is Ilina Crouse.

This month’s kit is a marvelous one-full of beautiful marine images: coral, jellyfish, seahorses, fish (even Nemo!)… and some darling punny sentiments with beautiful fonts. This month’s kit contents are valued at $70, but can be purchased for $34.99! These kits frequently sell out very quickly, so don’t hesitate to purchase, because once it’s gone, it’s gone! You can also subscribe to ensure that you get your own kit every month.

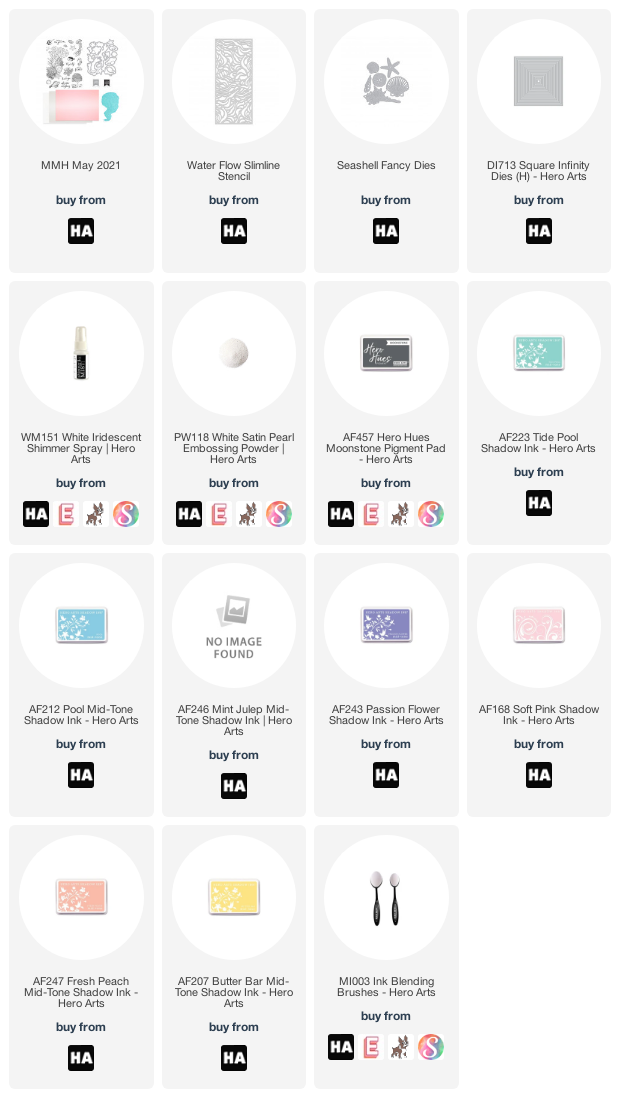
The images in this month’s kit are quite substantially sized; I wanted to use the main coral reef image as the base for my scene, and since it is such a large image, I decided to create a slimline card (3.5″x8.5″). I began by trimming down a panel of Arctic cardstock to slimline size, then used the new Water Flow Slimline Stencil to blend Tide Pool and Pool inks using blending brushes. I then spritzed some White Iridescent Shimmer Spray over the top of the stencil as well to create an extra shimmery background.

Next, I heat embossed several images from this month’s kit onto some white cardstock using White Satin Pearl embossing powder, then die cut them with the coordinating frame cuts and used a huge variety of inks and ink blending tools to add a rainbow of color to the embossed die cuts. (I’ll link the individual colors below.)

Finally, I used Moonstone pigment ink and more White Satin Pearl embossing powder to emboss the cute sentiment from this month’s kit. I adhered all of the pieces using foam adhesive, sometimes using a double layer to add lots of extra dimension. The final touch was to add some “bubbles” with iridescent gems. Lots of sparkle and shine on this one!

Now, for a completely different style. I have always fancied super high end stationery, and the new Seashells Fancy Dies are perfect for creating a quick, elegant card with just two shades of cardstock. I began by die cutting the scalloped shell from the Seashells Fancy Dies set from some pearlescent gold cardstock. The details in the die cut are so beautiful!

I trimmed a panel of Nautical cardstock down to slightly smaller than A2-sized, then used one of the Square Infinity dies to to die cut a window from the center of the panel. I heat embossed a greeting from the new Color Layering Abalone stamp set using Brass embossing powder.

I popped up the embossed frame panel on another full size A2 panel of Nautical cardstock using foam adhesive, then popped up the seashell using some more foam tape. The final touch to add a touch more gold to this overall simple card was to add some golden pearls.

Now for some fun giveaway information!

Hero Arts will give away one $50 gift card, drawn from the comments left across the hop. Enter by Sunday, May 9th at 11:59pm pacific, and the winner will be announced on the Hero Arts blog the following week. The more comments you leave, the greater your chances to win!

Your next stop on the hop is Ilina Crouse. Thanks so much for stopping by today, and happy hopping!

Filed Under: Hero Arts Tagged With: giveaway, ink blending, my monthly hero, slimline

  • « Go to Previous Page
  • Page 1
  • Page 2
  • Page 3
  • Page 4
  • Page 5
  • Interim pages omitted …
  • Page 17
  • Go to Next Page »

Primary Sidebar

  • Facebook
  • Instagram
  • Pinterest
  • YouTube

Favorite Shops

Secondary Sidebar

Subscribe

Enter your email address to subscribe to this blog and receive notifications of new posts by email.

Instagram
Something is wrong.
Instagram token error.
Follow
Load More

Archives

Tags

3D embossing folder alcohol markers better press birthday birthday card blog hop card kit christmas christmas card christmas tag colored pencil copic copic coloring Daniel Smith die cutting embossing folder embroidery felt giveaway holiday holiday card hot foil ink blending karin brushmarker pro layered stencil masculine my monthly hero new release no line coloring no line watercolor OLO marker olo markers original illustration pawsitively saturated rainbow shaker card slimline stamping stamptember stencil thank you thinking of you valentine's day video watercolor

Popular Posts

Simon Says Stamp October 2026 Card Kit of the Month: Homespun Gratitude!
February 2018 My Monthly Hero Blog Hop!
Altenew Craft A Flower: Poppy Blog Hop+Giveaway!
Felted Gourd Wall Hanging with Simon Says Stamp!
Sunflower Home Decor with Simon Says Stamp!
Craft Your Life Project Kit: Feathered Lilies Blog Hop+Giveaway!
Simon Says Stamp October 2025 Card Kit of the Month!
Altenew Standalone Die Blog Hop+Giveaway!
The Ton Anniversary Release- Day 2
Honey Bee Stamps Cheerful Love Blog Hop!

Disclosure

Some affiliate links are used in my posts. This means that, should you click on one of my links and purchase something from that company, I will receive a small portion of the sale at no extra cost to you. I use the money earned from these sales to help maintain my blog. I so appreciate you visiting and, if you do choose to use one of my affiliate links, thank you so much for your support!
Copyright © 2026 ·Brunch Pro Theme · Genesis Framework by StudioPress · WordPress · Log in
Loading Comments...