• Skip to main content
  • Skip to primary sidebar
  • Skip to secondary sidebar

Sixth Street Sundries

Emily Midgett

  • Home
  • About Me
  • Contact
  • OLO Marker Color Swatch Chart
  • Shop

happy birthday

More Simon Says Stamp June 2025 Card Kit of the Month!

May 15, 2025

This post was sponsored by Simon Says Stamp. Thanks, Simon!

Hi friends! The new Simon Says Stamp Captured Joy Card Kit of the Month is available for preorder, and I have some more inspiration to share using the gorgeous elements of this kit! I shared THIS pair of cards yesterday that featured lots of ways to utilize the patterned papers and other pieces of the kit, including a fun floating frame shaker, but today, I thought I’d share some inspiration using the rub-ons and stamp set that is included with the kit. Here’s a sneak peek at the fabulousness included with the June 2025 Captured Joy Card Kit of the Month:
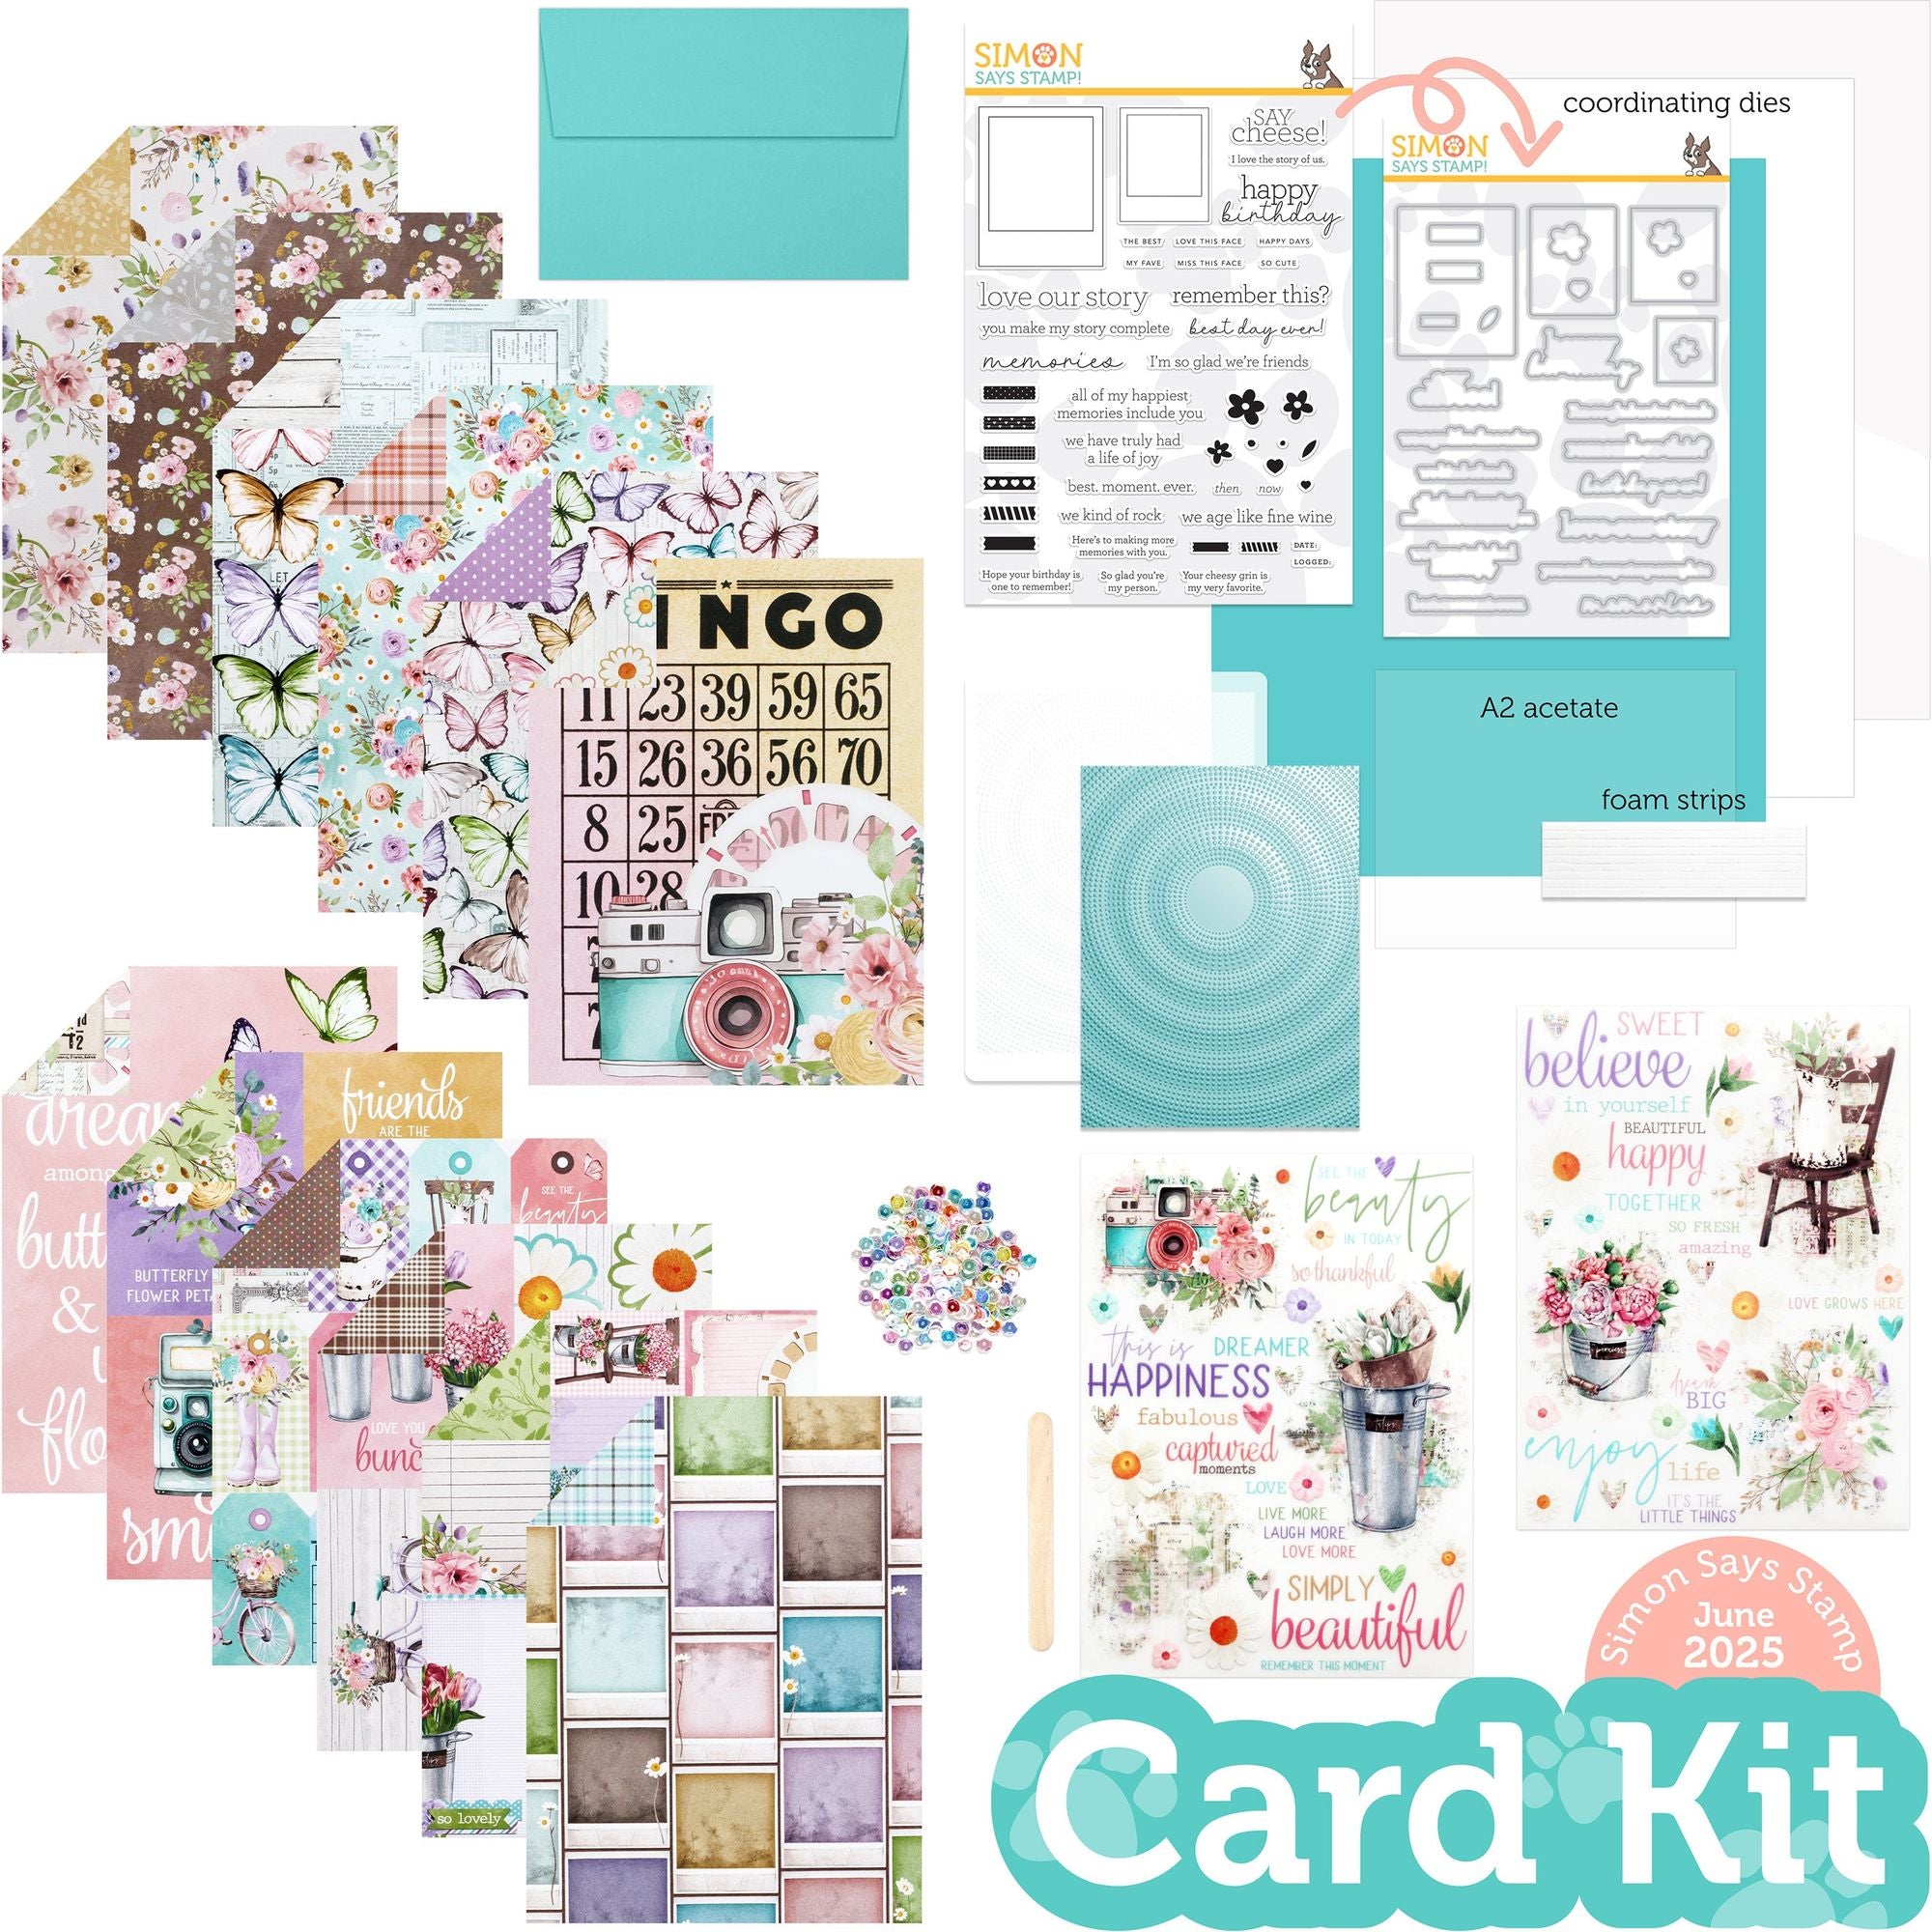
The value of the individual contents of this kit is so much higher than the $44.99 price tag (the stamps and dies alone are worth it, even more if you become a subscriber for $39.99!). This is one kit that you don’t want to miss out on!

*I have gathered links to all of the products used at the bottom of the post for your convenience, using affiliate links. Thank you for shopping with my links! I truly appreciate your support for my work!*

For my project today, I began by using the beautiful rub-ons included with the kit, creating a floral collage on an A2 panel of Audrey Blue cardstock, also included with the kit. Rub-ons could not be easier to use; simply use your scissors to cut out the images that you’d like to use, then use the included popsicle stick (or I used my bone folder) to rub the images onto your cardstock of choice. The vibrantly-printed images will remain vibrant even on a color-saturated background like this gorgeous Audrey Blue! I used several images to create a collage on my background, then splattered the entire panel with some shimmering iridescent glitter watercolor for an added “mixed media” feel.

For the focal point, I did some fussy cutting using some of the rub ons and the patterned papers included with the Captured Joy Card Kit. I used the “enjoy” and camera rub-ons with some plain white cardstock, then used my sharp recoil scissors to fussy cut the rub-on images. I also cut out some more butterflies from some of the patterned papers.

To help ground the images, I heat embossed one of the frames from the Modern Scrapbook stamp set included with the kit, stamping it and the “happy birthday” greeting on pale pink cardstock using Simon Says Stamp’s White Pigment Ink, the heat embossing the images with Iridescent Blue embossing powder. I used the coordinating dies to cut the images out, adding some darker pink alcohol marker to the frame to add a bit more contrast and color, then popped up all of the images on my collage card front with foam and liquid adhesive. I tucked an Iridescent White Cord bow beneath the sentiment, then added a few Prism Pawsitively Dazzling Gems for added sparkle!

This kit is so full of amazing products and even more amazing value; the stamps and dies alone having a higher individual value than the kit’s price! The Simon Says Stamp Card Kits are such an incredible value; the value of the individual elements of each kit equals far more than the $44.99 price tag, so you’re getting incredible bang for your buck. If you are consistently interested in the Simon Says Stamp Card Kit of the Month, you can sign up HERE to become a subscriber for an even bigger discount on these carefully curated products. As always, Simon also makes each individual element of the kits available a la carte, so that you can pick and choose what you would like to purchase if buying the entire kit isn’t really your thing. Who can say no to such incredible value though, right?

Thanks so much for stopping by today, and have a marvelous day!
Filed Under: simon says stamp Tagged With: captured joy, card kit of the month, die cutting, happy birthday, mixed media, modern scrapbook, rub on

Birthday Blues with STAMPtember from Simon Says Stamp !

September 1, 2023

This post was sponsored by Simon Says Stamp. Thanks, Simon!

Hi friends! STAMPtember, the incredible month-long party celebrating stamping and so many of the companies that we love, has officially begun over at Simon Says Stamp, with their first STAMPtember release going live last night! I shared a could of blurple projects with you last night featuring several of the new products for this first fabulous release (which you can check out HERE), but I have switched things up today to create this aqua (aka gender neutral!) birthday card using the new Party Hat die from the STAMPtember release! Birthday cards are one of my most favorite cards to create, because you can make them so fun and festive by adding sparkles, layers, and shine. Let’s get started with the details!

I began my project by die cutting the different layers of the new Party Hat die using a variety of pool-colored cardstocks, starting with Seaglass Cardstock for the base and accenting the stripes with turquoise glitter cardstock. I layered all of the pieces together using liquid adhesive to create a super fun party hat!

To accent the party hat and create the party atmosphere, I die cut several of the smaller balloons in the Balloons die set, cutting them from both Lawn Fawn Pearlescent Vellum and Pearlescent cardstock. Layering the vellum balloons behind the solid pearlescent cardstock gives you the opportunity to hide the adhesive behind the solid die cuts so that they don’t mess up the semi-transparent vellum! I also die cut a simple happy birthday sentiment using the Happy Birthday on a Line die from some more Pearlescent cardstock, adhering two more layers die cut from plain cardstock to create a dimensional die cut greeting!

Before I began arranging my different die cut elements, I trimmed down a panel of Seaglass Cardstock to A2 size, then used the Layered Confetti Stencil to create a fun, almost bokeh, effect for the background. I blended Tropic and Tidepool Pawsitively Saturated inks using the two stencils with the smaller circles, then spritzed Hero Arts Iridescent Shimmer Spray over the stencil with the largest circles. The large, shimmering circles add an ethereal quality to the background, I think! I arranged the balloons, party hat, and sentiment in a cluster on the card front using dimensional adhesive and added some shimmering gems to add even more sparkle. I also added some balloon strings with a glittery gel pen!

Well, that’s all for my project today! Be sure to check back tomorrow for the awesome blog party to kick of STAMPtember 2023 in a big way with an awesome scavenger hunt, not to mention tons of inspiration from an abundance of talented bloggers. Thanks so much for stopping by, and have a marvelous day!

Filed Under: simon says stamp Tagged With: balloons, birthday card, happy birthday, ink blending, layered confetti, layered stencil, party hat

VIDEO: Ombré Tone-On-Tone Intricate Die Cut Backgrounds for Pinkfresh Studio!

August 9, 2023

Hi friends! I have a new video over on the Pinkfresh Studio YouTube Channel, and for this month’s video I wanted to work with the gorgeous new Secret Garden Die. I love using these super intricate dies to create tons of tone-on-tone texture on a background, whether it’s with colored cardstock or with ink blending! For today’s video, I blended a super saturated ombré sunset background…twice! Check out the video:

Watch the video above or HERE on YouTube!

To create this vibrant, super saturated card, I began by blending two separate A2 panels of white cardstock using Peach Fuzz, Coral Reef, Passion Fruit, and Raspberry Bliss inks. I went back over each panel an additional time to ensure super smooth blends and to saturate the cardstock as much as I could with color. Once I had finished blending both panels, I splattered one with rose gold metallic watercolors, then die cut the other using the Secret Garden Die. I also die cut another Secret Garden die cut from some plain white cardstock and layered the two die cuts together to add a little extra height to my intricate die cut without having to fuss with teeny little strips of foam tape!

For the greeting, I used one of my previously-hot foiled greetings. When I’m hot foiling, I like to hot foil several sentiments in a variety of foil colors, and for today’s card I pulled out one of the Happy Birthday Hot Foil Plate sentiments that I’d hot foiled with Rose Gold foil. I lightly blended the Coral Reef, Passion Fruit, and Raspberry Bliss inks on the foiled sentiment die cut so that all of the die cut pieces would coordinate!

After I popped up the foiled, blended greeting on the blended background, I die cut some flowers and foliage using hot pink foil and rose gold glitter cardstock and the Garden Wreath Dies. These standalone dies are great for adding tiny little floral accents to perfectly match your color scheme. Finally, I added a few Butterscotch Glitter Drops to the flower centers and scattered on the card to add another element of sparkle!

Well, that’s all for my project today! Creating these super vibrant and textured tone-on-tone backgrounds is such a fun way to utilize these beautiful detailed die cuts. I hope you’ll give it a try! Thanks so much for stopping by today, and have a marvelous day!

Filed Under: pinkfresh studio Tagged With: happy birthday, ink blending, secret garden, video

Pretty in Pink for the Flower Challenge!

October 4, 2021

Hi there! I am excited to be a guest for The Flower Challenge this month! I was so honored when my friend Aileen (@huh_what_pardon on Instagram) asked if I would be a guest for this challenge. This month’s challenge theme is Use a Shape. I love flowers, we all know that, and so I was excited to have an excuse to play with one of the stamp sets I’ve illustrated for Pinkfresh Studio: Best of Everything. I did some loose watercoloring for today’s challenge project, so let’s get started with the details.

I began by heat embossing my intricate floral image from Best of Everything onto some Arches Hot Press watercolor paper using white pearl embossing powder. I then taped it down to my watercolor board using washi tape and watercolored it using my “tie dye” method of watercoloring with Holbein watercolors. Essentially, I begin by getting my entire watercolor panel wet with clean water, then dropping in very diluted (less pigment, more water) color all over the background, not caring whether the color lands on leaves (which should be green) or flowers, basically just allowing the colors to bleed into each other and create an interesting base layer.

After my tie-dye layer had dried, I went back with the same watercolors that I used for the base layer, this time more concentrated (more pigment, less water) to add depth and shadows to the individual flowers. The base layer helps to add a bit of variation on the individual flower petals and leaves by allowing multiple colors to shine through on the lighter highlighted areas. Once it had dried completely, I trimmed it down and mounted the watercolored panel on a vivid pink card base.

For the “Add A Shape” component of the challenge, I die cut a Blanket Stitched Oval die from Pinkfresh Studio, cut from some heavyweight vellum. I also die cut a Happy Birthday greeting from an older, retired die set (whoops!). I die cut the sentiment twice from the same vivid pink cardstock, then layered them together to create a sturdier, more dimensional die cut. I adhered the sentiment die cuts to the vellum oval, then popped them up with clear dimensional adhesive. Vellum can be tricky to work with, but small pieces of the clear dimensional tape are fairly well hidden behind the sentiment die cut! A few sparkling gems from Pinkfresh Studio helped to finish the project off and add some sparkle.

Well, that’s all for my project today! I hope you’ll check out The Flower Challenge blog to see how you can enter your own project for this month’s challenge: Add A Shape. Thanks so much for stopping by today, and have a marvelous day!

Filed Under: original illustrations, pinkfresh studio, Uncategorized Tagged With: best of everything, flower challenge, happy birthday, holbein, original illustrations, watercolor

Coral Camellias.

February 26, 2018

Good morning! I have a special post for you today with a giveaway sponsored by a fabulous stamp company, Technique Tuesday! I’ve ogled the beautiful Greenhouse Society series from Technique Tuesday for a long time, so I was thrilled to have the chance to play with them! This gorgeous Camellia stamp is an absolute blast to color…. I used Copics for today, but I have plans to do some watercoloring with this pretty set very soon! Just gorgeous!

To start, I did some simple stamping in the bottom corner of a panel of white, Copic friendly card stock using Hero Arts Intense Black ink with the Greenhouse Society Camellia stamp set. I love that this is just one stamp…. no worries about masking to get the leaves nestled beneath the bloom nicely! I then colored my little garden using Copic markers in lovely shades of Coral and Teal. Such a springy color combo, don’t you think? One of my favorite discoveries about using Copics (I recently rediscovered my love of Copic coloring and am sad thinking about how many of my Copics I sold off last year….) is that you can add lots of shimmer using your Spectrum Noir Shimmer pen without muddling your meticulous coloring like you would if you had used watercolor! Score for sparkly flowers!

Look at that shimmer:

After I had finished coloring and be-sparkling my Camellias, I die cut “Happy Birthday” from the Celebrate die collection using black shimmer card stock. I trimmed 1/4″ from the edge of my Copic colored panel, then adhered it to the corner of the A2 black shimmer paper.  I decided to add a few “droplets of dew” here and there on the flowers using my Hero Arts Lacquer Pen. Love the 3D effect it has!


~~~Now, for the GIVEAWAY!~~~

The generous folks at Technique Tuesday have graciously sponsored a giveaway for my blog readers. All you have to do is make sure that you’re a blog subscriber, then check out the Greenhouse Society page of the Technique Tuesday website and let me know in the comments which stamp and die set is your favorite! (You can simply add your email address to the “Subscribe” box on the left side of my blog homepage!) I will choose a random commenter on Friday, March 2 at 1 pm CST. Thanks for stopping by today, and good luck! Have a marvelous day!


Filed Under: giveaway, technique tuesday Tagged With: birthday card, camellia, copic coloring, die cutting, giveaway, happy birthday

Primary Sidebar

  • Facebook
  • Instagram
  • Pinterest
  • YouTube

Favorite Shops

Secondary Sidebar

Subscribe

Enter your email address to subscribe to this blog and receive notifications of new posts by email.

Instagram
Something is wrong.
Instagram token error.
Follow
Load More

Archives

Tags

3D embossing folder alcohol markers better press birthday birthday card blog hop card kit christmas christmas card christmas tag colored pencil copic copic coloring Daniel Smith die cutting embossing folder embroidery felt giveaway holiday holiday card hot foil ink blending karin brushmarker pro layered stencil masculine my monthly hero new release no line coloring no line watercolor OLO marker olo markers original illustration pawsitively saturated rainbow shaker card slimline stamping stamptember stencil thank you thinking of you valentine's day video watercolor

Popular Posts

Simon Says Stamp Joy For You Blog Hop- Day 1!
Simon Says Stamp Joy For You Release-Now Available!
Frozen Fractals All Around with New Simon Says Stamp Joy For You Release!
Shaped Holiday Shaker Card with New Simon Says Stamp Jolly Season Card Kit of the Month!
Holiday Postage with New Simon Says Stamp!
Simon Says Stamp Glory to the Newborn King Holiday Kit-Part II!
Altenew Build A Flower: Fuchsia Blog Hop+Giveway!
Holiday Joy in Pink and Green with New Simon Says Stamp DieCember!
Pinkfresh Studio 5th Birthday!
Honey Bee Stamps September Release Blog Hop!

Disclosure

Some affiliate links are used in my posts. This means that, should you click on one of my links and purchase something from that company, I will receive a small portion of the sale at no extra cost to you. I use the money earned from these sales to help maintain my blog. I so appreciate you visiting and, if you do choose to use one of my affiliate links, thank you so much for your support!
Copyright © 2026 ·Brunch Pro Theme · Genesis Framework by StudioPress · WordPress · Log in
Loading Comments...