• Skip to main content
  • Skip to primary sidebar
  • Skip to secondary sidebar

Sixth Street Sundries

Emily Midgett

  • Home
  • About Me
  • Contact
  • OLO Marker Color Swatch Chart
  • Shop

heavenly heart floral

Glittery Texture for Valentine’s Day with New Simon Says Stamp!

February 12, 2026

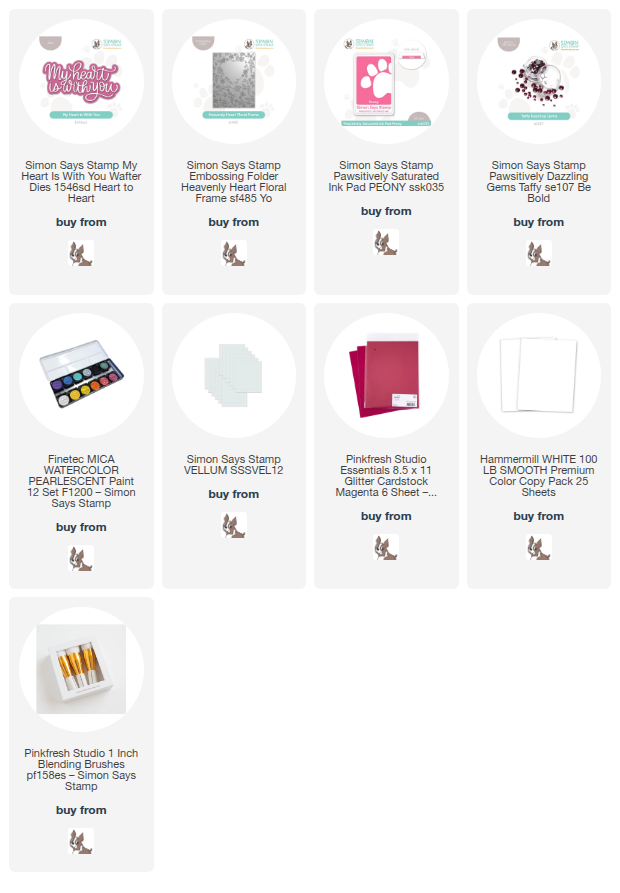
This post was sponsored by Simon Says Stamp. Thanks, Simon! *I have gathered links to all of the products used at the bottom of the post for your convenience, using affiliate links at no extra cost to you. Thank you for shopping with my links! I truly appreciate your support for my work!*

Hi friends! I am back with some more Valentine’s Day inspiration for you, this time covered in texture and glitter! I love customizing embossing folder images; the possibilities for customizing these embossing folder panels are truly limitless. For today’s project, I pulled out some glittering watercolors to create this pretty floral pattern out of the embossed images from the Heavenly Heart Floral Frame embossing folder. Let’s get started with the details!

Before adding any embossing to my A2 panel of white cardstock, I used a blending brush to lightly blend Peony Pawsitively Saturated Ink around the edges of my panel. The order in which you add ink blending to an embossed panel is important; if you add the ink blending after embossing, the ink can get caught in the raised areas, making the blend not quite as smooth but enhancing the texture. If you ink blend before embossing while the paper is still smooth, your ink blending will also be smooth and consistent. After I had blended the vibrant pink around the edges of my panel, I ran the blended panel through my die cutting machine using the Heavenly Heart Floral Frame. The embossing on the blended background is super pretty and textured in a tone-on-tone fashion, but I wanted to kick things up a notch!

I used a combination of alcohol markers and shimmering watercolors with a very fine paintbrush to add details to the individual raised images. I kept things simple, maintaining an overarching pink color palette in a variety of shades for the flowers, adding sparkling silver to the leaves and stems, then using my white gel pen to enhance the raised dots. It’s so difficult to capture in a photograph just how sparkly this panel is!!

After I had finished adding details to the embossed panel, I die cut the detail layer of the new My Heart is With You sentiment die set from some coordinating magenta glitter cardstock, then backed it with a vellum shadow layer. I used thin strips of foam adhesive to pop the sentiment die cut up in the center of the embossed heart, then added a silver-embossed pink bow leftover from a previous project and some Taffy Pawsitively Dazzling Gems for additional sparkle. Doesn’t this just look so pretty and feminine? Perfect for Valentine’s Day!!

Well, that’s all for my project today. We are coming in hot on Valentine’s Day, and I have a few more Valentine’s Day projects to share with you for some last-minute inspiration. Stay tuned! Thanks so much for stopping by today, and have a marvelous day!
Filed Under: simon says stamp, Uncategorized Tagged With: 3D embossing, embossing folder, heavenly heart floral, ink blending, my heart is with you, watercolor

Ink Swiped Wedding Card with New Simon Says Stamp!

May 6, 2025

This post was sponsored by Simon Says Stamp. Thanks, Simon!

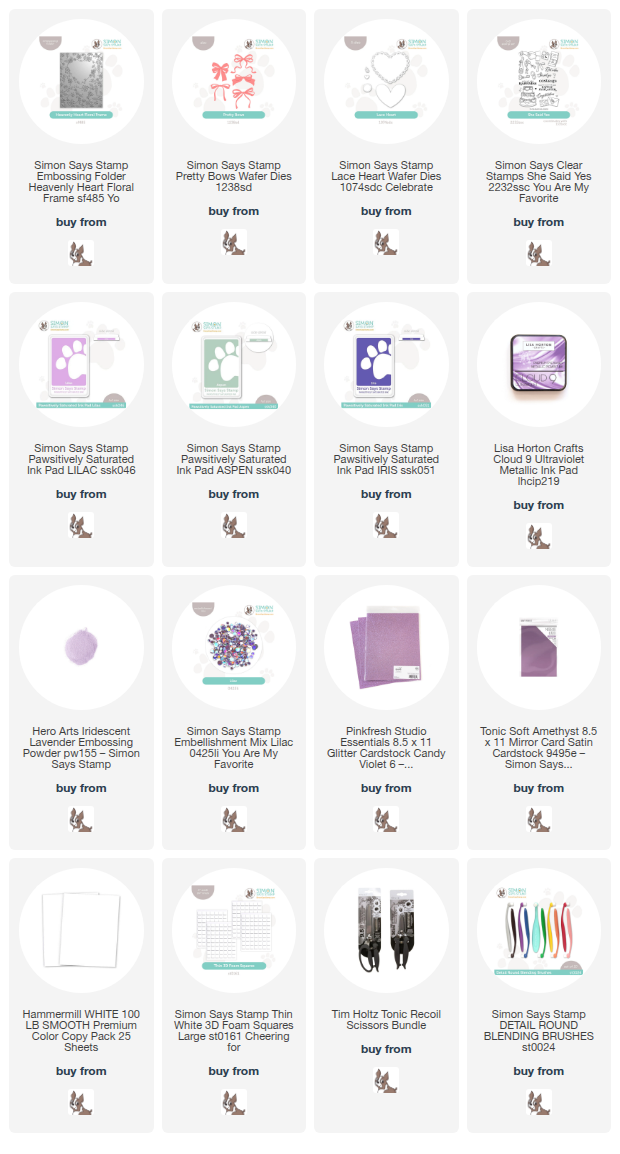
Hi friends! I have a unique project to share wtih you today using some fun old and new goodies from the new Simon Says Stamp  You Are My Favorite Release. The ink-swiping trend is such a fun way to make a big impact on a card with relatively little time commitment! I paired this fun technique with the new Heavenly Heart Floral Frame Embossing Folder to create this dainty wedding card. Let’s get started with the details!

*I have gathered links to all of the products used at the bottom of the post for your convenience, using affiliate links. Thank you for shopping with my links! I truly appreciate your support for my work!*

To begin, I embossed a panel of plain white cardstock with the new Heavenly Heart Floral Frame Embossing Folder, then flipped the panel over so that the panel was debossed, that is, with the pattern pushed down rather than raised up. I then used Simon Says Stamp’s small blending brushes to blend Lilac and Aspen Pawsitively Saturated Inks on the debossed flowers and foliage. The great thing about this technique is that you don’t have to be too fastidious with your ink blending and keep things too neat; any messy edges will be covered up with the dark ink swiping! Once I had “colored” all of the individual images, I pressed the Iris Pawsitively Saturated Ink Pad directly to the paper, sliding it over the flat parts of the debossed panel. The subterranean debossed images maintain their color, creating a colorful patterned background panel.

To enhance the heart shape in the center of the debossed pattern, I die cut a dainty and lacy heart frame using the previously-released Lace Heart Die from some coordinating lilac colored glitter cardstock. I popped the lacy heart frame up on the card front using thin strips of foam adhesive and topped the point of the heart off with a coordinating lilac matte foil bow cut using the Pretty Bows die set.

For the greeting, I stamped a sentiment from the new She Said Yes stamp set onto some coordinating minty pastel cardstock using Lisa Horton Ultraviolet ink, then embossed the pigment ink with Hero Arts Iridescent Lavender Embossing Powder to create a shimmering iridescent sentiment. I used my sharp scissors to cut the sentiment out, then popped it up in the center of the heart with a double layer of foam adhesive squares to give it a little extra height. Finally, I added a few sequins from the new Lilac Embellishment Mix to add a little more sparkle to the card!

Well, that’s all for my project today. Isn’t the ink swiping technique so much fun?? I just love the different looks that you can create simply by your color palette choices! Thanks so much for stopping by today, and have a marvelous day!

Filed Under: simon says stamp Tagged With: die cutting, embossing folder, heavenly heart floral, ink swiping, lace heart die, lisa horton ink, pawsitively saturated ink, pretty bows, she said yes, wedding card

Primary Sidebar

  • Facebook
  • Instagram
  • Pinterest
  • YouTube

Favorite Shops

Secondary Sidebar

Subscribe

Enter your email address to subscribe to this blog and receive notifications of new posts by email.

Instagram
Something is wrong.
Instagram token error.
Follow
Load More

Archives

Tags

3D embossing folder alcohol markers better press birthday birthday card blog hop card kit christmas christmas card christmas tag colored pencil copic copic coloring Daniel Smith die cutting embossing folder embroidery felt giveaway holiday holiday card hot foil ink blending karin brushmarker pro layered stencil masculine my monthly hero new release no line coloring no line watercolor OLO marker olo markers original illustration pawsitively saturated rainbow shaker card slimline stamping stamptember stencil thank you thinking of you valentine's day video watercolor

Popular Posts

Simon Says Stamp Sending Cheer Blog Hop- Day 2 + Freebie + Giveaway!
Joyful Snowman with New Simon Says Stamp Sending Cheer Release!
Simon Says Stamp Sending Cheer Release: Now Available!
February 2018 My Monthly Hero Blog Hop!
Altenew March 2020 Release Blog Hop+Giveaway!
Special Release: Simon Says Stamp Limited Edition STAMPtember Christmas Card Kit!
Simon Says Stamp Cozy & Bright Inspiration, Part Two!
Waffleflower December Release Blog Hop!
Altenew Build A Flower Japanese Mum Blog Hop!
Essentials By Ellen September Blog Hop!

Disclosure

Some affiliate links are used in my posts. This means that, should you click on one of my links and purchase something from that company, I will receive a small portion of the sale at no extra cost to you. I use the money earned from these sales to help maintain my blog. I so appreciate you visiting and, if you do choose to use one of my affiliate links, thank you so much for your support!
Copyright © 2026 ·Brunch Pro Theme · Genesis Framework by StudioPress · WordPress · Log in
Loading Comments...