• Skip to main content
  • Skip to primary sidebar
  • Skip to secondary sidebar

Sixth Street Sundries

Emily Midgett

  • Home
  • About Me
  • Contact
  • OLO Marker Color Swatch Chart
  • Shop

in the meadow

Simon Says Stamp STAMPtember Collaboration: Concord & 9th!

September 16, 2024

Hi friends! Simon Says Stamp’s STAMPtember celebration is in full swing, and today we’re spotlighting the ultra-fabulous Concord and 9th! I have loved C9 almost since they arrived on the scene many years ago, and I have been diligently collecting items from their product lineup since that time. I am a lover of all things color-coordinated, and the luscious inks with their matching cardstocks are simply divine. I paired the new STAMPtember Friendly Florals set with some older and some newer products from the C9 product catalogue to create this trio of coordinating cards. Let’s get started with the details!

All of my cards today feature the vibrant Watermelon, Wildberry, Eucalyptus, and Juniper inks and cardstock to create a cohesive card set. I love creating sets in this way, each card with its own unique design but still held together by common color palettes or layouts. The stunning new Friendly Florals set features the sophisticated simplicity that we’ve come to expect from Concord and 9th, and so it paired beautifully with many of their older products, as well! I have linked all of the products that I’ve used on today’s projects down at the bottom of my post.

For my first project, I put the beautiful wreath image from the new Friendly Florals set to use with some clear embossing powder to create this colorful background! I stamped the layers of the wreath using Watermelon and Juniper inks, taking advantage of the MISTI by also stamping directly over the top with sticky embossing ink and adding clear embossing powder over the top. Once I had melted the embossing powder with my heat tool, I used a blending brush to lightly blend more Juniper ink over the top, creating a print shop effect with the super smooth and vibrant stamping on the colorful background! This is such a fun technique to apply with solid stamps.

For the greeting, I kept things very simple, die cutting the “thinking of you” sentiment from the In the Meadow die set, cutting the detail layer from Juniper cardstock and the shadow from vellum, adhering the two together with liquid adhesive and adding tiny bits of clear dimensional adhesive behind the solid die cuts and placing it in the center of my stamped and blended card front. Finally, I added a bit of sparkle with some coordinating gems in the center of the flowers!

For my second card, I took advantage of the standalone flower stamps included in the Friendly Florals set to create a custom patterned background. I used the “stamping off” technique to create a subtler color palette, still using the Watermelon and Juniper color scheme from the first card, this time adding a punch of pink with Wildberry ink. I stamped each image individually, starting with the largest flower and working my way down to the smaller images, each time stamping the full-strength inked image on a piece of scrap paper and then on my card front in order to create a softer background. After I had finished stamping the background, I blended a bit of Watermelon ink in the center to highlight my large sentiment from the Big On You stamps + die set. I had embossed the greeting onto vellum using Hero Arts’s Iridescent Green embossing powder, then die cut the sentiment with the coordinating dies. To accent the sentiment, I stamped several individual flowers and leaves from Friendly Florals with full-strength ink and fussy cut them (though you can do this much more quickly with the coordinating dies!) and tucked them around the sentiment with foam adhesive!

For my final project, I used the same color palette, this time creating a lush garden background using the coordinating colored cardstocks and the spectacular Primrose Garden dies. I die cut the images and layers from the Primrose Garden set using Juniper, Wildberry, Sage, Watermelon, Nectar, and Dragonfruit cardstocks, accenting the center of the flowers with some Flaming Orange glitter cardstock. I created a guide for my florals by die cutting only the stitched background die into an A2 Juniper cardstock panel, then began adhering the different die cuts with liquid and foam adhesive in different heights to create an insane amount of dimension. For the greeting, I heat embossed a sentiment from Friendly Florals onto some Watermelon cardstock using white embossing powder, then used my sharp scissors to fussy cut it (again, the dies would be so much quicker!) and tucked it amongst the vibrant florals, finally accenting the greeting with a bit of texture from a twine bow!

Well, that’s all for my projects today! Don’t wait too long on this one…. The limited edition STAMPtember collaboration sets go super fast, and I’m sure Friendly Florals will be no different! And for your convenience, there are several different combinations with the stamps and dies to purchase the set that makes the most sense for you… you can purchase with all of the dies, just the sentiments, just the florals, or even no dies at all if you like to fussy cut! So simple!

And, to sweeten the deal, follow the instructions below to get FREE SHIPPING!

Thanks so much for stopping by today, and happy STAMPtember!
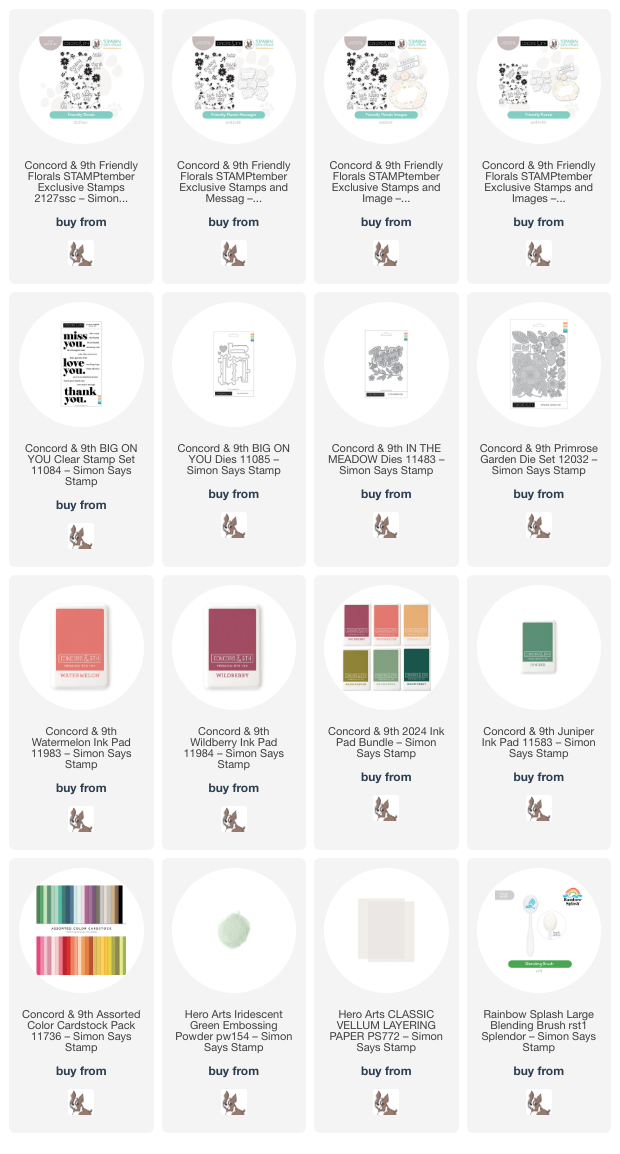
Filed Under: Concord and 9th, simon says stamp Tagged With: big on you, coordinating card set, die cutting, friendly florals, in the meadow, ink blending, primrose garden, stamptember

Concord and 9th-For the Record, Greatest Hits, and Little Crate *plus* a Giveaway!!

March 17, 2023

Hi friends! I am back with my last post as a guest for Concord and 9th. I had such a wonderful time playing with these beautiful, clever new products from the March Release, and I’m so grateful to have been asked to be a guest for March. Now, settle in, because this is a long post. I have several projects to share using the new For the Record, Greatest Hits, and Little Crate bundles! Let’s get started with the details.

For my first project, I took to Pinterest to get some inspiration on how to use the new For the Record stamp and die bundle. This set features a record background turnabout, which is stamped in multiple steps so that you can get a variety of colors on your background! I stamped the background using Aqua Sky, Ballet Slipper, and Mushroom inks. I love this color combo; it totally gives me 50’s soda shoppe vibes!

I saw a photo on Pinterest of a room with an entire wall of vinyl records that had been decorated with silk flowers and thought that it was a perfect mashup of the new For the Record and my first love: flowers! I am unabashedly feminine in my cardmaking, and I will add flowers or pink if at all possible, ha. I die cut lots of the little posies from the Flower Shoppe companion die set using Ballet Slipper cardstock, adding some teeny little leaves cut from Aqua Sky cardstock.

For the greeting portion of the card, I die cut the “record” die from the For the Record die set from some more Ballet Slipper cardstock, and lightly blended some Ballet Slipper ink towards the top of the die cut to create a pale pink ombré sentiment die cut. I backed it with a Mushroom cardstock outline, creating lots of contrast for the pale pink letters. I die cut the “for the” from some more Mushroom cardstock, backing it with some white cardstock to help the sentiment stand out, then heat embossed a greeting from the For the Record stamp set on a small rectangle of Mushroom cardstock. I arranged all of the sentiment pieces on a vellum oval die cut (included in the For the Record die set) to give them a bit more of a neutral ground from the busy patterned card front. I accented the sentiment with some pale pink flowers from the In the Meadow die set. A girly take on this For the Record bundle, to be sure!

For my second card, I created a sentiment collage using lots of bright colors and the new Greatest Hits Bundle! I started by created my color blocked background. I trimmed some strips of Honeysuckle, Marmalade, and Oceanside colored cardstock, as well as a couple of thinner strips of white glitter cardstock. Using some scrap white cardstock, I adhered all of the pieces together to create one panel, then popped the strips up in the center of my white A2 card base.

With my background complete, I turned my attention to the sentiment. So many fun sentiments in fabulous fonts and shapes=sentiment collage! I selected all of the sentiments that would work nicely together, then stamped them on more white cardstock using Honeysuckle, Marmalade, and Oceanside inks. I die cut them all using the coordinating dies, though I did fussy cut the You Rock sentiment, as there wasn’t any coordinating die for that particular sentiment. I popped all of the sentiments up on the striped card base using foam adhesive. I die cut several of the little stars included in the coordinating die set from some silver holographic cardstock and scattered them across the stripes for an added element of shine!

My final project for this month’s guest spot features the darling new Little Crate die set. This was designed to work perfectly with the pocket die from the Greatest Hits dies to create a milk crate full of vinyl records (how darn creative is that, right?) but…. you know I had to put my own girly spin on it. I thought the crate would be the perfect holder for an array of miniature cards. I created an homage to aqua, using only the Peacock, Oceanside, and Aqua Sky product bundles, accented with crisp white. The crate itself was crazy easy to assemble; you die cut the large die twice and layer them together perpendicular to each other. The dies also cut the strips for the top and bottom. These are used to add extra sturdiness to the crate as well as some extra dimension and texture. You could even cut these in different colors if you wanted to get fancy! I added a few flowers, die cut tag, and some crisp white twine to the front of the crate to zhuzh it up.

I created three little envelope pockets using the Greatest Hits dies, cutting and assembling an aqua ombré trio of pockets. These were so intuitive and easy to assemble; I do recommend using super strong double sided tape to create a very secure pocket. I used the Woven Stripes stamp with the coordinating ink shades to add a little texture to the fronts of each of the pockets, lightly ink blending around the edges of each pocket with the same coordinating ink shade to give it a bit of a vintage, distressed feel. I adhered a white “for you” die cut to the front of each pocket, as well, cut using the sentiment die from the Little Crate die set.

I created a trio of miniature cards by folding three A2 card fronts in half. These fit perfectly inside of the little pockets, and gave the tiniest, sweetest canvas on which to decorate with my favorite C9 products that I’ve been saving for a rainy day! On the Aqua Sky card, I embellished it with an Oceanside Plaid Card Front-Thin die cut, adding a sentiment from Greatest Hits Bundle embossed in white on vellum. I accented it with a few flowers from the Delicate Blossoms die set. I created an Oceanside version, again using the Delicate Blossoms die set and the three different shades of aqua cardstock. The final mini-card uses such a fun technique, one which I will probably create a full sized project and do a post on by itself because I loved it so much. I stamped the base layers of the Painted Peony stamps on Peacock cardstock using white pigment ink, which acted as a barrier for the subsequent layers of colorful ink to keep it from sinking into the deep teal cardstock. I added a die cut greeting from the Greatest Hits dies, backing it with some white cardstock to make it pop.

These little mini-cards are the perfect size to hold a gift card. Wouldn’t a little crate of these cards and envelopes, wrapped in a little cellophane bag and tied with some pretty twine, make a lovely gift?

Now, to celebrate the new March Release, Concord & 9th is providing each guest with a $25 gift card to give away! All you need to do to enter is be a blog follower and leave a comment on this post telling me which of the new products from the March Release were your favorite. I will select a winner on Monday, 3/20, and then Concord & 9th will email you the gift card.

Thanks so much for stopping by today, and thank you tons and tons to the folks at Concord & 9th for asking me to be your guest this month! It was my pleasure to work with these marvelous products. Have a marvelous day, friends!

Filed Under: Concord and 9th Tagged With: delicate blossoms, flower shoppe, for the record, greatest hits, in the meadow, little crate, painted peony, plaid card front, woven stripes

Primary Sidebar

  • Facebook
  • Instagram
  • Pinterest
  • YouTube

Favorite Shops

Secondary Sidebar

Subscribe

Enter your email address to subscribe to this blog and receive notifications of new posts by email.

Instagram
Something is wrong.
Instagram token error.
Follow
Load More

Archives

Tags

3D embossing folder alcohol markers better press birthday birthday card blog hop card kit christmas christmas card christmas tag colored pencil copic copic coloring Daniel Smith die cutting embossing folder embroidery felt giveaway holiday holiday card hot foil ink blending karin brushmarker pro layered stencil masculine my monthly hero new release no line coloring no line watercolor OLO marker olo markers original illustration pawsitively saturated rainbow shaker card slimline stamping stamptember stencil thank you thinking of you valentine's day video watercolor

Popular Posts

Simon Says Stamp Sending Cheer Blog Hop- Day 2 + Freebie + Giveaway!
Altenew October 2026 Release Blog Hop + Giveaway!
Simon Says Stamp Sending Cheer Release: Now Available!
Simon Says Stamp October 2026 Card Kit of the Month: Homespun Gratitude!
A Double Leftovers Card Set with New Simon Says Stamp Stencils and Dies!
Joyful Snowman with New Simon Says Stamp Sending Cheer Release!
Simon Says Stamp November 2025 Card Kit: Give Thanks!
Hero Arts Partners Blog Hop: Lawn Fawn!
Altenew Standalone Die Blog Hop+Giveaway!
March 2020 My Monthly Hero Blog Hop+Giveaway!

Disclosure

Some affiliate links are used in my posts. This means that, should you click on one of my links and purchase something from that company, I will receive a small portion of the sale at no extra cost to you. I use the money earned from these sales to help maintain my blog. I so appreciate you visiting and, if you do choose to use one of my affiliate links, thank you so much for your support!
Copyright © 2026 ·Brunch Pro Theme · Genesis Framework by StudioPress · WordPress · Log in
Loading Comments...