• Skip to main content
  • Skip to primary sidebar
  • Skip to secondary sidebar

Sixth Street Sundries

Emily Midgett

  • Home
  • About Me
  • Contact
  • OLO Marker Color Swatch Chart
  • Shop

karin brushmarker pro

Simon Says Stamp STAMPtember Collaboration: Honey Bee Stamps!

September 7, 2024

Hi friends! I am here with my first project using one of the incredible, limited edition STAMPtember Collaboration sets! Nearly every day throughout the month of September, Simon Says Stamp releases a stamp set created in collaboration with a different crafting company. This provides an opportunity for you all to get to know these incredible small businesses that help make our stamping dreams a reality with their innovative products and gorgeous designs! (You can check out all of the collaboration sets that have been released already HERE.) Today’s spotlight is on Honey Bee Stamps, a company very near and dear to my heart. Melissa, the owner, is a dear friend of mine, and Honey Bee Stamps was the first company to turn my artwork into clear stamps. I will be forever grateful to her for taking a chance on my illustrations, turning my flowery doodling into stamps. I was lucky enough to be on the Honey Bee Stamps design team for quite a while; working with Melissa’s beautiful designs is truly effortless!

I have a trio of flaming orange projects to share with you today, two using the new Honey Bee Stamps STAMPtember collaboration stamp set and another project pairing some older dies from Honey Bee Stamps and Simon Says Stamp that I’ve had waiting for the perfect project. Let’s get started with the details!

I am really leaning in to orange lately, finding that when I pair a bright sunny yellow-orange with an intense burnt orange, it creates the prettiest and most elegant orange combination. For my projects today, I turned to my stash of orange cardstock scraps and selected a few different colors that were not the typical pumpkin orange, but just a degree or two lighter or darker. After I had my main color palette in mind, I stamped all of the beautiful pumpkin images from the Honey Bee Stamps STAMPtember set called Sending Autumn Blessings. I stamped them first with black pigment ink onto some Arches hot press watercolor paper, then added some beautiful Iridescent Gold embossing powder over the top, the combination of which created the shiniest, most shimmering shade of bronze.

I used Karin Brushmarker Pro watercolor markers to watercolor all of the pumpkins, keeping the color palette a bit more towards the sunrise yellow and burnt orange rather than traditional pumpkin orange. With Karin markers, I like to scribble the color onto my glass mat or ceramic palette, then pick the color up with my damp paintbrush. This gives me more control over the intensity of the color, as well as providing me with a bit better movement on the watercolor paper itself. Once I had finished watercoloring, I used my sharp scissors (you could use the coordinating dies, but I didn’t receive them in time) to fussy cut all of the images. I used a coordinating deep orange alcohol marker to color in the edge of the die cuts to keep my overall color palette as loyal as possible to the vision in my head.

To create the background for my pumpkins, I die cut a few of the gorgeously detailed dies from Honey Bee Stamp’s Fancy Fall Layering Dies set, cutting the largest two frames from two different shades of orange cardstock that coordinated nicely with the watercolored pumpkins, lightly blending some Paprika Pawsitively Saturated Ink around the edges of the smaller frame. I also die cut the included banner die from some gold pearl vellum. To create the sentiment, I used the banner as a guide to curve the “truly thankful for you” greeting so that it would follow the arch of the banner nicely. I used the same black pigment ink and Iridescent Gold embossing powder combination to stamp the sentiment onto some more burnt orange cardstock, then used my scissors to fussy cut the sentiment. I popped the layers up using foam adhesive squares, finally adding a twine bow and a few orange gems for added sparkle!

I did end up with a leftover watercolored pumpkin cluster, so I decided to make a cute little tag using the Simon Says Stamp Label Tag Dies. I die cut the tag from some more burnt orange cardstock, then blended more Paprika ink around the edges to add extra dimension. I popped up the pumpkins on the tag with some foam adhesive, then added another embossed sentiment strip directly over the top. Finally, I finished off the tag with a twine bow and loop as well as a few more deep orange adhesive gems.

My last project is showcases some dies from Honey Bee Stamps that I’ve had in my stash for awhile but have never had an opportunity to use. I bought the Honey Bee Stamps Lovely Layers Autumn Bouquet last year; I find the entire Lovely Layers die collection absolutely wonderful, and I adore how nearly all of the different die sets work together so nicely in terms of scale. One of the nice things about the owner being a cardmaker herself is that she understands how important proportions are for cardmaking, and Melissa does a top notch job designing her stamps and dies!

To start, I used the leftovers of those same shades of orange cardstock that I used for the first projects, adding in some brushed copper foil cardstock for added texture and shine. I die cut multiples of several of the designs in the Lovely Layers Autumn Bouquet set in multiple colors so that I could arrange a harvest bouquet! I also die cut the largest frame image from the beautiful Decorative Star Layering Frames from some orange cardstock, adding to the drama and vibrancy by blending some more Paprika ink around the edges. I find that ink blending over the top of die cuts that have debossed details on them, as these frames do, helps to enhance those beautiful details and make them pop a bit more. I popped up the blended frame die cut on an A2 panel of Flaming Orange glitter cardstock, adding a sparkling edge around the blended frame!

Before I began arranging the foliage die cuts, I die cut the detail layer of the new Simon Says Stamp Fancy Just Because from some more of the burnt orange cardstock and the shadow layer from some more gold pearl vellum. I layered the die cuts together using liquid adhesive and decided to enhance the sentiment with a foiled greeting from the new Sentiment Strips Reverse Just Because, to which I had used my Minc machine to add Simon Says Stamp DecoFoil Orange toner foil. I popped up the sentiment in the center of the card with some more foam squares, then arranged the foliage in a bouquet around the sentiment, popping some up with foam adhesive and adding some with liquid adhesive to create multiple levels of height and dimension. Finally, I added a few sparkling gems as a final touch of shimmer!

Well, that’s all for my projects today! These STAMPtember collaboration sets are limited edition and usually sell out very quickly, so if you’re on the fence, don’t wait too long! To sweeten the deal and make it even easier for you to shop, Heidi at Simon Says Stamp has offered free shipping for purchases over $25 for a limited time!!

Don’t let this set get away from you! Not only are the pumpkin illustrations absolutely luscious, the sentiments included in the set are beautiful and so useful for cards beyond the autumnal season. Thanks so much for stopping by today, and have a marvelous day!


Filed Under: Honey Bee Stamps, simon says stamp Tagged With: autumn bouquet, collaboration, fancy just because, karin brushmarker pro, karin watercolor markers, label tags, lovely layer, minc, reverse just because sentiment strips, stamptember, star layering frames, watercolor

April Showers Bring May Flowers: Celebrate Rose Corner Edition!

May 13, 2024

This post was sponsored by Simon Says Stamp. Thanks, Simon!

Hi friends! After a whirlwind of fun teaching at a Simon Says Stamp booth at CREATE, I am back home and trying to get back into the swing of things at a little bit less frantic pace. (I spent several days prior energetically prepping to be gone from my family for four days) I meant to blog this project while I was gone, but I had too much fun teaching and was exhausted by the end of the days, so there’s been a bit of a lull here on my blog as a result. But I’m back with some fun inspiration for my April Showers Bring May Flowers series, this time using my Celebrate Rose Corner illustration for Simon Says Stamp. This was one of my first illustrations for Simon Says Stamp, and it’s still one of my favorites! It’s such fun to play with older supplies using different mediums and color palettes. I chose to use a soft peach melba color combination for today’s project. Let’s get started with the details!

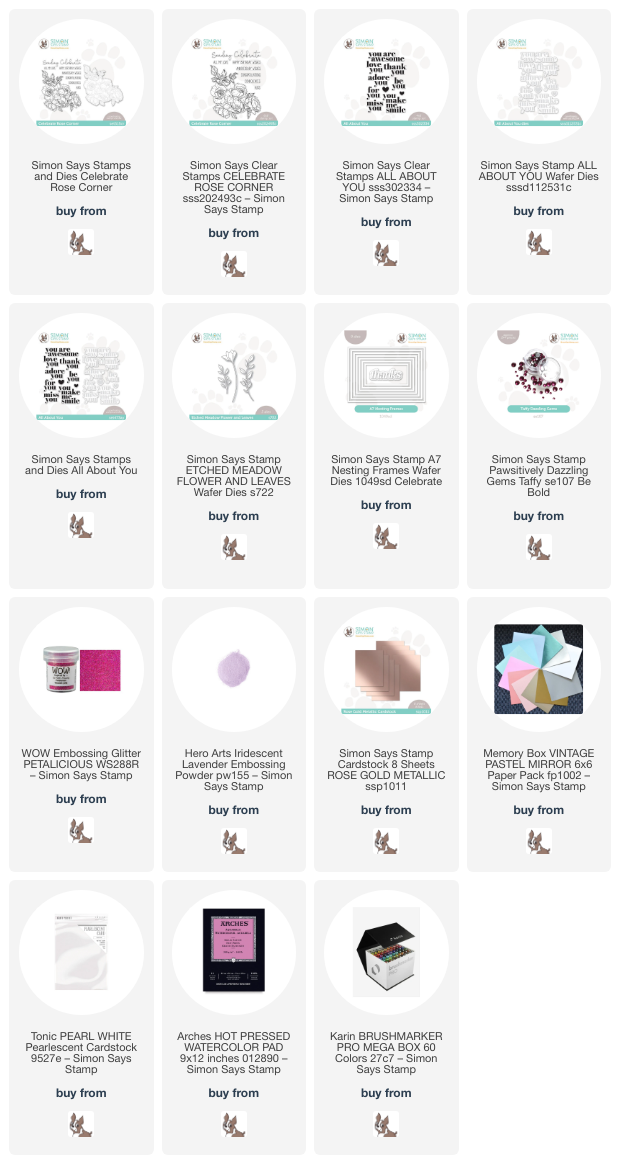
To begin my project, I stamped the large Celebrate Rose Corner stamp on an A7 panel of Arches Hot Press watercolor paper, then heat embossed the image with Hero Arts’s Iridescent Lavender embossing powder. This embossing powder is gorgeous and creates a subtle iridescent sheen on your embossed image. It looks marvelous on both colored cardstock and white cardstock alike. I like to use white or clear embossing powder when I want to create a semi-no-line-coloring look. The white lines are a bit softer than the stark black lines created with typical stamping. However, because of these white lines on the white paper, I do like to start watercoloring the background first so that I have a better visual on where the flowers are located.

To begin my watercoloring, I taped my panel down to my watercolor board to reduce warping, then used Karin Brushmarker Pro markers to add soft peach and pink around the edges of my embossed image. To create that dreamy watercolor look, I scribble the color on my glass craft mat, then dilute the color with lots of water. I add lots of layers of color, allowing each layer to dry between applications, which helps create the subtle layers of color. I used the same colors for the roses to create these pretty peachy roses, paying extra attention to the shadowed areas. Once I had finished adding color to the image, I allowed it to dry completely before beginning to assemble my card front.

After allowing my watercolor panel to dry completely, I die cut a frame using the A7 Nesting Frame Dies and Rose Gold Metallic foil cardstock from Simon Says Stamp. The soft rosy foil cardstock complements the peach and pink tones in the watercolored image. I trimmed the watercolored panel down to 4″ x 6″, then selected a coordinating frame and adhered it to the watercolor panel using liquid adhesive. I added the framed watercolored panel to a full size A7 panel of pearlescent white cardstock, creating a shimmery white mat around the edge. I heat embossed a sentiment from All About You onto some heavyweight vellum using pink glitter embossing powder, then die cut the sentiment with the coordinating die. To add a little extra interest to the sentiment, I die cut some foliage from the Etched Meadow Flower and Leaves using pale pink brushed foil cardstock. I nestled the foliage behind the sentiment, then added some Taffy Pawsitively Dazzling Gems for extra sparkle!

Well, that’s all for my project today. Thank you so much for stopping by, and have a marvelous day!

Filed Under: simon says stamp Tagged With: A7 card, A7 nesting frames, all about you, celebrate rose corner, etched meadow flower and leaves, karin brushmarker pro, watercolor

Monochromatic Toile Watercolor!

March 5, 2024

This post was sponsored by Simon Says Stamp. Thanks, Simon!

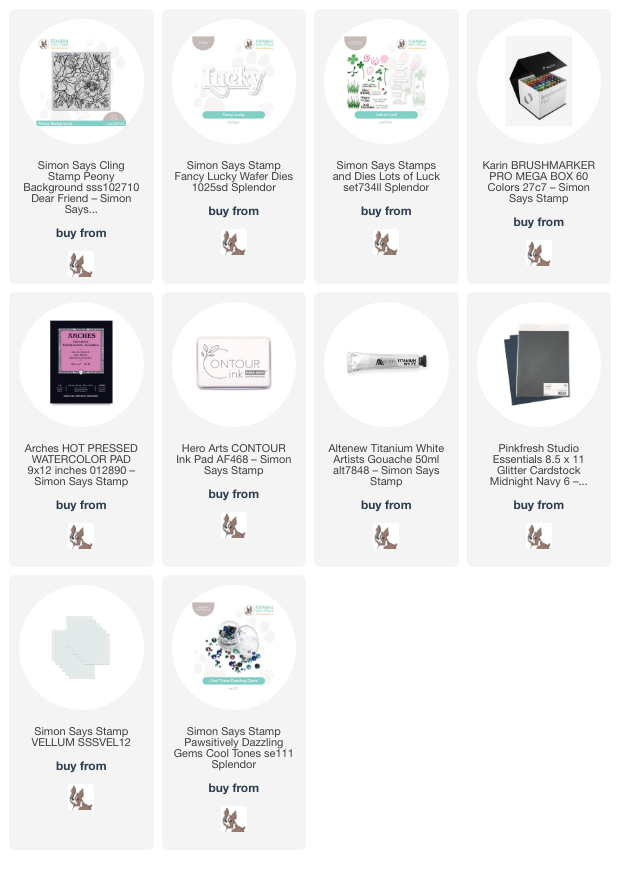
Hi friends! It’s getting warmer out, and so my brain has switched into flower mode. Be prepared for lots of flowers over the next few weeks! I have always loved monochromatic patterns. My wedding colors were selected because of my love of blue and white Delft china and toile, and so I wanted to channel that with my project today! I used my huge Peony Background, which is one of my older illustrations but still definitely a favorite! I love the idea of monochromatic neutral paintings, but I wanted to try my hand at creating my own version of toile using my super detailed Peony Background stamp and just a few painting supplies. Let’s get started with the details!

I started my project by stamping the Peony Background onto some Arches Hot Press watercolor paper using Contour Ink. I selected two different shades of blue Karin Brushmarker Pro markers, one dark and one medium. I like to use hot press watercolor paper when working with Karin markers; I find that the smooth surface of the hot press allows the color to move nicely. I taped my stamped panel down to my watercolor board and began the watercoloring process!

One of my favorite things about watercolor is the ability to stretch the colors by changing the water to pigment ratio. The more water you add, the more diluted your color will be, allowing you to create a wide color gradient with each shade. I have found that, for at least the first layer of color with your Karin Brushmarker Pro markers, you will achieve better results if you scribble the color out onto your glass mat or watercolor palette and pick up the color using your damp paintbrush. This allows you to control the vividness of the color being laid down on the watercolor paper. I have found that if you put the marker directly to the paper for the first layer, it sometimes is reluctant to move with your damp paintbrush. I have no idea if there is any scientific reason behind this or if it is just my painting style, but it seems that once you have that initial layer of diluted color laid down, the paper is almost “primed” and the color will move even more easily for you!

Because the first layer of color is diluted with water when I pick up the color from my palette, the color is less intense. For the second layer of color, I want to increase the intensity and the shading, so I put the marker directly to the paper in just the areas that I want to be really shadowed. Using both of these methods allows me to expand that color gradient, keeping some of the white highlights with the diluted color and creating deep shadows with the undiluted color.

After I had finished using my blue watercolors, I used some Artistry by Altenew White Artists’ Gouache to clean up the edges of some of the petals. I squeezed a small amount of the white gouache out onto my glass mat, then wet my brush fairly well and picked up some of the gouache. Using a careful hand, I ran the crisp tip of my paintbrush along the edge of each petal, cleaned my brush, and then pulled the edges of that gouache out so that it faded seamlessly into the blue. The opaque gouache covers up any messy spots or untidy edges, while the medium’s ability to move with water makes it super simple to use.

Once I had finished my painting (I fussed with this for far longer than I should have… no-line watercoloring stirs up my need for perfection!!), I wanted to keep the rest of the card simple, so I die cut the new Fancy Lucky die from Simon Says Stamp’s Splendor Release using Midnight Navy glitter paper for the detail layer and Simon Says Stamp vellum for the shadow layer. I also white embossed and die cut a greeting from Lots of Luck onto some navy blue cardstock. Before adding my sentiments, I trimmed 1/4″ off of the long sides of my watercolor panel and added some strips of Midnight Navy glitter paper peeking out from each side. I popped up the greeting pieces using some foam adhesive, then added a few coordinating Pawsitively Dazzling blue gems for even more sparkle!

Well, that’s all for my project today. I adore how this monochromatic “toile” card came out. I think it was totally worth the time spent fussing on the details! Thanks so much for stopping by today, and have a marvelous day!

Filed Under: simon says stamp Tagged With: fancy lucky, karin brushmarker pro, lots of luck, no line watercolor, original illustration, peony background, watercolor

Video: Unexpected Holiday Anemones with Pinkfresh Studio!

November 17, 2023

Hi friends! I am over on the Pinkfresh Studio YouTube channel today with this vibrant holiday card featuring the gorgeous new Nothing But the Best stamps + dies and Karin Brushmarker Pro watercolor markers.

Watch the video below or HERE on YouTube.

In case you can’t watch the video, here are some of the highlights:

I started by heat embossing the Nothing But the Best stamp onto some Fabriano Artistico cold press watercolor paper using silver embossing powder. I taped the panel down to my watercolor board, then used Karin Brushmarker Pro markers in jewel-toned shades of red and green to create a stunning holiday floral arrangement. A friend of mine had deep red anemones with black centers for her bridal bouquet, and since then I’ve adored the idea of these intense flowers as an addition to a holiday bouquet! After watercoloring, I die cut the image with the coordinating die.

To add some texture behind the watercolored floral arrangement, I ran an A2 panel of plain white cardstock through my die cut machine using the Diagonal Stitched Plaid cover plate. This die adds a hint of texture and pattern to the background, and I think that plaid is the quintessential holiday pattern, don’t you? I also die cut a vellum tag from the Shaker Tag Book die and a black glitter bow from the Wrap Around Elements die set to accent the hot foiled “peace and joy” sentiment (from what I now realize is a discontinued set- but a heat embossed greeting from the Holiday Large Sentiments Stamps + Coordinating Dies product suite would be a good replacement!)

After fiddling with my die cuts to decide the best arrangement, I decided to be brave and chop my watercolored flower bouquet in half so that I could create a visual cascade running down the front of my card. Before adhering the two floral die cut pieces, I adhered a glittering Ornate Rectangle Frame die cut with some foam adhesive, then added my remaining die cuts with some more foam adhesive, hiding the foam tape behind the solid die cut adhered to the vellum tag. The final touch was a few Matte Silver Pearls to add one more element of silver to my card front!

Well, that’s all for my project today. I love using unexpected combinations to create unique holiday cards. Thanks so much for stopping by today, and have a marvelous day!
Filed Under: pinkfresh studio Tagged With: christmas card, diagonal stitched plaid, holiday card, holiday large sentiments, karin brushmarker pro, nothing but the best, ornate rectangle frame, shaker tag book, watercolor, wrap around elements

Alex Syberia Designs One-Year Anniversary Release Blog Hop | Giveaway | Over £800 ($1000) in prizes

September 7, 2023

Hi friends! Today, I am ever so excited to be joining a blog hop to celebrate one year of fabulousness from Alex Syberia Designs!! You should have arrived here from Raquel, and your next stop is Erin. You can also find the full hop list over on the Alex Syberia Designs Blog Post. To celebrate this impressive achievement, tons of your favorite companies are joining in on the fun and have sponsored marvelous giveaways. Read all the way to the bottom to find out how you can be one of the winners of these fabulous prizes!

I have a thing for birthday cards. I love to go all out on them and make them crazy festive, with tons of layers, sparkles, textures… the sky is the limit! I think going all out on the birthday card makes the recipient feel extra loved, and who wouldn’t want that? Balloons with flowers are certainly having a moment on my blog (remember this project??), and I fell in love with these beautiful, sketchy floral clusters from the Floral Balloon Extravaganza Stamps (ASD | SSS) and Dies (ASD | SSS), so much so that I created two different cards using two different techniques using these gorgeous balloons! Let’s get started with the details.

For my first project, I wanted to create some transparent balloons to make them look as life-like as possible by adding color with some light ink blending. I also wanted to test out my Karin Decobrush Pigment Markers on vellum to create the opaque flowers! I am absolutely in love with this technique and can’t wait to play with it some more.

I started by heat embossing the different balloons included in the Floral Balloon Extravaganza Stamps (ASD | SSS) set using gold embossing powder on some lighter weight vellum paper. I then die cut the individual images with the Coordinating Dies (ASD | SSS). Once I had each of the individual components ready, I flipped them over and began using the opaque Karin Decobrush Pigment Markers on the flowers only. Adding this opaque color on the back of the die cuts allows the details of the embossing to still be visible from the front. Because the floral images are on the small side, you don’t need to worry much about adding details and shading, because the embossed details on the front do the work for you. The opaque paint is solely adding color to the image, as well as a sneaky place to hide your adhesive!

After the paint had dried, keeping the balloons with the embossing face down on my work surface, I used a blending brush to blend Cheeky and Blush Pawsitively Saturated Inks. The semi-transparent vellum combined with the water-based dye ink allows the ink to simply dye the vellum without compromising the transparency! I think the balloons look positively weightless and so unique. It’s such a fun technique! I also heat embossed some balloon strings on some more vellum to allow them to “float” on my card front, as well.

For the background, I die cut a slimline panel of white cardstock using the new Slimline Nested Stitched Die (ASD | SSS). I then used the same Cheeky and Blush Pawsitively Saturated Inks with the super festive and fun new Carnival Party Stencil + Die (ASD | SSS) set from the Alex Syberia Birthday Release. I blended the two part streamer stencils on the top of my die cut panel, then lightly blended the Cheeky ink around the upper edges of the panel. I splattered the entire piece with some super sparkly gold watercolors, as well.

For the greeting, I hot foiled the sentiment strips using the new Celebrations Sentiments Hot Foil Plate (ASD | SSS) onto some white cardstock using shining gold foil, then die cut the sentiments with the Thin Stripes Cover Die (ASD | SSS). (I have a bunch of birthday sentiments ready to go-love these one-and-done hot foil plate and die sets!) I also die cut the “wish” portion of the Birthday & Wish Die Set (ASD | SSS) from some super shiny gold mirror cardstock. I arranged the balloons on my blended card front, hiding the clear dimensional adhesive behind the opaque floral bouquets, then added my sentiment pieces. The final touch was to add a few shimmering gems to this super festive card front! I love that you can still see the streamers through the balloons. So much fun!

My second card is a bit more traditional. I heat embossed the balloons and the gorgeous floral bouquet from the Floral Balloon Extravaganza Stamps (ASD | SSS) set on some watercolor paper using pale rose gold embossing powder. I then added lots of beautiful pink, peach, and jade watercolor to the images using my Karin Brushmarker Pro watercolor markers. I glazed the finished pink balloons with some super shimmery, handmade glitter watercolors from Etsy, as well. Birthday cards, especially super feminine pink floral birthday cards, need as much sparkle as you can pack on, in my opinion!

For the background, I cut down an A2 panel of Dragonfruit cardstock from Concord and 9th and blended it with the coordinating Dragonfruit Ink around the edges of the card front. I splattered some more rose gold metallic watercolor on the background to add extra interest and shimmer to the background.

For the greeting, I heat embossed one of the beautiful scripty sentiments included in the Floral Balloon Extravaganza Stamps (ASD | SSS) set using the pale rose gold embossing powder. I used the coordinating dies (notice the sentiment dies for each individual sentiment, including the tiny sentiment strips! Now that is some attention to detail! Well done, Alex!) to die cut the sentiments. I then arranged the floral bouquet and balloons on my blended, splattered card front using foam adhesive for extra dimension. I heat embossed some more balloon strings on vellum so that they were as floaty and ethereal as possible, then added them to the card front with tiny dots of liquid adhesive. I added the greeting pieces using more foam tape, finally finishing the card off with some sparkly gems!

Well, that’s all for my projects today! Now for the fun giveaway information I promised at the beginning of the post:

To celebrate their birthday, Alex Syberia Designs has collaborated with a ton of wonderful sponsors to give away a grand total of £800 ($1000) in prizes!

Alex Syberia Designs: 5x £40 ($50) Gift Cards

Altenew : $50 Gift Card
Auzz Trinklets n crafts : $30AUD Gift Card
Crafty Purple Frog: £25 Gift Card
Dies to Die For : £25 Gift Card
Doeading : 50€ Gift Card (only for EU)
Gina K  : $100 Gift Card
Glitter and ink : $50 CAD Gift Card (only for Canada)
Jennifer McGuire Ink : 1 Share Handmade Kindness goodies bag -$75value
Kit & Clowder : $15 Gift Card
Mennys Bastelshop : 2x 20€ Gift Cards (EU)
Online Card Classes : 3 x free spots to any classes
Paper & i : $25 Gift Card (only for USA)
Pear Blossom press : $25 Gift Card
Scrap Shotz : $25 CAD Gift Card (only for Canada)
Seize the Stamp : 2x CHF 25 Gift Cards
Simon Says Stamp : $100 Gift Card
SCT Magazine : $50 Gift Card
The Glitter Hubb : $25 CAD Gift Card
WOW Embossing : 2x $25 Gift Cards

Be sure to leave comments by midnight BST (London, UK time) on September 17th, 2023, for a chance to win!

Start your comment by telling us where you’re from (USA, Canada, Europe, or Australia) and what your favorite product is from this September Anniversary release.

All the winners will be chosen at random from the comments left on any of the posts in the blog hop, upcoming YouTube hop, and the three upcoming Instagram hops. Winners will be announced on the Alex Syberia Designs GIVEAWAY WINNERS PAGE on September 18th, 2023.

Make sure to come back and check if you are a winner! Prizes not claimed within two weeks will be forfeited.

To increase your chances of winning, be sure to comment on this blog hop, the upcoming Anniversary Video Hop that starts on the 9th of Sep on Alex Syberia Designs YT Channel, and the three consecutive Instagram Hops on Alex Syberia Designs  Instagram starting on the 11th of September.

Thanks so much for stopping by today, friends, and happy anniversary to Alex Syberia Designs! May this be the first of many years of success!

Filed Under: alex syberia designs Tagged With: balloons, birthday, celebrations sentiments, floral balloon extravaganza, karin brushmarker pro, karin decobrush pigment, slimline, thin stripes, vellum

  • « Go to Previous Page
  • Page 1
  • Page 2
  • Page 3
  • Page 4
  • Interim pages omitted …
  • Page 6
  • Go to Next Page »

Primary Sidebar

  • Facebook
  • Instagram
  • Pinterest
  • YouTube

Favorite Shops

Secondary Sidebar

Subscribe

Enter your email address to subscribe to this blog and receive notifications of new posts by email.

Instagram
Something is wrong.
Instagram token error.
Follow
Load More

Archives

Tags

3D embossing folder alcohol markers better press birthday birthday card blog hop card kit christmas christmas card christmas tag colored pencil copic copic coloring Daniel Smith die cutting embossing folder embroidery felt giveaway holiday holiday card hot foil ink blending karin brushmarker pro layered stencil masculine my monthly hero new release no line coloring no line watercolor OLO marker olo markers original illustration pawsitively saturated rainbow shaker card slimline stamping stamptember stencil thank you thinking of you valentine's day video watercolor

Popular Posts

Simon Says Stamp Joy For You Blog Hop- Day 1!
Simon Says Stamp Joy For You Release-Now Available!
Frozen Fractals All Around with New Simon Says Stamp Joy For You Release!
Shaped Holiday Shaker Card with New Simon Says Stamp Jolly Season Card Kit of the Month!
Holiday Postage with New Simon Says Stamp!
Simon Says Stamp Glory to the Newborn King Holiday Kit-Part II!
Holiday Joy in Pink and Green with New Simon Says Stamp DieCember!
Pinkfresh Studio 5th Birthday!
Altenew Build A Flower: Fuchsia Blog Hop+Giveway!
July My Monthly Hero Blog Hop+Giveaway!

Disclosure

Some affiliate links are used in my posts. This means that, should you click on one of my links and purchase something from that company, I will receive a small portion of the sale at no extra cost to you. I use the money earned from these sales to help maintain my blog. I so appreciate you visiting and, if you do choose to use one of my affiliate links, thank you so much for your support!
Copyright © 2026 ·Brunch Pro Theme · Genesis Framework by StudioPress · WordPress · Log in
Loading Comments...