• Skip to main content
  • Skip to primary sidebar
  • Skip to secondary sidebar

Sixth Street Sundries

Emily Midgett

  • Home
  • About Me
  • Contact
  • OLO Marker Color Swatch Chart
  • Shop

mother's day

Mother’s Day Love in Purple with New Simon Says Stamp!

March 30, 2026

This post was sponsored by Simon Says Stamp. Thanks, Simon! *I have gathered links to all of the products used at the bottom of the post for your convenience, using affiliate links at no extra cost to you. Thank you for shopping with my links! I truly appreciate your support for my work!*

Hi friends! I just spent a weekend with some of my favorite crafty friends, and I’m back feeling refreshed and with a new creative spring in my step! I have some Easter projects planned for this week, but I wanted to share this pretty-in-purple Mother’s Day card with you using lots of new goodies from the  Simon Says Stamp n My Heart release! (Click HERE to see the entire new release!) Embossing folders are one of my absolute favorite products to use; so many incredible techniques can be applied to the magnificent textures created with these inexpensive products. They truly give you such a great bang for your buck! I chose to add some pencil coloring to the new Blooming Wreath embossing folder, adding some extra interest by starting with a colored cardstock base. Let’s get started with the details on my project!

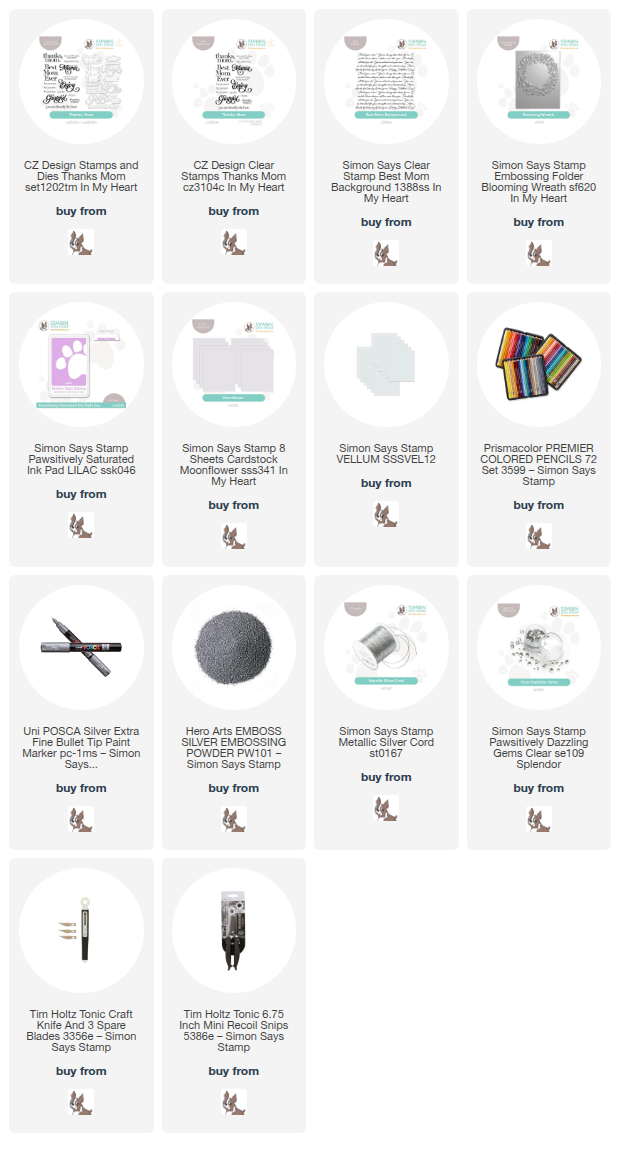
To begin my project, I ran a panel of the new Moonflower cardstock through my die cutting machine using the Blooming Wreath embossing folder. I then used my colored pencils and a silver paint pen to add lots of delicate details to the embossed flowers, adding different shades of purple and shimmering metallics to the intricate images that had been embossed into my cardstock. Starting with the pale lavender cardstock helps enhance the monochromatic aesthetic of my project! Once I had finished coloring all of the images, I used my sharp scissors to cut the finished wreath out, as well as using a sharp craft knife to cut out the center of my wreath. I backed the finished wreath with vellum, creating the perfect circlet upon which to arrange my greeting!

After I had completed the floral wreath, I stamped the new Best Mom Background onto a full size A2 panel of the Moonflower cardstock using Lilac Pawsitively Saturated Ink. I then adhered the finished wreath over the center of the stamped panel using foam adhesive. The vellum behind the wreath helps to soften the patterned background, allowing plenty of visual space for the eye to focus on the sentiment!

After I had mounted the wreath, I heat embossed two greetings from the new Thanks Mom stamp set onto more Moonflower cardstock using silver embossing powder. I used the coordinating dies to die cut the greetings and placed them in the center of my colored wreath, again using foam adhesive, adding a bit of extra height to the sentiment so that it was easily viewed by the recipient. I tied some silver cord around the entire card base, nestling the bow beneath the greeting, then adhered my card front to my A2 card base. Finally, I added some Clear Pawsitively Dazzling Gems for an additional touch of sparkle!

Well, that’s all for my project today! I hope you’re enjoying the springtime temperatures like we are… the sun is warm and bright today, and the flowers are a-blooming. Thanks so much for stopping by today, and have a marvelous day!
Filed Under: simon says stamp Tagged With: best mom background, blooming wreath, colored pencil, die cutting, embossing, embossing folder, monochromatic, mother's day, no line coloring, thanks mom

Going LIVE With Pinkfresh Studio!

May 6, 2025

Hi friends! Last week, I went live with my friends at Pinkfresh Studio to create a super girly, pink and purple, sparkling Mother’s Day card using a few of my favorite techniques with Press Plates. You can watch the whole video below or HERE on YouTube:

Here’s a close-up of the project that I made during the video!

Here are the supplies that I used during the live demonstration:

I also went live with Pinkfresh Studio earlier today, on May 6! I used some more fun techniques with Press Plates, ink blending, and lots of sparkle to create this color saturated, monochromatic homage to turquoise.

And here are the products used in today’s live:

These live demos are so much fun; it’s so enjoyable to be able to chat with you all and answer questions in real-time (or almost real-time, ha!). I am hoping to be able to do more lives starting in the fall when my little boys are starting kindergarten!

Reminder: each time Pinkfresh Studio has a live demonstration, they generously give away two $50 gift certificates to the people commenting during the lives, then give away another two $50 gift certificates for those who watch the replay and leave a comment! Be sure to leave your comments to enter to win, even if you’re watching the replay!

Thanks so much for stopping by today, and have a marvelous day!

Filed Under: pinkfresh studio Tagged With: better press, beyond happy, blanket stitched octagons, die cutting, grateful greenery, ink blending, jody lowercase alpha, magnificent magnolia, mother's day, thanks for being there

You are Loved for Mother’s Day with Simon Says Stamp

April 28, 2025

This post was sponsored by Simon Says Stamp. Thanks, Simon!

Hi friends! Mother’s Day is coming up quickly, so I have been working on some pretty projects using some new goodies from the Simon Says Stamp You Are My Favorite release to create this pretty-in-pink card, made extra special with some sparkling accents! Let’s get started with the details.

*I have gathered links to all of the products used at the bottom of the post for your convenience, using affiliate links. Thank you for shopping with my links! I truly appreciate your support for my work!*

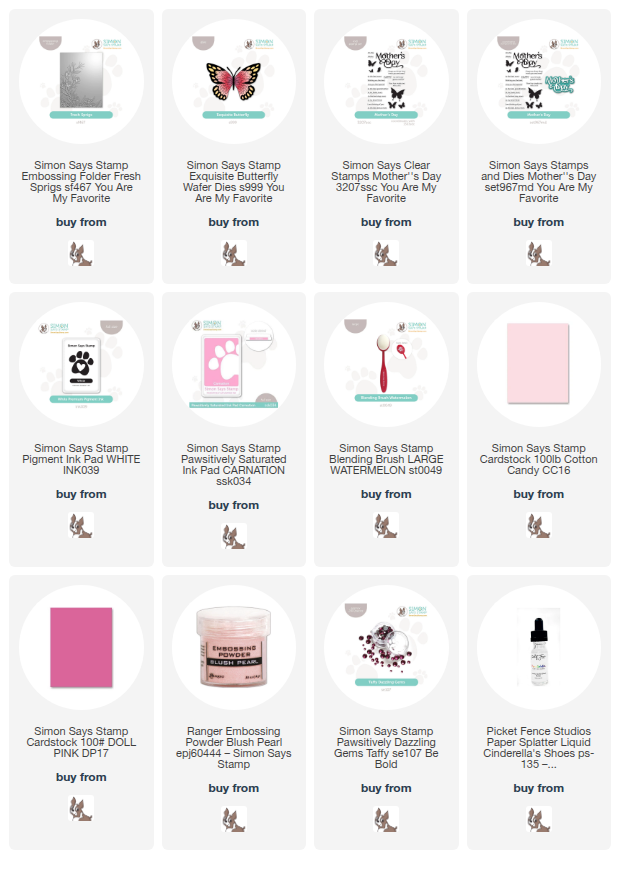
To start, I embossed a panel of light pink cardstock using the new Fresh Sprigs Embossing Folder, then used a blending brush to blend some Carnation Pawsitively Saturated Ink on the corner where the delicate floral sprigs are embossed. I swiped my Simon Says Stamp White Pigment Ink Pad on the raised areas of the blending to help enhance those pretty blooms, then splattered the background with some shimmering glitter watercolors. Lots of texture and detail on this background, which I think looks lovely with the delicately detailed embossed image!

After I had created the card front, I turned my attention to some adornments for the front. I began by die cutting the different components from the new Exquisite Butterfly from hot pink pearlescent cardstock and hot pink foil cardstock. Though these two cardstocks are similar in color, the tone-on-tone is enhanced by the difference in textures between them. The coating on the pearlescent cardstock also helps to enhance the partially die cut details on the more solid layer of the butterfly. I adhered the layers together with liquid adhesive, then turned my eyes to the sentiment!

To create my greeting, I started by stamping the different sentiments from the new Mother’s Day stamp set using Simon Says Stamp’s White Pigment Ink onto some vibrant magenta cardstock, then sprinkled Blush Pearl embossing powder over the top to create a beautiful, subtly pearlescent blush greeting. I used my trimmer and the coordinating shadow die from the coordinating Mother’s Day Die set to die cut the embossed sentiments. I popped up all of the die cuts and individual elements with foam adhesive squares, then finished the card off with some Taffy Pawsitively Dazzling Gems.

Well, that’s all for my project today! Using multiple shades of the same color makes for such an elegant card, don’t you think? And the addition of the textures and shimmers just kicks the card up another notch, perfect for Mother’s Day! Thanks so much for stopping by today, and have a marvelous day!

Filed Under: simon says stamp, Uncategorized Tagged With: 3D embossing folder, die cutting, fresh sprigs, ink blending, mother's day, mother's day die

Simon Says Stamp You Are My Favorite Release Blog Hop + Giveaway!

April 25, 2025

This post was sponsored by Simon Says Stamp. Thanks, Simon!

Hi friends! I am hopping along with my friends at Simon Says Stamp to share inspiration with you using the new You Are My Favorite Release! You should have arrived here from Lisa Addesa, and your next stop is Emma Williams. You can also start back at the beginning at the Simon Says Stamp Blog for the full hop list! I was just in love with the beautiful new 3D embossing folders and gorgeous fonts in this release, so I decided to combine them with some ink blending to create this colorful Mother’s Day card. Let’s get started with the details!

*I have gathered links to all of the products used at the bottom of the post for your convenience, using affiliate links. Thank you for shopping with my links! I truly appreciate your support for my work!*

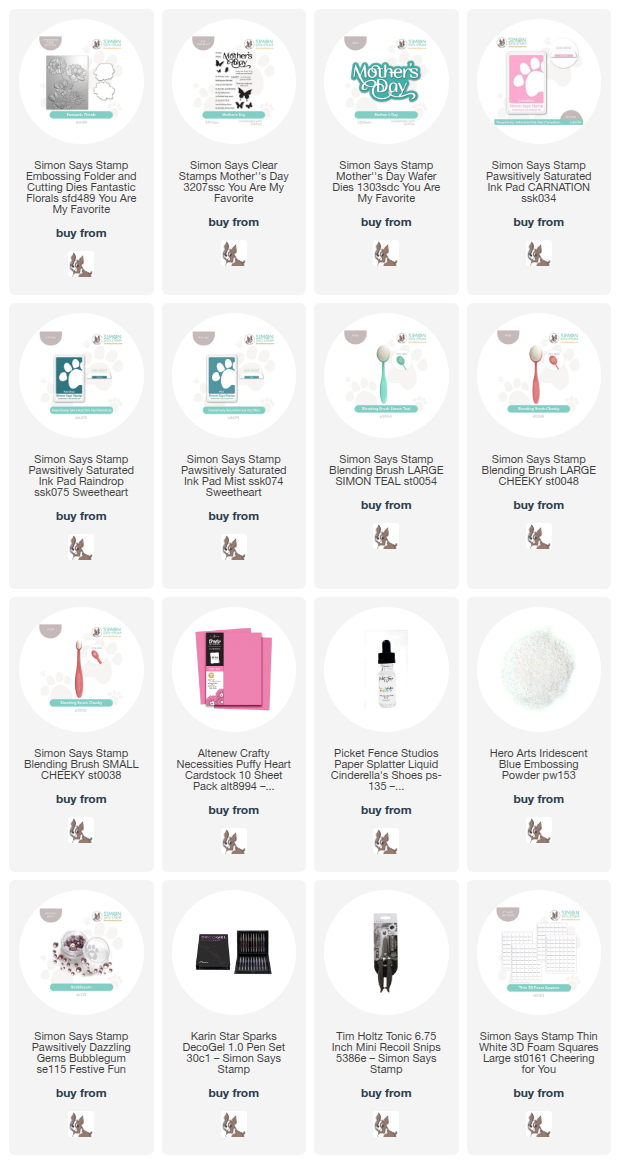
To begin, I used the new Fantastic Florals Embossing Folder to emboss the gorgeous floral background on a panel of white cardstock. I then used blending brushes to blend a pretty combination of Pawsitively Saturated Ink in shades of Carnation, Raindrop, and Mist. I blended the pink directly on the flowers, keeping a light hand and concentrating the color in the center of each flower. After I had made the flowers pink, I used blending brushes to lightly blend the Mist ink all around the edges of the card, then I blended Raindrop ink around just the edges of the card, creating a gorgeous turquoise halo around the delicate pink blooms.

To “gild” the florals, I used some super shimmery iridescent watercolors along the edge of each petal. The addition of the glittery watercolors on the edge of each petal has the added bonus of adding some dimension and differentiation between the petals on the flowers with their simplistic blending. I also added some sparkly gel pen to the centers of each flower for the stamens.

For the greeting, I used the new Mother’s Day stamp set and Mother’s Day die to create a super shiny and iridescent sentiment. I die cut the detail layer of the Mother’s Day die from some super shiny foil cardstock and the shadow layer from some heavyweight vellum, adhering the two together with liquid adhesive. I embossed a sentiment from the Mother’s Day stamp set with some super shiny Iridescent Blue embossing powder onto some strips of coordinating bubblegum pink cardstock, then adhered the sentiment components in the center of the sparkling blended card front with thin foam adhesive. I also used the same Iridescent Blue embossing powder to heat emboss a few solid butterflies from Mother’s Day stamp set and fussy cut them with my sharp scissors. I popped up the butterflies with some foam adhesive squares and added a few Bubblegum Pawsitively Dazzling Gems for some added sparkle!

Well, that’s all for my project today. Now for some fun giveaway and freebie information!

To celebrate the new You Are My Favorite Release, Simon Says Stamp is giving away a $25 coupon to every stop on the hop from your blog comment section. Winners will be selected and posted on the Simon Says Stamp blog on Wednesday the 30th of April. Winners can email Simon Says Stamp to claim his/her prize 🙂

You can also receive a fun freebie with purchase for a limited time! Simply purchase $30 from the new You Are My Favorite Release and receive the beautiful Sunny Fern Emboss & Cut Folder with your order for free! What a fun incentive to go shopping, right? (As though most of us really need an excuse, ha!)

Your next stop on the hop is Emma Williams. Thanks so much for stopping by today, and happy hopping!

Filed Under: simon says stamp, Uncategorized Tagged With: die cutting, fantastic florals, ink blending, mother's day, mother's day dies

Floral Flashback Week: Favorite Flowers with Simon Says Stamp!

February 17, 2025

This post was sponsored by Simon Says Stamp. Thanks, Simon!

Hi friends! This week on my blog, I thought I would take a moment to share some new inspiration using some of my favorite floral stamps which I designed for Simon Says Stamp. I feel extraordinarily lucky to have had the opportunity to turn some of my illustrations into stamp sets, and I never cease to be thrilled and amazed when a new illustration-turned-stamp set is released. All good things must come to an end at some point, sadly, and some of my favorites have been discontinued. I wanted to share some new inspiration using some of my older stamp sets that are still on the Simon website, so this week will be a throwback week, dedicated to inspiration using these older sets! First up is one of my favorites: Mother’s Day Tulips. When I originally illustrated this set, I intended for it to be used as a corner for a slimline card, but as all trends do, slimline cards have become less prevalent. That doesn’t mean that this stamp set can’t be adapted to fit a different sized card, though! I decided to do some no-line coloring to create a vibrant pop of peachy color on this 5×7 card front. Let’s get started with the details!

*I have gathered links to all of the products used at the bottom of the post for your convenience, using affiliate links. Thank you for shopping with my links! I truly appreciate your support for my work!*

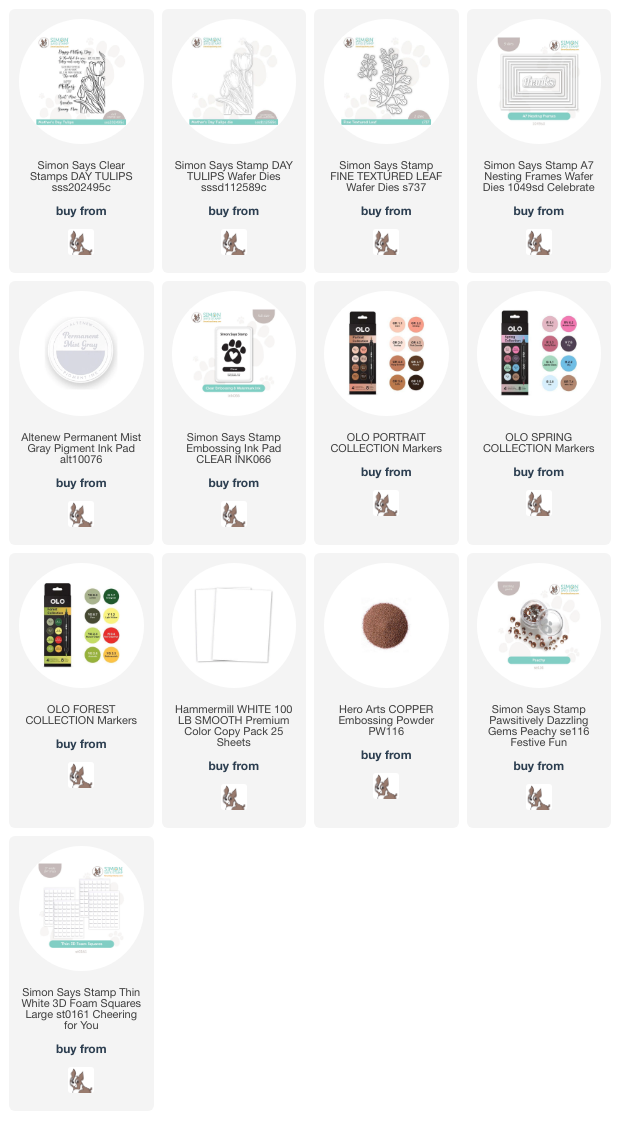
To begin my project, I stamped most of the Mother’s Day Tulips floral arrangement on a panel of white cardstock using Altenew’s Permanent Gray ink, which is an excellent ink for use with no-line alcohol ink coloring. I used some gorgeous peach and spring green tones from OLO Markers to do some vibrant no-line coloring. Tulips come in such an enormous variety of color palettes, and this pretty peachy-coral is a color that I love but haven’t used for this particular stamp set. (At least I don’t think I have, ha.) Once I had finished the detailed coloring, I used the coordinating die to cut out the image; I just love how very detailed this die is, cutting super close to the edges and also getting in between the leaves to create this intricate cutout.

Those intricately-colored tulips needed to be the star of this card, so I decided to add some monochromatic texture behind them. Because most embossing folders come oriented to fit A2 cards, I used another of my favorite techniques to add some texture behind my bouquet of tulips: tone-on-tone foliage die cuts. I die cut several of the Fine Textured Leaf dies from white cardstock to arrange them behind the vibrant tulips. I also die cut the A7 Nesting Frames from white cardstock, nestling two of them together and popping them up on my white A7 card front using foam adhesive. I snuggled the tulips into the corner of the frames and popped them up with some more foam adhesive, then arranged the leaf die cuts behind the tulips, creating some lacy, botanical texture to enhance the vibrant tulips.

After I had arranged all of the die cuts on the large A7 card front, I heat embossed a greeting from Mother’s Day Tulips onto some more white cardstock using shimmery metallic embossing powder. When creating this stamp set, I wanted to add lots of options for names, because my own children call my mom Mimi, and it can be difficult to find things with that particular name on it. One of the perks of designing stamp sets!! I used my scissors to fussy cut the sentiments and popped them up on the card front with some more foam adhesive. Finally, I added a few Peachy Pawsitively Dazzling Gems to add some more sparkle to the card.

Well, that’s all for my project today. It was such fun to delve into my stash of sets that I’ve illustrated and breathe some new life into them, and it is a great way to add some color into this arctic blast that we will be having this week. Thanks so much for stopping by today, and have a marvelous day!

Filed Under: simon says stamp Tagged With: A7, die cutting, fine textured leaf, mother's day, mother's day tulips, no line coloring, olo markers, original illustration

  • « Go to Previous Page
  • Page 1
  • Page 2
  • Page 3
  • Page 4
  • Go to Next Page »

Primary Sidebar

  • Facebook
  • Instagram
  • Pinterest
  • YouTube

Favorite Shops

Secondary Sidebar

Subscribe

Enter your email address to subscribe to this blog and receive notifications of new posts by email.

Instagram
Something is wrong.
Instagram token error.
Follow
Load More

Archives

Tags

3D embossing folder alcohol markers better press birthday birthday card blog hop card kit christmas christmas card christmas tag colored pencil copic copic coloring Daniel Smith die cutting embossing folder embroidery felt giveaway holiday holiday card hot foil ink blending karin brushmarker pro layered stencil masculine my monthly hero new release no line coloring no line watercolor OLO marker olo markers original illustration pawsitively saturated rainbow shaker card slimline stamping stamptember stencil thank you thinking of you valentine's day video watercolor

Popular Posts

Simon Says Stamp Joy For You Blog Hop- Day 1!
Vibrant Poinsettia Holiday Wishes with Simon Says Stamp!
March 2020 My Monthly Hero Blog Hop+Giveaway!
Simon Says Stamp Bright Christmas December 2025 Card Kit of the Month- Now Available for Preorder!
Simon Says Stamp Glory to the Newborn King Holiday Kit-Now Available!
Honey Bee Stamps Birthday Blog Hop, Day 2!
Altenew July Stamp and Die Blog Hop+Giveaway!
Tonic Studios Garden Party Blog Hop!
Simon Says Stamp Joy For You Release-Now Available!
Simon Says Stamp November 2025 Card Kit: Give Thanks!

Disclosure

Some affiliate links are used in my posts. This means that, should you click on one of my links and purchase something from that company, I will receive a small portion of the sale at no extra cost to you. I use the money earned from these sales to help maintain my blog. I so appreciate you visiting and, if you do choose to use one of my affiliate links, thank you so much for your support!
Copyright © 2026 ·Brunch Pro Theme · Genesis Framework by StudioPress · WordPress · Log in
Loading Comments...