• Skip to main content
  • Skip to primary sidebar
  • Skip to secondary sidebar

Sixth Street Sundries

Emily Midgett

  • Home
  • About Me
  • Contact
  • OLO Marker Color Swatch Chart
  • Shop

my monthly hero

Hero Arts My Monthly Hero January 2024 Blog Hop + Giveaway!

January 8, 2024

Hi friends! I am hopping along today with my friends from Hero Arts to share inspiration using their new My Monthly Hero Kit and some of the coordinating add-on products that coordinate! This month, we are celebrating all things love with a beautiful floral layered stencil, chunky word dies, and (in the Premium Kit) gorgeous graphic flower dies! Here’s a peek at this month’s kit:

Classic Kit Contents:

  • 5 Color Layering Floral Background Stencils, 5.25″ x 6.5″
  • Coordinating Heart Window Frame Cut
  • Love You Fancy Dies
  • Love Messages Clear Stamp Set, 4″ x 6″
  • 6 Sheets of Camel Watercolor Paper, 5″ x 7″
  • 3 Core Ink Cubes (Moss, Azalea, Summer Sky)

    Premium Kit Contents:
    (Premium Elements in Bold)
  • 5 Color Layering Floral Background Stencils, 5.25″ x 6.5″
  • Coordinating Heart Window Frame Cut
  • Love You Fancy Dies
  • 10 Floral Fancy Dies
  • Love Messages Clear Stamp Set, 4″ x 6″
  • 6 Sheets of Camel Watercolor Paper, 5″ x 7″
  • 3 Core Ink Cubes (Moss, Azalea, Summer Sky)
  • Gold Leaf Flakes
  • Sparkle Clear Lacquer Pen
  • Pink Gold Metallic Spray, 1 oz.

Classic Kit: $70 Value for $36.99
Premium Kit: $106 Value for $49.99

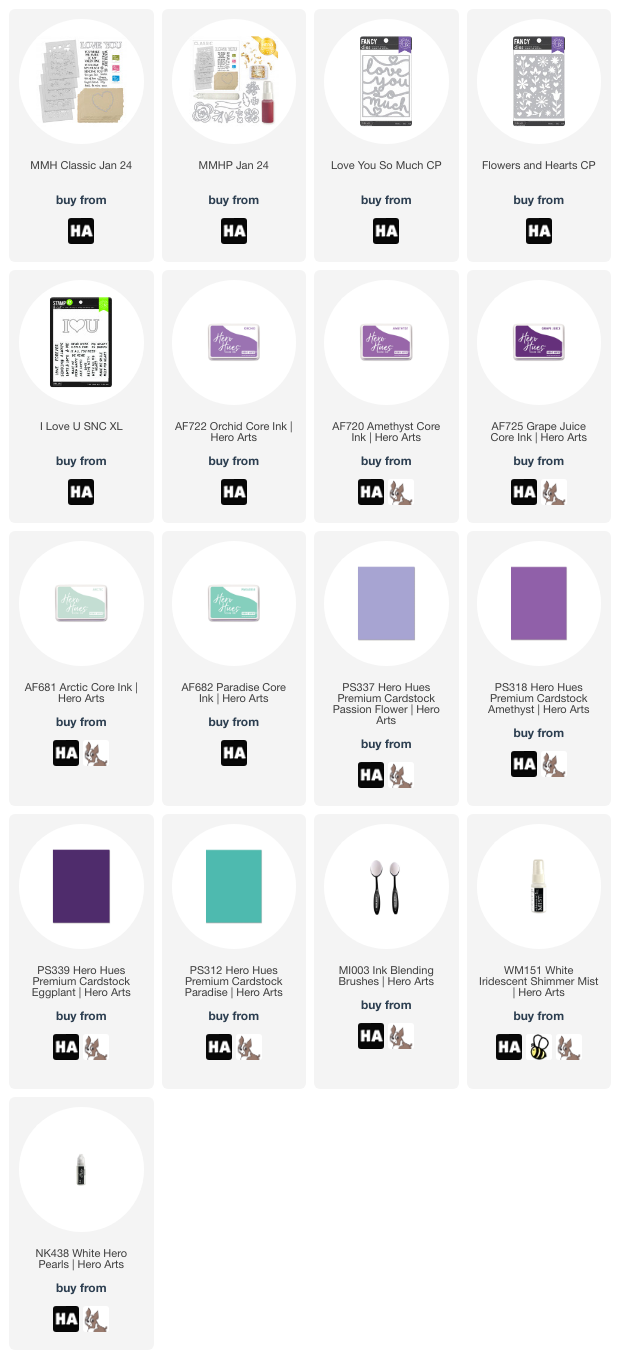
I am a pink girl, but for this month’s love-themed kit, I thought that I would create an homage to another of my favorite colors that is also Valentine’s-approriate: purple! I pulled out Orchid, Amethyst, and Grape Juice Core Inks, Amethyst and Passion Flower cardstock, and some blending brushes and got to work to create this trio of purple cards. Let’s get started with the details!

For this first project, I used the lovely floral layering stencils included in both the Classic Kit and the Premium Kit with Orchid, Amethyst, Grape Juice, Arctic, and Paradise Core Inks to create this vivid background. After ink blending, I also spritzed the entire A2 panel with Iridescent Shimmer Mist. The sparkle on this panel is so lovely in person, but so difficult to capture in a photo!

After I had created my panel, I used some deep purple glitter cardstock to die cut the chunky “love” sentiment, included in both the Classic Kit and the Premium Kit, heat embossing the coordinating sentiment strip onto a piece of Passion Flower cardstock with silver embossing powder. To accent the greeting and add a little more texture to the project, I die cut several of the flowers included in the Premium Kit from Passion Flower, Eggplant, and Paradise cardstock and layered them around the sentiment components. For a final touch, I dotted some White Hero Pearls in the center of the little hydrangea flowers!

My next project pairs the gorgeous Orchid, Amethyst, and Grape Juice Core Inks with the new Love You So Much cover plate die. I began by ink blending the three purple inks on two different A2 panels of white cardstock using blending brushes. Once I had finished blending both panels, I die cut the new Love You So Much cover plate die from one blended piece and layered it over the top of the other, creating a subtle, tone-on-tone card front filled with vibrant color!

To accent the simple card, I die cut some hearts from a few scraps of lilac glitter cardstock to inlay them into the delicate hearts at the top and bottom of the card! I also swiped a shimmer pen over the top of my words to try to emphasize them a bit more, but I had some leaking issues (hello blobs of sparkle ruining my blended backgrounds! Thumbs down!), so splatters came to the rescue! I splattered the background with some handmade glitter watercolors from Etsy to camouflage some of the blobs, then added some more purple die cut hearts with foam adhesive to hide others. I would have been so frustrated to throw the panels away, so I’m glad that I was able to come up with a solution to hide the messy bits!

My last card features the new Flowers and Hearts Cover Plate die! I die cut the cover plate from some beautiful Amethyst cardstock and backed it with some coordinating lilac colored glitter cardstock so that the pattern sparkled so prettily behind the die cut windows! I reserved all of the die cut pieces for later to accent my sentiment.

I die cut the new I Love U Stamp N Cut XL from Eggplant cardstock and some purple mirror foil that I found in my stash of specialty cardstocks. I paired it with a white heat embossed greeting from the new Valentine Wreath Bundle, popping up all of the pieces with foam adhesive. To accent the greeting, I used a Copic marker to add color to some of the leftover die cuts from the Flowers and Hearts Cover Plate die to help them stand out from the different shades of purple on the card front! This is an easy way to customize your leftovers and still have everything look coordinated and cohesive. Finally, I added a few white jewels to the center of some of the flowers for some more sparkle.

Well, that’s all for my projects today! Now for some fun giveaway information:

We will give away a $50 gift card, drawn from the comments left across the hop. Enter by
Sunday, January 14th at 11:59pm PT, and the winner will be announced on the Hero Arts blog
the following week.

You can see the full hop list over on the Hero Arts Blog. Thanks so much for stopping by today, and happy hopping!
Filed Under: Hero Arts Tagged With: flowers and hearts cover plate, i love u snc xl, layered stencil, love you so much, my monthly hero, valentine's day

Hero Arts December 2023 My Monthly Hero Kit Launch Blog Hop + Giveaway!

December 4, 2023

Hi friends! Happy Monday! It’s the first Monday of the month, and that means that it’s time for another kit release from my friends at Hero Arts! You should have arrived here from the marvelous Kelly Taylor, and this is your last stop on the hop! This month’s theme is dedicated to all things alphabet. I received my kit a bit late, so I have some very quick and easy tags to share with you. We can all use “quick and easy” around this time, can’t we? Here’s a peek at this month’s Classic Kit:

And a look at the Premium Kit:

The contents of these kits retail individually for over double the kit purchase price. The My Monthly Hero Classic kit can be yours for $36.99, and the Premium Kit can be purchased for $49.99! There are also a ton of marvelous, universally-useful add-ons which coordinate with the kits or can be used as standalone products. Let’s get started with my projects!!

Whenever I see alphabet dies, my mind immediately goes to personalized stationery. I started my cardmaking journey when I was newly married and wanted to create the perfect monogram stationery to send as thank you notes, and so new alphabet products always bring me back to my roots. Now, as a momma of four kids, personalization is important, because my kids like to make sure that everybody knows whose toy is whose!! (lol and cry simultaneously) I die cut the new cover plate die from the Classic Kit from using Pitch Black cardstock and realized that my boys’ names are short enough that the die cut letters could easily be added onto some tags. My little boys are learning how to spell their names in preschool, and seeing their letters anywhere (stop sign, mail, gas station sign, etc) brings them a thrill that I thought seeing a personalized tag on their “want” gift would make them so happy!

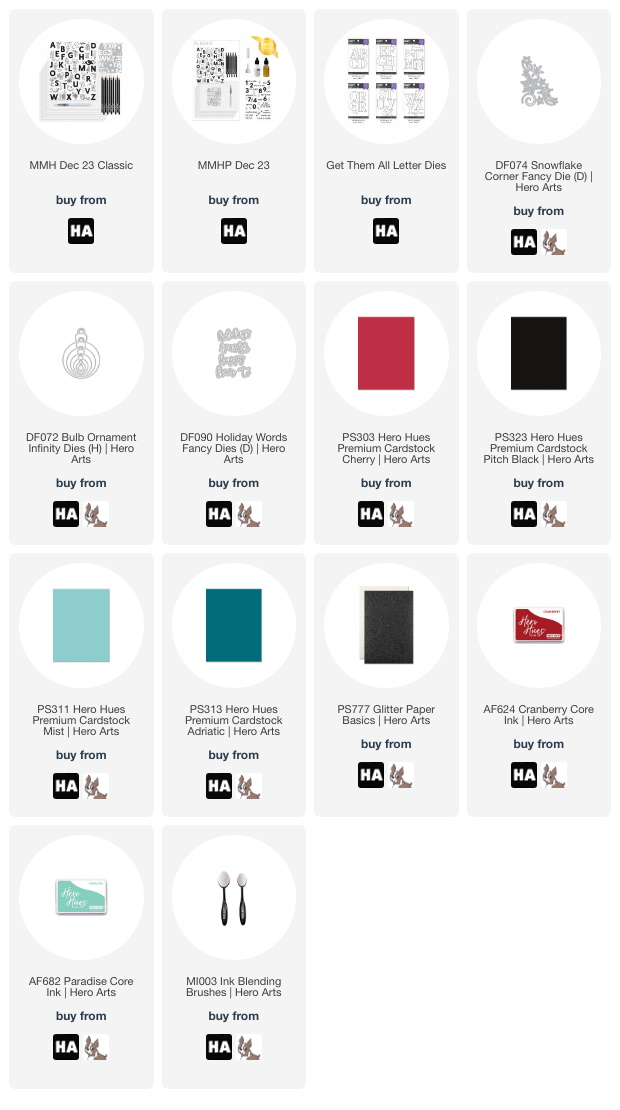
I die cut three tags from Cherry cardstock using the Bulb Ornament Infinity Dies which are unfortunately out of stock at the moment, but you can easily sign up for email notification for when they come back in stock! They’re super useful, especially considering the variety of sizes included in the set. I used a Post-It note to mask off the top of the ornament bulbs and blended Cranberry ink around the edges to add some extra dimension. I then used the Snowflake Fancy Die and white glitter cardstock from the Glitter Basics cardstock pack to add a festive snowflake pattern to each snowflake, snipping off the extras spilling over the edges. I popped up the die cut letters from the My Monthly Hero Classic Kit using foam adhesive and added a bit of sparkly silver twine from which my tag could swing!

On the back of the tag, I used more Pitch Black cardstock to add a die cut “from” from the Holiday Words Fancy Die set. I love that these tags came together so quickly and easily. They’d be super easy to mass produce and would be darling as tags for gifts or even place cards for a family meal!

For my lone girl child, I wanted to create a variation on the same tags with a bit more feminine color palette. Her name is a bit longer than the boys’ names, so I used the “V” die from the new S-V Fancy Dies. Having a V for her first initial makes it a bit more challenging to find monogrammed items, so she really enjoys seeing her monogram on anything!! I die cut the large Bulb Ornament Infinity Dies from Mist cardstock, then placed my Post-It Note mask on the top and blended Paradise ink around the edges. I added more sparkly snowflakes, then die cut the large V from S-V Fancy Dies from Adriatic cardstock and popped it up with foam adhesive, I added a sparkly silver twine bow and loop. Super cute and sparkly! I think she will probably even keep it as an ornament for her little Christmas tree in her bedroom.

When I opened my release package last week, I was immediately struck by the generous size of the new Alphabet Fancy Dies and knew that I wanted to create a festive word garland for my office Christmas tree! My new office gave me enough space to have a tree of my very own, a white tree decorated in blush pink and rose gold, and it was such fun to create this little banner to decorate it. I die cut the Alphabet Fancy Dies from some light pink shimmer cardstock as well as regular white cardstock, then adhered them together to add a bit of extra stability. Then, I dug out my glue gun (haven’t used that in awhile!) and adhered the letters to some sparkly rose gold twine.

I think it looks fabulous on my little tree!

Well, that’s all for my projects today! Now for some fun giveaway information:

Hero Arts will give away a $50 gift card, drawn from the comments left across the hop. Enter by Sunday, December 10th at 11:59pm Pacific, and the winner will be announced on the Hero Arts blog the following week.

I’m the last stop on the hop, so if you’ve made it this far, you’re all done! You can also start back a the beginning at the Hero Arts blog if you got out of order. Thanks so much for stopping by today, and have a marvelous day!

Filed Under: Hero Arts Tagged With: christmas tags, gift tags, holiday decor, my monthly hero

November 2023 Hero Arts My Monthly Hero Release Blog Hop + Giveaway!

November 6, 2023

Hi friends! Today, I’m hopping along with Hero Arts to help introduce their November My Monthly Hero Collection! You should have arrived here from Dana Joy, and your next stop is Ilina Crouse. You can also start back at the beginning at the Hero Arts Blog if you get lost!

This month’s Classic Kit is absolutely spectacular, particularly if you are a Harry Potter fan or just love owls! Owls are such majestic birds, surrounded by a hint of magic and mystery, and this new kit shows them in so many different ways, and if you’re a Harry Potter fan, you might be able to imagine them as Hedwig or Pigwidgeon or another post owl! Here’s a peek at the Classic Kit:

And here’s a peek at the Premium Kit, which includes all of the elements of the Classic Kit with some amazing additions that work beautifully with the Classic Kit:

These kits are valued at more than double their purchase price, so not only are you getting fabulous crafty products, you’re also getting a fabulous deal! These kits frequently sell out very quickly and will not be restocked, so don’t hesitate to get them if you are loving what you see. You can also check out the subscription HERE. Hero Arts also offers the Premium Elements for sale separately, so that you can purchase those extras without having to become a subscription member. So many fun options to get your craft on!

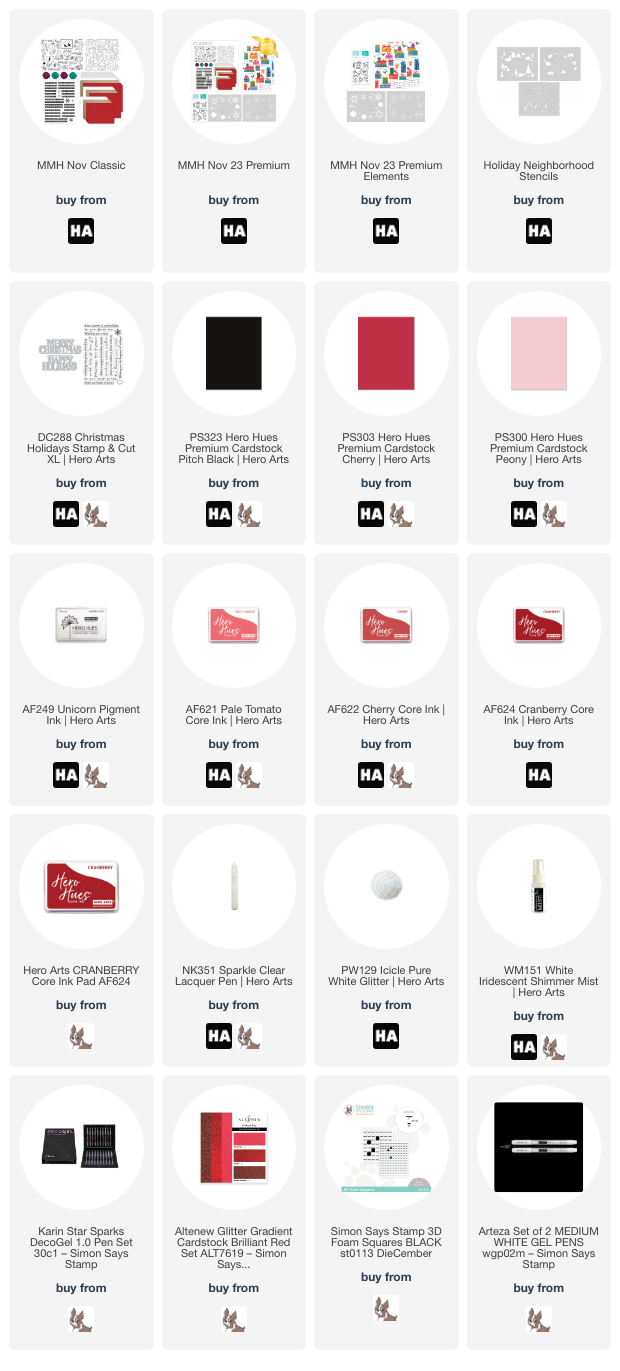
For my projects today, I created a dramatic winter card using my colored pencils and my favorite Pitch Black cardstock, as well as a coordinating envelope using the layering stencils included with the Premium Kit. My projects today feature an homage to layering stencils, using the new Color Layering Holiday Neighborhood Stencils to create a pinkalicious holiday neighborhood of which even Cindy Lou Who would be proud! Let’s get started with the details.

To start, I stamped several of the images from the Classic Kit onto some Pitch Black cardstock using Unicorn White pigment ink. I love to use Unicorn White pigment ink when working with colored pencils on colored cardstock. I feel like the pigment ink blends beautifully into the colored pencil because it sits on top of the cardstock rather than sinking down into the cardstock, so it can be “folded in” (Schitt’s Creek reference, anyone?) when working with the colored pencils. I used my Caran D’Ache colored pencils to add traditional red and apple green, creating a majestic barn owl complete with cozy red scarf. After I had finished coloring all of the images, I used the coordinating Frame Cuts dies included in the Classic Kit to cut out each individual piece.

To create the wintry background, I first used a blending brush to lightly blend some Unicorn White pigment ink around the edges of a Pitch Black cardstock A2 card front, then used white gouache mixed with a bit of water to splatter some snowflakes on the background. Once my gouache had dried completely, I used a white gel pen to add some more defined snowflakes to the background. I also white embossed a few of the snowflakes included in the Classic Kit onto some more black cardstock and cut them out using the coordinating frame cuts. When creating a snowy backdrop, I like to vary the sizes of the snowflakes, from tiny gouache dots to medium sized gel pen snowflakes with more definition to the larger, more detailed embossed die cut snowflakes. I think that these three sizes scattered throughout the background help to add even more interest to the card!

After my background was dry, I arranged the mailbox, owl, and her parcel on the snowy backdrop, adhering them using black foam adhesive squares. To add some “snow” to the mailbox, I placed some “glue” from the the Sparkle Lacquer Pen where I wanted my sparkling snow, then sprinkled some Icicle Pure White Glitter over the top, pressing down lightly to make sure that it was really stuck into the lacquer. Finally, I added a white embossed greeting from the Classic Kit, also popped up using foam adhesive. The white blending around the edge adds a wintry feel to the card but also creates a little vignette to draw your eye to the focal point in the center of the card!

I also used the Layering Stencils included in the Premium Kit to create this coordinating envelope. I first blended the larger snowflake layer using Cherry Core Ink and the detail layer using the darker Cranberry Core Ink. Once I had completed both layers, I spritzed some Iridescent White Shimmer Mist over the first stencil, adding some subtle shimmer to the snowflake pattern. I also added some delicate white dots using the white gel pen to create a pretty pattern on the snowflake. Who wouldn’t want to receive a card in such a pretty envelope?

For my second project, I paired the new Color Layering Holiday Neighborhood Stencils with Pale Tomato, Cherry, and Cranberry inks and Peony cardstock to create this tone-on-tone background! After using blending brushes to blend each layer of ink on the pale pink background, I trimmed the panel down slightly and lightly blended some more Pale Tomato ink around the edges. I also used the Karin Star Spark Deco Gel pens to add some shimmering details to the neighborhood and kick the festive feelings up a notch!

For the greeting, I used the Christmas Holiday Stamp-n-Cut XL to create a tone-on-tone sentiment. I die cut the detail layer of the Happy Holidays sentiment from some shimmering ruby red glitter paper, adhering it to the die cut vellum background layer to help it stand out from the busy stenciled background. I also stamped a coordinating greeting (which I thought worked perfectly with the little houses in the neighborhood background!) on a strip of Peony cardstock using Cranberry ink, then stamped it again using clear embossing ink and sprinkled clear embossing powder over the top. The little extra step of adding the clear embossing powder over the top of the red sentiment makes the tone-on-tone sentiment pop a bit from the pink background. I adhered the sentiment strip to a slightly larger strip of red glitter cardstock to add another element of shimmer and shine.

To assemble the card, I added the stenciled layer to a full size A2 layer of Cherry cardstock, creating a thin red frame around the edge of my stenciled background. I popped up the greeting pieces using some foam tape for a simple and eye catching holiday card. I think this card definitely reminds me of Rifle Paper Co holiday designs. So classic with just a touch of modern whimsy!

Well, that’s all for my projects today. Now for some fun giveaway information!

We will give away a $50 gift card, drawn from the comments left across the hop. Enter by Sunday, November 12th at 11:59pm Pacific, and the winner will be announced on the Hero Arts blog the following week.

Your next stop is Ilina. Thanks so much for stopping by today, and happy hopping!

Filed Under: Hero Arts Tagged With: christmas card, christmas holidays stamp and cut, holiday card, holiday neighborhood, ink blending, my monthly hero

Hero Arts My Monthly Hero Release Blog Hop + Giveaway!

October 2, 2023

Hi friends! Today, we are hopping along to help introduce the absolutely stunning October 2023 My Monthly Hero Collection from Hero Arts. You should have arrived here from Dana, and your next stop is Ilina. You can also start back at the beginning at the Hero Arts Blog. This month’s collection is an homage to serene winter scenes, elegant critters (who knew?), and gorgeous, classic holiday imagery. Here’s a peek at the Classic Kit:

The Classic Kit features: • 3 Large Scene Fancy Dies, • 4 Fancy Word Dies, • Swirl Snow Clear Stamp Set, 3″ x 4″, • 4 Sheets of Pitch Black Cardstock, 5.5″ x 8.5″, • 4 Sheets each of White, Slate, Winter Blue & Frosted Blue Cardstock, 5.5″ x 8.5″, • White Acrylic Spray, 1 oz. The total contents of the kit are valued individually at $71, but you can purchase for only $36.99! Such a great value.

The Premium Kit includes all of the elements from the Classic Kit, as well as: 3 Mini Peeking Fancy Dies, Nordic Layering Clear Stamp Set, 4″ x 6″, and • 20 Vellum Snowflakes. Individually, all of these elements would retail for $103, but you can purchase this kit for only $49.99! If you don’t wish to subscribe to the Premium Kit, you can always elect to purchase the Classic Kit and the Premium Elements individually. To find out more information about the My Monthly Hero subscription plan, click HERE. These kits frequently sell out very quickly and are limited edition, so don’t wait if you’re on the fence, because they might not be there when you come back!!

I have three cards to share with you today, so let’s get started with the details.

I love a good non-traditional holiday color scheme, and blue, white, and silver is unique enough to keep these holiday cards interesting with enough typical imagery to maintain a fairly classic holiday aesthetic. I shared a project HERE during the Countdown using only elements from the Classic Kit, but today’s projects center around elements from the Premium Kit and glorious Add-On products.

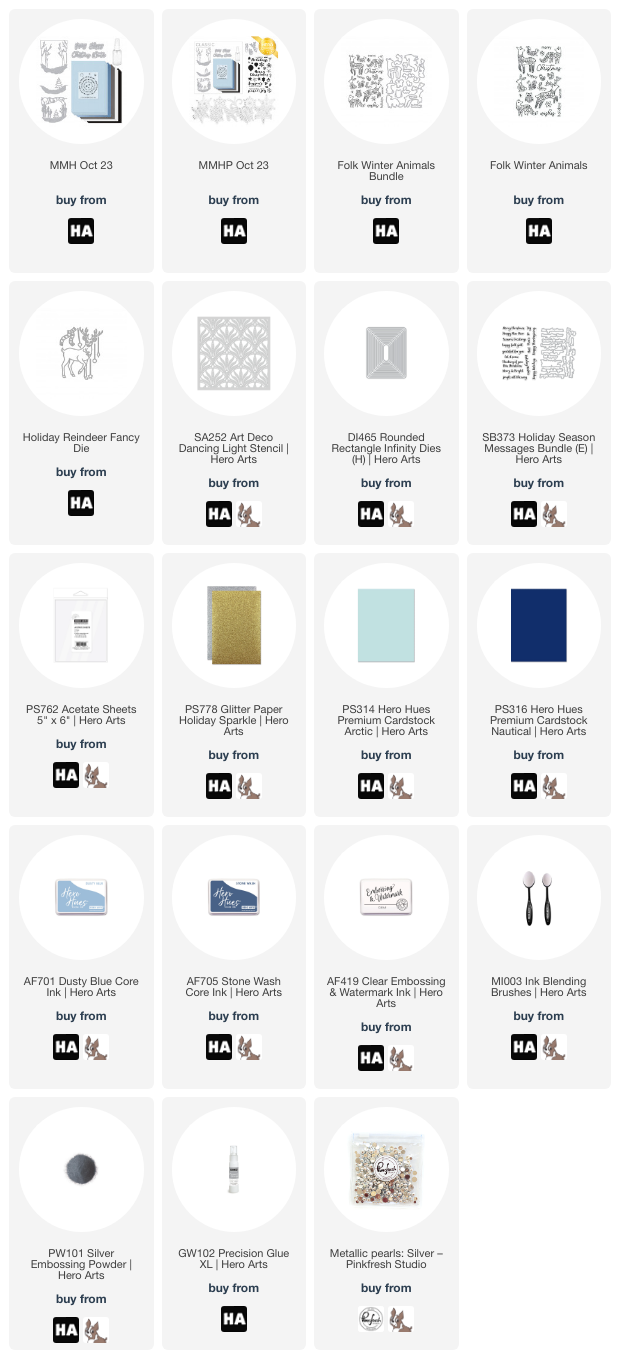
My first card centers around those stunning silver foiled vellum snowflakes that are included in the Premium Kit. I wanted to pay homage to these ethereal snowflakes by layering them on an acetate card, giving them a floaty, weightless look. I trimmed down the pearlescent blue cardstock from the Premium Kit to A2 size, then trimmed down a piece of clear acetate to 4.25″ x 5.25″, then scored the acetate at the .25″ mark to create a fold for my acetate card. I folded the lip over the top of the pearly blue panel and adhered it using super strong double sided tape, creating a unique top-fold acetate card base!

After I had created my card base, I arranged the vellum snowflakes and flourishes in a cluster on my card front. I heat embossed a greeting from the Premium Kit‘s main stamp set using silver embossing powder on a piece of Arctic cardstock. In order to hide my adhesive on these semi-transparent snowflakes, I added some strips of double sided adhesive to the back of my sentiment strip, then placed it on top of the vellum snowflake cluster. This allowed me to hide the adhesive (at least from the front) by adding adhesive behind the solid sentiment strip. I did use some tiny dots of liquid adhesive behind the solid foiled areas for pieces that did not peek out from behind that solid sentiment strip. The final touch was to add a few shining silver pearls from my stash! Such a unique, elegant project!

My second card features the same blue, white, and silver color scheme, this time with a few pops of red. I silver heat embossed the elegant reindeer from Folk Winter Animals onto some white cardstock, then used alcohol markers to very simply color the image, adding some pops of red to the details. I also heat embossed several snowflakes and a greeting, die cutting them using the coordinating dies from the Folk Winter Animals Set.

For the background, I wanted to keep things very simple, so I lightly blended some Dusty Blue ink on the center of a white A2 card base, then splattered the background with some shimmering white watercolor, creating the look of snowflakes drifting softly down around my leaping reindeer! I popped up all of the heat embossed elements with some foam adhesive. This card would be fun to mass produce, made simpler by removing the alcohol marker coloring and just keeping the color scheme an elegant white and silver!

My second card features another of the Add-On products, this time using the Holiday Reindeer Fancy Die. I have a mild obsession with deer for winter cards. I find their elegance and air of mystery so intriguing! I die cut the from Nautical cardstock, cutting the scarf from some shimmery dark blue cardstock from my stash. I layered the two die cut pieces together with Precision Glue and added some shiny silver pen details to the scarf and the eyes. I also die cut the baubles from the Holiday Reindeer Fancy Die set from silver glitter cardstock.

For the background, I lightly blended more Dusty Blue ink on a white card base, then blended Stone Wash ink with the Dancing Light Stencil directly over the top of the pale blue blended background. I created a frame using the Rounded Rectangle Infinity Dies and a panel of A2 sized Arctic cardstock. I popped the frame up around the edge of the stenciled background panel using foam adhesive, then added my reindeer and baubles using liquid and foam adhesive. I silver embossed a greeting from the Holiday Season Messages Bundle onto some white cardstock and tucked it on the card front with some more foam tape. Finally, I added a few shiny silver pearls for one more festive, shiny element!!

Well, that’s all for my projects today! Now for some fun giveaway information:

We will give away a $50 gift card, drawn from the comments left across the hop. Enter by Sunday, October 8th at 11:59pm Pacific, and the winner will be announced on the Hero Arts blog the following week.

Your next stop is Ilina. Thanks so much for stopping by today, and happy hopping!

Filed Under: Hero Arts Tagged With: art deco dancing light, christmas, folk winter animals, holiday, holiday reindeer, holiday season messages, my monthly hero, reindeer, rounded rectangle infinity dies, stencil

Hero Arts October 2023 My Monthly Hero Countdown-Day 3!

October 1, 2023

Hi friends! I have (another) sick little guy this weekend (preschool germs are rough, I tell you!!) and so I’m just popping in quickly to share my project for Day 3 of the October 2023 My Monthly Hero Countdown! You can check out Days 1 and 2 HERE.

We’re building detailed winter scenes this month, using the standalone cover plate dies that Hero Arts does so well to create this gorgeous layered scene!

I used only elements from this month’s Classic Kit to create this card, including the gorgeous pearlescent blue cardstock and the beautiful word dies, which I die cut from some of Hero Arts’s beautiful white glitter paper and Layering Vellum. I die cut all of the layers to this peaceful winter scene from white cardstock and layered them on the blue background with liquid and foam adhesive.

After I had adhered all of my layers, I wanted to really capture the shimmer of a sparkling winter landscape with some glittery snow. I added some Sparkle Pen to the different layers and sprinkled some Icicle Glitter over the top of it while it was still wet to create multiple types of sparkle and add some super festive shine to this peaceful wintry holiday card!

Well, that’s all for my project today! Be sure to check back tomorrow for the full reveal of the October 2023 My Monthly Hero Kit and marvelous Add-Ons. This kit is unbelievably beautiful and the add-ons are spectacular. You won’t want to miss it!! And be sure to check out the Hero Arts Blog to see more inspiration from the Creative Team using this beautiful kit. Thanks so much for stopping by, and have a marvelous day!

Filed Under: Hero Arts Tagged With: christmas, kit, my monthly hero, winter

  • « Go to Previous Page
  • Page 1
  • Page 2
  • Page 3
  • Page 4
  • Interim pages omitted …
  • Page 16
  • Go to Next Page »

Primary Sidebar

  • Facebook
  • Instagram
  • Pinterest
  • YouTube

Favorite Shops

Secondary Sidebar

Subscribe

Enter your email address to subscribe to this blog and receive notifications of new posts by email.

Instagram
Something is wrong.
Instagram token error.
Follow
Load More

Archives

Tags

3D embossing folder alcohol markers better press birthday birthday card blog hop card kit christmas christmas card christmas tag colored pencil copic copic coloring Daniel Smith die cutting embossing folder embroidery felt giveaway holiday holiday card hot foil ink blending karin brushmarker pro layered stencil masculine my monthly hero new release no line coloring no line watercolor OLO marker olo markers original illustration pawsitively saturated rainbow shaker card slimline stamping stamptember stencil thank you thinking of you valentine's day video watercolor

Popular Posts

Simon Says Stamp Sending Cheer Blog Hop- Day 2 + Freebie + Giveaway!
Altenew October 2026 Release Blog Hop + Giveaway!
Simon Says Stamp Sending Cheer Release: Now Available!
Simon Says Stamp October 2026 Card Kit of the Month: Homespun Gratitude!
A Double Leftovers Card Set with New Simon Says Stamp Stencils and Dies!
Simon Says Stamp November 2025 Card Kit: Give Thanks!
Joyful Snowman with New Simon Says Stamp Sending Cheer Release!
Hero Arts Partners Blog Hop: Lawn Fawn!
Altenew Paint A Flower: Carnation Blog Hop+Giveaway!
Simon Says Stamp October 2025 Card Kit of the Month!

Disclosure

Some affiliate links are used in my posts. This means that, should you click on one of my links and purchase something from that company, I will receive a small portion of the sale at no extra cost to you. I use the money earned from these sales to help maintain my blog. I so appreciate you visiting and, if you do choose to use one of my affiliate links, thank you so much for your support!
Copyright © 2026 ·Brunch Pro Theme · Genesis Framework by StudioPress · WordPress · Log in
Loading Comments...