• Skip to main content
  • Skip to primary sidebar
  • Skip to secondary sidebar

Sixth Street Sundries

Emily Midgett

  • Home
  • About Me
  • Contact
  • OLO Marker Color Swatch Chart
  • Shop

oh baby

Welcome Baby Ducky Shaker Card with New Simon Says Stamp!

May 21, 2026

This post was sponsored by Simon Says Stamp. Thanks, Simon! *I have gathered links to all of the products used at the bottom of the post for your convenience, using affiliate links at no extra cost to you. Thank you for shopping with my links! I truly appreciate your support for my work!*

Hi friends! I am back with a sweet shaker project using one of the add-ons from the June 2026 Simon Says Stamp Card Kit of the Month. The main kit has sold out, but one of the best things about the Simon Says Stamp kits is that you can buy the individual items a la carte in addition to the add-on products. I am a sucker for a cute little ducky, especially when paired with some other baby imagery. I have mentioned before that my older twins’ baby shower and nursery theme was gray and yellow ducklings and flowers, so I always get a little nostalgic any time I am presented with an opportunity to work with duck imagery. I created this sweet shaker card using a single ducky die cut from the new Darling Duckies embossing folder and die set. Sometimes one is all you need! Let’s get started with the details!

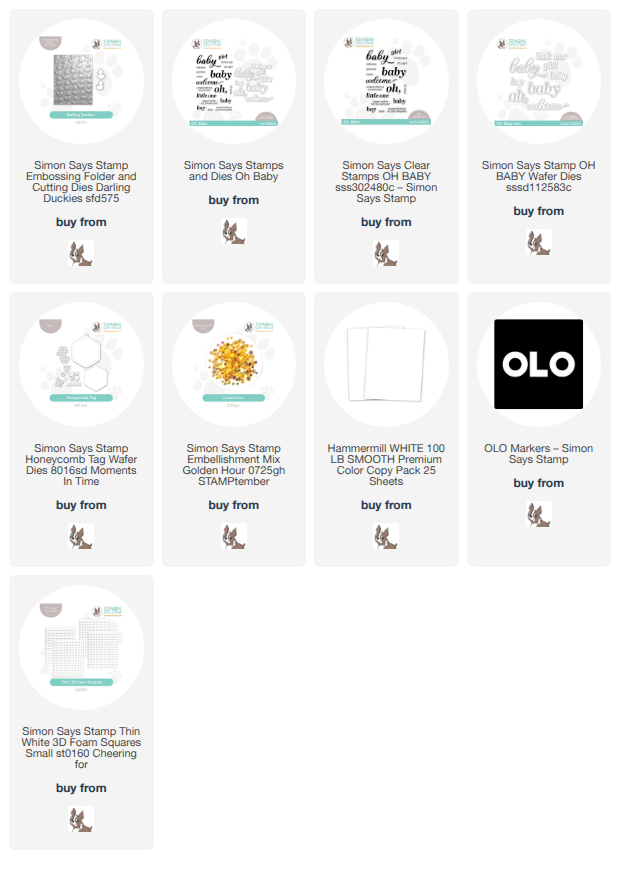
To begin, I die cut an individual ducky using the dies from the Darling Duckies product set, then placed the die cut in its appropriate spot in the embossing folder and ran it through my die cutting machine to add that fabulous raised texture and shape to the die cut. I used my OLO Markers to add some simple coloring to the embossed duck die cut, keeping the colors simple and adding only hints of shadow and shape.

After I had created my ducky, I used the older Honeycomb Tag set to create a window in the side of my A2 card front. To create this scalloped, hexagonal shape without having the tag topper, I placed the die to the side of my card front, overlapping the edge with the top of the tag with the edge of the cardstock so that it would hang over the side and not be visible on my card front! Once I had created my window opening, I used some leftover packaging to create a flat shaker on another piece of white A2 cardstock, filling the shaker pouch with Golden Hour Embellishment Mix. Once the shaker was created and filled, I adhered the card front with the window directly over the top so that I could keep the shaker bits visible. I nestled the scalloped frame die cut in the correct spot, then adhered it with thin foam adhesive squares to add a little extra dimension.

Once I had adhered the window card front and scalloped frame to the shaker base, I created a sentiment using the older Oh, Baby set, embossing it with shimmering gold embossing powder on white cardstock. I also die cut a few individual flowers from the Honeycomb Tag set, coloring them using the same yellow alcohol markers used on the ducky die cut. I think they look just like delicate little buttercups! I popped up the greeting die cuts with foam adhesive, overlapping the shaker window, then arranged the ducky and buttercups around the greeting with more foam adhesive. A sweet little bow finished it off!

Well, that’s all for my project today! I just love when an entire project is built around one tiny die cut. This project is a bit cleaner than my typical projects, but sometimes white space is required. Thanks so much for stopping by today, and have a marvelous day!
Filed Under: simon says stamp, Uncategorized Tagged With: baby card, darling duckies, die cutting, embossing folder, golden hour, honeycomb tag, no line coloring, oh baby, olo markers, shaker card, simon says stamp card kit of the monht

Man Card Monday: Baby Boy Style!

May 19, 2025

This post was sponsored by Simon Says Stamp. Thanks, Simon!

Hi friends! I am back with another installment of Man Card Monday, this time in the form of a baby card that is perfectly neutral for a boy or a girl! It’s been a few months since I had a project for Man Card Monday… It’s been several stressful months between my mom’s health issues, surgeries for my husband and daughter, some health difficulties of my own, and then the regular stress that comes with having four kids with tons of activities and strong personalities… so I’ve been “comfort crafting.” Sometimes, it’s challenging for me to work with cute images; I find myself naturally gravitating towards floral images, but those don’t really work for guy cards, do they? With everything going on, I have found myself in a “comfort crafting” zone, just working with images that fed my creative soul. (Not to say I don’t enjoy making masculine cards… they just require more mental and creative energy than I’ve had available to me lately!) I couldn’t resist the adorable momma and baby images in the new Love You, Mama stamp set, and I thought they’d be perfect for a gender-neutral baby card since we’re past Mother’s Day! Let’s get started with the details on my card!

*I have gathered links to all of the products used at the bottom of the post for your convenience, using affiliate links. Thank you for shopping with my links! I truly appreciate your support for my work!*

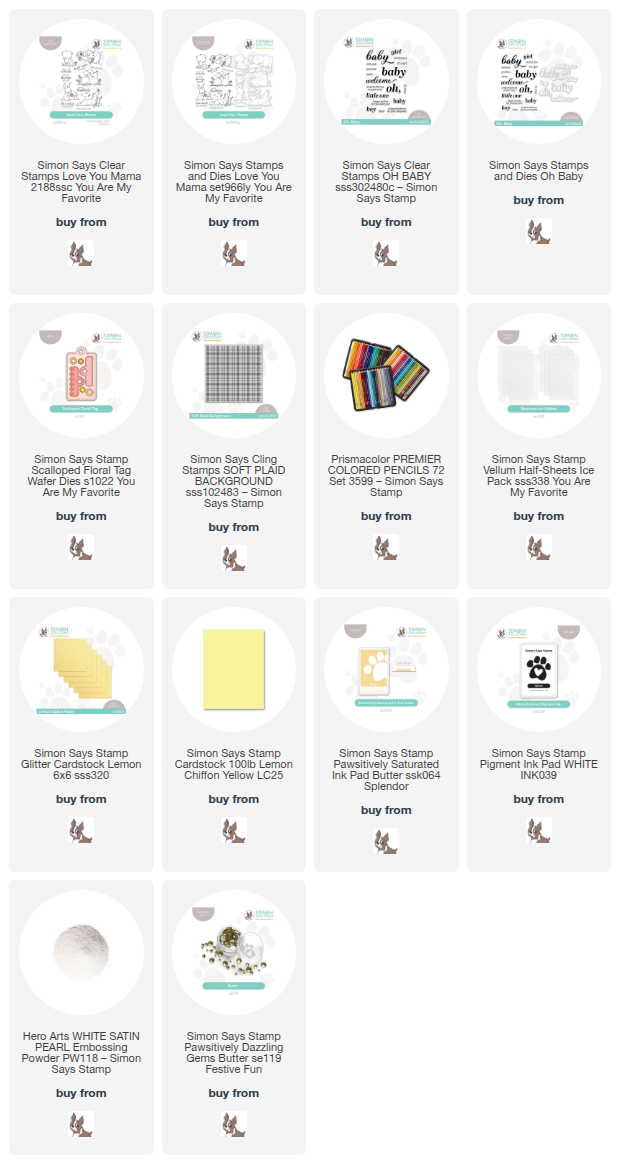
I knew that I wanted to do some detailed pencil coloring with these sweet storybook images, so I stamped the momma bear with her baby bear from Love You, Mama on some Simon Says Stamp Lemon Chiffon cardstock using Simon Says Stamp White Pigment Ink, then used my favorite colored pencils to add some detailed coloring to the image on the yellow cardstock. I love using colored pencils for these tone-on-tone cards; they allow me to keep the colored cardstock completely consistent throughout the project! After I had finished adding all of the color, I used the coordinating die from the Love You, Mama set to die cut the super detailed image. I think it’s super cute!

After I had finished coloring and die cutting the main focal point image, I decided to ground it with a Scalloped Floral Tag from the You Are My Favorite release. I die cut the main tag image from some Simon Says Stamp Ice Vellum and added the scalloped topper from some more Lemon Chiffon cardstock, then adhered the pencil die cut momma and baby with some liquid adhesive. I also heat embossed a greeting from Oh, Baby on some more Lemon Chiffon cardstock, stamping it first with more White Pigment Ink, then adding some White Satin Pearl embossing powder. I love the pearlescent white effect that this combination has on colorful cardstock! I used the coordinating dies from Oh, Baby to die cut the sentiment pieces.

For the background, I stamped the Soft Plaid Background on an A2 panel of Lemon Chiffon cardstock using Butter Pawsitively Saturated Ink, creating a soft, tone-on-tone plaid. I trimmed 1/2″ from the bottom of the panel, then tucked a strip of Simon Says Stamp Lemon Glitter cardstock to complete the A2 card front, adding a touch of texture and shimmer to the background. I mounted the die cut pieces to the card front using thin foam adhesive squares, then added a sweet white silk bow and some Butter Pawsitively Dazzling Gems to finish the project off! Such a sweet card, perfect for a baby shower for either gender!

Well, that’s all for my project today. My little boys just had their last day of preschool… they’re kindergarteners now, which doesn’t seem possible to me! Mentally, I am still in 2020. Ha! My big kids finish school in the next couple of weeks, so I will be trying to work amongst with everybody at home… hopefully my cards don’t reflect the chaos that will be swirling around me like a cyclone!! Thanks so much for stopping by today, and have a marvelous day!

Filed Under: simon says stamp Tagged With: baby card, colored pencils, die cutting, love you mama, man card monday, no line coloring, oh baby, scalloped floral tag, soft plaid background

Creating a Baby Card with Old Fashioned Christmas from Simon Says Stamp!

November 9, 2024

This post was sponsored by Simon Says Stamp. Thanks, Simon!

Hi friends! I have another card to share with you using one of my newest illustrations for Simon Says Stamp: Old Fashioned Christmas featured in the Festive Fun release! When I was illustrating this set, I wanted to make sure to include a big, fluffy bow. I love a good multipurpose stamp, and this large bow works so nicely with lots of different themes. I have seen tons of images lately of watercolored bow backgrounds for wallpaper, and so I thought that I would create my own custom patterned paper using only the pretty bow stamp and some Tombow markers. Let’s get started with the details!

*I have linked all of the products used at the bottom of the post using affiliate links for your convenience. Thank you for shopping with my links! I truly appreciate your support for my work!*

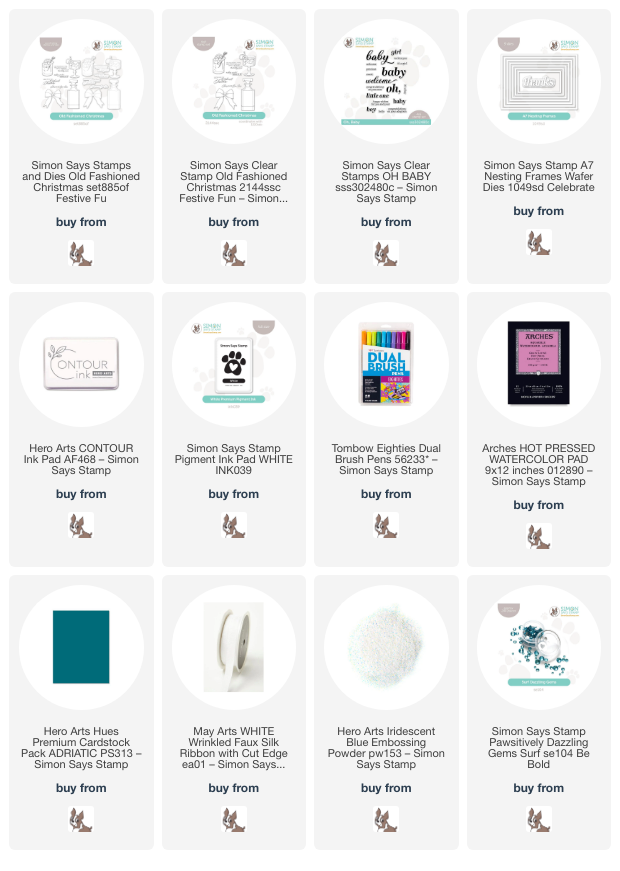
I started by stamping the large bow from Old Fashioned Christmas repeatedly on a panel of Arches Hot Press Paper using Hero Arts Contour Ink. After I had stamped the pattern over the entire panel, I used Tombow watercolor markers to paint the bows. I used two different shades of teal, beginning with one layer of a lighter turquoise and plenty of water to allow for distinct contrast between highlights and shading, then adding a second layer of a darker teal to intensify the shadows. When working with watercolor markers like this, I like to scribble the color out onto my glass work surface and pick it up with a damp paintbrush, apply the color to the image, then clean my brush and use that clean brush to move the color. This allows me more control over the intensity of the color and therefore greater control over the contrasting highlights and shadows.

After I had finished watercoloring, I used the older Oh, Baby stamps and coordinating dies to create the perfect sentiment for my bow patterned paper. I stamped the greetings on deep teal cardstock using white pigment ink from Simon Says Stamp, then added some Iridescent Blue embossing powder from Hero Arts to make it stand out a bit more and add some beautiful shimmer. I die cut the sentiment with the coordinating dies. I love how beautifully they stand out on the patterned background with that dark teal cardstock!

For the card base, I trimmed down the bow panel 1/4″ on each side, then mounted it in the center of a full size A7 panel of the same deep teal cardstock that I used for the sentiment, creating a teal border mat. I used an iridescent white frame cut using the A7 Nesting Frame Dies to frame my offset sentiment, then created a custom super pale aqua bow using some May Arts faux silk ribbon and an alcohol marker. Such fun to create custom colored ribbons that perfectly coordinate with the color palette of the card! A few Surf Pawsitively Dazzling Gems was the final touch of sparkle for this sweet baby card.

Well, that’s all for my project today! I love when I can get tons of different and unexpected uses out of a stamp set, and the bow in my new Old Fashioned Christmas set is sure to become a staple on my desk. I want to pair it with some flowers, for sure! Also-FYI: if you haven’t checked out the Simon Says Stamp blog hop celebrating the new Festive Fun release, you’re missing out. Go to the Simon Says Stamp Blog to see both days or click HERE to see my post from yesterday’s Day 1 hop! Thanks so much for stopping by today, and have a marvelous day!

Filed Under: simon says stamp Tagged With: A7 nesting frames, baby card, contour ink, no line coloring, oh baby, old fashioned christmas, tombow markers, watercolor

Daisies for Babies-Adding Gilded Accents to your 3D Embossed Images!

July 22, 2023

This post was sponsored by Simon Says Stamp. Thanks, Simon!

Hi friends! Today, I have some inspiration using the utterly gorgeous Fresh Daisies Embossing Folder + dies. I have become obsessed with adding color to embossing folder images in a variety of ways, including ink blending, alcohol markers, and watercolor, and today I combine a few of those techniques for a two-fer. When I first saw the Fresh Daisies Embossing Folder + dies, I thought that the little baby’s breath flowers and daisies reminded me of a sweet baby card. White daisies are so innocent and clean, so friendly (“Don’t you think that daisies are the friendliest flowers?”), that I thought this embossing folder would make some beautiful and elegant baby cards. Let’s get started with the details!

Both of my cards today feature the Fresh Daisies Embossing Folder. I used two different techniques for these cards, though I kept the color scheme similar for both projects, using Lake Shores Ink for my main color addition.

Oh, Baby + dies

A2 Thin Frames

Lake Shores Ink

My first card pairs the Fresh Daisies Embossing Folder + dies with the Leafy Greens Embossing Folder + dies. I recently added this Leafy Greens folder to my stash with the intention of using it in conjunction with the several different embossed floral dies that are available in the Simon Says Stamp store. The leaves are beautifully delicate and a lovely, graceful shape. I die cut the daisies and the foliage from plain white cardstock, intending to add some alcohol marker coloring to them.

To achieve good results with the die cut embossed flowers, I first die cut the images from my chosen cardstock, then place the die cuts inside the embossing folder in the correct spot for that image, then run it through my die cut machine. If you tried to die cut the embossed image, you would flatten out all of the embossed dimension, so it works best to start with a clean, smooth die cut. Using my OLO Markers, I colored the daisies and foliage die cuts, using BV2.0 and the Zero markers on the “white” daisies, keeping the color mainly on the petals tucked behind the top layer of petals in order to enhance the shadows while still keeping the color a crisp white. I added golden yellow to the daisy centers and colored the leaves a lovely shade of aqua that coordinates nicely with the Lake Shores Ink.

For the background, I used Simon Says Stamp’s Very Very Low Tack Tape and some Post-It Notes to mask off the top and bottom of my white A2 card front. I lightly blended Lake Shores Ink in the center of the card front, then, keeping the masks intact, added the Daisies and Leaves Stencil, which I had lightly spritzed with Pixie Spray to keep the delicate stencil in place while blending. I blended more Lake Shores ink over the top of the stencil to create a very subtle, tone-on-tone pattern in my blended area. I also spritzed the colorful strip with some Hero Arts Iridescent Shimmer Spray. When I removed the masks, I was left with a strip of subtle, but lovely, aqua. Before adding my die cut flowers, I splattered some beautiful, sparkling warm white watercolors to add even more interest to the background.

I arranged the die cut embossed flowers on the card front, adhering them using foam tape. I also stamped a greeting from Oh, Baby onto some white cardstock using Lake Shores Ink, then, keeping the stamps and cardstock in place in my MISTI, stamped again with clear embossing ink and sprinkled some white satin pearl embossing powder over the top. This combination created a beautifully soft color-coordinated sentiment, which I die cut using the coordinating dies. I adhered the sentiment with a double layer of foam tape and added a few gems and some twine for more texture. Once I had everything arranged properly, I “gilded” the flower petals and foliage with the same sparkling white watercolor that I had splattered on the background, adding it only in the highlighted spots to add just a touch of sparkle. I am totally in love with this card; the sparkle is unreal and *so* difficult to capture in a photograph.

My second card also features the Fresh Daisies Embossing Folder and Lake Shores Ink. After embossing my white panel with the full Fresh Daisies Embossing Folder, I blended Lake Shores Ink with a blending brush over the entirety of the embossed panel. I also went back over the raised areas with the ink pad, lightly swiping the panel with the ink pad to add extra color saturation to the raised areas.

Once I’d finished blending and swiping on the panel, I used the same golden white sparkly watercolors to enhance some of the raised embossed images. Leaving the monochromatic color on the background would be fine in itself, but adding the sparkling highlights kicks it up a notch! I also splattered the entire card front with more sparkly watercolors, which I think almost creates a raindrop effect. I added a glittery white frame cut using some white glitter paper and the A2 Thin Frames dies.

For the greeting, I used another pair of die cuts from the Oh, Baby + dies, stamped again using Lake Shores ink + clear embossing ink, and embossed using White Satin Pearl embossing powder. I also lightly blended some more Lake Shores ink on the die cuts to keep them cohesive on the blue background. I popped the greeting up on the card front using foam adhesive, then added some gems and a twine bow. I think the addition of the twine bow helps to enhance the idea that this elegant card is a sweet baby card!

Well, that’s all for my projects today. If you have any iridescent or sparkly watercolors, I would encourage you to try adding some sparkly highlights to your embossed images and backgrounds. It’s super easy, and the effect is absolutely stunning! Thanks so much for stopping by, and have a marvelous day!

Filed Under: simon says stamp Tagged With: baby card, embossing folder, fresh daisies, ink blending, IUILE watercolors, leafy greens, masking, oh baby, olo markers, stencil

Primary Sidebar

  • Facebook
  • Instagram
  • Pinterest
  • YouTube

Favorite Shops

Secondary Sidebar

Subscribe

Enter your email address to subscribe to this blog and receive notifications of new posts by email.

Instagram
Something is wrong.
Instagram token error.
Follow
Load More

Archives

Tags

3D embossing folder alcohol markers better press birthday birthday card blog hop card kit christmas christmas card christmas tag colored pencil copic copic coloring Daniel Smith die cutting embossing folder embroidery felt giveaway holiday holiday card hot foil ink blending karin brushmarker pro layered stencil masculine my monthly hero new release no line coloring no line watercolor OLO marker olo markers original illustration pawsitively saturated rainbow shaker card slimline stamping stamptember stencil thank you thinking of you valentine's day video watercolor

Popular Posts

Simon Says Stamp Sending Cheer Blog Hop- Day 2 + Freebie + Giveaway!
Altenew October 2026 Release Blog Hop + Giveaway!
Rustic Monochromatic Stars for Christmas with Rainbow Splash!
December 2018 My Monthly Hero Blog Hop + Giveaway!
March 2020 Essentials By Ellen Blog Hop+Giveaway!
The Ton Anniversary Release: Day 1!
The Ton Stamps Summer Release: Day 1
Hero Arts Partners Blog Hop: Lawn Fawn!
Waffleflower July Release Blog Hop!
Simon Says Stamp STAMPtember Tim Holtz Collaboration: Festive Holidays!

Disclosure

Some affiliate links are used in my posts. This means that, should you click on one of my links and purchase something from that company, I will receive a small portion of the sale at no extra cost to you. I use the money earned from these sales to help maintain my blog. I so appreciate you visiting and, if you do choose to use one of my affiliate links, thank you so much for your support!
Copyright © 2026 ·Brunch Pro Theme · Genesis Framework by StudioPress · WordPress · Log in
Loading Comments...