• Skip to main content
  • Skip to primary sidebar
  • Skip to secondary sidebar

Sixth Street Sundries

Emily Midgett

  • Home
  • About Me
  • Contact
  • OLO Marker Color Swatch Chart
  • Shop

original illustrations

Simon Says Stamp To Love and To Be Loved Release Blog Hop!

January 10, 2025

This post was sponsored by Simon Says Stamp. Thanks, Simon!

Hi friends! I am hopping along with my friends at Simon Says Stamp to celebrate not one, but two new releases! The December 2024 To Love release is the companion release to this month’s To Be Loved release, and we are celebrating with a massive blog hop! You should have arrived here from Barbara Tarayao, and your next stop is Amy Rysavy. You can also start back at the beginning at the Simon Says Stamp Blog! I have a project featuring products from both releases, including my newest stamp set called Anemone Wreath, so let’s get started with the details!

*I have gathered links to all of the products used at the bottom of the post for your convenience, using affiliate links. Thank you for shopping with my links! I truly appreciate your support for my work!*

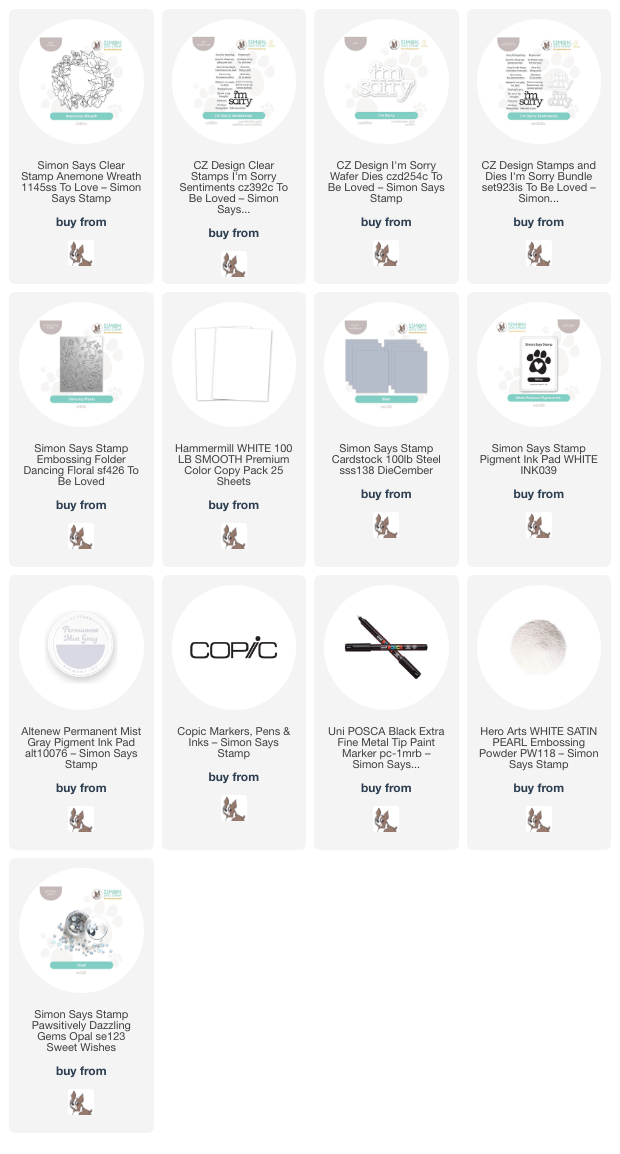
To begin, I stamped my new Anemone Wreath stamp from the To Love release onto some white cardstock using Altenew’s Permanent Mist Gray ink, which is great for no-line coloring. I then used Copic markers in cheery shades of sunny yellow and jade green to do some no-line coloring, coloring only a couple of the blooms and foliage. I made sure to select blooms and foliage that were completely intact, not tucked behind another flower or leaf, so that I could do some fussy cutting and create a completely unique arrangement. Selectively using individual flowers is another great way to stretch this stamp set! After I had finished coloring the images, I used my sharp scissors to fussy cut the images, adding a pale gray border around the edges with a Copic marker that coordinated perfectly with the Simon Says Stamp Steel cardstock that I planned to use in the background.

For that background, I ran an A2 sized panel of the Steel cardstock through my die cutting machine using the new Dancing Floral Embossing Folder. The delicate floral pattern on this embossing folder was just neutral enough that it added beautiful texture behind my focal points without distracting from the vibrant yellow flowers!

For the greeting, I die cut the detail layer of the new I’m Sorry die from some more Steel cardstock as well as the shadow layer from some Simon Says Stamp Vellum cardstock, layering the two together with liquid adhesive. The vellum shadow helps the tone-on-tone sentiment stand out from the background a bit. I also stamped a greeting from the I’m Sorry Sentiments stamp set onto a small rectangle of Steel cardstock using Simon Says Stamp White Pigment Ink, then added some White Pearl Embossing Powder over the top of the sticky pigment ink to create a lovely and subtle pearlescent accompaniment to the chunky greeting die cut. I arranged the die cut, sentiment block, and vibrant blooms on the embossed card front, adhering them with some foam adhesive for added dimension. Finally, I added a smattering of Opal Pawsitively Dazzling Gems for a touch of shimmer. Pairing gray and yellow is such an unusual color palette for me, but I am always encouraged to use it more frequently whenever I do use it; it’s such a striking combination, perfect for these dreary gray January days!

Well, that’s all for my project today. Now for some fun giveaway information!

Simon Says Stamp is giving away a $25 coupon to every stop on the hop from your blog comment section. Winners will be selected and posted on the Simon Says Stamp blog on Wednesday the 15th of January. Winners can email the Simon team to claim his/her prize 🙂

To celebrate this release duo, Simon Says Stamp is also offering a fabulous freebie with purchase! Simply follow the instructions in the graphic at the top of the post to receive the Circle Hoops Embossing Folder for free with your order.

Your next stop is Amy Rysavy. Don’t forget to check back on the Simon Says Stamp Blog tomorrow for Day 2 of the hop for even more fabulous inspiration using these new products! Thanks so much for stopping by today, and happy hopping!
Filed Under: simon says stamp Tagged With: anemone wreath, blog hop, copic coloring, dancing floral, die cutting, encouragement card, giveaway, i'm sorry, i'm sorry sentiments, no line coloring, original illustrations, sympathy card, to be loved, to love

Simon Says Stamp Dear Friend Blog Hop- Day 1 + Giveaway!

May 20, 2023

Good morning! It’s the weekend… hooray! It’s an extra wonderful weekend, because the new Simon Says Stamp Dear Friend release is live, and we are hopping along to inspire you with the fabulous new products! You should have arrived here from Lisa Addesa, and your next stop is Tina Smith.

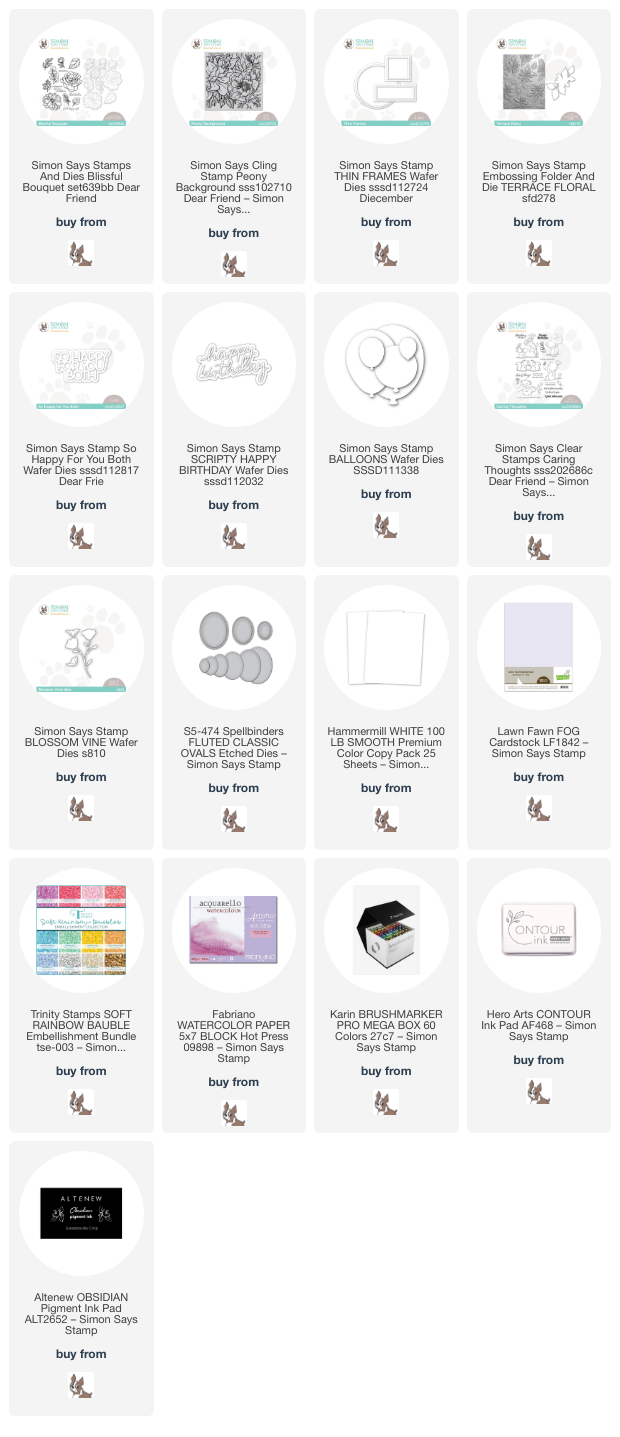
I am super proud of the fact that I have two new illustrations included in this Dear Friend release: Peony Background and Blissful Bouquet! (I have shared some inspiration using Peony Background HERE.) I love a good bouquet stamp, because how easy is it to stamp and go without having to worry about masking or die cutting each individual piece, but I also love the versatility and freedom of a good bouquet builder. I designed the Blissful Bouquet set to create lush, fluffy bouquets, with uniquely-shaped foliage, sprigs of “filler” flowers, and two large centerpiece blooms- a peony and a dahlia. I have a pair of projects to share with you using this new stamp set, so let’s get started with the details!

I love challenging myself with no-line coloring, but sometimes no-line coloring can be made even more challenging if the images are extremely small. I made sure to size the images in this set so that no-line coloring would be a bit easier! I die cut and stamped a ton of the images from Blissful Bouquet onto Hammermill cardstock (which is awesome for alcohol marker coloring!) using Hero Arts’s Contour Ink, my preferred ink for no-line coloring, then sat down with my Copic markers and went crazy coloring.

I very rarely use yellow or orange while creating, so after my homage to pink and purple on THESE cards, I thought I would switch things up and play with yellow and gray! I love the combination of yellow and gray; it’s so unique and modern, and can be great for masculine cards, but when paired with florals, it can be beautifully feminine, as well. The dahlia is such a sunny yellow; it practically glows!

Once I had finished coloring my images, I die cut a vellum circle using the circular Thin Frames Die from Simon Says Stamp. I ran the circle die cut through my die cut machine inside the Terrace Floral 3D Embossing Folder, which creates a beautifully subtle textured effect on the translucent vellum. I die cut a super pale gray circle frame and adhered it to the embossed vellum die cut, creating an area around which I could “ground” my floral images.

Next, I trimmed another panel of pale gray cardstock down to slightly smaller than A2 sized and mounted it on a full size white A2 card front, leaving a white border around the edge. I arranged the Blissful Bouquet floral die cuts around the embossed vellum circle and adhered them to the circle, then hid foam adhesive behind the solid die cuts so avoid marring the translucent vellum. I die cut a pale gray So Happy For You Both greeting and added it over the vellum circle, as well as a silver heat embossed “congratulations” from the Blissful Bouquet stamp set. The final touch was to add a few iridescent, pale gray pearls to add one last bit of shine and elegance, perfect for a wedding card!

My second card features a festive floral shaped balloon card created using the Blissful Bouquet and the Balloons dies from Simon Says Stamp! Who wouldn’t want a beautiful balloon decorated with flowers and a fluffy silk bow? I kept my no-line coloring an elegant, feminine palette of vivid mauve, jade green, and periwinkle blue. That big fluffy peony bloom makes my heart go pitter-patter. I used Copic markers for these images today, but I can’t wait to try no-line watercoloring with these pretty blooms!

I die cut the sentiment from a panel of coordinating mauve cardstock using the Scripty Happy Birthday die, cutting it twice from the same cool rose colored cardstock and layering the die cuts together to create a dimensional die cut. I also die cut the largest balloon of the Balloons die set from some iridescent white foil cardstock. I arranged the flowers in a swag around the base of the balloon, leaving the bottom bare so that I could tie a silk bow around where the balloon would be tied after filling it up. The iridescent coating on the white foil cardstock is difficult to capture in the photograph, but it picks up the colors of the flowers and foliage beautifully.

After I had added all of my die cuts to the front of the balloon, I created a shaped card by slightly offsetting that same largest balloon die on an A2 card base, allowing the edge of the balloon to overlap the folded side of the card. I adhered the full size, decorated balloon die cut to the card front, creating a festive, elegant, uniquely shaped birthday card!

My last card features the utterly adorable new Caring Thoughts stamp set! I am so smitten with the storybook illustration style of these critters, and the sweet little scenes make it super easy to stamp one or two stamps and have a scene ready to go! I stamped my darling bunny with the butterflies onto some Fabriano Artistico Hot Press watercolor paper using Contour Ink, then used Karin Brushmarker Pro markers and a damp paintbrush to pick up the color from my glass mat. I prefer this method of picking up the scribbled color from the glass mat to putting the marker directly to the watercolor paper, because this allows me to control the vibrancy of the color a bit more. I can easily dilute the color on my mat, but it is much more difficult once the concentrated color hits the watercolor paper. I added a few black pen lines (the eyes, the whiskers, the details on the butterfly) that got a bit lost in the no-line watercoloring. I die cut the finished vignette using a fluted oval die from Spellbinders.

To accent my sweet purple butterflies, I decided to watercolor some coordinating purple flowers. I die cut the Blossom Vine dies from some more Fabriano Artistico Hot Press watercolor paper, then used Karin Brushmarker Pro and my damp paintbrush to add vibrant lilac and bottle green to the die cuts.

I arranged the oval bunny die cut with the flowers on a white A2 card front using foam adhesive. For the greeting, I stamped the “hello” from the Caring Thoughts using Obsidian pigment ink, then clear embossed over the top of the stamped image to create a crisp black sentiment strip. I also trimmed down one of the greetings from the  Reverse Bold Hello Sentiment Strips and adhered it beneath the “hello” with another double layer of foam adhesive. I love how the bunny looks like it’s nestled amongst a field of pretty purple blooms!

Well, that’s all for my projects today! Now for some fun giveaway information:

We’re giving away a $25 coupon to every stop on the hop from the blog comment section. Winners will be announced on the Simon Says Stamp blog on Wednesday the 24th of May. The winner can email Simon Says Stamp to claim his/her prize.

Here’s the full hop list, in case you get lost:

Simon Says Stamp Blog  <<YOU ARE HERE!

Nina-Marie Trapani

Caly Person

Suzy Plantamura

Debby Hughes

Sidnie Des Jardins

Amy Rysavy

Lisa Addesa

Emily Midgett <—– you are here!

Tina Smith

Emma Williams

Lea Lawson

Bobbi Lemanski

Seeka

Lorraine Aquilina


Today is only Day 1 of this fabulous hop; be sure to check out the Simon Says Stamp Blog for more inspiration from Day 2 tomorrow morning! Thanks so much for stopping by today, and happy hopping!

Filed Under: original illustrations, simon says stamp Tagged With: balloon, birthday, blissful bouquet, caring thoughts, copic coloring, critter, karin brushmarker pro, no line coloring, original illustrations, storybook, watercolor, wedding card

Simon Says Stamp Stamptember Blog Party!

September 2, 2022

STAMPtember is officially in full swing, and we’re celebrating with a blog party! If you’re new to STAMPtember: September is Simon Says Stamp‘s birthday month, so the entire month is filled with fabulous releases, celebrations, prizes, challenges… good, clean, inky fun (and prizes!) for an entire month!! I am so thrilled to have illustrated two of the sets that were released during yesterday’s introductory release:  Floral Frames and Butterfly Ranunculus. I have a previous blog post with some watercolored projects using these new sets, which you can check out HERE. Today’s post again features the Butterfly Ranunculus set, this time with Copic markers! I have a video that you can watch below or HERE on YouTube.

In my cardmaking, I am all about making things as seamless and coordinated as possible. To that end, the white edge on die cut images drives me a little nuts when I am working with a vibrant, saturated, colorful background. I recently saw Dawn from Wplus9 use a pale blue Copic marker around her images before die cutting, and I thought that it would translate well to other colors, too! The beautiful Shamrock cardstock from Hero Arts is such a stunning shade of green, and it reminded me of beautiful brocade fabrics, with intense emerald silk for the background and brilliant blue embroidery. Monochromatic, but not really monochromatic, if you know what I mean. I just had to channel that inspiration into a card!

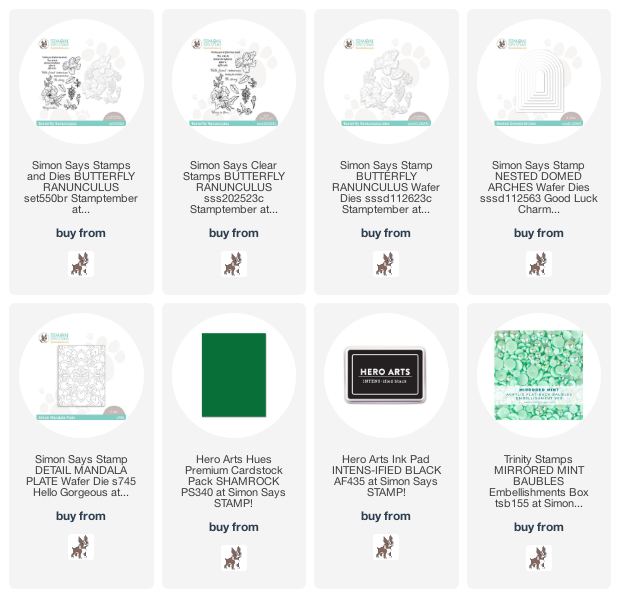
I began by stamping all of the images from the Butterfly Ranunculus set using Hero Arts Intens-ified Black ink onto some white, Copic-friendly cardstock. I used G07 Copic marker to color a halo around the edge of the images, making sure to extend far enough that the entire edge would be green when die cut. I then colored the images, using BG49, BG53, BG01, B00, B000 for the flower and T7, BG78, G28, G09 for the foliage.

Because I wanted to keep the flower a very light shade of blue, I colored the petals first with the four lightest shades of aqua, then added touches of BG49 wherever the shadows would be deepest, blending them out with the lighter shades to get a smooth blend. A little goes a long way with the darker shades, so don’t add too much, because it’s basically impossible to remove once you put the ink on the paper!

Once I had my flowers colored and die cut, I cut a Nested Domed Arch from the Shamrock cardstock, running it through my die cut machine once more with the Detail Mandala Plate from Simon Says Stamp. This extra step adds just a touch of subtle interest and texture to the background of my flowers. I adhered the domed arch to an A2 Shamrock card base using foam tape, then arranged the colored flowers, adhering them with lots of foam tape, sometimes in double layers to add extra height. I heat embossed a greeting from Butterfly Ranunculus onto a strip of Shamrock cardstock using silver embossing powder, finally adding a smattering of Mirrored Mint pearls for some shine!

Well, that’s all for my project today. To celebrate the beginning of STAMPtember, we have a scavenger hunt of all kinds of great freebies that you can receive with your order!

Enter code EH5M427Q at checkout to receive the darling Party Like a Puffin stamp set free with your purchase of $30 or more! You can also check out the other Blog Party participants to see what other kinds of fabulous free gifts you can receive in addition to utterly amazing inspiration!

Thanks so much for stopping by today, and happy STAMPtember!!

Filed Under: original illustrations, simon says stamp Tagged With: butterfly ranunculus, copic markers, monochromatic, original illustrations, stamptember

Introducing Enchanting Anemones-New Coloring Panel Release!

March 15, 2022

Hello, friends! It has been a bit since my last coloring panel release. Things have been so busy; between kiddos, creating new stamp designs, design team work, Flower on the Grain, and just general life stuff, I have not had a chance to finish coloring these new panels to help introduce them to you all! I decided finally that I should just go ahead and release them with only two of the panels fully colored, and hopefully you all would be able to visualize what they look like as a finished product without my samples. 🙂

So, I present to you:

Enchanting Anemones

I admit… I have had a long love affair with anemones. They come in such a wide variety of colors that I feel like they can be adapted to any color scheme that you like, plus the black centers are so very unique and simply stunning. They are graceful, with beautiful movement, and I find them simply beguiling.

This set of four coloring panels features four different arrangements of anemone, so that you can simply color and add a sentiment. A few of these would be super fun fussy cut if you find fussy cutting enjoyable-particularly that wreath! I think that would be lovely popped up to give even more dimension.

I added a few berries, a few impatiens, some campanula, a few ranunculus… a wide variety of “filler flowers,” but the focus is truly on the large anemone blooms. The two panels pictured above allow for some white space for your greeting, featuring a corner arrangement (left) and a swag (right).

The arrangements in the two panels pictured above cover more of the A2 card front, with a full background pattern (left) and complete wreath (right).

Pictured above are the no-line version of the Enchanting Anemones panels. I am now able to offer no-line panels in both the Copic-friendly cardstock as well as the watercolor paper.

I also am making available a few of my previously-released coloring panel sets in both outline and no-line for both watercolor and Copic coloring:

Lo, How A Rose E’er Blooming

Framed Florals Volume 2

Just Add Fruit

Here are the details:

  • Pricing:
    Copic-friendly white cardstock-$8
    Watercolor paper-$10
    Shipping is included in the continental US for up to 3 sets of panels (twelve total A2 sheets). A charge of $3 will be added for four or more sets.
    International friends: add $4 to accommodate international postage (this may be increased slightly if more than two sets of panels are ordered to accommodate for the increased weight of the envelope.) Sorry, no tracking available on these, and international mail seems to be exceptionally slow these days, so I can’t guarantee how quickly they will arrive, unfortunately.
  • You will receive 4 panels in each set-one of each for four individual designs. To purchase: please indicate which set(s) you would like, whether you would like outline or no-line printing, paper choice (i.e.-Copic-friendly white cardstock or watercolor paper), and whether you are located within the US or internationally. I will then send you an invoice via PayPal, to please be paid within 24 hours of receipt.
  • I will leave the preorders open until March 22, 2022. It’s just me printing, trimming, and shipping, so please allow 2 additional weeks for processing and shipping. I have four little kids here; please be patient with me! 
  • In purchasing these coloring panels, you agree that you will use the designs for personal use only. The designs belong to me, Emily Midgett, and are not to be copied or used for commercial gain. I appreciate your support in keeping my artwork safe!

To order: email me at eamidgettsketches (at) gmail.com, and be sure to include all of the information requested above!

Thank you so much for the support and kind words on my little venture! I appreciate each of you who have ordered or offered a kind comment so very much. <3 Have a marvelous day!

Filed Under: coloring panels, original illustrations Tagged With: coloring panels, enchanting anemone, original illustrations

Introducing Orchid Rose Bouquet from Simon Says Stamp!

January 14, 2022

Hi friends! I am incredibly excited today to share that my newest stamp illustration for Simon Says Stamp, Orchid Rose Bouquet, is part of the February 2022 Card Kit, called Season of Sentiments! I am so honored to have my design used in this card kit. I have a project to share with you today using the new Orchid Rose Bouquet, so let’s get started with the details!

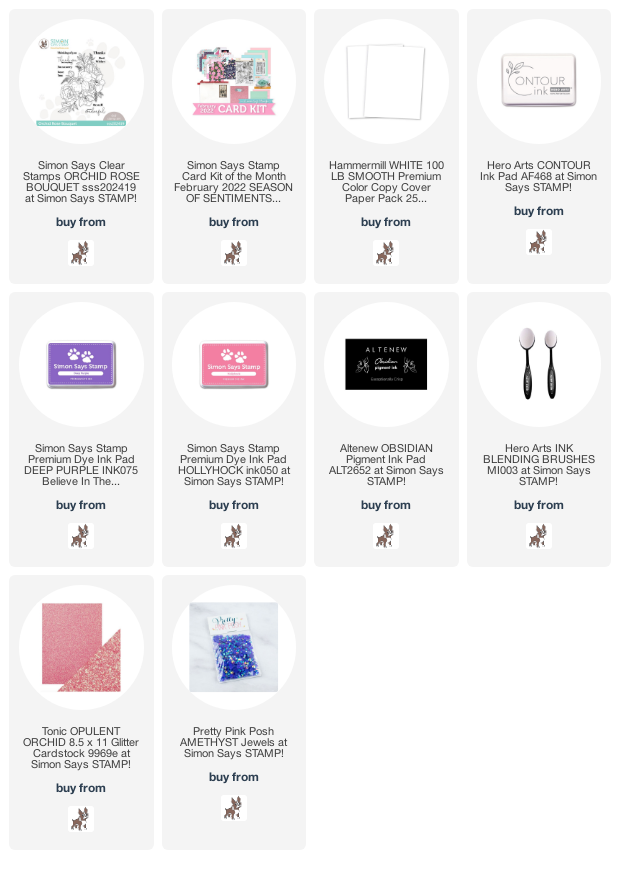
I began by stamping the Orchid Rose Bouquet from the Season of Sentiments kit on Hammermill cardstock using Hero Arts’s Contour Ink for some no-line Copic coloring. I used some vibrant pink, purple, and green Copic markers to add lots of intense color to the image, allowing the large orchid to be the star of the show!

Once I had finished coloring my image, I lightly blended some Hollyhock and Deep Purple inks from Simon Says Stamp in the opposite corner to coordinate with the shades in the colored bouquet. I then stamped one of the sentiments included in the Orchid Rose Bouquet using Obsidian black pigment ink from Altenew to get a really crisp stamped image over the top of the ink blending.

Before mounting the colored panel on my A2 glitter paper card base, I adhered it to a slightly larger panel of some deep purple cardstock to add a bit of contrast between the edge of the colored panel and the similarly-colored pink glitter paper, appropriately named Opulent Orchid. The shades were a similar level of vibrancy, so without that contrasting deep purple edge, the two cardstocks would have blended into each other. The final touch was to add some iridescent purple gems for some added sparkle and texture!

Well, that’s all for my card today. I am so thrilled that my illustration was included in the Season of Sentiments card kit. The Simon Says Stamp team have absolutely knocked it out of the park with their own projects; I highly encourage you to go check them out on the post on the Simon Says Stamp blog! Thank so much for reading, and have a marvelous day!

Filed Under: simon says stamp Tagged With: card kit, copic, copic coloring, no line copic coloring, Orchid Rose Bouquet, original illustrations, watercolor

  • Page 1
  • Page 2
  • Page 3
  • Go to Next Page »

Primary Sidebar

  • Facebook
  • Instagram
  • Pinterest
  • YouTube

Favorite Shops

Secondary Sidebar

Subscribe

Enter your email address to subscribe to this blog and receive notifications of new posts by email.

Instagram
Something is wrong.
Instagram token error.
Follow
Load More

Archives

Tags

3D embossing folder alcohol markers better press birthday birthday card blog hop card kit christmas christmas card christmas tag colored pencil copic copic coloring Daniel Smith die cutting embossing folder embroidery felt giveaway holiday holiday card hot foil ink blending karin brushmarker pro layered stencil masculine my monthly hero new release no line coloring no line watercolor OLO marker olo markers original illustration pawsitively saturated rainbow shaker card slimline stamping stamptember stencil thank you thinking of you valentine's day video watercolor

Popular Posts

Watercolor Poinsettia Card and Tag with Tim Holtz and Simon Says Stamp!
Cottagecore Christmas Framed Artwork with New Simon Says Stamp!
Simon Says Stamp Joy For You Blog Hop- Day 1!
Warmth and Love at Christmastime with New Simon Says Stamp!
Honey Bee Stamps 4th Anniversary Celebration!
Altenew Build A Flower Sweet Violet+Giveaway!
Simon Says Stamp Glory to the Newborn King Holiday Kit-Part II!
Altenew July Stamp and Die Blog Hop+Giveaway!
Altenew Watercolor Coloring Book Release Blog Hop + Giveaway!
Cottagecore Canvas with New Simon Says Stamp Shine On Release!

Disclosure

Some affiliate links are used in my posts. This means that, should you click on one of my links and purchase something from that company, I will receive a small portion of the sale at no extra cost to you. I use the money earned from these sales to help maintain my blog. I so appreciate you visiting and, if you do choose to use one of my affiliate links, thank you so much for your support!
Copyright © 2026 ·Brunch Pro Theme &middot; Genesis Framework by StudioPress &middot; WordPress &middot; Log in
Loading Comments...