• Skip to main content
  • Skip to primary sidebar
  • Skip to secondary sidebar

Sixth Street Sundries

Emily Midgett

  • Home
  • About Me
  • Contact
  • OLO Marker Color Swatch Chart
  • Shop

floral lace

Altenew July 2023 Marvelous Monthly Series Release Blog Hop + Giveaway ($300 in Total Prizes!)

July 18, 2023

Hi there! Today, Altenew is hosting a blog hop to celebrate their July 2023 Marvelous Monthly Release! You should have arrived here from Jaycee Gaspar, and your next stop is Caly Person You can also start back at the beginning at the Altenew Blog. I have a project to share using the stunning new Build-A-Garden: Sweet Lilies set, so let’s get started with the details!

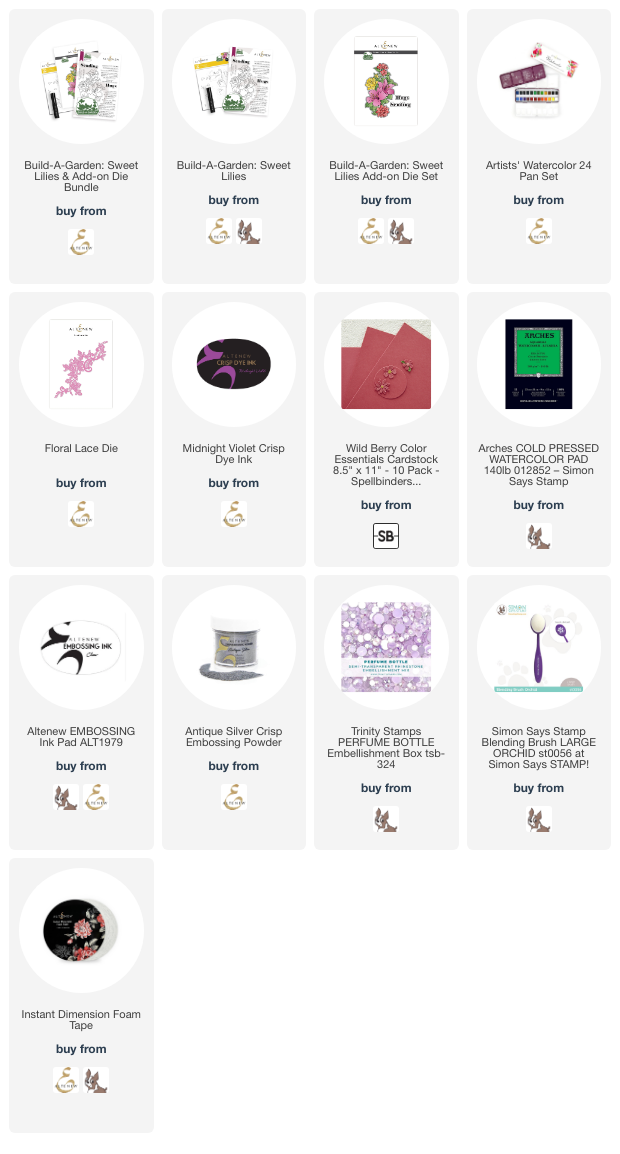
The new Build-A-Garden: Sweet Lilies set features a gorgeous 6×8 stamp set that is complete with a stunning floral arrangement as well as a wide variety of beautifully poignant sentiments that would work for so many different occasions. The set also features a layering stencil set and a small blending brush! You can also purchase the coordinating die as an add-on, which features a large die for the floral arrangement as well as dies for the larger sentiment stamps. I love the polished look that these sentiment dies give to the card! If you find yourself loving the Build-A-Garden series each month, you can become a subscriber HERE to make sure that you get first dibs and a discount!

For my card today, I began by heat embossing the gorgeous floral arrangement from Build-A-Garden: Sweet Lilies on a panel of cold press watercolor paper using silver embossing powder. I couldn’t resist painting the huge, beautiful lilies in the arrangement rather than using the layering stencils, so I pulled out my Artists’ 24 Pan Watercolor Set, which is one of my most favorite sets of watercolors in my stash! The colors are beautifully vibrant and unique shades, or they can be mixed to create a custom color palette. For today’s card, I did quite a bit of mixing and matching to create this lavender, coral, pink, and green bouquet, adding Fall Harvest to the Shades of Purple to create the muted lavender shade, mixing Rock Collection with Green Meadows for the deep green leaves, etc. Each of the colors on the bouquet was created by combining two (or more!) of the colors in the palette. Sometimes, a little tweak is all you need to create a truly gorgeous custom color palette!

Once I had finished watercoloring the image, I used the coordinating die to cut it out. I wanted to coordinate my background with the colors in the image, so I decided to match my vibrant pink slimline background with an alcohol marker from my stash, then outline the white edges of the die cut. I love to keep the color palettes on these vivid projects as true as possible, so I avoided any white or black at all, preferring to allow the colors be incredibly vibrant! To accent the vivid bouquet, I die cut the Floral Lace Die from the same shade of bright watermelon pink cardstock. I also lightly blended some Midnight Violet ink along the top and bottom of the slimline card front to coordinate with the purple in the bouquet. I arranged the watercolored floral image and lacy die cuts on the card front, adhering them with a mixture of liquid and foam adhesive for lots of different heights.

Once I’d finished arranging the background, it was time to add a sentiment. I heat embossed the large “sending” and a smaller sentiment strip onto yet another piece of that bright watermelon pink cardstock using silver embossing powder. I used the coordinating die to cut the “sending” and trimmed the slim sentiment strip with my trimmer. I adhered them both to the center of my card with another layer of foam tape to allow them to really pop from the card front. I added a few shimmering jewels for some sparkle as a final touch!

Well, that’s all for my project. Now for some fun giveaway information!

$300 in total prizes! To celebrate this release, Altenew is giving away a $100 gift certificate to 1 lucky winner and a $40 gift certificate to 5 winners! Please leave a comment on the Altenew Card Blog and/or each designer’s blog post on the blog hop list below by 07/24/2023 for a chance to win. Altenew will draw 6 random winners from the comments left on each stop of this blog hop and announce the winners on the Altenew Winners Page on 07/26/2023.
*The winner of the $100 gift certificate will be chosen from comments left on the Altenew blog. 

Here’s the full hop list in case you get lost:

You are invited to the Inlinkz link party!

Click here to enter

Thanks so much for stopping by today, and happy hopping!
Filed Under: altenew Tagged With: artists 24 pan watercolors, build a garden, die cutting, floral lace, ink blending, marvelous monthly, sweet lilies, watercolor

Pinkfresh Studio January 2023 Stamp+Die+Stencil+Hot Foil Plate Release Blog Hop + Giveaway!

January 23, 2023

Good morning, and happy Monday! Today, Pinkfresh Studio is hopping along to celebrate their first new release of the brand new year! I am always delighted to work with Pinkfresh Studio products, but it’s even more exciting for me when I get to use stamps that I’ve illustrated. The new Wonderful In Every Way is one of my most favorite illustrations that I’ve created, and I’m so excited to finally see it in a tangible stamp. And, bonus, Pinkfresh Studio has even created a coordinating hot foil plate to complement the stamp, die, and layering stencils, and I will share another project using that product tomorrow. Today, I have two projects to share using new goodies from this month’s new release using my current color combination obsession. Let’s get started with the details!

Both of my cards today feature bold, dramatic black backgrounds with brightly colored flowers as the focal point. In order to keep my color scheme as cohesive as possible, when coloring, I go one step further by coloring around the edge of my colored image with a black marker. This helps to visually keep the color scheme for both cards as true as possible, avoiding that white outline that detracts from the overall color scheme.

My first card uses the beautiful new Floral Trio stamp, die, and stencil suite. I began by stamping the main floral image from the Floral Trio stamp set onto some white cardstock using black pigment ink, then clear embossed over the top. I like to do this especially with images that will be stenciled, because the clear embossing powder seals the black lines and prevents them from smudging while blending.

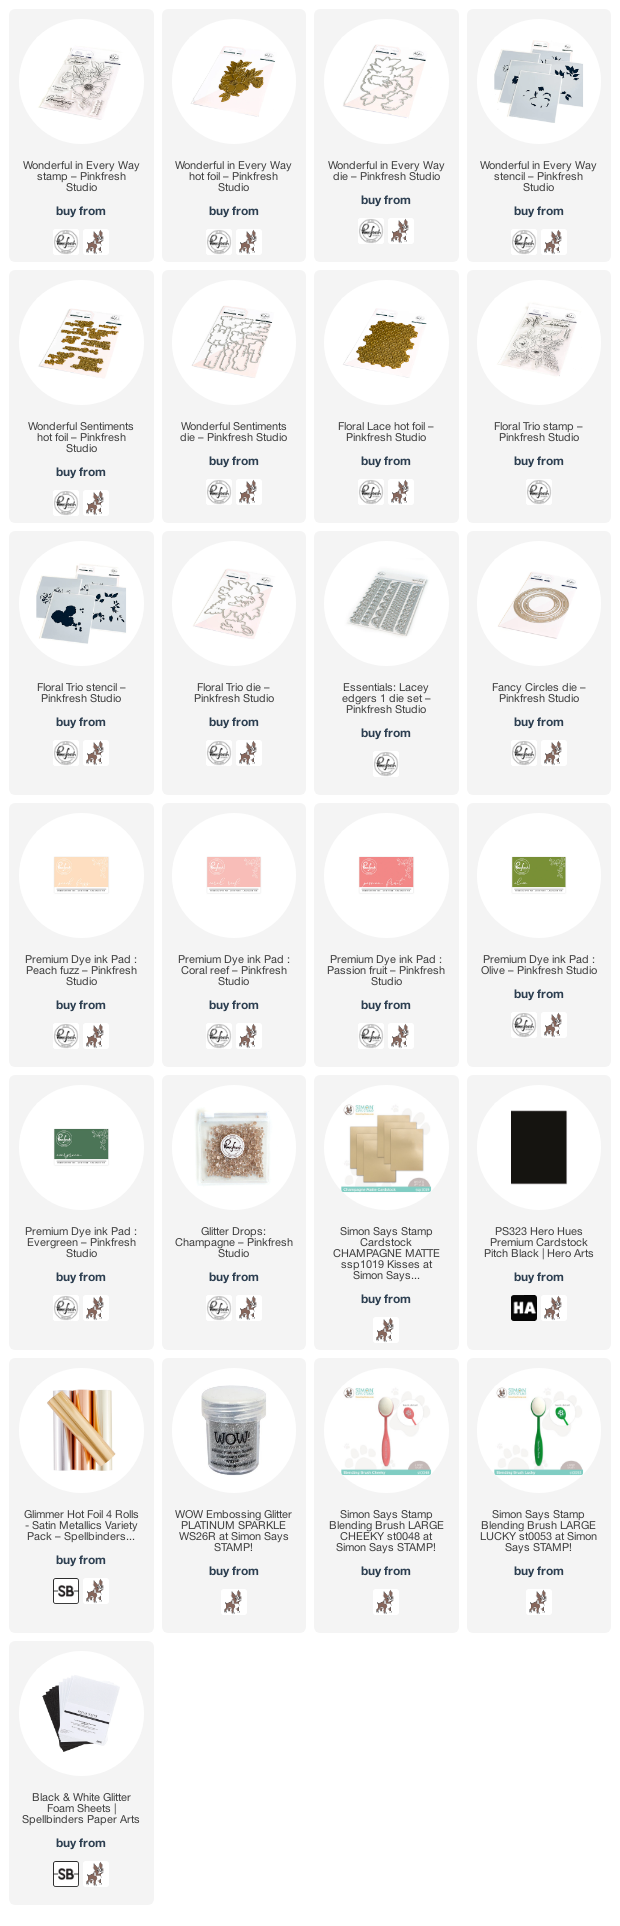
I paired the Floral Trio Layering Stencils with Peach Fuzz, Coral Reef, Passion Fruit, Olive, and Evergreen inks from Pinkfresh Studio, using a light touch and some soft blending brushes to achieve a more subtle effect. I can be somewhat heavy-handed sometimes when it comes to ink blending, so I made special effort to use a light touch with these images, and I love the result with the soft peachy flowers and fresh green foliage! I used a black copic marker around the edge of the finished blended flowers, then used the coordinating die to die cut the floral bouquet.

When I am working with new hot foil products, I always try to hot foil with several different colors of foil and cardstock, so that I have lots of options when the time actually comes to start creating with the new goodies. I had hot foiled the beautiful new Floral Lace Hot Foil image onto some black cardstock using matte platinum hot foil from Spellbinders, and I had also hot foiled the greetings from the new Wonderful Sentiments Hot Foil set using the same matte platinum foil so that the two designs could work together nicely. I trimmed down my hot foiled panel, then popped it up on an A2 black card front using foam adhesive.

I added a sparkly black glitter foam die cut border cut using an Essentials: Lacey Edgers die. I adhered the floral bouquet to the card front with some more foam tape, creating a double layer of height, then added the greeting (creating a triple layer of foam-eek!) and a few Champagne Glitter Drops for some sparkle! I love how adding that simple black edge around the die cut makes those lovely peachy blooms pop from the dramatic dark background. Such a simple step, but I think it makes the card so much more interesting.

My second project features my new Wonderful In Every Way stamps and the coordinating dies. I wanted to do some simple watercoloring to show how much fun these stamps are to color! Because I had already hot foiled my black and platinum sentiments using that matte platinum hot foil and the Wonderful Sentiments Hot Foil, I heat embossed the large poppy image from Wonderful In Every Way using platinum sparkle embossing powder, which matches the platinum foil beautifully, onto some Arches cold press watercolor paper.

I taped the panel down to my watercolor board and used my Daniel Smith paints in shades of bright coral and red with olive green for the foliage to watercolor the large, open image. I love how easy the watercoloring for this image can be; the large petals of the flower and simple foliage help simplify the coloring process and give you plenty of area in which to work with those nooks and crannies! I used a black Karin watercolor marker to color around the edges of my image before die cutting, again using that black die cut edge to keep the color scheme true.

For the card base, I heat embossed the poppy image from Wonderful In Every Way along the edge of a black A2 card front using the same sparkling platinum embossing powder. This adds almost a lacy effect to the background, creating an intricate pattern, but maintaining the dramatic black and not adding any extra colors to the background helps to keep the focus on those watercolored poppies.

I die cut a coordinating platinum foil frame using the Fancy Circles die. I popped up the circle on the black embossed background using foam tape, then added the watercolored floral die cut over the top, allowing the simply embossed images on the card front to peek out from behind the colorful watercolored image. I added another greeting from the Wonderful Sentiments Hot Foil set, which I also die cut with the coordinating dies. The last touch was a few sparkling Champagne Glitter Drops.

Well, that’s all for my projects today! I have another project for you tomorrow, featuring my new Wonderful In Every Way Hot Foil Plate with the layering stencils, so I hope you will come back tomorrow to take a peek.

Now for some fun giveaway information! Pinkfresh Studio is giving away their full release over on the Pinkfresh Studio Blog and YouTube channel, as well as ten $25 gift cards to the shop drawn from comments left along the hop! Simply leave a comment at each stop on the hop to be eligible to win! Winners will be announced on the Pinkfresh Studio Blog on January 31, 2023.

Here’s the full list of hop participants:

You are invited to the Inlinkz link party!

Click here to enter

Thanks so much for stopping by today, and happy hopping!

Filed Under: pinkfresh studio Tagged With: fancy circles, floral lace, floral trio, hot foil, layered stencil, original illustration, poppy, stencil, watercolor, wonderful in every way, wonderful sentiments hot foil

Altenew Vintage Galore Collection Release Blog Hop + Giveaway ($300 in total prizes)

January 4, 2022

Hi there! Altenew is celebrating their new Vintage Galore release with a blog hop chock full of inspiration, and I’m excited to share with you what I’ve created using the new goodies both here and on the Altenew Blog! You should have arrived here from Therese Calvird, and your next stop is Michelle Short. You can also start at the beginning at the Altenew Blog, where I have a third project featuring this gorgeous Golden Days product suite! I have two pretty in purple projects to share with you today, so let’s get started with the details!

Both of these projects feature the Golden Days product suite and the Enchanted Garden ink suite for those beautiful shades of purple. I love that the main images from the hot foil/stencil set and the stamp/stencil/die set from the Golden Days product suite coordinate, but create such very different looks! Let’s get started with the details on my projects.

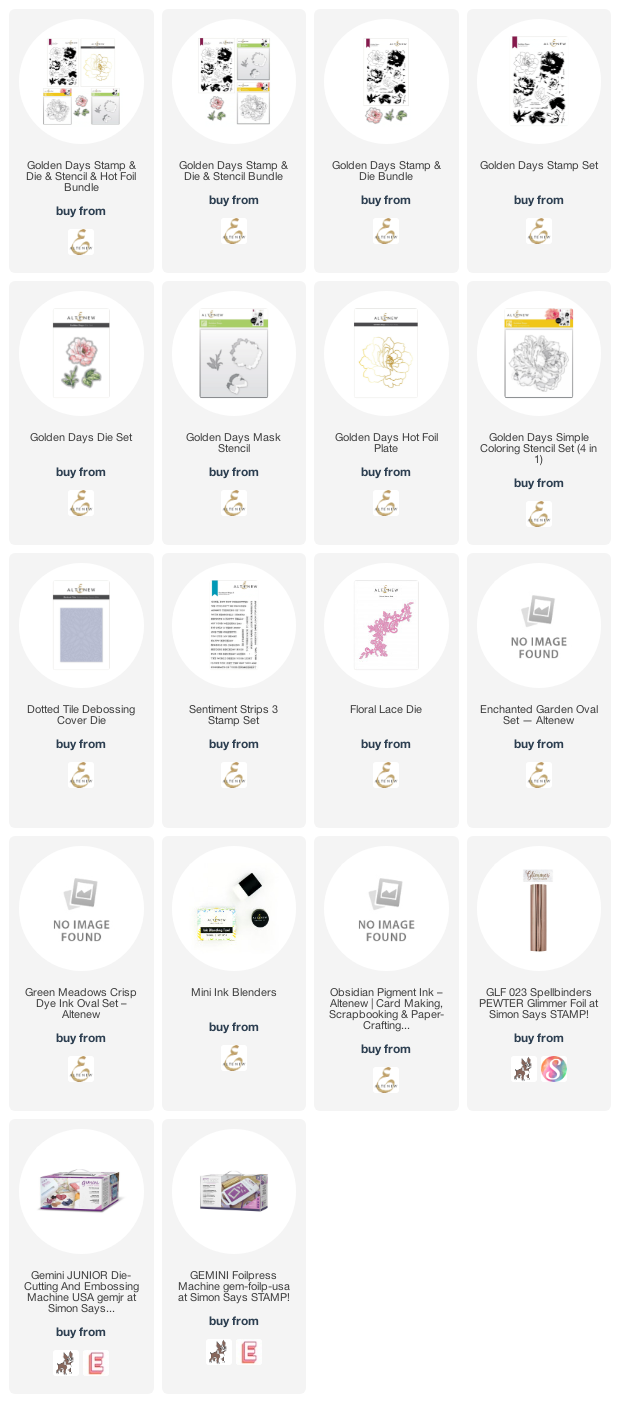
My first project utilizes the Golden Days Stamp/Die/Stencil bundle. I used the mask stencil with the lightest shade of ink from the Enchanted Garden ink suite to create the base layer for my layered, stamped flower, then added the stamped details with the darker shades of ink to create this beautifully detailed layered flower. I stenciled and stamped the leaves using the Green Meadows ink set for some lovely, springy foliage. I die cut the finished blooms using the coordinating dies.

For the card base, I used the beautiful new Dotted Tile Debossing Die. This die partially cuts a beautifully subtle stitched design on the background. I love the understated but elegant interest that this adds to the card front!

I stamped a greeting from the new Sentiment Strips 3 using some deep purple ink on a thin strip of white cardstock. I arranged the bloom and foliage in a small swag, then adhered it and the sentiment strip using  Instant Dimension Foam Tape. So simple, but still elegant with the white-on-white and pop of pretty purple!

My second card is a bit more involved. I don’t have enough space on my desk to keep my hot foiling products out all the time, so I had to get everything out and set it up to be able to use the Golden Days Hot Foil Plate, but let me tell you… it was so worth it! I used some metallic pewter colored foil with the white Hammermill cardstock with my Gemini foil system and got beautiful results. I love how massive this bloom is!

I used Altenew’s Mini Blending Tools and the Enchanted Garden ink suite to blend the gorgeous Golden Days Simple Coloring Stencils over the hot foiled image. I think the stencils are such a clever product to add with this giant foil plate; there’s no way we could ever fit all of those layering stamps in one stamp set for this enormous flower, so the stencils are a great alternative! Plus there are so many fun techniques that you can do with them!

Because the image is so extraordinarily large, I decided to take full advantage and create a full size slimline card using the Golden Days foiled and stenciled flower as the focal point. I trimmed my flower down to 3.5″ wide, then added it to a white slimline card front with some foam adhesive. I tucked some “foliage” cut from white cardstock using the Floral Lace die behind the huge flower, leaving some of the edges adhesive-free so that they could be curled up just a touch and add extra dimension! I added a greeting from Sentiment Strips 3, stamped with Obsidian pigment ink and heat embossed with white pearl embossing powder to coordinating with the charcoal foil. The final touch was to add some iridescent white pearls to make this wedding card look extra special!

Well, that’s all for my projects today! Now for some giveaway information:

$300 in total prizes! To celebrate this release, Altenew is giving away a $50 gift certificate to 2 lucky winners and a $25 gift certificate to 8 winners! Please leave a comment on the Altenew Card Blog and/or each designer’s blog post on the blog hop list below by 01/10/2022 for a chance to win. Altenew will draw 10 random winners from the comments left on each stop of this blog hop and announce the winners on the Altenew Winners Page on 01/12/2021.

Your next stop is Michelle Short. Thanks so much for stopping by, and happy hopping!
Filed Under: altenew Tagged With: dotted tile, floral lace, golden days, hot foil, ink blending, slimline, stencil

Altenew Wondrous World Dies/Stencils/Embossing Folders Collection Release Blog Hop + Giveaway

February 17, 2021

Hi there! Today, Altenew is releasing some absolutely beautiful new stencils, embossing folders, and standalone dies, and of course, we’re celebrating with a blog hop with lots of inspiration and prizes! You should have arrived here from Virginia Lu, and your next stop is Vicky Papaioannou, or you can start at the Altenew Card Blog to start at the beginning. I have three projects for you today, so let’s get started with the details!

My three projects today focus on a pale gray, peach/coral, and white color scheme, which I think is a great transitional combination from winter to spring. The peach is a little softer and less autumnal than gray and yellow, but the light gray and white still add a touch of cool winter feel to it.

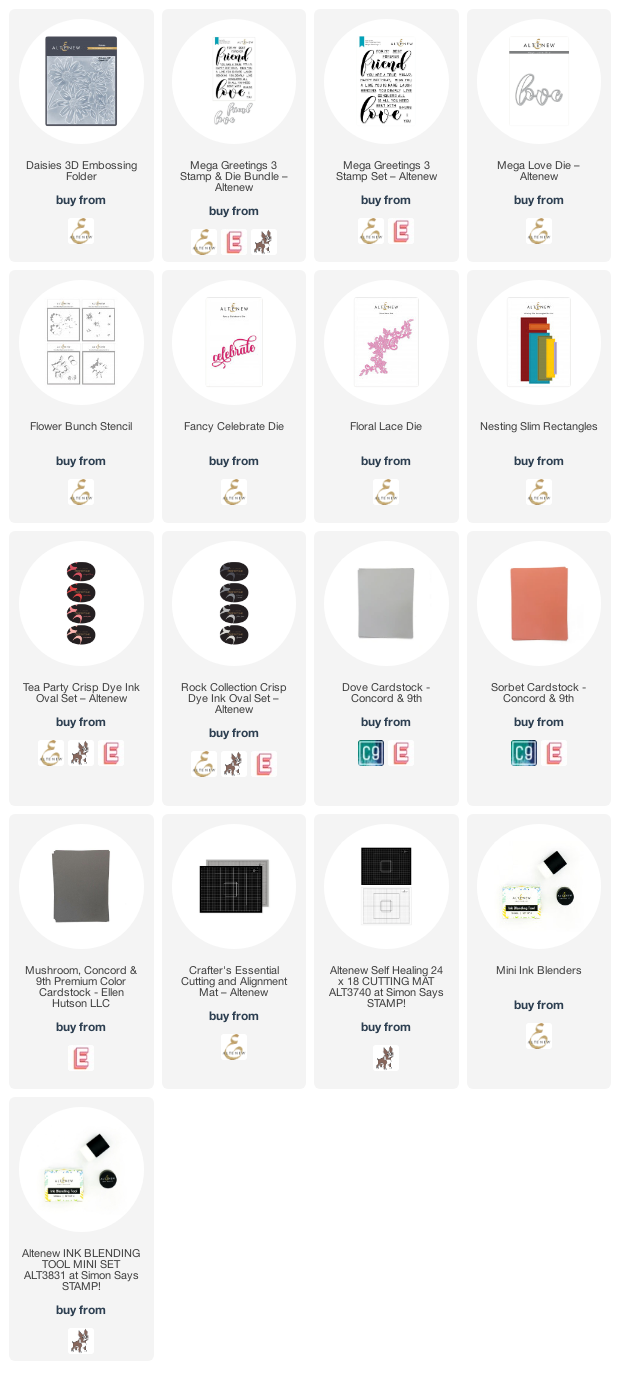
My first project focuses on the Daisies 3D Embossing Folder. These new super detailed embossing folders are so much fun, and they are such a quick and easy way to make a big impact on a card. There are all kinds of fun techniques that you can do with them, with inking and such, but I love the simple embossed look with just some plain cardstock. I embossed the Daisies 3D Embossing Folder on some pale gray cardstock, and I just adore the detail that came through.

To allow the detailed embossing to shine through, I die cut a Mega Love die from some shimmery iridescent white cardstock and heat embossed a greeting from Mega Greetings 3 on a thin strip of the same pale gray cardstock used for the base. I adhered both using foam adhesive for extra dimension, and added a few shimmery white gems for added texture and shine.

My next card focuses on the stunning new Flower Bunch Simple Layering Stencil. These new layering stencils are incredible. They function very similarly to the layering stamps for which Altenew is known so well, but they allow for huge versatility in size and technique that can’t be achieved as easily with a stamp set. For this project, I allowed the gorgeous Flower Bunch Simple Layering Stencil to shine by blending the bouquet using Pink Pearl, Coral Bliss, Heartbeat. Silver Stone, Limestone, Industrial Diamond, Pure Graphite inks on some plain white cardstock. (I will link all of the colors at the end of the blog post.)

I trimmed the stenciled panel down a bit and matted it on some light gray cardstock. For a greeting, I die cut the new Fancy Celebrate Die three times from some deep charcoal cardstock, then adhered them all together to create a dimensional die cut and adhered it right in the center of the blended bouquet. The thick charcoal die cut pops off of the center of the stenciled background! I added a few gems to help add some sparkle to the otherwise matte card front.

My final card uses the new Floral Lace Die with the Nesting Slim Rectangles Die. I die cut a plain light gray rectangle using the Nesting Slim Rectangles Die for a full slimline card front. I also die cut a Floral Lace Die from some coral cardstock. The amount of detail in this die is absolutely splendid! so beautiful.

Before adhering the Floral Lace Die cut to the card front, I blended some Industrial Diamond ink on the card front to help make the details on the intricate die cut contrast and pop even more. I adhered the Floral Lace Die cut to the blended card front using liquid adhesive, then added a die cut “congrats,” which I cut from white cardstock using the Tall Lowercase Alpha dies. I lined the die cuts up on my Cutting and Alignment Mat, then picked them up in one piece using a piece of washi tape and added liquid adhesive to the back. While they were all still attached to the washi tape, I picked it up and adhered the sentiment to my card front. The final touch was some more iridescent gems for some sparkle.

Well, that’s all for these projects! To celebrate the Wondrous World release, Altenew is having some fun giveaways!

$300 in total prizes! To celebrate this release, Altenew is giving away a $50 gift certificate to 2 lucky winners and a $20 gift certificate to 10 winners! Please leave a comment on the Altenew Card Blog and/or each designer’s blog post on the blog hop list below by 02/22/2021 for a chance to win. Altenew will draw 12 random winners from the comments left on each stop of this blog hop and announce the winners on the Altenew Winners Page on 02/25/2021. The more comments you leave, the more chances you have to win!

Your next stop on the hop is Vicky Papaioannou. Thanks so much for stopping by today, and have a marvelous day!

Filed Under: altenew Tagged With: daisies 3D embossing folder, fancy celebrate, floral lace, flower bunch layering stencils, layering stencils, mega greetings, mega love, nesting slim rectangles, slimline, stencil

Primary Sidebar

  • Facebook
  • Instagram
  • Pinterest
  • YouTube

Favorite Shops

Secondary Sidebar

Subscribe

Enter your email address to subscribe to this blog and receive notifications of new posts by email.

Instagram
Something is wrong.
Instagram token error.
Follow
Load More

Archives

Tags

3D embossing folder alcohol markers better press birthday birthday card blog hop card kit christmas christmas card christmas tag colored pencil copic copic coloring Daniel Smith die cutting embossing folder embroidery felt giveaway holiday holiday card hot foil ink blending karin brushmarker pro layered stencil masculine my monthly hero new release no line coloring no line watercolor OLO marker olo markers original illustration pawsitively saturated rainbow shaker card slimline stamping stamptember stencil thank you thinking of you valentine's day video watercolor

Popular Posts

Simon Says Stamp Sending Cheer Blog Hop- Day 2 + Freebie + Giveaway!
Joyful Snowman with New Simon Says Stamp Sending Cheer Release!
Simon Says Stamp Sending Cheer Release: Now Available!
Altenew October 2026 Release Blog Hop + Giveaway!
February 2018 My Monthly Hero Blog Hop!
Altenew March 2020 Release Blog Hop+Giveaway!
Special Release: Simon Says Stamp Limited Edition STAMPtember Christmas Card Kit!
Simon Says Stamp Cozy & Bright Inspiration, Part Two!
Waffleflower December Release Blog Hop!
Altenew Build A Flower Japanese Mum Blog Hop!

Disclosure

Some affiliate links are used in my posts. This means that, should you click on one of my links and purchase something from that company, I will receive a small portion of the sale at no extra cost to you. I use the money earned from these sales to help maintain my blog. I so appreciate you visiting and, if you do choose to use one of my affiliate links, thank you so much for your support!
Copyright © 2026 ·Brunch Pro Theme · Genesis Framework by StudioPress · WordPress · Log in
Loading Comments...