• Skip to main content
  • Skip to primary sidebar
  • Skip to secondary sidebar

Sixth Street Sundries

Emily Midgett

  • Home
  • About Me
  • Contact
  • OLO Marker Color Swatch Chart
  • Shop

Archives for November 2022

Rainbow Holiday with Hero Arts!

November 2, 2022

Are you team colored lights or team white lights? I can’t decide! Have you noticed that the new colored LED Christmas lights just don’t provide quite the exact glow of the holiday lights from when you were a kid? I think it’s the addition of the neon lilac color instead of the light pink lights! I’ve been on the hunt for the energy efficient LED lights in the same color palette as the incandescent lights from when I was younger, because while I adore the elegance of white Christmas lights, there’s just something so nostalgic about colored lights. I’ve bought so many strands of colored lights hoping that they’d be just the right colors (cue your surprise that I’d be sensitive to colors, haha!), but I haven’t found just the right ones yet. Darn it!

If you’ve seen my blog much this season, you will know by now that I love non-traditional holiday color palettes, but this card that I created for the Hero Arts Winter 2022 catalog is as traditional as it comes! The sweet little Holiday Peg Dolls from the Hero Arts Holiday 2022 Catalog were so cute that I couldn’t resist coloring them up! You might have seen this card in the Hero Arts Catalog, but I thought I’d share the details here.

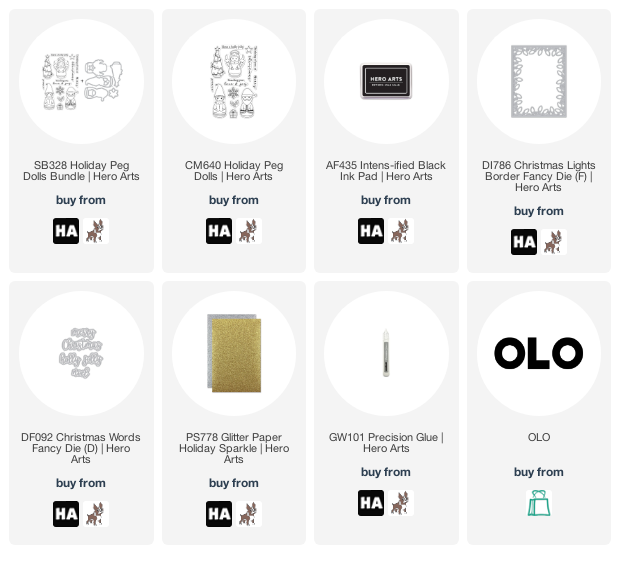
I began by stamping the Santa, Elf, and Christmas tree images from the Holiday Peg Dolls stamp set using Intens-ified Black ink onto some alcohol ink-friendly white cardstock. I used my OLO markers to add lots of vibrant color to the images, keeping the colors fairly traditional and adding lots of color to the lights on the Christmas tree. I also die cut the Christmas Lights Border Fancy Die from some more white cardstock and used the same marker shades that I used on the Christmas tree to add cheerful color to the Christmas lights. I left the wires white so that they would provide a bit of texture to the white A2 card front.

For the greeting, I used the Christmas Words Fancy Die to die cut the “Christmas” twice from white cardstock and once from silver glitter cardstock, adhering all of the die cuts together using Precision Glue to create a dimensional die cut greeting. I also stamped a sentiment strip from Holiday Peg Dolls. I arranged the peg dolls and tree in a little cluster, grounding them on the cluster of sentiment components. I find that using the sentiments as the “ground” for my cluster of cute scene-building images is a great way to make that scarily-large blank space on my card front a little less intimidating for this scene-building novice!

Well, that’s all for my project today! I am sad to think that there are only a few more weeks of holiday crafting left. It’s hard to find time to do holiday crafting throughout the year when there are so many other beautiful non-holiday stamp sets to work with throughout the year! Thanks so much for stopping by today, and have a marvelous day!
Filed Under: Hero Arts, OLO markers

VIDEO: Creating Dimensional Die Cuts with OLO Markers and Honey Bee Stamps Make It Merry + Giveaway!

November 1, 2022

Hi friends! I am excited to be taking part in the Honey Bee Stamps Make It Merry YouTube Hop today, sharing some more inspiration using some of the stunning new holiday products from the Make It Merry release. Here’s the video:

You can watch the video HERE on YouTube!

I love these super vibrant and color saturated cards with absolutely no white in sight for Christmas these days… Today’s card is an homage to plum and teal! In case you can’t watch the video, here’s how I created my card!

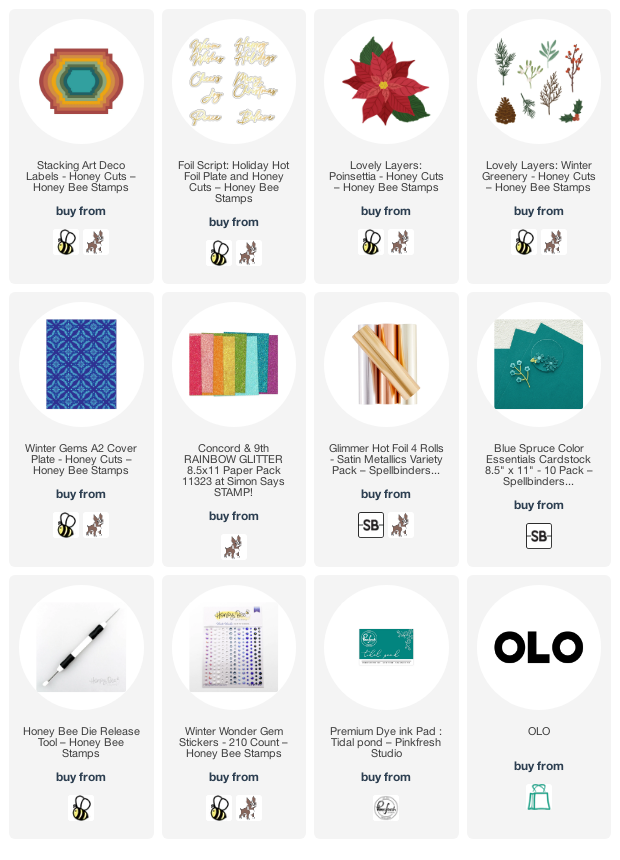
I began by die cutting all of the layers from the new Lovely Layers: Poinsettia from some plain white cardstock. I then used my OLO markers to add some jewel bright coloring to the die cut layers. This was super easy, because the impressed score lines on each layer tell you exactly which layer will be visible when the poinsettia flower is assembled, so you don’t have to color each petal for every single layer-just the petals that are visible on that layer! I also colored the foliage and twig for the berry sprig from Lovely Layers Winter Greenery using the OLO markers, and die cut a few glittery spruce boughs from some aqua glitter cardstock.

To ground my floral bouquet, I die cut a Stacking Art Deco Label from some Spellbinders Blue Spruce cardstock. I ran the die cut shape through my die cut machine again using the Winter Gems A2 Cover Plate die. This super unique and gorgeous die doesn’t actually cut anything; rather, it impresses a debossed pattern on the cardstock, creating a beautiful textured design. To help bring this design even further forward, I did a bit of light ink blending around the edge of the die cut with some Tidal Pool ink from Pinkfresh Studio. This helps to subtly enhance the texture without adding any extra colors to my monochromatic card! I also die cut a coordinating frame from some more Blue Spruce cardstock and popped it up on the solid die cut using foam adhesive.

I adhered my framed die cut piece to an A2 Blue Spruce card front using some strong adhesive tape, then added the colorful die cut poinsettia and foliage using lots of foam tape. For the greeting, I added a hot foiled sentiment from the Foil Script Holiday Hot Foil set, which I hot foiled onto some more Blue Spruce cardstock using some pewter satin foil from Spellbinders. (I absolutely love that foil/cardstock combination! Will definitely be using that again.) I popped that up with a double layer of foam tape, then added some baubles from the Winter Wonder Gem Stickers from Honey Bee Stamps.

Well that’s all for my project today! You can see more inspiration using the Make It Merry release HERE and HERE. Now for some fun giveaway information!

Honey Bee Stamps is giving away two $50 shopping sprees to the Honey Bee Stamps store! To enter the giveaway, you MUST follow the instructions in the description on the YouTube videos. Click HERE to go to my video and get linked up to the video hop! (Please note: comments left here on my blog will not be entered into the giveaway. You must comment on the YouTube videos to be entered into the drawing.)

Thanks so much for stopping by today, and happy video hopping!

Filed Under: Honey Bee Stamps, OLO markers Tagged With: holiday hot foil, hot foil, lovely layers poinsettia, lovely layers winter greenery, olo markers, winter gems

Altenew November 2022 Simply Scientific Stamps/Dies/Stencils Release + Giveaway ($300 in Total Prizes!) 

November 1, 2022

Hi there! Today, Altenew is celebrating the release of their latest collection: Simply Scientific! We are hopping along to share tons of inspiration with you. You should have arrived here from Caly Person and your next stop is Helen Kalb. You can also start at the beginning at the Altenew Blog. The name of the collection doesn’t quite cover all of the gorgeousness that is included in these new goodies… there are some stunning new floral designs (as always with Altenew) that I was totally in love with. I have two super bright and bold projects for you today, featuring some seamless alcohol marker coloring. Let’s get started with the details!

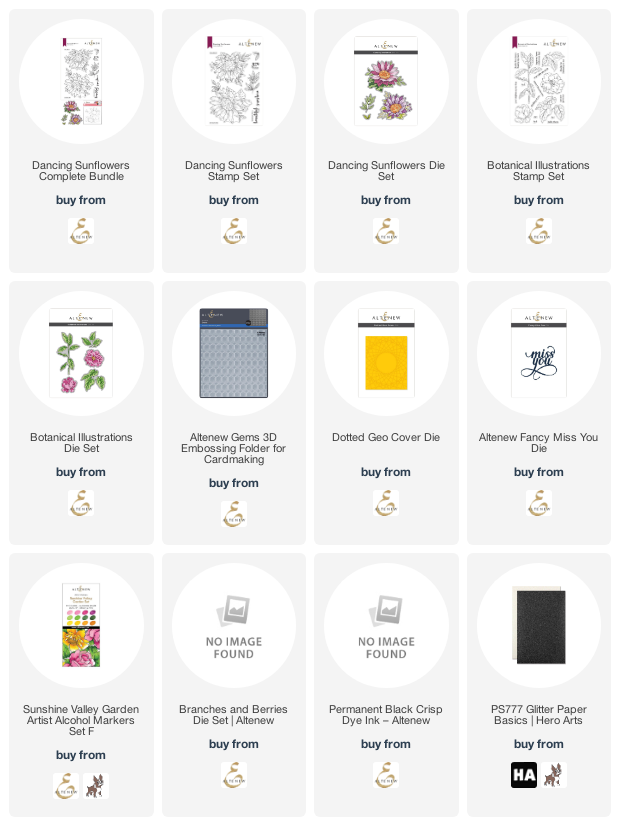
Both of my project feature images colored with the Sunshine Valley Garden Artist Markers from Altenew. The bright, bold colors included in this marker set speak to my heart, particularly that beautiful bubble gum pink.

My first project features the new Botanical Illustrations stamps and dies. I began by stamping the images onto some white cardstock using Permanent Black Ink. After drying the ink with my heat tool a bit, I colored the images with that lovely bubblegum pink marker quartet from the Sunshine Valley Garden Artist Markers set. Because I intended to place these colored die cuts on a black card front, I also edged around the colored images with a black alcohol marker. This edging helps to keep that pesky white edge from detracting from the overall color scheme, while also helping that pretty pink to pop from the stark card front!

For the card base, I created a mini-slimline card front from some black cardstock. I ran this through my die cut machine using the Gems 3D Embossing Folder to add some lovely geometric texture to the background of my bright flowers. I also die cut some glittery black sprigs from the Branches and Berries die set to help fill out the colorful stamped and colored bouquet.

I arranged the floral die cuts and glittery black sprigs on the textured black background, then adhered them using foam adhesive. I added a simple white embossed greeting from the Botanical Illustrations stamp set. The final touch was a few black gems for one last element of shine!

My second card features the same technique, this time with the stunning new Dancing Sunflowers product suite! These enormous sunflowers are just. so. fun. to color. I again stamped a large sunflower image on white cardstock using Permanent Black Ink, setting the ink with my heat tool again to ensure that it was dry. I used the lovely summery yellow markers from the Sunshine Valley Garden Artist Markers set to create this vivid yellow sunflower. I again added the black edges around the colored image, making sure to color out far enough away from the edge that it would be covered when I cut the images out.

For the background, I again wanted to add some interesting texture to keep the card front from being too simplistic, so I die cut an A2 panel of black cardstock using the new Dotted Geo Cover Die. This die adds a lovely piercing detail in a radiating image, perfect for adding some very subtle texture to the background of your focal point.

I popped up the finished colored sunflower die cut in the center of the pierced card front using some foam adhesive. For the greeting, I kept things fairly simple, die cutting a Fancy Miss You from some black glitter cardstock. I also heat embossed a greeting in gold on a strip of black cardstock, then added both elements to the card front. The difference in texture on the black glitter cardstock helps to keep the sentiment from getting overshadowed by the black background. I added a few iridescent black gems to the card front; the yellow and green in the colored images help to complement the iridescent coating on the gems! I love the seamless look adding that black border around the die cuts provides for these cards. It’s so vibrant with those intense pops of color from the black backgrounds.

Well, that’s all for my projects today! Now for some fun giveaway information:

$300 in total prizes! To celebrate this release, Altenew is giving away a $50 gift certificate to 2 lucky winners and a $25 gift certificate to 8 winners! Please leave a comment on the Altenew Card Blog and/or each designer’s blog post on the blog hop list below by 11/06/2022 for a chance to win. Altenew will draw 10 random winners from the comments left on each stop of this blog hop and announce the winners on the Altenew Winners Page on 10/08/2022.

Your next stop on the hop is Helen Kalb. Thanks so much for stopping by today, and happy hopping!

Filed Under: altenew Tagged With: altenew artist alcohol markers, botanical illustrations, dancing sunflowers, dotted geo cover die, fancy miss you, gems 3D embossing folder

  • « Go to Previous Page
  • Page 1
  • Page 2
  • Page 3
  • Page 4

Primary Sidebar

  • Facebook
  • Instagram
  • Pinterest
  • YouTube

Favorite Shops

Secondary Sidebar

Subscribe

Enter your email address to subscribe to this blog and receive notifications of new posts by email.

Instagram
Something is wrong.
Instagram token error.
Follow
Load More

Archives

Tags

3D embossing folder alcohol markers better press birthday birthday card blog hop card kit christmas christmas card christmas tag colored pencil copic copic coloring Daniel Smith die cutting embossing folder embroidery felt giveaway holiday holiday card hot foil ink blending karin brushmarker pro layered stencil masculine my monthly hero new release no line coloring no line watercolor OLO marker olo markers original illustration pawsitively saturated rainbow shaker card slimline stamping stamptember stencil thank you thinking of you valentine's day video watercolor

Popular Posts

Simon Says Stamp Joy For You Blog Hop- Day 1!
Simon Says Stamp Joy For You Release-Now Available!
Frozen Fractals All Around with New Simon Says Stamp Joy For You Release!
Shaped Holiday Shaker Card with New Simon Says Stamp Jolly Season Card Kit of the Month!
Holiday Postage with New Simon Says Stamp!
Simon Says Stamp Glory to the Newborn King Holiday Kit-Part II!
Holiday Joy in Pink and Green with New Simon Says Stamp DieCember!
Pinkfresh Studio 5th Birthday!
Altenew Build A Flower: Fuchsia Blog Hop+Giveway!
July My Monthly Hero Blog Hop+Giveaway!

Disclosure

Some affiliate links are used in my posts. This means that, should you click on one of my links and purchase something from that company, I will receive a small portion of the sale at no extra cost to you. I use the money earned from these sales to help maintain my blog. I so appreciate you visiting and, if you do choose to use one of my affiliate links, thank you so much for your support!
Copyright © 2026 ·Brunch Pro Theme · Genesis Framework by StudioPress · WordPress · Log in
Loading Comments...