• Skip to main content
  • Skip to primary sidebar
  • Skip to secondary sidebar

Sixth Street Sundries

Emily Midgett

  • Home
  • About Me
  • Contact
  • OLO Marker Color Swatch Chart
  • Shop

Archives for March 2022

Introducing Enchanting Anemones-New Coloring Panel Release!

March 15, 2022

Hello, friends! It has been a bit since my last coloring panel release. Things have been so busy; between kiddos, creating new stamp designs, design team work, Flower on the Grain, and just general life stuff, I have not had a chance to finish coloring these new panels to help introduce them to you all! I decided finally that I should just go ahead and release them with only two of the panels fully colored, and hopefully you all would be able to visualize what they look like as a finished product without my samples. 🙂

So, I present to you:

Enchanting Anemones

I admit… I have had a long love affair with anemones. They come in such a wide variety of colors that I feel like they can be adapted to any color scheme that you like, plus the black centers are so very unique and simply stunning. They are graceful, with beautiful movement, and I find them simply beguiling.

This set of four coloring panels features four different arrangements of anemone, so that you can simply color and add a sentiment. A few of these would be super fun fussy cut if you find fussy cutting enjoyable-particularly that wreath! I think that would be lovely popped up to give even more dimension.

I added a few berries, a few impatiens, some campanula, a few ranunculus… a wide variety of “filler flowers,” but the focus is truly on the large anemone blooms. The two panels pictured above allow for some white space for your greeting, featuring a corner arrangement (left) and a swag (right).

The arrangements in the two panels pictured above cover more of the A2 card front, with a full background pattern (left) and complete wreath (right).

Pictured above are the no-line version of the Enchanting Anemones panels. I am now able to offer no-line panels in both the Copic-friendly cardstock as well as the watercolor paper.

I also am making available a few of my previously-released coloring panel sets in both outline and no-line for both watercolor and Copic coloring:

Lo, How A Rose E’er Blooming

Framed Florals Volume 2

Just Add Fruit

Here are the details:

  • Pricing:
    Copic-friendly white cardstock-$8
    Watercolor paper-$10
    Shipping is included in the continental US for up to 3 sets of panels (twelve total A2 sheets). A charge of $3 will be added for four or more sets.
    International friends: add $4 to accommodate international postage (this may be increased slightly if more than two sets of panels are ordered to accommodate for the increased weight of the envelope.) Sorry, no tracking available on these, and international mail seems to be exceptionally slow these days, so I can’t guarantee how quickly they will arrive, unfortunately.
  • You will receive 4 panels in each set-one of each for four individual designs. To purchase: please indicate which set(s) you would like, whether you would like outline or no-line printing, paper choice (i.e.-Copic-friendly white cardstock or watercolor paper), and whether you are located within the US or internationally. I will then send you an invoice via PayPal, to please be paid within 24 hours of receipt.
  • I will leave the preorders open until March 22, 2022. It’s just me printing, trimming, and shipping, so please allow 2 additional weeks for processing and shipping. I have four little kids here; please be patient with me! 
  • In purchasing these coloring panels, you agree that you will use the designs for personal use only. The designs belong to me, Emily Midgett, and are not to be copied or used for commercial gain. I appreciate your support in keeping my artwork safe!

To order: email me at eamidgettsketches (at) gmail.com, and be sure to include all of the information requested above!

Thank you so much for the support and kind words on my little venture! I appreciate each of you who have ordered or offered a kind comment so very much. <3 Have a marvelous day!

Filed Under: coloring panels, original illustrations Tagged With: coloring panels, enchanting anemone, original illustrations

Hero Arts Support Ukraine Collection and Blog Hop

March 12, 2022

The blue and yellow of the Ukraine flag symbolize the beauty and calm of the skies above and the joy and prosperity of wheat fields throughout the country. The national flower, the sunflower, symbolizes motherhood. To honor Ukraine, and help counter the devastation and destruction, we are donating 100% of our net profits from sales of this Support Ukraine collection.  Funds will be donated to the Ukrainian Red Cross for immediate, on-the-ground help.  We will continue our fundraising efforts to also support the long-term rebuilding that will be required to restore schools, roads, homes, and the spirit of the Ukrainian people.

The folks at Hero Arts have created a beautiful digital stamp available for purchase in the Hero Arts shop, which you can check out here.

I used the gorgeous Sunflower Heroscape to create this faux watercolor framed picture as the focal point for my card. I began by trimming a rectangle of Arches watercolor paper into the approximate size needed to fit inside the Museum Frame Fancy Die. I stamped each layer using Hero Arts Pigment inks, then used a damp paintbrush to soften the edges into an almost Monet-ish painting.

I die cut a Museum Frame Fancy Die from some Pitch Black cardstock and placed the sunflower painting inside, then turned my attention to the card front.

I cut the Magnolia Branches die from some more Pitch Black cardstock, then trimmed a few of the whole pieces and added them to a black A2 card front to add some subtle texture to the background. I popped up the sunflower painting, then added a greeting from the Sunflower Heroscape heat embossed in white on a strip of black cardstock.

You can check out the rest of the blog hop here:

Hero Arts
Lydia Fiedler
Seeka
Ilina Crouse
Mindy Eggen
Jessica Frost-Ballas
Daniel West
Debi Adams
Michelle Short
Emily Midgett
Channin Pelletier
Libby Hickson

Filed Under: Hero Arts Tagged With: sunflowers, sunflowers for ukraine, ukraine, watercolor

Altenew Craft Your Life Project Kit: Dynamic Blossoms Release Blog Hop + Giveaway ($300 in total prizes)

March 12, 2022

Hi there! Today, Altenew is hopping along to celebrate their latest Craft Your Life Project Kit: Dynamic Blossoms! You should have arrived here from Nandini Karmarkar, and your next stop is Amy Hill. You can also start back at the Altenew Card Blog to find the full hop list. This month’s kit is a gorgeous one, with both outline and layered stamps, a beautiful embossing folder, and some really unique and intricate standalone dies in addition to the dies for the main stamped image! Here’s a peek at this month’s kit:

Beautiful, right? That large floral bouquet is so, so pretty and large enough to be a focal point all on its own! If you are finding these kits irresistible month after month, you can always subscribe to ensure that you get first dibs on them when they’re released and, bonus, you get them at a discount with your subscription! Check out the details here. I have a project with a pop of vibrant fuchsia on a background that I softened with some vellum, so let’s get started with the details!

I began by stamping the main image from Dynamic Blossoms using embossing ink and embossed it with platinum embossing powder. I like using metallic embossing powders; I think that they soften a lovely floral image instead of having a stark black outline, especially when I’m trying to keep the color palette minimal and ethereal. I used the  Artists’ 24 Pan Watercolors to add some vibrant fuchsia and teal watercoloring to the image, then die cut the finished image with the included coordinating die.

For the background, I wanted to use one of the beautiful decorative flourish dies included in the Dynamic Blossoms kit, but I didn’t want to add more color to the background by using it with colored cardstock. I arranged the floral bouquet approximately where I wanted it on the card front, then die cut one of the flourish dies from an A2 panel of heavyweight vellum so that it was peeking out from behind where I wanted the bouquet to rest. I also die cut another flourish die from some plain white cardstock to use as accents. I adhered the vellum to an A2 white card base using small dots of adhesive in the areas that would be covered up by the floral bouquet, then adhered the floral bouquet using foam adhesive. I added the white die cut flourishes behind the floral bouquet. I think the variety of textures and heights adds lots of interest to the card, and the vellum adds an unexpected level of softness to the white card front, almost like a veil.

For the greeting, I die cut the “You” from the Dynamic Blossoms twice from white cardstock, adhering them together for a dimensional die cut greeting. I also heat embossed the rest of the greeting using some more platinum embossing powder on a thin strip of white cardstock, which I nestled into the corner of the You die cut and popped up foam adhesive. The final touch was to add some iridescent platinum pearls to help fill in the bouquet and add some shine to the card front.

Well, that’s all for my project today! Now for some fun giveaway information:

$300 in total prizes! To celebrate this release, Altenew is giving away a $50 gift certificate to 2 lucky winners and a $ 25 gift certificate to 8 winners! Please leave a comment on the Altenew Card Blog and/or each designer’s blog post on the blog hop list below by 03/18/2022 for a chance to win. Altenew will draw 10 random winners from the comments left on each stop of this blog hop and announce the winners on the Altenew Winners Page on 03/20/2022.

Your next stop is Amy Hill. Thanks so much for stopping by today, and happy hopping!

Filed Under: altenew Tagged With: craft your life project kit, dynamic blossoms, watercolor

Sunflowers for Ukraine from Pinkfresh Studio!

March 10, 2022

Hi friends. I know that the events happening in Ukraine are weighing on people’s minds. New horrors emerge in the news daily. As a momma of four, the atrocities affecting the children are weighing on my heart so heavily, as I’m sure they are weighing on many people’s hearts. Seeing daily reports of children’s hospitals and maternity hospitals being bombed, evacuation corridors being shelled, and the other countless horrific reports make me yearn to offer those poor babies solace and safety. I have been trying to figure out how I can help them, and I have donated money and formula and diapers, but helping these innocent people seems like such an impossible feat. To that end, I am very happy to announce that I have designed and painted my very first washi tape set for Pinkfresh Studio, the Sunflowers Suite, and Pinkfresh Studio is donating 100% of the profits from the sale of these pieces to the Save the Children organization.

The powers-that-be at Pinkfresh had already planned to release these products during our March release, but decided that in light of the fact that Ukraine’s national flower is the sunflower, they would release the set early and donate the profits from the entire month of March. (Wow, right?) The product suite was released Monday, but I was quite ill over the weekend, and just had the opportunity to do some work with them yesterday. I have four projects to share with you today, so let’s get started with the details!

These first projects use the Sunflowers Washi Tape. These washi tapes are especially exciting for me to see in the final product, as it’s the first time that any of my paintings or coloring have been printed in any form. The tape comes on a large roll 4 inches wide by 10 meters long, and coordinates with a matching die to make a seemingly endless supply of floral embellishments. Both of my cards today have been created with Sunflowers washi tape that has been adhered to vellum, the translucence of which I think lends an airiness to the overall feel of the projects. I simply adhered a section of the washi tape to some heavyweight vellum, then used the coordinating die to cut the pieces for some incredibly quick embellishments.

\

My first project uses a soft watercolored background to allow the sunflowers to be the focal point. I taped down a panel of watercolor paper to my watercolor board, then added a very subtle pastel rainbow wash at a diagonal across the front of the card. Once it had dried, I trimmed the Sunflowers Washi Tape die cuts and adhered them to the corner of the rainbow background, adding them with both clear foam tape and liquid adhesive.

I matted one corner of the watercolor sunflower panel with some matte gold foil cardstock to help enhance the gold foil accents on the washi tape, then butted both pieces into the corner of an A2 card base. I added a greeting from Incredibly Grateful, gold embossed on a square of white cardstock. I popped it up with some foam tape, then added a few gold pearls for one more accent of shiny gold.

The second project again features the Sunflowers Washi Tape and matching die. To conjure the image of a sunburst or sunshine, I die cut the Radiating Background 2 die from some white cardstock and layered it on a full A2 card base using foam adhesive.

I arranged the larger sunflower wreath image and some of the individual pieces of foliage around the opening in the center, popping some up with foam adhesive and adhering some with liquid adhesive. I added a greeting from Always Uplifting, heat embossed in gold on a strip of heavyweight vellum. A few more metallic gold pearls completed the card and added a touch of shine.

My next set features some watercoloring using the Sunflowers Stamps. The stamps include a variety of smaller bouquets, individual foliage, some sprigs of berries, and a larger wreath-just like the washi tape, except that with the stamps, you can use your choice of coloring medium to color them or “color” with the layering stencils! I chose to stamp them on some watercolor paper using no-line coloring ink, then used my Holbein watercolors to add lots of vibrant yellow, jade green, and sky blue. I die cut them with the coordinating dies, which are the same dies that are used for the washi tape. The entire suite coordinates, which I think is just splendid and makes the products incredibly versatile!

For my first project, I layered the watercolored images on top of a circular frame die cut from white cardstock, arranged to create a swag. I adhered them to a panel that I’d created using some silver holographic foil and the Arch Backdrop Hot Foil Plate.

I trimmed the hot foiled panel down slightly to mat it on a coordinating blue cardstock base. I white embossed a sentiment from the Sunflowers Stamps on a smaller strip of that same cornflower blue cardstock, which I matted with some holographic silver foil cardstock. I added it to the card front with some more foam tape, then added a few shiny silver pearls for even more shine.

My last card allows the large sunflower wreath to be the focal point of the card. I die cut an Ornate Oval Frame die from some iridescent white glitter cardstock, then die cut another from some navy blue cardstock. I ran the center oval through my die cut machine using the Tulip Love cover plate die to add a little texture and interest to that piece, which I then layered back inside the white glitter die cut. I adhered it to a coordinating navy blue A2 card base with foam tape. The pattern in the center is super subtle with that very dark blue cardstock, but it adds just enough texture to the background to add a touch of visual interest!

For the greeting, I used the Phrase Builder: Hello dies and Simply Sentiments: Hello stamps to die cut and heat emboss an uplifting greeting. I layered all of the die cut pieces on top of the sparkling die cut frame using another layer of foam tape, creating tons of heigh and dimension on this project. The final touch was to add some sparkling jewels for a bit of sparkle.

Well, that’s all for these projects. I hope that you will consider purchasing one (or all!) of the elements from the Sunflowers Suite from Pinkfresh Studio. It’s a great way to make your crafty dollars go farther and help those children whose lives have been upended by this horrifying war. I am honored to be a very small part of these donations to help the Ukrainian children. When Kinnari and I were brainstorming product ideas, we could not ever have planned that something like this would happen, but I am so honored and so grateful to work with such a wonderful company. As of yesterday afternoon, the crafty community has purchased enough of these sets to donate $18,000 to the Save the Children organization, and I am just astonished and speechless at the generosity of our community.

Thank you so much for reading, and have a wonderful day.

Filed Under: original illustrations, pinkfresh studio Tagged With: sunflowers, ukraine, washi tape, watercolor

March 2022 My Monthly Hero Blog Hop+Giveaway!

March 7, 2022

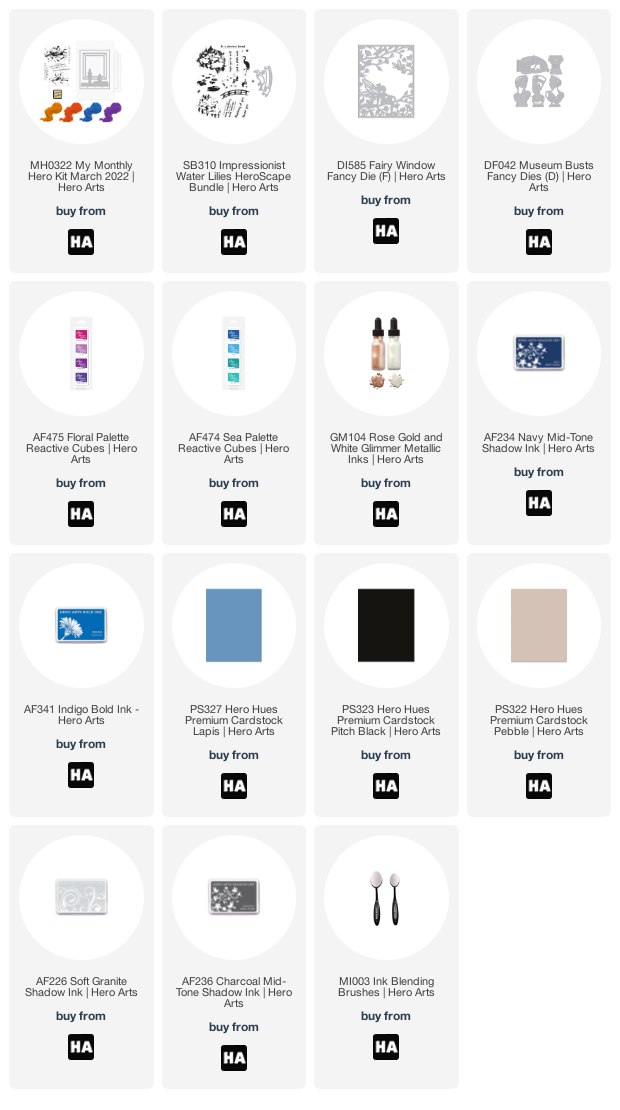
Hi there! Hero Arts is releasing their new My Monthly Hero Kit and collection for March 2022, and this art-themed collection is just so darn unique! We are hopping along today to share lots of inspiration with you; you should have arrived here from Debi Adams, and your next stop is Ilina Crouse. This month’s My Monthly Hero kit features a fabulous detailed silhouette scene die, as well as a 4×6 stamp set that will easily create your own miniature Jackson Pollack paintings! Here’s a peek at this month’s kit:

You will receive: • 4″ x 6″ Clear Stamp Set, • Fancy Window Die, • 4 Embossing Powders in Goldenrod, Orange, Blue, Purple (1/4 oz. each), • Clear Embossing & Watermark Ink Cube, • 2 Sheets Extra Thick Canvas Paper (4.25″ x 5.5″), • 1 Sheet Canvas-textured Paper (5.5″ x 8.5″). The kit contents are valued at $70, but are available to you for $34.99! These kits frequently sell out quickly, so if you’d like to be guaranteed to receive a kit each month, you can subscribe here! I’ve created my own rainbow Jackson Pollack scene for my card today, so let’s get started with the details!

I began by die cutting the main die from the kit from some Pitch Black cardstock. I love how detailed these fancy dies are even when cut from plain black paper. So unique!

I then did some ink blending using Berry Smoothie, Purple Galaxy, Blue Hawaii, and Pool Party Reactive inks in a vertical rainbow across the front of my white A2 cardstock base. I used the splatter stamps included in this month’s kit to stamp splatters in the coordinating color across the ink blended area. I love the subtle effect of the splatters! I also splattered a bit of metallic pearl paint with a damp paintbrush to really help enhance that arts, y splatter-y look.

I adhered the die cut frame using some foam adhesive, then used a double layer of foam adhesive to add the greeting from the stamp set in the kit, which I heat embossed on a strip of black cardstock using some white embossing powder. Relatively simple, but that vibrant ink blending and stamping in the center just pops so perfectly from that stark black die cut! Such a fun kit this month.

My second card uses the new Museum Busts Fancy Dies. I will admit, I was totally thinking of the Disney movie Hercules when I made this card. You know the scene, where Meg and the Muses are singing in the moonlit garden? I wanted to recreate that starry garden background for my busts, so I began by blending Indigo and Navy inks around the edge of a Lapis card base. I also splattered some pearlescent white paint to create some shimmering stars.

Next, I die cut the Museum Busts Fancy Dies from some Pebble cardstock. I used blending brushes to lightly blend some Charcoal ink on one side of the bust die cuts to create a shadow. It’s amazing what dimension taking that quick extra step added to the die cuts! They look almost 3D to me!

I wanted to add some foliage to create that botanical garden feel, so I die cut the Fairy Window Fancy Die from some Pitch Black cardstock, then did some selective trimming so that I had some tree branches just barely dripping down from the top corner and flowers popping up from the bottom right on my blended night sky card base. I popped up the busts using foam adhesive, then added a greeting from the new Impressionist Water Lilies, white embossed on a strip of Pitch Black cardstock.

Well, that’s all for my projects today! Now for some fun giveaway information!

We will give away a $50 gift card, drawn from the comments left across the hop. Enter by Sunday, March 13th at 11:59pm Pacific, and the winner will be announced on the Hero Arts blog the following week.

Your next stop on the hop is Ilina Crouse. Thanks so much for stopping by today, and happy hopping!

(Affiliate links used at no extra cost to you. Thank you for your support!)

Filed Under: Hero Arts Tagged With: ink blending, my monthly hero

  • « Go to Previous Page
  • Page 1
  • Page 2
  • Page 3
  • Go to Next Page »

Primary Sidebar

  • Facebook
  • Instagram
  • Pinterest
  • YouTube

Favorite Shops

Secondary Sidebar

Subscribe

Enter your email address to subscribe to this blog and receive notifications of new posts by email.

Instagram
Something is wrong.
Instagram token error.
Follow
Load More

Archives

Tags

3D embossing folder alcohol markers better press birthday birthday card blog hop card kit christmas christmas card christmas tag colored pencil copic copic coloring Daniel Smith die cutting embossing folder embroidery felt giveaway holiday holiday card hot foil ink blending karin brushmarker pro layered stencil masculine my monthly hero new release no line coloring no line watercolor OLO marker olo markers original illustration pawsitively saturated rainbow shaker card slimline stamping stamptember stencil thank you thinking of you valentine's day video watercolor

Popular Posts

Simon Says Stamp Joy For You Blog Hop- Day 1!
Simon Says Stamp Joy For You Release-Now Available!
Frozen Fractals All Around with New Simon Says Stamp Joy For You Release!
Shaped Holiday Shaker Card with New Simon Says Stamp Jolly Season Card Kit of the Month!
Holiday Postage with New Simon Says Stamp!
Simon Says Stamp Glory to the Newborn King Holiday Kit-Part II!
Holiday Joy in Pink and Green with New Simon Says Stamp DieCember!
Pinkfresh Studio 5th Birthday!
Altenew Build A Flower: Fuchsia Blog Hop+Giveway!
July My Monthly Hero Blog Hop+Giveaway!

Disclosure

Some affiliate links are used in my posts. This means that, should you click on one of my links and purchase something from that company, I will receive a small portion of the sale at no extra cost to you. I use the money earned from these sales to help maintain my blog. I so appreciate you visiting and, if you do choose to use one of my affiliate links, thank you so much for your support!
Copyright © 2026 ·Brunch Pro Theme &middot; Genesis Framework by StudioPress &middot; WordPress &middot; Log in
Loading Comments...