• Skip to main content
  • Skip to primary sidebar
  • Skip to secondary sidebar

Sixth Street Sundries

Emily Midgett

  • Home
  • About Me
  • Contact
  • OLO Marker Color Swatch Chart
  • Shop

Archives for August 2022

Stamptember Has Arrived + New Illustrations!

August 31, 2022

Hi there! Have you heard? Stamptember has arrived over at Simon Says Stamp, and it promises to be a month of pure fun with tons of exciting releases all month long. If you’re not familiar with Stamptember, it’s Simon Says Stamp’s birthday month, and they celebrate all month long with huge Simon Says Stamp product releases, as well as super fun, limited-edition collaboration stamp sets from the wonderful companies that we know and love! I am super stinking excited that two of my own illustrations have been used for tonight’s release: Floral Frames and Butterfly Ranunculus! I have two projects using these new sets to share with you today, so let’s get started with the details!

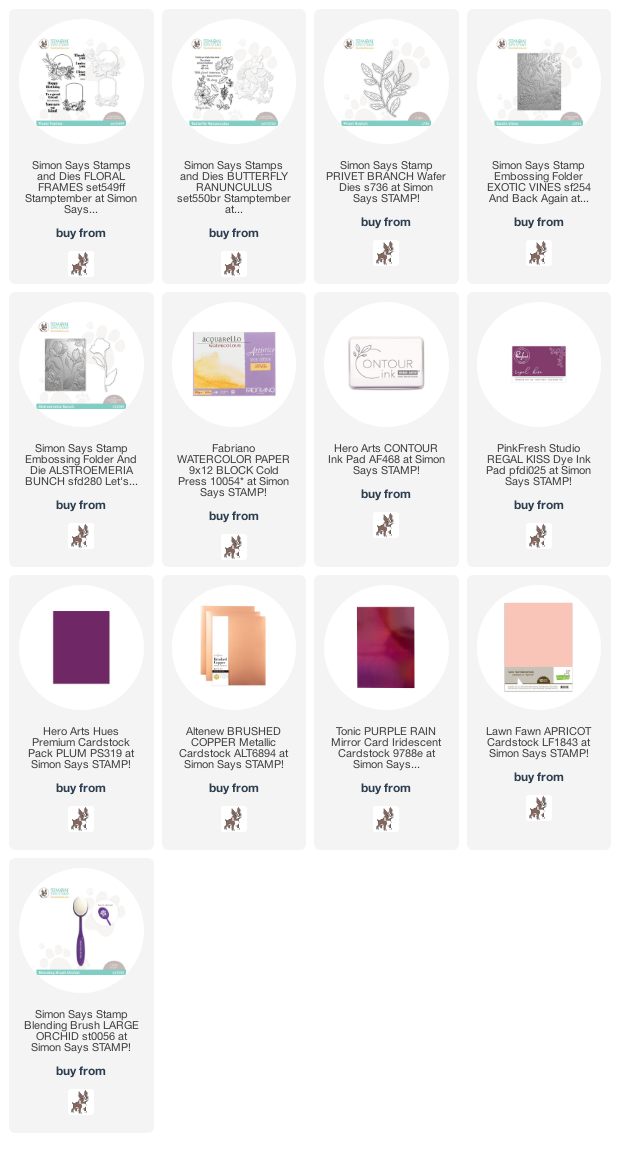
My first project features my new Floral Frames illustration. I have always loved combining thin, delicate frames with bold florals, and these images in this set are perfect for highlighting a poignant greeting, of which there are a ton included in the set! I began by stamping the framed anemone image from Floral Frames onto some Fabriano Artistico watercolor paper using Hero Arts Contour Ink. I then used my Sennelier watercolors to add some lovely plum and jade no-line watercoloring. I used a very thin black pen to add the stamens to the center of the anemone after the watercolor had dried.

For the greeting, I stamped one of the sentiments included in the Floral Frames set, again using Hero Arts Contour Ink. I then used some handmade metallic plum watercolor, a very small brush with a sharp point, and a steady hand to watercolor the sentiment and the frame itself. I love how it looks like I hand painted the greeting myself! The shimmer in the metallic plum watercolor is such a lovely complement to the plummy anemone and pink berries.

For the card base, I ran an A2 panel of Hero Arts Plum cardstock through my die cut machine using the Exotic Vines Embossing Folder from Simon Says Stamp. I lightly brushed the Pinkfresh Studio Regal Kiss inkpad over the raised areas to help add even more interest and texture to the background, then used a blending brush to lightly blend around the edges of the embossed panel. I popped up the watercolored die cut using foam adhesive. I thought that the card needed another shiny, metallic element, so I added a few sprigs cut using the Simon Says Stamp Privet Branch die, cut from some coordinating Purple Rain iridescent foil cardstock. I popped on a few gems for one last touch of shine and texture!

My second card features my other illustration released tonight: Butterfly Ranunculus! I adore the graceful movement of the butterfly ranunculus flower, and they come in tons of different shapes and sizes. I normally gravitate more towards pinks and purples, but I thought that for this project I would venture into the warmer area with some brick red, peach, yellow, and copper. I stamped images from Butterfly Ranunculus onto some Fabriano Artistico watercolor paper using Hero Arts Contour Ink, and again used my Sennelier watercolors to add color to the images, keeping things a bit more muted with some buttery yellow, peach, and brick red watercoloring. I included several different sprigs and foliage options with this set, so it makes building a bouquet super fun!

For the background, I ran an A2 panel of Apricot cardstock through my machine using the Simon Says Stamp Alstroemeria Embossing Folder. I thought that the graceful movement of this background suited the movement of the ranunculus flowers beautifully! I splattered some copper metallic watercolors on the embossed background for a little extra interest.

I arranged the bouquet on my embossed card front, adding a few coppery sprigs of the same Privet Branch die, cut from Altenew Brushed Copper cardstock. I adhered the bouquet using both liquid and foam adhesive for lots of dimension, then added a greeting. I tried to included a few multi-purpose-but-still-heartfelt greetings in the Butterfly Ranunculus set, and this is my favorite one! I embossed it onto some vellum using copper embossing powder, then fussy cut it with some sharp scissors and added it to the card front using some tiny dots of adhesive. A few buttery yellow iridescent gems were the final piece to the puzzle.

Well, that’s all for my projects today! I have a few more projects that I’m saving for later this week, but I hope you’ll check out the entire new release HERE. It’s fabulous and chock full of a ton of different products and styles to suit every person! Thanks so much for stopping by today, and Happy Stamptember!
Filed Under: simon says stamp Tagged With: 3D embossing folder, butterfly ranunculus, floral frames, no line watercolor, original illustration, watercolor

Altenew September 2022 Winter Magic Collection Release Blog Hop + Giveaway ($300 in Total Prizes!)

August 31, 2022

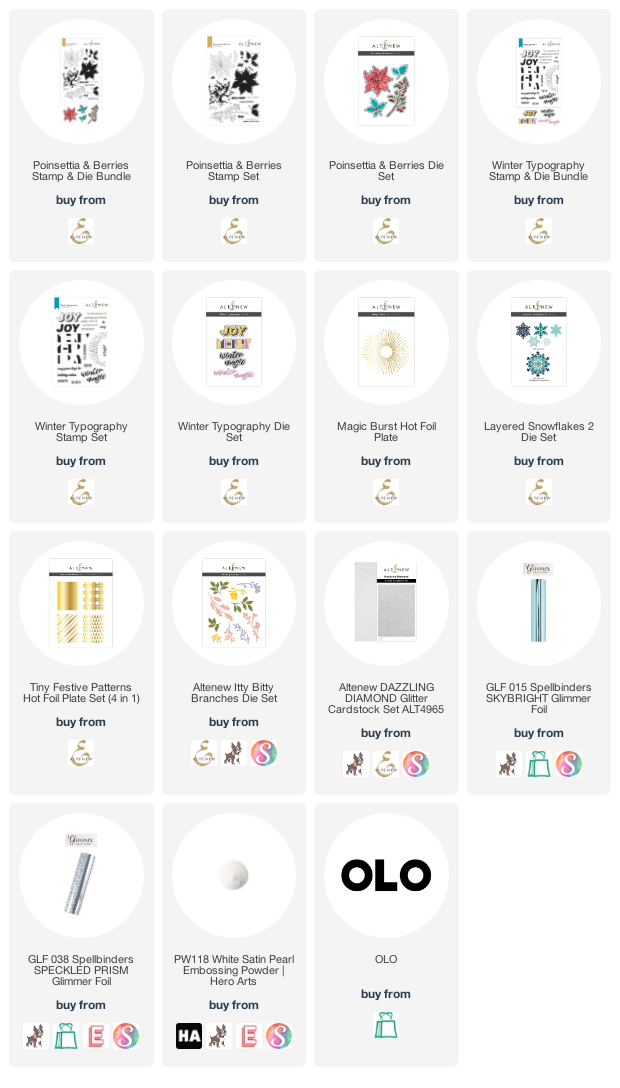
Hi there! Thanks so much for joining us for Altenew’s Winter Magic Release and celebratory blog hop. You should have arrived here from Berina Rajakumar, and your next stop is Caly Person. You can also start back at the beginning at the Altenew Card Blog. Holiday crafting is easily in my top three. I adore creating elegant, unique holiday cards that are full of sparkling, shiny details, and so many of the new products in Altenew’s Winter Magic Release are perfect for creating elegant holiday cards. I have two project to share with you today with lots of sparkle and turquoise, so let’s get started with the details!

It is always so fun for me to create a “pair” of cards using totally different products. They coordinate, but are unique projects in their own right. Today’s projects feature the beautiful new Poinsettia and Berries stamp/die bundle, Tiny Festive Patterns Hot Foil Plate, Winter Typography dies, Magic Burst Hot Foil Plate, and Layered Snowflakes 2 dies. I kept the color palette cool and crisp for both pieces, with lots of white space and pops of turquoise.

My first card is an homage to the snowflake. I began by hot foiling the new Magic Burst Hot Foil Plate using some sparkly holographic hot foil, offset to the side of a white A2 card base. I also die cut several snowflakes from the new Layered Snowflakes 2, cutting from both plain white cardstock and Dazzling Diamond glitter cardstock from Altenew.

Next, I die cut the “winter magic” greeting from some bright turquoise cardstock using the new Winter Typography dies, as well as a coordinating turquoise stamped sentiment strip.

I arranged the snowflake die cuts and greeting, allowing the largest sparkling snowflake to be highlighted by the holographic foil burst on the card base by popping that snowflake up with some foam tape. I arranged the sentiment pieces amongst the snowflakes, then added a few iridescent white gems for some more sparkle. I think that sparkly, textured white and turquoise is so elegant and festive!

My second project features the same color combination. I began by embossing several of the images from the beautiful new Poinsettia and Berries stamp/die bundle using pearlescent white embossing powder on some crisp white cardstock. I added color using some bright turquoise alcohol markers, carefully siphoning off any extra ink that was left behind on the embossing powder using the colorless blender marker.

Next, I hot foiled the small plaid background from the new Tiny Festive Patterns Hot Foil Plate using some bright turquoise foil. The shiny and crisp plaid background perfectly complements the bright poinsettia flower!

I die cut a few sprigs from the Itty Bitty Branches die set using some more Dazzling Diamond glitter cardstock, then arranged the poinsettia, berries, and foliage in the corner of the foiled plaid on the card base, adhering the die cuts with both liquid and foam adhesive for tons of dimension. I added a small “season’s greetings” from the Poinsettia and Berries. A few more shiny iridescent gems helps to complete this super festive and special holiday card!

Well, that’s all for my projects today! Now for some fun giveaway information!

$300 in total prizes! To celebrate this release, Altenew is giving away a $50 gift certificate to 2 lucky winners and a $25 gift certificate to 8 winners! Please leave a comment on the Altenew Card Blog and/or each designer’s blog post on the blog hop list below by 09/06/2022 for a chance to win. Altenew will draw 10 random winners from the comments left on each stop of this blog hop and announce the winners on the Altenew Winners Page on 09/07/2022.

Your next stop is Caly Person. Thanks so much for stopping by today, and happy hopping!

Filed Under: altenew Tagged With: christmas, holiday, hot foil, poinsettia, snowflake, tiny festive patterns, winter typography

Hero Arts Winter 2022 Catalog Release Blog Hop + Giveaway!

August 24, 2022

Hi there! Today, the fabulous folks at Hero Arts are officially releasing their new Holiday 2022 Collection! This collection features the sometimes beautiful, sometimes whimsical, sometimes creepy (think zombies!), always creative images that you have come to associate with Hero Arts! AND! I am super excited that Hero Arts has released their own hot foil plates! These new plates are absolutely fantastic, filled with classic images, some of which you can use year round for non-holiday projects. You should have arrived here from Daniel West, and your next stop is Ilina Crouse. I have two watercolored projects to share with you today using some of the new goodies, so let’s get started with the details!

My first project features the stunning new Finch Greetings stamp and die bundle. I stamped the image on some Arches cold press watercolor paper using Contour Ink, then watercolored the images using the Hero Arts Daniel Smith watercolor palette. I die cut the images with the coordinating dies included in the bundle.

For a subtle background for my winter birds, I used the oldie-but-goodie Greenery Fancy Die, cut from the center of a white A2 card base. I popped it up with foam tape on a solid white A2 card base to add some subtle texture and interest to the background while still keeping a relatively “nature-esque” theme. I love how the foam tape adds so much extra oomph to the background-even the white-on-white! Easily one of my most favorite techniques.

I popped up the birds with some more foam tape, creating a double layer of foam tape in spots for tons of height. For the greeting, I used one of the beautiful scripty greetings included in the Finch Greetings stamp set, which I heat embossed in gold on some of Hero Arts’s Heavyweight Vellum cardstock. I tucked it behind the watercolored bird die cuts, sneaking dots of adhesive in the areas that would be covered by the solid watercolored die cuts.

I have some more watercoloring for my second card, featuring one of the gorgeous, brand-spanking-new hot foil plates: Ornament Border Hot Foil Plate! I first hot foiled the image (I love how detailed and enormous this image is!) onto some hot press watercolor paper using gold foil. The smooth surface of the hot press watercolor paper makes it perfect canvas for the hot foil!

I taped down the hot foiled image to my watercolor board to try to minimize the warping, then added lots of vivid color in muted shades of teal and green, with a few tiny pops of deep berry red for the berries! The hot foil behaves similarly to embossed images, creating a kind of resist technique. So fun to use with so many mediums!

Once I had finished the watercoloring and allowed the image to dry completely overnight (allowing it to dry naturally while taped down rather than forcing it to dry with a heat tool also minimizes warping!), I added a greeting created using the new Christmas Words Fancy Dies. I die cut the top layer from some Holiday Sparkle Glitter Paper, then cut two more layers from plain white cardstock. I adhered all three layers together to create dimensional die cut greetings. Very simple, but very effective, and so sturdy- they would hold up great in the mail!

Well, that’s all for my projects today! Now for some fun giveaway information:

Hero Arts will give away *THREE* $50 gift cards, drawn from the comments left across the hop. Enter by Wednesday, August 31st at 11:59pm Pacific, and the winner will be announced on the Hero Arts blog the following week.

Your next stop is Ilina Crouse. You can also start at the beginning at the Hero Arts Blog. Thanks so much for stopping by today, and happy hopping!

Filed Under: Hero Arts Tagged With: blog hop, finch greetings, holiday, hot foil, no line watercolor, ornament border hot foil, watercolor, winter 2022 catalog

Video: Watercoloring with Pinkfresh Studio Dye Inks!

August 24, 2022

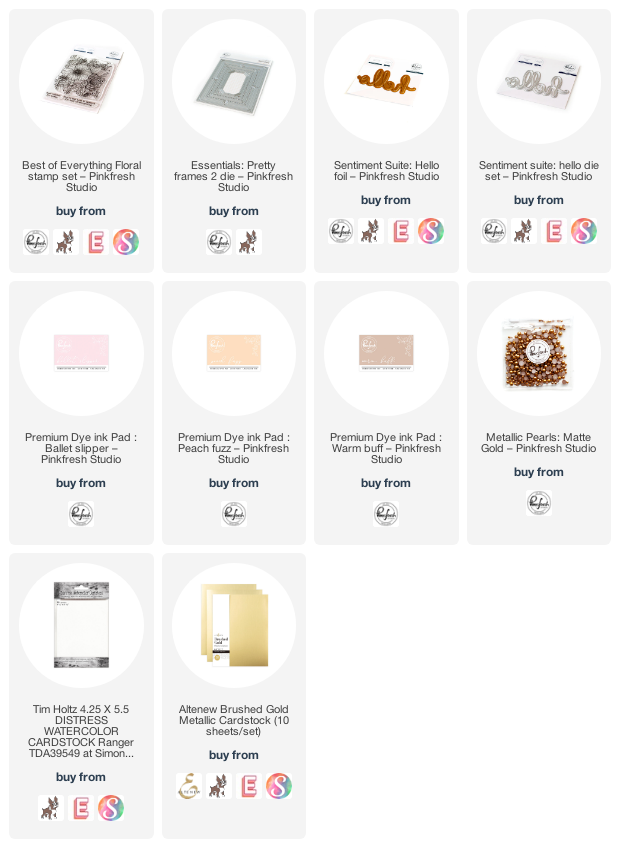
Hi there! I’m over on the Pinkfresh Studio YouTube channel today with this video featuring an unusual-for-me technique: watercoloring with Pinkfresh Studio dye inks! I normally like to stick to my trusty pan watercolors for my watercolor projects, but I wanted to demonstrate how easy it is to get a lovely watercolored look with supplies that you already have on hand. I pulled out one of the first stamp sets that I illustrated for Pinkfresh Studio: Best of Everything. You can watch the video below:

Or you can watch it HERE on YouTube.

I began by heat embossing the Best of Everything stamp set using gold embossing powder onto some Distress Watercolor cardstock. The amount of detail in the Best of Everything stamp set makes it super easy to create a pretty background with minimal effort because the stamp set itself is so super detailed! Once I’d finished heat embossing, I used blending brushes to blend Ballet Slipper, Peach Fuzz, and Warm Buff inks on the background to create a soft background with these muted feminine colors.

Next, I did some watercoloring using several more of the inks from the Pinkfresh Studio line. I simply tapped the different shades out onto my glass mat, picked up the color with my damp paintbrush, and added them to the different flowers, keeping the technique simple and adding very subtle shadows. The end result looks very similar to the results that can be achieved with the layering stencils! The base layer of ink blending helps to add some subtle color variation and interest to the images. I did find that the dye ink color moved more successfully when I first wet the area that I intended to watercolor with clean water, then added in my concentrated ink and maneuvered the color until I was satisfied with the flowers. The damp watercolor paper allowed the ink to “bloom” naturally and not sink into the paper.

After I’d finished watercoloring, the paper was very warped from the volume of liquid that was added to it, so I placed it beneath my watercoloring board and heavy die cut machine overnight to flatten it. The next day, the panel was quite flat, but I added a bit of extra stability with a gold foil frame, cut using the Pretty Frames 2 dies. I added a hot foiled greeting using the Sentiment Suite: Hello Hot Foil and Coordinating Dies, on which I lightly blended some more of the Ballet Slipper, Peach Fuzz, and Warm Buff inks to coordinate with the background. I added a greeting from Best of Everything, then popped everything up with foam adhesive, and added a few matte gold pearls for one last metallic gold element.

Well, that’s all for me today! If you aren’t a watercolorist, I hope this video and technique gives you a little nudge to show you that it’s super easy to do, and you only need a few supplies that I’d bet you already have on hand! Thanks so much for stopping by today, and have a marvelous day!

Filed Under: pinkfresh studio Tagged With: best of everything, ink blending, original illustration, watercolor

Altenew August 2022 Endless Ambition Release Blog Hop + Giveaway ($300 in Total Prizes!)

August 22, 2022

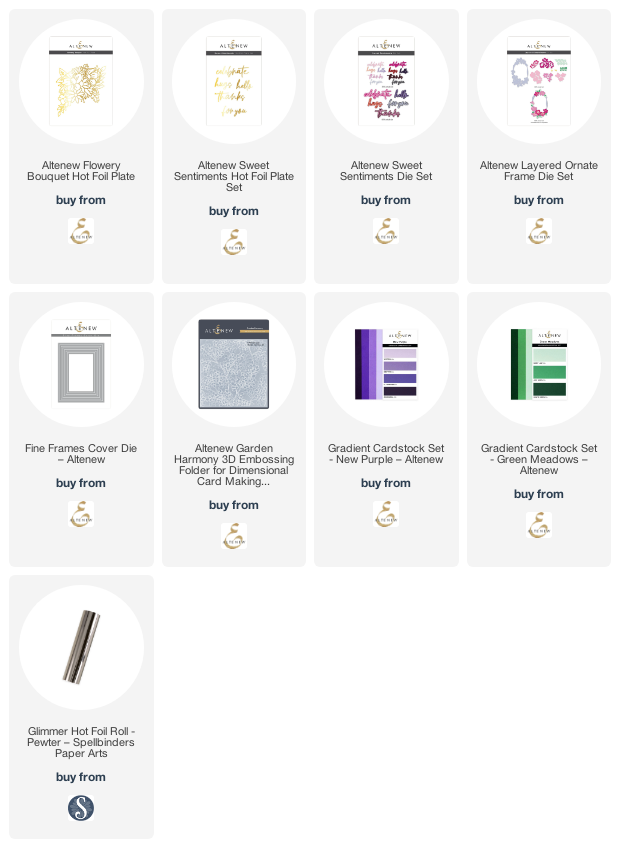
Hi there! Welcome to the Altenew Endless Ambition Release Blog Hop! You should have arrived here from LauraJane, and your next stop is Kari VanNoy. You can also start back at the beginning at the Altenew Blog. We are hopping along today to celebrate the new Endless Ambition Release, a gorgeous new collection of standalone dies, embossing folders, and hot foil plates. Let’s get started on the details for my projects!

I kept both of my projects in the same color family: jewel pinks and purples with touches of gray and crisp white areas! I love creating card “sets” this way-similar elements and similar color schemes help keep things consistent on both projects.

For my first project, I used the stunning new Flowery Bouquet hot foil plate. I hot foiled the majority of the image (this is a *big* plate-can be used it so many orientations to create tons of unique layouts!) on the center of a white A2 card base using some charcoal metallic foil. I then used my alcohol markers to add lots of vibrant color to the images. I love using hot foil with coloring mediums; it’s similar to the emboss resist technique, because the foil resists the coloring medium. Sometimes, darker alcohol markers can leave some ink behind on the hot foiled images, but it’s easily picked up with a colorless marker.

For the greeting, I hot foiled one of the new Sweet Sentiments Hot Foil Plate with some more of the metallic charcoal foil that I used on the main floral image. I die cut the sentiment with the coordinating outline die. Hot foiled sentiments look so perfect and beautifully polished to me.

To help ground the floral image, I die cut the Fine Frames Cover Die set using some deep charcoal gray cardstock. I added a couple of the frames, one thicker and one smaller, very thin frame, adhering them with liquid adhesive. I added the foiled greeting with foam tape to help it pop.

My second card features a similar color scheme, using the new Layered Ornate Frame die set. This is such a pretty set! I kept things relatively simple, using a gray cardstock frame and purple and sage green flowers and leaves. I was very grateful for the included color layering guide, which made putting all of the pieces together relatively simple!

For the background, I ran the Garden Harmony 3D Embossing Folder through my die cut machine with a white A2 card base. I love adding subtle texture to a white card base; it allows the background to be interesting while also allowing the main focal point to be the star of the show.

For the greeting, I used another of the hot foiled Sweet Sentiments Hot Foil Plate with some more of the metallic charcoal foil that I used on the previous card, then die cut the greeting with the coordinating outline die. I adhered the floral frame to the embossed card front using liquid adhesive, then added the hot foiled greeting with foam adhesive. The final touch was to add some more shine with some graphite metallic gems!

Well, that’s all for my projects today! Now for some fun giveaway information!

$300 in total prizes! To celebrate this release, Altenew is giving away a $50 gift certificate to 2 lucky winners and a $25 gift certificate to 8 winners! Please leave a comment on the Altenew Card Blog and/or each designer’s blog post on the blog hop list below by 08/28/2022 for a chance to win. Altenew will draw 10 random winners from the comments left on each stop of this blog hop and announce the winners on the Altenew Winners Page on 08/29/2022.

Your next stop is Kari VanNoy. Thanks so much for stopping by today, and happy hopping!

Filed Under: altenew Tagged With: alcohol markers, copic coloring, die cutting, flowery bouquet, hot foil, layered ornate frame

  • Page 1
  • Page 2
  • Page 3
  • Go to Next Page »

Primary Sidebar

  • Facebook
  • Instagram
  • Pinterest
  • YouTube

Favorite Shops

Secondary Sidebar

Subscribe

Enter your email address to subscribe to this blog and receive notifications of new posts by email.

Instagram
Something is wrong.
Instagram token error.
Follow
Load More

Archives

Tags

3D embossing folder alcohol markers better press birthday birthday card blog hop card kit christmas christmas card christmas tag colored pencil copic copic coloring Daniel Smith die cutting embossing folder embroidery felt giveaway holiday holiday card hot foil ink blending karin brushmarker pro layered stencil masculine my monthly hero new release no line coloring no line watercolor OLO marker olo markers original illustration pawsitively saturated rainbow shaker card slimline stamping stamptember stencil thank you thinking of you valentine's day video watercolor

Popular Posts

Simon Says Stamp Joy For You Blog Hop- Day 1!
Simon Says Stamp Joy For You Release-Now Available!
Frozen Fractals All Around with New Simon Says Stamp Joy For You Release!
Shaped Holiday Shaker Card with New Simon Says Stamp Jolly Season Card Kit of the Month!
Holiday Postage with New Simon Says Stamp!
Simon Says Stamp Glory to the Newborn King Holiday Kit-Part II!
Holiday Joy in Pink and Green with New Simon Says Stamp DieCember!
Pinkfresh Studio 5th Birthday!
Altenew Build A Flower: Fuchsia Blog Hop+Giveway!
July My Monthly Hero Blog Hop+Giveaway!

Disclosure

Some affiliate links are used in my posts. This means that, should you click on one of my links and purchase something from that company, I will receive a small portion of the sale at no extra cost to you. I use the money earned from these sales to help maintain my blog. I so appreciate you visiting and, if you do choose to use one of my affiliate links, thank you so much for your support!
Copyright © 2026 ·Brunch Pro Theme · Genesis Framework by StudioPress · WordPress · Log in
Loading Comments...