• Skip to main content
  • Skip to primary sidebar
  • Skip to secondary sidebar

Sixth Street Sundries

Emily Midgett

  • Home
  • About Me
  • Contact
  • OLO Marker Color Swatch Chart
  • Shop

IUILE watercolors

Pinkfresh Studio November 2023 Stamp, Die, Stencil, and Embellishment Release

November 13, 2023

Good morning, and welcome to the November 2023 Pinkfresh Studio Release Blog Hop! You should have arrived here from Cheryl, and your next stop is Heather. The November 2023 Release features a variety of goodies to share with you, including a fabulous new alphabet set, some snowy holiday beauty, and of course, some gorgeous flowers. I have two projects using some non-traditional holiday colors to share with you, so let’s get started with the details!

While I tend to use red a lot for holiday cards, I couldn’t resist using some totally non-traditional pinks, greens, and sparkling metallics for these cards today! I thought that the whimsical and unique aesthetic of the new Folk Snowflake set would lend itself beautifully to some intense, vibrant pink.

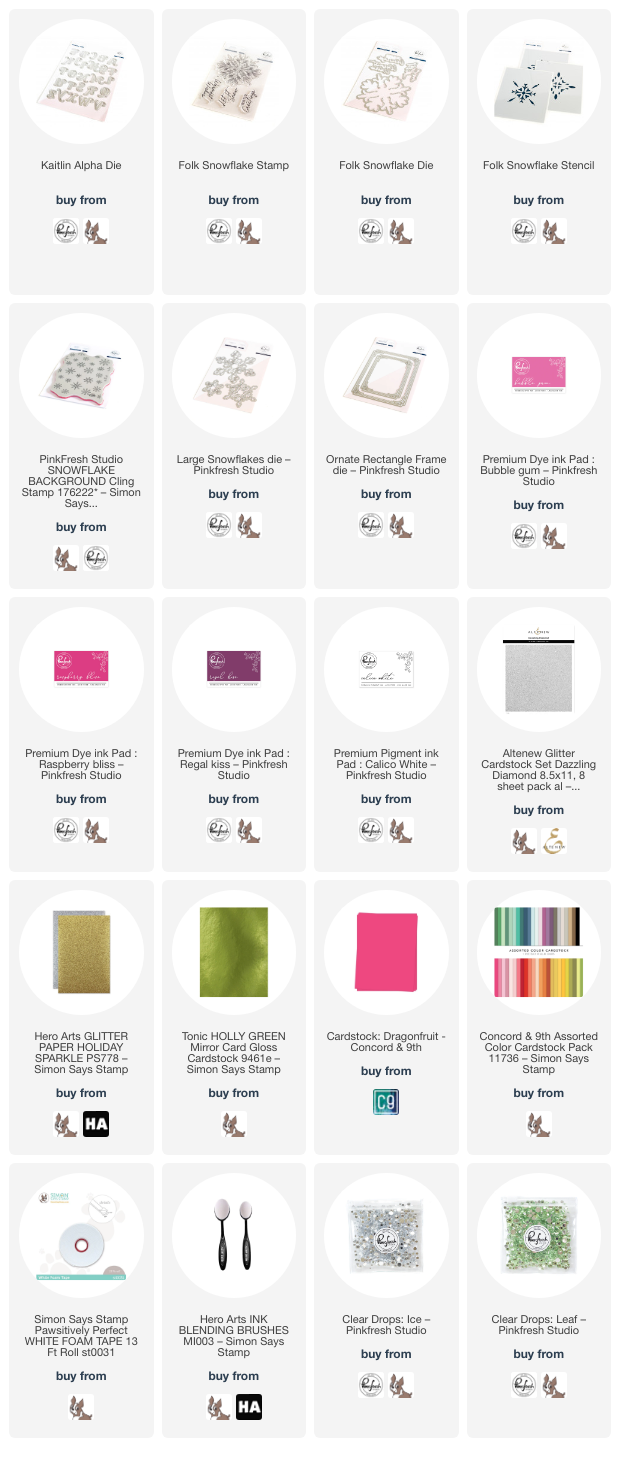
For my first card, I began by blending Bubble Gum, Raspberry Bliss, and Regal Kiss inks on a plain white card front using blending brushes, then stamped the Snowflakes background stamp using Calico White ink. I was amazed at how well the white pigment ink popped on the super vivid blended background. If you haven’t tried out the new Calico White ink, you definitely should! It’s awesome! I die cut a large Ornate Rectangle Frame die from some Dazzling Diamond glitter cardstock and popped it up around the edge of the blended and stamped background.

Next, I heat embossed the large snowflake image from the new Folk Snowflake stamp set onto some Dragonfruit cardstock from Concord and 9th. I used the coordinating Folk Snowflake stencils to add some deep pink and purple details to the image, accenting them with some glittering handmade watercolor. I also heat embossed a greeting from Folk Snowflake onto some more vivid pink cardstock, die cutting both embossed images with the coordinating Folk Snowflake dies. I popped them up on the card front using foam adhesive, then accented the shimmering white details with some new Ice clear drops. So much vivid color and shine on this project!

My next project uses the large snowflake image from the Folk Snowflake set to create a patterned background. I began by silver embossing the large snowflake a few times on a 4″ x 6″ piece of cold press watercolor paper. I then used regular pan watercolors as well as sparkling glitter watercolors from IUILE (on Etsy) to add tons of vibrant pink and green to the panel. It’s super bright and shimmery, but I think that Christmas is the perfect time to layer up on the sparkle for your holiday cards!

To create the greeting, I die cut “joyful” using the beautiful new Kaitlin Alpha die set and some green mirror foil cardstock. I also silver embossed a sentiment from the Folk Snowflake stamp set onto some pale pink cardstock, die cutting it with the coordinating die. I popped up the greeting components using foam adhesive, then tucked a few die cut snowflakes on the card front, created using the smallest of the Large Snowflakes dies and some Silver glitter cardstock. I matted the watercolored panel first with some more green mirror foil cardstock, then a full size A7 piece of pale pink cardstock. Finally, I added some shiny Leaf Clear Drops for more texture and gloss!

Well, that’s all for my projects today! Now for some fun giveaway information:

Pinkfresh Studio will be giving away the full release on the Pinkfresh blog & YouTube channel. They will also be giving away a total of TEN $25  gift cards along the hop. The winners will be selected from the comments along the hop. Winners will be posted on November 21, 2023 on our GIVEAWAY PAGE. Winners must check that page & claim their prize within 2 weeks.

Here’s the full hop list in case you get lost:

You are invited to the Inlinkz link party!

Click here to enter

Thanks so much for stopping by today, and happy hopping!
Filed Under: pinkfresh studio Tagged With: christmas card, Daniel Smith, folk snowflake, holiday card, ink blending, IUILE watercolors, kaitlin alpha, large snowflakes die, snowflakes background, watercolor

Daisies for Babies-Adding Gilded Accents to your 3D Embossed Images!

July 22, 2023

This post was sponsored by Simon Says Stamp. Thanks, Simon!

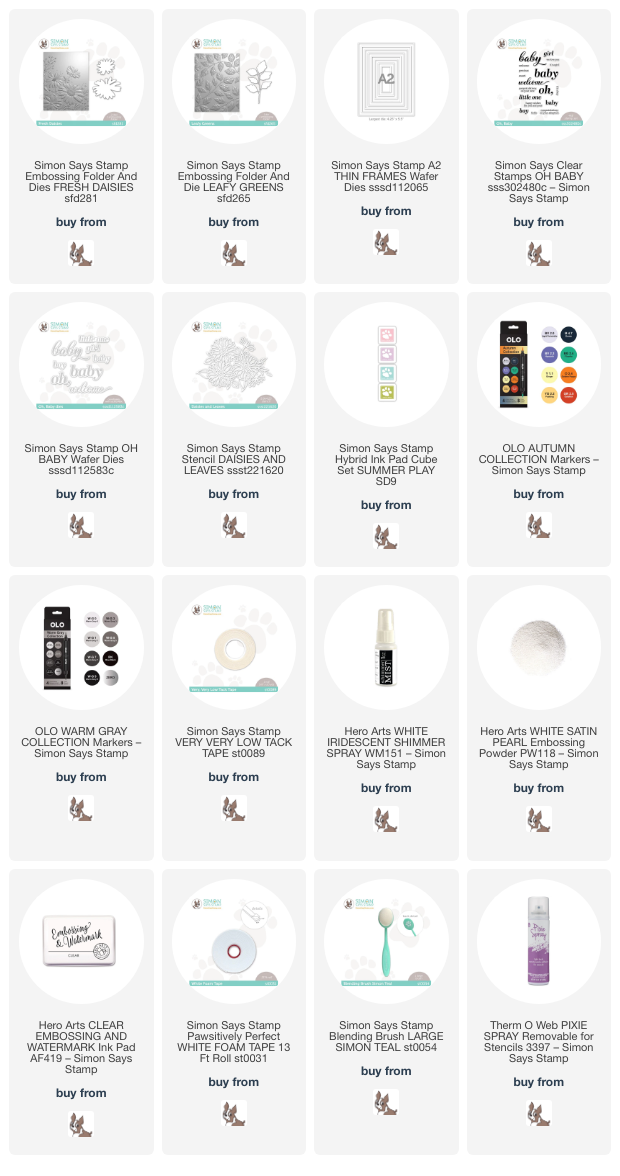
Hi friends! Today, I have some inspiration using the utterly gorgeous Fresh Daisies Embossing Folder + dies. I have become obsessed with adding color to embossing folder images in a variety of ways, including ink blending, alcohol markers, and watercolor, and today I combine a few of those techniques for a two-fer. When I first saw the Fresh Daisies Embossing Folder + dies, I thought that the little baby’s breath flowers and daisies reminded me of a sweet baby card. White daisies are so innocent and clean, so friendly (“Don’t you think that daisies are the friendliest flowers?”), that I thought this embossing folder would make some beautiful and elegant baby cards. Let’s get started with the details!

Both of my cards today feature the Fresh Daisies Embossing Folder. I used two different techniques for these cards, though I kept the color scheme similar for both projects, using Lake Shores Ink for my main color addition.

Oh, Baby + dies

A2 Thin Frames

Lake Shores Ink

My first card pairs the Fresh Daisies Embossing Folder + dies with the Leafy Greens Embossing Folder + dies. I recently added this Leafy Greens folder to my stash with the intention of using it in conjunction with the several different embossed floral dies that are available in the Simon Says Stamp store. The leaves are beautifully delicate and a lovely, graceful shape. I die cut the daisies and the foliage from plain white cardstock, intending to add some alcohol marker coloring to them.

To achieve good results with the die cut embossed flowers, I first die cut the images from my chosen cardstock, then place the die cuts inside the embossing folder in the correct spot for that image, then run it through my die cut machine. If you tried to die cut the embossed image, you would flatten out all of the embossed dimension, so it works best to start with a clean, smooth die cut. Using my OLO Markers, I colored the daisies and foliage die cuts, using BV2.0 and the Zero markers on the “white” daisies, keeping the color mainly on the petals tucked behind the top layer of petals in order to enhance the shadows while still keeping the color a crisp white. I added golden yellow to the daisy centers and colored the leaves a lovely shade of aqua that coordinates nicely with the Lake Shores Ink.

For the background, I used Simon Says Stamp’s Very Very Low Tack Tape and some Post-It Notes to mask off the top and bottom of my white A2 card front. I lightly blended Lake Shores Ink in the center of the card front, then, keeping the masks intact, added the Daisies and Leaves Stencil, which I had lightly spritzed with Pixie Spray to keep the delicate stencil in place while blending. I blended more Lake Shores ink over the top of the stencil to create a very subtle, tone-on-tone pattern in my blended area. I also spritzed the colorful strip with some Hero Arts Iridescent Shimmer Spray. When I removed the masks, I was left with a strip of subtle, but lovely, aqua. Before adding my die cut flowers, I splattered some beautiful, sparkling warm white watercolors to add even more interest to the background.

I arranged the die cut embossed flowers on the card front, adhering them using foam tape. I also stamped a greeting from Oh, Baby onto some white cardstock using Lake Shores Ink, then, keeping the stamps and cardstock in place in my MISTI, stamped again with clear embossing ink and sprinkled some white satin pearl embossing powder over the top. This combination created a beautifully soft color-coordinated sentiment, which I die cut using the coordinating dies. I adhered the sentiment with a double layer of foam tape and added a few gems and some twine for more texture. Once I had everything arranged properly, I “gilded” the flower petals and foliage with the same sparkling white watercolor that I had splattered on the background, adding it only in the highlighted spots to add just a touch of sparkle. I am totally in love with this card; the sparkle is unreal and *so* difficult to capture in a photograph.

My second card also features the Fresh Daisies Embossing Folder and Lake Shores Ink. After embossing my white panel with the full Fresh Daisies Embossing Folder, I blended Lake Shores Ink with a blending brush over the entirety of the embossed panel. I also went back over the raised areas with the ink pad, lightly swiping the panel with the ink pad to add extra color saturation to the raised areas.

Once I’d finished blending and swiping on the panel, I used the same golden white sparkly watercolors to enhance some of the raised embossed images. Leaving the monochromatic color on the background would be fine in itself, but adding the sparkling highlights kicks it up a notch! I also splattered the entire card front with more sparkly watercolors, which I think almost creates a raindrop effect. I added a glittery white frame cut using some white glitter paper and the A2 Thin Frames dies.

For the greeting, I used another pair of die cuts from the Oh, Baby + dies, stamped again using Lake Shores ink + clear embossing ink, and embossed using White Satin Pearl embossing powder. I also lightly blended some more Lake Shores ink on the die cuts to keep them cohesive on the blue background. I popped the greeting up on the card front using foam adhesive, then added some gems and a twine bow. I think the addition of the twine bow helps to enhance the idea that this elegant card is a sweet baby card!

Well, that’s all for my projects today. If you have any iridescent or sparkly watercolors, I would encourage you to try adding some sparkly highlights to your embossed images and backgrounds. It’s super easy, and the effect is absolutely stunning! Thanks so much for stopping by, and have a marvelous day!

Filed Under: simon says stamp Tagged With: baby card, embossing folder, fresh daisies, ink blending, IUILE watercolors, leafy greens, masking, oh baby, olo markers, stencil

Art Supply Favorites-A Long List!

November 23, 2022

Hi there! So I’ve recently had some questions about what watercolor supplies I would recommend, so I thought I would put a post together sharing some of my favorite items in case you wanted to ask Santa for them for your stocking… 😉

I want to preface this post by saying that I am a firm believer in the statement that you get what you pay for. Sometimes the inexpensive items are okay, like when you’re dealing with store-brand food vs name brand, but with art supplies, I’ve definitely found a difference in quality when using the student grade options. Of course, this is not an inexpensive hobby to begin with, so watching for sales and using coupons is a great way to expand your collection of art supplies while also not compromising quality. I have been stamping for 13 years, watercoloring seriously for 6+ years, and so have been building up my collection gradually. I have been lucky to have been provided some of these supplies through my work with different companies, but the vast majority of these supplies have been purchased by me over time, watching for sales and with birthday money or Christmas gift cards. I only recommend supplies that I really think will provide great results, regardless of whether they’ve been purchased by me or if companies have generously sent them to me to try. This list is not at all intended to encourage you to make purchases that you don’t need; I only want to recommend my favorite supplies if you are planning to do some artsy shopping or want to ask for some art supplies for Christmas! 🙂

***I will be providing affiliate links where applicable. When you use these links, no extra cost is added to your purchase, and it helps me to support my blog and my family. This is my job, so any support that you give me by using my affiliate links is immensely appreciated!***

First up, watercolors.

Watercolors hold true to the idea that you get what you pay for. Student grade watercolors contain less pigment and more fillers in order to make them less expensive; thus, the student grade watercolors will require more paint in order to achieve better vibrancy. The artist grade watercolors are more expensive, but contain much higher ratio of pigment to fillers, so I find that they last longer than the student grade and give better results from the start. Over the course of my watercolor journey, I have found that saving the “good” supplies and using the less expensive supplies for practice is a waste of time and money, because the good supplies behave vastly differently to the less expensive, so your results between the student grade vs artist grade will be very inconsistent. If I had known this at the start, I would not have bothered with the student grade and instead focused on building my artist-grade collection (slowly, ha) rather than wasting the time and money on the less expensive products.

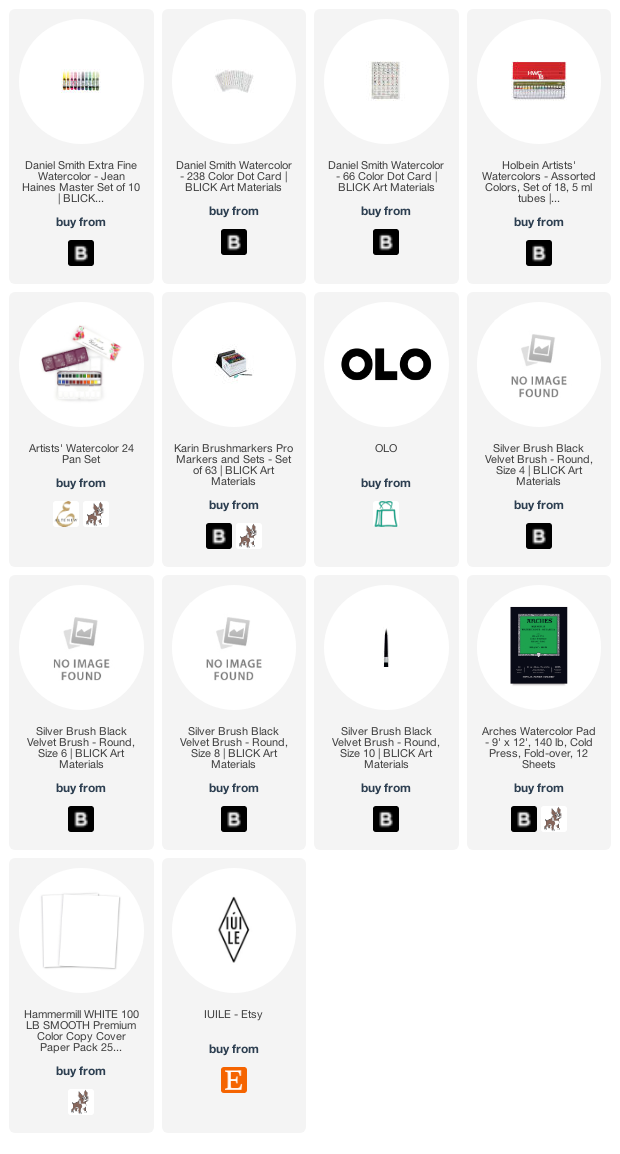
Pan Watercolors-Watercolors are one of those things that depend a lot on your personal preferences. If given the choice, I will choose to work with pan watercolors over watercolor markers, simply because I feel that I have better control over the amount of pigment and thus the intensity of the colors on my image. Artist watercolors also have better lightfast ratings, meaning that they will be less likely to fade over time. I have two artist-grade brands that I reach for over and over again: Daniel Smith Extra Fine Watercolors (Blick|SSS) and Holbein Artist Watercolors (Blick).

I have watercolors from a wide variety of brands, and I have found the stunning variety of colors in both of these brands to be unmatched. The Daniel Smith paints use many natural pigments, so the color palettes tend to be a bit more muted and earth-toned, while the Holbein palette seems to be a bit brighter and cooler. I used the Daniel Smith watercolors on the holiday paintings in the photo above; the Holbein palette is pictured below. You can see the difference in overall tone and brightness in the photos!

Both of these brands offer watercolor sets, in which they have selected a variety of shades that offer the majority of the rainbow. I have been collecting these watercolors over the last several years, and while I do enjoy having a huge variety of shades at my disposal, these watercolor sets would certainly be sufficient for quite a lot of projects. It’s amazing what custom colors you can create by mixing colors in different intensities. Holbein offers a very affordable set of 18 colors (Blick), which could easily be customized by adding a few extra pinks, purples, and greens (because we know how much I love pink!). Daniel Smith offers several different watercolor sets that are great for beginners. I personally love the color palette in the Jean Haines Master Set of 10 (Blick), which includes some of my favorite shades. One of my favorite things about the Daniel Smith line is that you can also purchase Dot Cards (Blick) that have a small sample of each color, so that you can try each color out, find your favorites, and build your own custom palette! You would be amazed at how long those little dots of watercolor will last-totally worth the money! Once you find your favorites, you can build your custom palette by purchasing the individual watercolor tubes.

I also wanted to mention the Altenew Artists’ 24 Pan Watercolors (ALT|SSS). I have found that these pan watercolors are of excellent quality and at an extremely affordable price point. If you are looking to dip your toe into watercoloring but don’t know if you want to invest in the artist grade watercolor tubes, this is a marvelous, super economical set of 24 pan watercolors that have a gorgeous color palette and move beautifully. I have been able to create tons of beautiful paintings with my 24 pan set, with a wide variety of color palettes, because mixing and matching the colors is super easy! These watercolors frequently go on sale, and they are 100% worth the money. I have a class on the Altenew website (only $8.95 for 6 videos!) that delves into these watercolors, great for beginners! You can check out the class HERE.

Watercolor Markers– While I adore pan watercolors, I can also appreciate the ease and vibrance of watercolor markers. There are several different brands of watercolor marker available, but I have found that the Karin Brushmarker Pro (Blick|SSS) markers offer wonderful quality and a huge variety of colors. I have found that I get better results by scribbling the color onto a ceramic palette, then picking the color up with my damp paintbrush, rather than putting the marker directly to the paper. This provides more control for my style of watercolor.

Next up: Alcohol Markers.

OLO Markers (OLO) are relatively new to the art world, as they were just debuted this past winter at NAMTA. I have been lucky enough to have the opportunity to work with these OLO markers over the last 8 months or so, and I have to say-I find them to be a wonderful addition to my work space. They have an incredible vibrance and blend super smoothly. I also really love the ease of selecting your blending colors; the color families are very clearly delineated and blend beautifully together, which takes the guesswork out of your color selection. They have 4 fluid ounces of ink in the barrel -nearly twice as much as other brands- and feature a unique ink delivery system that cuts down on the amount of ink wasted. Refilling them is extremely simple. I have a longer blog post with video detailing all of the unique qualities of these markers HERE. You can check them out HERE, and you will automatically receive a 10% discount when you shop using my personal link!

You can see the incredible vibrance of these markers in the photo above. I can’t wait for them to release even more colors!

Next up, paintbrushes and paper.

Watercolor Brushes-You cannot go wrong with Silver Black Velvet. I’ve tried tons of different brands of paintbrushes (don’t tell my hubby! Teehee.), and the Silver Black Velvet brushes win every time. The bristles release water very gradually, and they come to a nice crisp point giving you the ability to create really sharp edges for no-line watercoloring. I would recommend a Round Number 4 (Blick) or 6 (Blick), and a round number 8 (Blick) for large washes. If you only watercolor very small images, as many stamped images are fairly small and detailed, you might prefer the finely detailed point that a Round Number 4 brush provides. I know that these brushes are a little pricy to start, but again, you get what you pay for with watercolor supplies, and I do find that they last for quite a long time if you take care of them.

Watercolor paper– watercolor paper is a very personal choice. Your unique style of watercoloring may suit the features of one paper over another. Sometimes, it takes some experimentation to figure out which paper brand works best with your own personal style. That being said, I have always had good results with Arches cold press watercolor paper (Blick|SSS). Cold press paper has a textured side and a smooth(er) side, while hot press paper is very smooth, and I have found that texture to be an invaluable trait with my style of watercolor no matter the brand. The color moves beautifully, lifts and scrubs easily, and holds up to repeated layers of water and even embossing folders, without worrying about the fibers of the Arches cold press paper disintegrating.

You can see how well the Arches cold press holds up to a 3D embossing folder and some pretty intense watercoloring!

Alcohol Marker Cardstock– For alcohol marker coloring, no matter which brand, I have found that the Hammermill 100 lb cardstock (SSS) works wonderfully. The super smooth surface of the paper allows the colors to blend beautifully, and the weight is great for papercrafting.

Bonus: Metallic Watercolors.

If you like all things sparkly, as I do, you will love checking out the IUILE shop on Etsy. They feature handmade, unbelievably sparkly watercolor pans that add so much sparkle to your projects… it’s almost unreal. I use them for splattering backgrounds, for adding metallic sparkle to large brushed sentiments, and adding sparkly accents to alcohol marker pieces, as you can see in the Cinderella project above. They are such a fun little accent to add to your projects to help kick them up a notch!

I hope that you find this list helpful! I want to reiterate that these are my own personal preferences, and this is by no means an exhaustive list. I am by no means an expert, but I have done quite a lot of experimentation (and shopping, ha) so hopefully you can benefit from my artistic experimental trial-and-error over the last several years! If you have any questions, please feel free to reach out to me via email or DM on Instagram. I’m happy to help in any way that I can! Thanks so much for reading, if you’ve made it this far, and Happy Thanksgiving!

Filed Under: Uncategorized Tagged With: artists 24 pan watercolors, daniel smith watercolors, holbein watercolor, IUILE watercolors, karin brushmarker pro, olo markers, silver black velvet

Primary Sidebar

  • Facebook
  • Instagram
  • Pinterest
  • YouTube

Favorite Shops

Secondary Sidebar

Subscribe

Enter your email address to subscribe to this blog and receive notifications of new posts by email.

Instagram
Something is wrong.
Instagram token error.
Follow
Load More

Archives

Tags

3D embossing folder alcohol markers better press birthday birthday card blog hop card kit christmas christmas card christmas tag colored pencil copic copic coloring Daniel Smith die cutting embossing folder embroidery felt giveaway holiday holiday card hot foil ink blending karin brushmarker pro layered stencil masculine my monthly hero new release no line coloring no line watercolor OLO marker olo markers original illustration pawsitively saturated rainbow shaker card slimline stamping stamptember stencil thank you thinking of you valentine's day video watercolor

Popular Posts

Simon Says Stamp Joy For You Blog Hop- Day 1!
Simon Says Stamp Joy For You Release-Now Available!
Frozen Fractals All Around with New Simon Says Stamp Joy For You Release!
Shaped Holiday Shaker Card with New Simon Says Stamp Jolly Season Card Kit of the Month!
Holiday Postage with New Simon Says Stamp!
Simon Says Stamp Glory to the Newborn King Holiday Kit-Part II!
Pinkfresh Studio 5th Birthday!
Altenew Build A Flower: Fuchsia Blog Hop+Giveway!
Holiday Joy in Pink and Green with New Simon Says Stamp DieCember!
Honey Bee Stamps September Release Blog Hop!

Disclosure

Some affiliate links are used in my posts. This means that, should you click on one of my links and purchase something from that company, I will receive a small portion of the sale at no extra cost to you. I use the money earned from these sales to help maintain my blog. I so appreciate you visiting and, if you do choose to use one of my affiliate links, thank you so much for your support!
Copyright © 2026 ·Brunch Pro Theme · Genesis Framework by StudioPress · WordPress · Log in
Loading Comments...