• Skip to main content
  • Skip to primary sidebar
  • Skip to secondary sidebar

Sixth Street Sundries

Emily Midgett

  • Home
  • About Me
  • Contact
  • OLO Marker Color Swatch Chart
  • Shop

snowy birdhouse

Christmas In July: Rustic Maroon and Dusty Blue!

July 18, 2024

This post was sponsored by Simon Says Stamp. Thanks, Simon!

Hi friends! I am back for another Christmas In July post, this time featuring rustic red paired with dusty blue to give a more country-feel to these holiday cards. I love coming up with unique color palettes for holiday cards beyond the traditional bright red and green, and the combination of the maroon and dusty blue combination reminds me of a rustic holiday tree, complete with gingham bows, pinecones, and lots of berries. I wanted to try this color combination out on one of my own illustrations after working with the sweet birdhouse image from the Snowy Birdhouse, and so pulled out the magnolia image in the Holiday Blossoms set that I illustrated for Simon Says Stamp. I thought that the maroon magnolias would be beautiful on a holiday card! Let’s get started on the details for my projects.

For both of my cards, I used Arches Hot Press watercolor paper with some of my artist-grade watercolors. I have a rather extensive collection of watercolors from a variety of brands, but frequently find myself reaching for the same medium and brands over and over, and so am trying to use my artist-grade watercolors from Schmincke. The richness of the colors never disappoints!

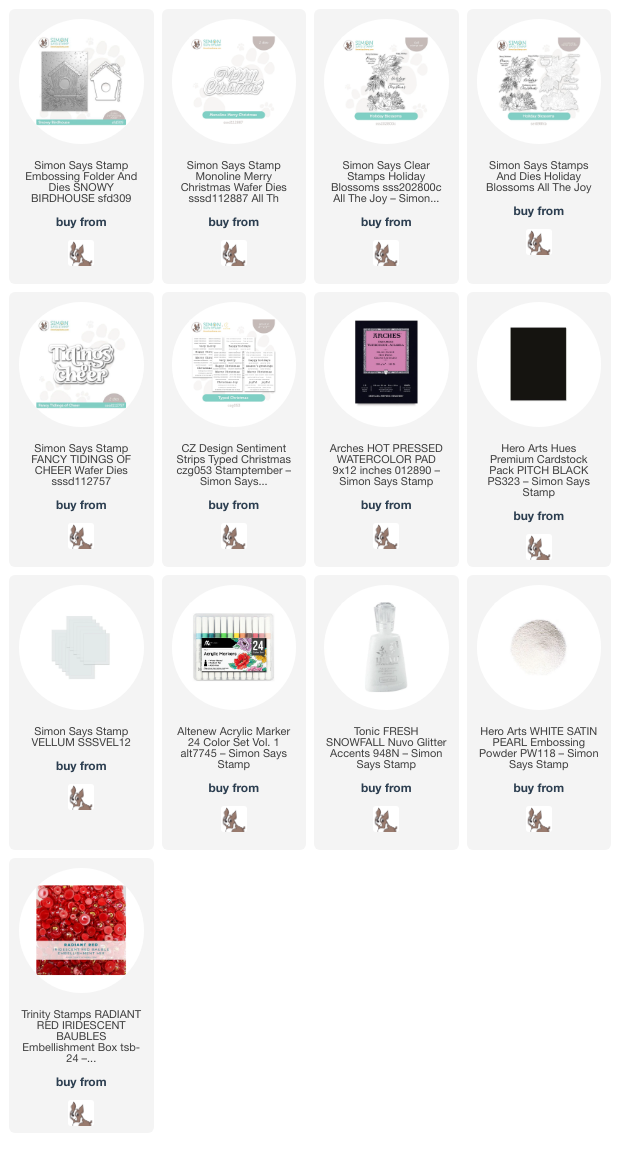
For my first project, I embossed the Snowy Birdhouse image on a slightly-larger-than-A2 panel of Arches Hot Press watercolor paper, then taped it down to my watercolor board to reduce further warping of the cardstock while watercoloring. I used my Schmincke watercolors to add lots of vibrant red to the snowy bird house, dotting the snowflakes with the white marker in the Altenew Acrylic Markers. I also die cut the separate snow pieces from some pearlescent white cardstock and adhered them using liquid adhesive, finally adding some sparkling “snow” on the image using Tonic Snowfall glitter. Between the embossing, various mediums, and glitter, this card front has incredible texture!

For the greeting, I kept things very simple, die cutting the detail layer from the Monoline Merry Christmas die set from Pitch Black cardstock, then adding the shadow layer behind it, cut from some vellum. After allowing plenty of time to dry, I removed the tape from the edges, trimmed the edges of the watercolored panel down 1/8″, then mounted the watercolored piece on an A2 panel of coordinating deep red cardstock. Such a simple, festive card that definitely evokes lots of winter imagery!

For my second card, I applied the same beautiful deep red and dusty blue color palette to the magnolia image from my Holiday Blossoms set. To create a large, full bouquet for an A7 card, I heat embossed the image twice onto some Arches Hot Press watercolor paper using White Satin Pearl embossing powder. I watercolored all of the images using the same color palette, keeping the colors a bit muted and rustic, and adding a pale wash of the same dusty blue watercolor around the edges of both embossed images. This wash of blue helps to enhance some of the white pearl embossed details on this super intricate image, which have the potential of getting lost on the creamy white watercolor paper.

While my images were drying, I taped down an A7 panel of Arches Hot Press watercolor paper onto another watercolor board, then used the same dusty blue watercolor with lots of water to create a lovely background for my large holiday floral bouquet, which also happens to coordinate nicely with the blue wash around the edges of the watercolored florals.

For the greeting, I die cut the detail layer of the Fancy Tidings of Cheer from Pitch Black cardstock and adhered it to a vellum shadow layer. I also trimmed down a coordinating sentiment from the Typed Christmas sentiment cards. I arranged the floral bouquet on the center of my now-dried watercolor background and popped it up with some foam adhesive. I adhered the die cut greeting over the “seam” where the two floral die cuts meet, softening the area behind the crisp black sentiment with the semi-transparency of the vellum. Finally, I added a few red pearls for added shine.

Well, that’s all for my projects today! I have one more project to share with you for Christmas In July, and I’ve saved my favorite for last! Thanks so much for stopping by today, and have a marvelous day!
Filed Under: simon says stamp Tagged With: christmas card, cz design sentiment stripes, cz design sentiment strips, fancy tidings of cheer, holiday blossoms, holiday card, monoline merry christmas, original illustration, schmincke watercolors, snowy birdhouse, watercolor

Embossing Folders: Holiday Edition!

May 25, 2024

This post was sponsored by Simon Says Stamp. Thanks, Simon!

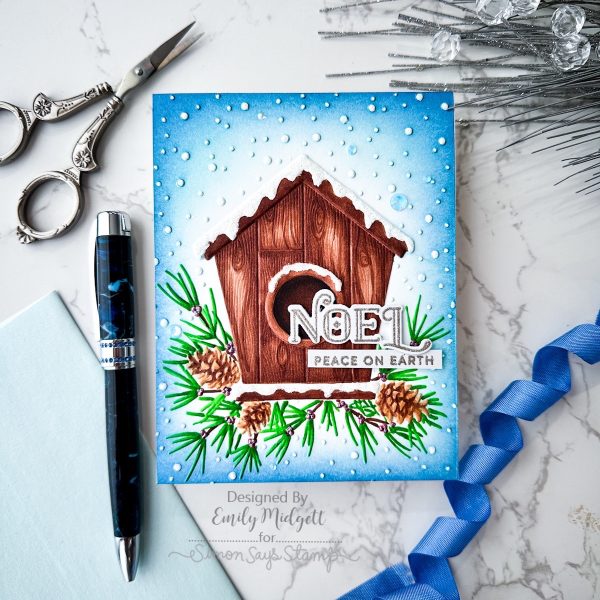
Hi friends! I am back with another pair of embossing folder projects, this time with a holiday twist. I created these coordinating, super textured cards using some white cardstock, some alcohol markers, and lots of ink blending. While the alcohol marker card would be challenging to mass produce in a timely fashion, the ink blended project would be super simple to mass produce. Embossing folders are one of my favorite ways to add a huge impact to my projects with minimal effort (and cost!), because they create such splendid texture with one pass through your die cutting machine. And bonus: Simon Says Stamp is running a fabulous sale on their embossing folders!! Let’s get started with the details on my projects!

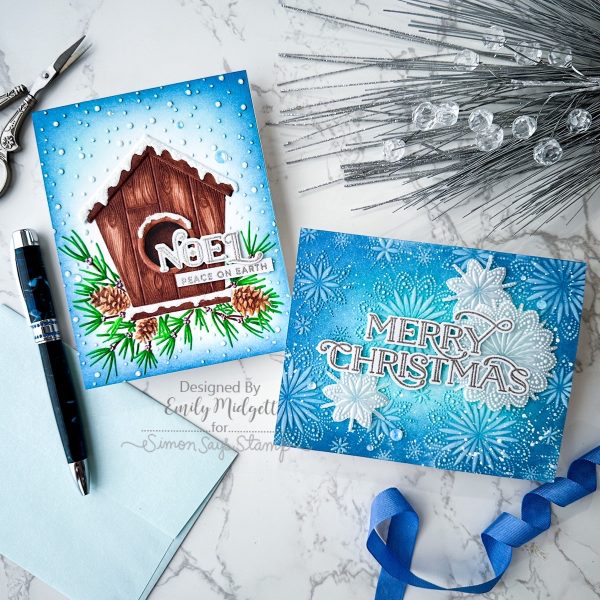
As we approach summer, I always find myself missing the cool temperatures of the winter months, so I thought I would channel those icy temperatures with some cool blues, snowflakes, and splatters. I adore embellishing the patterns on embossed images with ink blending and a white pigment ink pad, but for my birdhouse project, I pulled out some white gouache to help enhance some of those details!

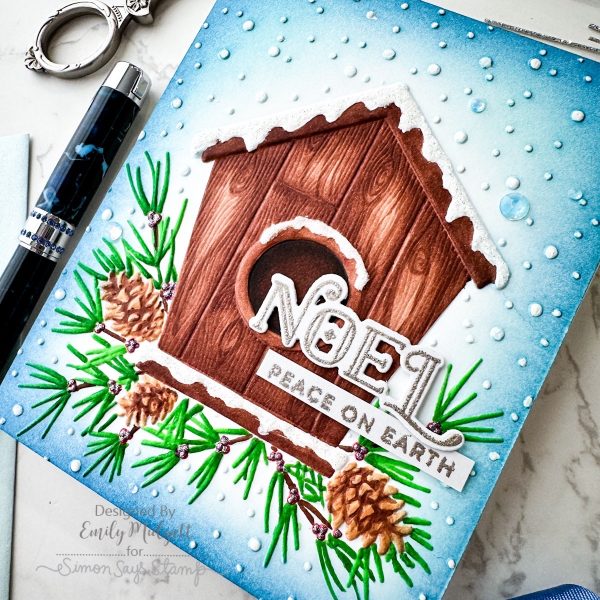
To start my project, I ran a panel of white cardstock through my die cutting machine using the Snowy Birdhouse embossing folder. This embossing folder comes with coordinating dies, which can be used to enhance the details on the beautiful birdhouse and foliage, but I decided to simplify things and make it almost a one-layer card. I used Copic markers to add vibrant greens and browns to the card, then blended some Dusk and Dew Pawsitively Saturated Ink around the edges to create a moody blue glow around the birdhouse. I enhanced the snowflakes with some Altenew white gouache to help them stand out from the blended background.

For the greeting, I kept things simple with a peaceful sentiment from Making Spirits Bright, which I heat embossed using Platinum Sparkle embossing powder onto Fog Gray cardstock. I die cut the “noel” using the gorgeous and intricate coordinating die, the detail on which I think makes such a huge impact on such a relatively simple card! I popped up the greeting pieces with some foam adhesive, which I think is a necessity for keeping the sentiment looking even on this super textured background. I added a touch more sparkle with some Fresh Snowfall glitter glue on the snowy roof, door, and base of the birdhouse. It’s difficult to see the added texture in the photo, but it looks so lovely in real life!

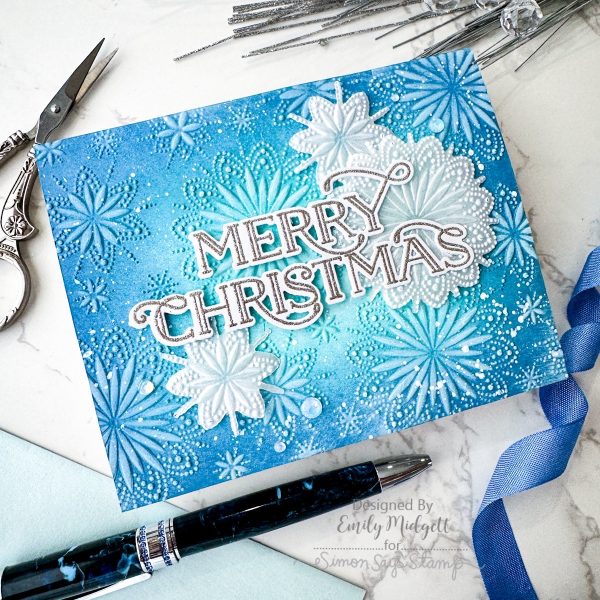
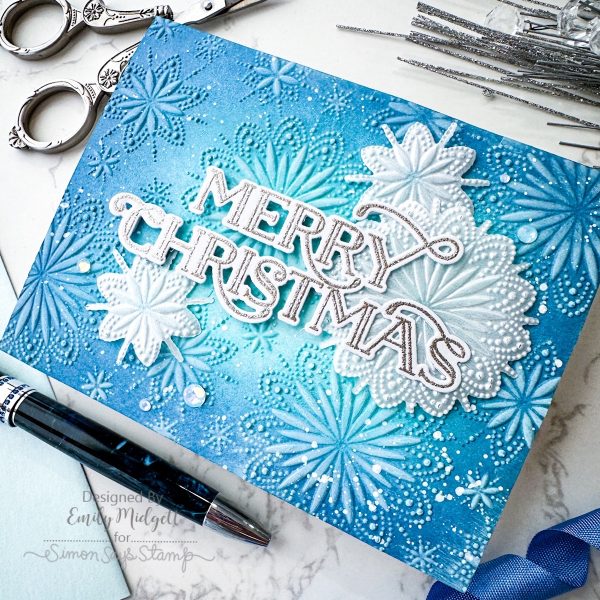
My second card would be super easy to mass produce, made to look extra special despite its simplicity with the gorgeous details of the Burst Snowflakes Embossing Folder. These snowflakes have the most delicate little pinpoints that remind me of eyelet lace. I think it’s such a stunning and impactful design! I ran an A2 panel of white cardstock through my die cutting machine using the Burst Snowflakes Embossing Folder, then used blending brushes to blend Dusk and Dew Pawsitively Saturated Ink over the entire panel. (You could simplify this card even further by starting with colored cardstock!) Once I had completed the ink blending, I gently swiped my white pigment ink pad over the raised areas, further enhancing those delicate details and making it look even more like eyelet lace, in my opinion! I also splattered some white gouache on the background for a bit extra icy texture.

For the greeting, I heat embossed the large “merry Christmas” from the Making Spirits Bright set (I just adore that unique font!) using Platinum Sparkle embossing powder onto Fog Gray cardstock. I also die cut some extra standalone snowflakes using the dies included with the Burst Snowflakes Embossing Folder and some shimmery silver vellum. I adhered the greeting die cut with the embossed vellum snowflakes using foam adhesive, then added a few sparkling gems for added shine!

Well, that’s all for my projects today! Simon Says Stamp is currently running a 25% discount on their Simon-branded embossing folders, so it would be a great time to stock up on some of the stunning holiday embossing folders that also have coordinating dies! Simply add your embossing folders to your cart (click HERE to see them all) and then use code EFLDR at checkout to take 25% off of your embossing folder purchase. I hope that you don’t mind my sharing some holiday inspiration at the beginning of summer vacation… I couldn’t resist playing with the holiday embossing folders! Thanks so much for stopping by today, and have a marvelous day

.

Filed Under: simon says stamp Tagged With: 3D embossing folder, burst snowflakes, christmas, embossing folder, holiday, making spirits bright, pawsitively saturated, snowy birdhouse

Primary Sidebar

  • Facebook
  • Instagram
  • Pinterest
  • YouTube

Favorite Shops

Secondary Sidebar

Subscribe

Enter your email address to subscribe to this blog and receive notifications of new posts by email.

Instagram
Something is wrong.
Instagram token error.
Follow
Load More

Archives

Tags

3D embossing folder alcohol markers better press birthday birthday card blog hop card kit christmas christmas card christmas tag colored pencil copic copic coloring Daniel Smith die cutting embossing folder embroidery felt giveaway holiday holiday card hot foil ink blending karin brushmarker pro layered stencil masculine my monthly hero new release no line coloring no line watercolor OLO marker olo markers original illustration pawsitively saturated rainbow shaker card slimline stamping stamptember stencil thank you thinking of you valentine's day video watercolor

Popular Posts

Simon Says Stamp Joy For You Blog Hop- Day 1!
Simon Says Stamp Joy For You Release-Now Available!
Frozen Fractals All Around with New Simon Says Stamp Joy For You Release!
Shaped Holiday Shaker Card with New Simon Says Stamp Jolly Season Card Kit of the Month!
Holiday Postage with New Simon Says Stamp!
Simon Says Stamp Glory to the Newborn King Holiday Kit-Part II!
Altenew Build A Flower: Fuchsia Blog Hop+Giveway!
Holiday Joy in Pink and Green with New Simon Says Stamp DieCember!
Pinkfresh Studio 5th Birthday!
Honey Bee Stamps September Release Blog Hop!

Disclosure

Some affiliate links are used in my posts. This means that, should you click on one of my links and purchase something from that company, I will receive a small portion of the sale at no extra cost to you. I use the money earned from these sales to help maintain my blog. I so appreciate you visiting and, if you do choose to use one of my affiliate links, thank you so much for your support!
Copyright © 2026 ·Brunch Pro Theme · Genesis Framework by StudioPress · WordPress · Log in
Loading Comments...