• Skip to main content
  • Skip to primary sidebar
  • Skip to secondary sidebar

Sixth Street Sundries

Emily Midgett

  • Home
  • About Me
  • Contact
  • OLO Marker Color Swatch Chart
  • Shop

spring blooms

Two-fer with Spring Blooms and Karin Markers!

June 5, 2021

Hi there! I’m up on the Honey Bee Stamps Blog today with a couple of projects created using one watercolored panel and some die cutting! My Spring Blooms background stamp is such a nice size, 6×6, and it’s easy to spend an enjoyable afternoon watercoloring and get two different projects out of the colored panel. Let’s get started with the details!

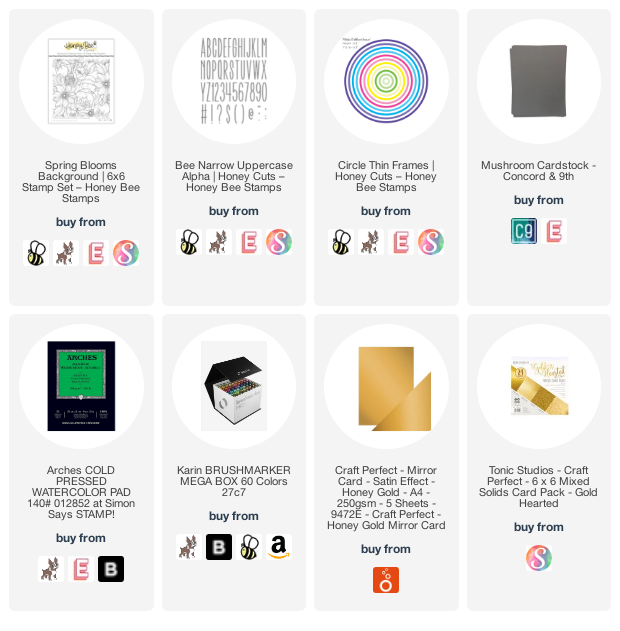
I realized that I hadn’t watercolored my Spring Blooms background since it had been released, and so I pulled out some gold embossing powder and my Karin Brushmarker Pro markers and got to work! I’ve had a bit of difficulty finding a paper that was easily accessible and moderately affordable that also worked well with the Karin markers, and I was quite thrilled to find that the slightly-less-textured “back” side of Arches Cold Press paper works beautifully with the markers, and a bonus is that its smoother texture makes embossing detailed images like the Spring Blooms background much more crisp!

I heat embossed the majority of the background on a panel of Arches watercolor paper that I had in my scrap drawer, not quite the full size of the background stamp, but close enough, then colored it with the Karin Brushmarker Pro markers in the picture above to create a pretty peachy color scheme with pops of jewel-toned green and hints of charcoal.

After I had completed the watercoloring, I cut one portion down to 2.5×5″ (to fit on a mini-slimline card) and left the other as-is. I matted the mini-slimline panel with some matte gold foil cardstock to help make the shiny gold embossing pop even more. I mounted the embossed and foiled section on a full sized mini-slimline panel of charcoal cardstock to help bring out the charcoal centers of the anemones in the floral background.

I wanted a simple greeting, something that wouldn’t take up a huge amount of space or cover up much of the watercolored background, so I die cut HUGS twice from some more charcoal cardstock using the Bee Narrow Uppercase Alphabet Dies and adhered them together. I added these dimensional alphabet die cuts slightly lower than the very center of the watercolored background. Simple, but the shiny gold embossing and gold foil accents help kick the simple card design up a notch!

I used the second portion of the watercolored panel to create a bookmark. I added some more die cut letters, this time spelling out READ, and punched a hole at the top of the bookmark using my Crop-a-Dile. I also added a ring cut from the Circle Thin Frames dies to help reinforce the hole. The final touch was a pretty deep coral bow and tassel made from some seam binding found in my stash. (This is exactly why I don’t like to throw things away!) How fun would this be to give tucked inside a book as a gift?

Well, that’s all for my project today! I love being able to make more than one finished project from a single colored background. Thanks so much for stopping by today, and have a marvelous day!
Filed Under: Honey Bee Stamps Tagged With: bbookmark, karin brushmarker pro, mini slimline, original illustration, spring blooms, watercolor, watercolor brush markers

Spring Blooms and Perfect Pearls with Honey Bee Stamps!

April 3, 2021

Hi there! I’m over on the Honey Bee Stamps blog today, and I thought I’d do something a little different for my post. The Spring Blooms background is perfect for coloring in your favorite medium, but it’s also super detailed, so much that it can stand alone to make a pretty tone-on-tone background! I’ve paired Spring Blooms with some Perfect Pearls and colored cardstock to create a pair of pretty monochromatic cards today. Let’s get started with the details!

I began by stamping the Spring Blooms background stamp with some Versamark ink onto a panel of pale blue and minty green cardstocks, then used Mint and Turquoise Perfect Pearls to create a subtle, shiny, tone-on-tone background.

For my blue card, I trimmed down the floral panel and mounted it on a panel of super shiny blue foil cardstock, orienting it to the top left corner, which left the shiny blue foil peeking out from the edge. I also die cut a Double Stitched Polygon from some vellum, oriented it to the right side and trimmed off the excess.

For the greeting, I die cut an “enjoy” from some more of the blue foil cardstock using the Enjoy Honey Cuts dies, then white embossed the coordinating sentiments from Enjoy stamp set on some strips of blue cardstock. I adhered the greeting die cuts to the card front, then added a few Moonlight gems for some sparkle. I love how the shimmery background is so subtle, but makes such an impact when the light hits it just right!

For my second project, I cut the same Double Stitched Polygon from some more vellum, as well as the pretty Thankful Buzz Word from some deep teal cardstock.

I adhered the thankful die cut to the center of the vellum polygon, then white embossed the coordinating greeting from the Grateful stamp set on some thin strips of dark teal cardstock. A few more Moonlight gems finished it off.

Well, that’s all for these projects today! I love showing how these super detailed floral stamps look so pretty by themselves without any coloring. Thanks so much for stopping by, and have a marvelous day!

Filed Under: Honey Bee Stamps Tagged With: double stitched polygons, grateful, perfect pearls, spring blooms, thankful

Spring Blooms with Copic Markers!

February 20, 2021

Hi there! I have a trio of cards that I created using one full colored panel from my new Spring Blooms 6×6 background stamp for Honey Bee Stamps! I’m not going to lie; some of the stamps that I illustrate are more exciting for me than others. I this this background stamp is one of my absolute favorite sets that I’ve illustrated. Those huge peonies and anemones are so much fun to color!

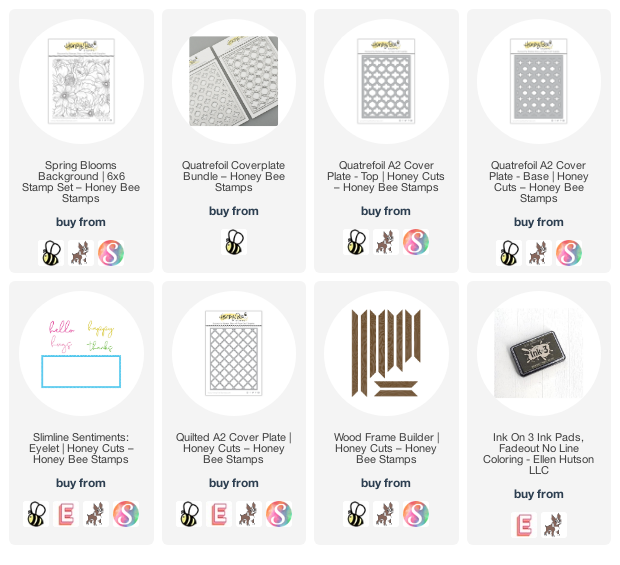
I began by stamping the Spring Blooms 6×6 background stamp onto a 6×6 panel of Copic-friendly white cardstock using no-line coloring ink. I colored the entire background using Copic markers (I’ve shown the combos below), with an interesting combination of deep, raspberry pink, bright blue, and golden orange. I saw a photo on Pinterest of a bridal bouquet with these colors (it actually was the bouquet that inspired the illustration to start with), and I couldn’t wait to color it using the same colors!

After I’d colored the entire image (I won’t tell you how long it took), I wanted to maximize the entire image by creating as many cards as I could from it. So, I cut it into three panels to create three cards with it. For the first card, I used a long, rectangular panel and backed it with a slightly wider piece of black cardstock to create a mat.

For the first card, I used a long, rectangular panel and backed it with a slightly wider piece of black cardstock to create a mat.

For the card base, I created a super textured, white-on-white background using the Quatrefoil Cover Plate bundle. I mounted the floral strip using liquid adhesive, orienting it to one side, then added a die cut greeting cut from some silver glitter cardstock using the Slimline Sentiments: Eyelet die set.

My second card uses another strip of the Spring Blooms 6×6 background panel, this time across the bottom portion of a vertical A2 card front. I again backed the colored panel with some black cardstock.

I mounted the matted Copic-colored panel on another textured white background panel, this one cut using the Quilted Cover Plate die. Another simple, silver glitter sentiment from Slimline Sentiments: Eyelet die set finished it off.

The final piece of the Spring Blooms panel featured that huge peony as the star. I wanted to let it be the main character on the card, so I used the new Wood Frame Builder dies to create a white frame around the edge.

After adhering the framed panel to a white card base (using the white-on-white allows the super colorful floral panel to pop really well), I added another dimensional die cut from the Slimline Sentiments: Eyelet.

Simple, but so colorful and eye-catching! When you spend that much time coloring a background, you need to make as many cards as you can from it, right?

Well, that’s all for me today! Thanks so much for stopping by, and have a marvelous day!

Filed Under: Honey Bee Stamps Tagged With: quatrefoil cover plate, quilted cover plate, slimline sentiments eyelet, spring blooms, wood frame builder dies

Honey Bee Stamps Spring Bliss release+New Illustrations!

February 17, 2021

Hi there! Honey Bee Stamps has the new Spring Bliss release now available for purchase, and it’s chock full of some absolutely beautiful new stamp sets. I’m pleased and proud to say that I have two new illustrations being released within this release, as well! I have a quartet of pretty spring cards for you today, so let’s get started with all of the details.

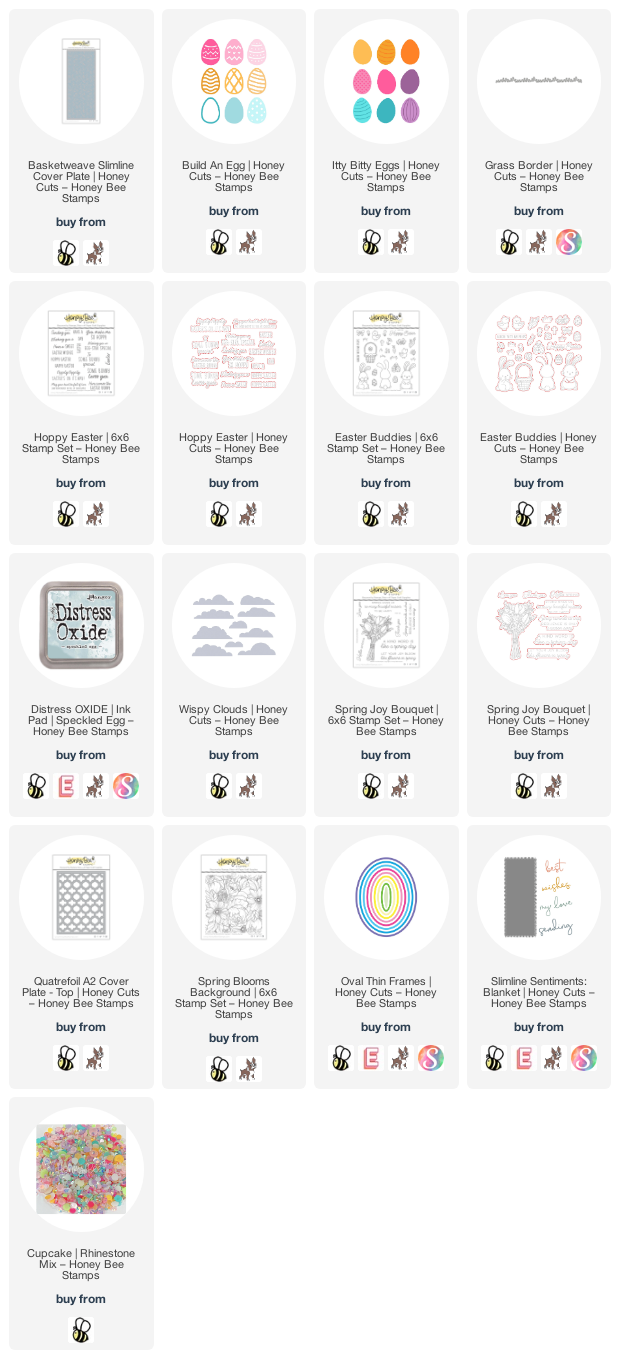
My first card features some of the fantastic new standalone dies from this release: Basketweave Slimline Die and Build An Egg. I love a good standalone die… there are so many, many techniques and tricks that you can use to make them really fun and unique. One of my favorite ways to make an impact with standalone dies is to use specialty papers, like glitter or foil paper. I die cut the base layer of the eggs from Build An Egg from some sparkly white glitter paper, then die cut a some detailed eggs from pale pink cardstock and a polka dotted egg from some pink foil cardstock, as well as a few teeny eggs from Itty Bitty Eggs. I also die cut some pretty green grass using the Grass Border die.

I die cut a Basketweave Slimline Die from some plain white cardstock, then arranged all of the sparkly, shiny pink egg die cuts on the grass, adhering them with foam adhesive. I stamped a greeting from the new Hoppy Easter sentiment set, then die cut it with the coordinating dies. I added a few Moonlight gems for added texture and sparkle!

My second card features the darling new Easter Buddies stamps and dies. I began by stamping a variety of the images from Easter Buddies with no-line ink on Copic-friendly paper, then used my Copic markers to color the images. I love the look of no-line Copic coloring… reminds me of illustrations from children’s books. I die cut all of the images using the coordinating dies.

For the card base, I blended a sky using Speckled Egg Oxide Ink (an appropriate color, no?) and then blended some extra grass using the Grassy Hill Border and some green ink. I adhered the negative die cut from the first card’s grass die cut along the bottom of the blended card base using foam adhesive, then added my little bunny, chick, and Easter accoutrements using foam and liquid adhesive.

I added some sparkly white clouds cut using the Wispy Clouds dies, as well as a die cut sentiment from Easter Buddies. Love these sweet little springy animals!

My next card features one of the new illustrations I created for the Spring Bliss release: Spring Joy Bouquet. It coordinates with the previously released Floral Bouquet Wrap die, but I thought I’d show it off all by itself! I began by heat embossing the bouquet using white pearl embossing powder on some watercolor paper, then used my Holbein watercolors to add pretty pastel pink, yellow, and lavender to create a super springy bouquet.

For the background, I used the wet-on-wet technique to create a light, airy backdrop for my bouquet. I began by taping down my watercolor paper to a board, then wet it thoroughly with clean water and dropped in diluted color, swirling the colors around to create a pretty background. Once it had dried completely, I added a light pink Quatrefoil Cover Plate die cut over the top to create some subtle texture.

I added the watercolored bouquet to the card front using foam adhesive, then added a white embossed greeting on some pretty periwinkle cardstock.

In addition to Spring Joy Bouquet, I also have illustrated a new background set: Spring Blooms. I heat embossed the background stamp using some pretty copper embossing powder on watercolor paper and used Karin markers to watercolor the blooms.

I used the Oval Thin Frames die to cut a copper foil frame. I adhered it using liquid adhesive, then die cut “sending my love” using the dies from the Slimline Blanket Sentiments, cutting them three times and adhering them together to create dimensional die cuts.

I adhered the die cuts using liquid adhesive, then added some Cupcake rhinestones for extra sparkle.

Well, that’s all for my post today! I hope you will check out the new Spring Bliss release from Honey Bee Stamps. So many beautiful and unique products! Thanks so much for stopping by, and have a marvelous day!

Filed Under: Honey Bee Stamps Tagged With: basketweave slimline die, easter buddies, easter card, floral bouquet, grassy hill border, hoppy easter, quatrefoil cover plate, spring bliss, spring blooms, spring joy bouquet, wispy clouds dies

Primary Sidebar

  • Facebook
  • Instagram
  • Pinterest
  • YouTube

Favorite Shops

Secondary Sidebar

Subscribe

Enter your email address to subscribe to this blog and receive notifications of new posts by email.

Instagram
Something is wrong.
Instagram token error.
Follow
Load More

Archives

Tags

3D embossing folder alcohol markers better press birthday birthday card blog hop card kit christmas christmas card christmas tag colored pencil copic copic coloring Daniel Smith die cutting embossing folder embroidery felt giveaway holiday holiday card hot foil ink blending karin brushmarker pro layered stencil masculine my monthly hero new release no line coloring no line watercolor OLO marker olo markers original illustration pawsitively saturated rainbow shaker card slimline stamping stamptember stencil thank you thinking of you valentine's day video watercolor

Popular Posts

Simon Says Stamp Joy For You Blog Hop- Day 1!
Simon Says Stamp Joy For You Release-Now Available!
Frozen Fractals All Around with New Simon Says Stamp Joy For You Release!
Shaped Holiday Shaker Card with New Simon Says Stamp Jolly Season Card Kit of the Month!
Holiday Postage with New Simon Says Stamp!
Simon Says Stamp Glory to the Newborn King Holiday Kit-Part II!
Pinkfresh Studio 5th Birthday!
Altenew Build A Flower: Fuchsia Blog Hop+Giveway!
Holiday Joy in Pink and Green with New Simon Says Stamp DieCember!
July My Monthly Hero Blog Hop+Giveaway!

Disclosure

Some affiliate links are used in my posts. This means that, should you click on one of my links and purchase something from that company, I will receive a small portion of the sale at no extra cost to you. I use the money earned from these sales to help maintain my blog. I so appreciate you visiting and, if you do choose to use one of my affiliate links, thank you so much for your support!
Copyright © 2026 ·Brunch Pro Theme · Genesis Framework by StudioPress · WordPress · Log in
Loading Comments...