• Skip to main content
  • Skip to primary sidebar
  • Skip to secondary sidebar

Sixth Street Sundries

Emily Midgett

  • Home
  • About Me
  • Contact
  • OLO Marker Color Swatch Chart
  • Shop

art deco frame

Pinkfresh Studio August 2023 Holiday Stamp, Die, Stencil, and Hot Foil Release

August 21, 2023

Hi there! Today, Pinkfresh Studio is releasing their holiday collection, and boy is it a stunner! The August 2023 Release features so many beautiful sentiments, timeless holiday images, and elegant hot foil plates to create the most marvelous array of holiday cards! I have two wintry cards both featuring the new Large Snowflakes dies to share with you today, so let’s get started with the details!

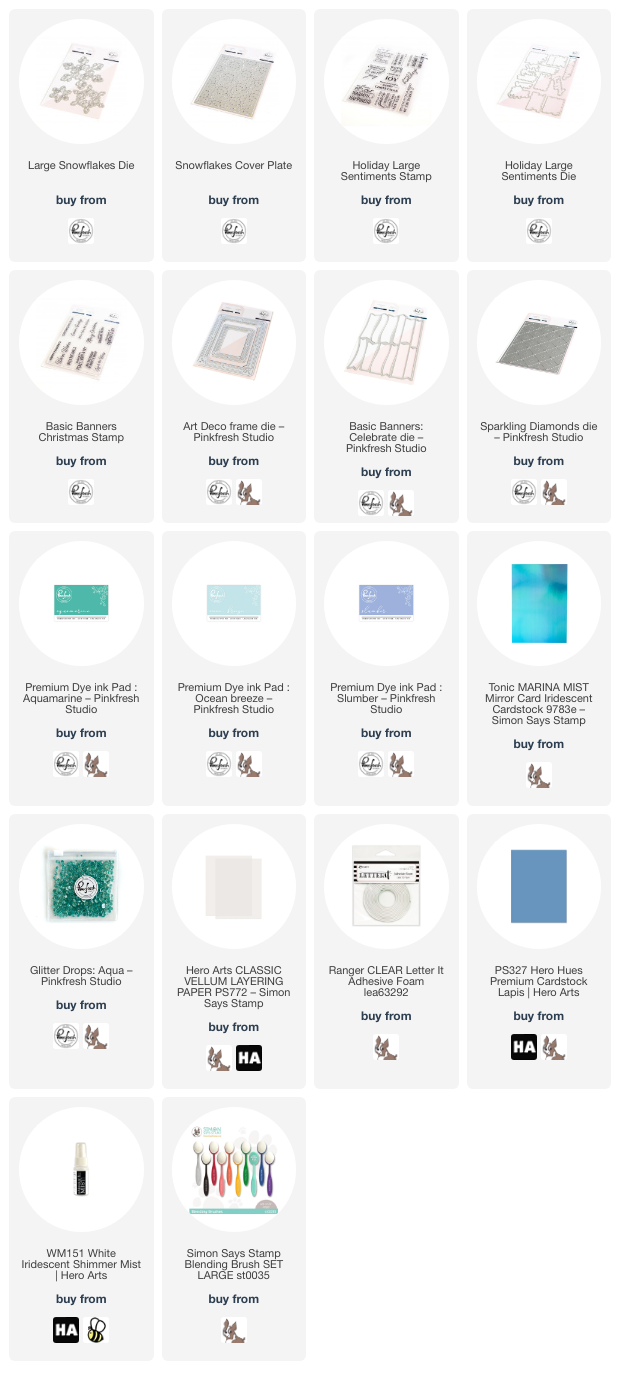
I have quite the collection of snowflake dies in my stash of holiday cardmaking supplies. I can’t help it. Their elegance and intricate beauty entrance me. The new Large Snowflakes dies feature three different shapes in a small, medium, and large size, perfect for creating a variety of styles and projects. Both of my cards today also feature an icy color combination of Ocean Breeze, Aquamarine, and Slumber inks. I think these three colors create the loveliest frosty background for my shimmering snowflakes!

To start my first project, I blended Ocean Breeze, Aquamarine, and Slumber inks on a panel of white, A2 cardstock, blending super lightly at first, then gradually building up the layers to create a smooth transition between the colors. Once I had a blend that I liked, I ran the entire blended panel through my die cutting machine using the utterly gorgeous new Snowflakes Cover Plate die. The cutout and stitched details on this new cover plate are spectacular and so very unique!! Once I had die cut the blended panel, I spritzed some iridescent shimmer spray over the entire piece to add even more shimmer and sparkle.

I have a mild obsession with foiled/mirror cardstock. I have so many different styles and shades, because I am truly that picky when it comes to my color combinations. The colors have to be just right. Imagine my delight when I searched through my stash to find this beautiful shade of blue with a minty green iridescent coating (check it out HERE) that perfectly matched my icy, shimmery, ink blended background. I die cut as many snowflakes as I could from a 1/2 sheet of the cardstock, knowing that I would have plenty for another card. I also die cut an iridescent white mirror foil (say that three times fast!) frame using the Pinkfresh Studio Art Deco Frame die. I backed the blended, die cut background with a panel of coordinating blue cardstock, then popped up that shining frame around the outside edge with some foam adhesive.

After I had added my frame, it was time to arrange my snowflakes and add a sentiment! I heat embossed a greeting from the new Holiday Large Sentiments stamp set, which I heat embossed using some beautiful shimmery teal embossing powder on some heavyweight vellum cardstock. I die cut the finished sentiment using the coordinating die and placed it next to my frame, popping it up with some clear foam adhesive. I then tucked some of the medium and small foil Large Snowflakes dies around the sentiment and under the frame, finally adding some Aqua Glitter Drops for even more sparkle! I don’t think a holiday card, especially one with snowflakes, can ever have too much sparkle!

My second project is much simpler and utilizes the largest of the three Large Snowflakes dies. This largest die is so generously sized that it easily stands alone as a focal point for a card front! I began this card by masking off the edges of a white, A2 card front using painter’s tape. I then used blending brushes to blend Ocean Breeze, Aquamarine, and Slumber inks on the exposed area, creating a lovely monochromatic ombré down my card front. Once I’d finished blending and before removing the mask around the edges, I spritzed some more shimmer spray over the top of the ink blending to create a beautiful backdrop for my snowflake die cut. I removed the masking tape and was left with a crisp white frame around the edge of my shimmery, icy, blended background!

I felt like the background needed a bit of extra texture before adding my snowflake die cut, so I ran the blended panel through my die cut machine using the Sparkling Diamonds Cover Plate die. The “sparkles” at the apex of each diamond remind me of snowflakes, and I thought it worked perfectly with my icy card! To add a little extra height to my extra large Large Snowflakes die cut, I cut out two more from white cardstock and layered them together using liquid adhesive. This allowed me to add extra height without having to fuss with tiny pieces of foam adhesive! I adhered the snowflake to the center of the card front using liquid adhesive.

For the greeting, I used the new Basic Banners Christmas stamp set with the previously-released coordinating Basic Banners die. I heat embossed it in teal (if you don’t have teal embossing powder, you can always stamp the sentiment in your coordinating dye ink, then stamp again with embossing ink and cover with clear or pearlescent embssing powder! This won’t work on vellum, but it works beautifully on regular cardstock!), then die cut the sentiments with the handy-dandy one pass Basic Banners die. I now have a ton of leftover die cuts to use on futur projects! Hooray! I added it smack dab in the center of my snowflake with some foam adhesive, then added some more Aqua Glitter Drops at the tips of the snowflake for more sparkle.

Well, that’s all for my projects today! Now for some fun givewaway information:

We will be giving away the full release on the Pinkfresh blog & YouTube channel. 

Pinkfresh Studio will be giving away a total of TEN $25  gift cards along the hop. As per usual with blog hops – the winners will be selected from the comments.
Winners will be announced on August 30, 2023 on our GIVEAWAY PAGE. Please mention that they must check that page & claim their prize within 2 weeks.

Here’s the full hop list below:

You are invited to the Inlinkz link party!

Click here to enter

Thanks so much for stopping by, and have a marvelous day!
Filed Under: pinkfresh studio Tagged With: art deco frame, christmas, holiday, ink blending, snowflakes, snowflakes dies

Pinkfresh Studio June 2023 Stamp, Die, Stencil, and Hot Foil Release

June 26, 2023

Good morning! Today, Pinkfresh Studio is releasing their June 2023 collection of products, and it’s full of stunning new florals that are sure to uplift your cards and cardmaking process! I pulled out my watercolors to do lots of no-line watercoloring today, and I’m excited to share the projects with you. Let’s get started with the details!

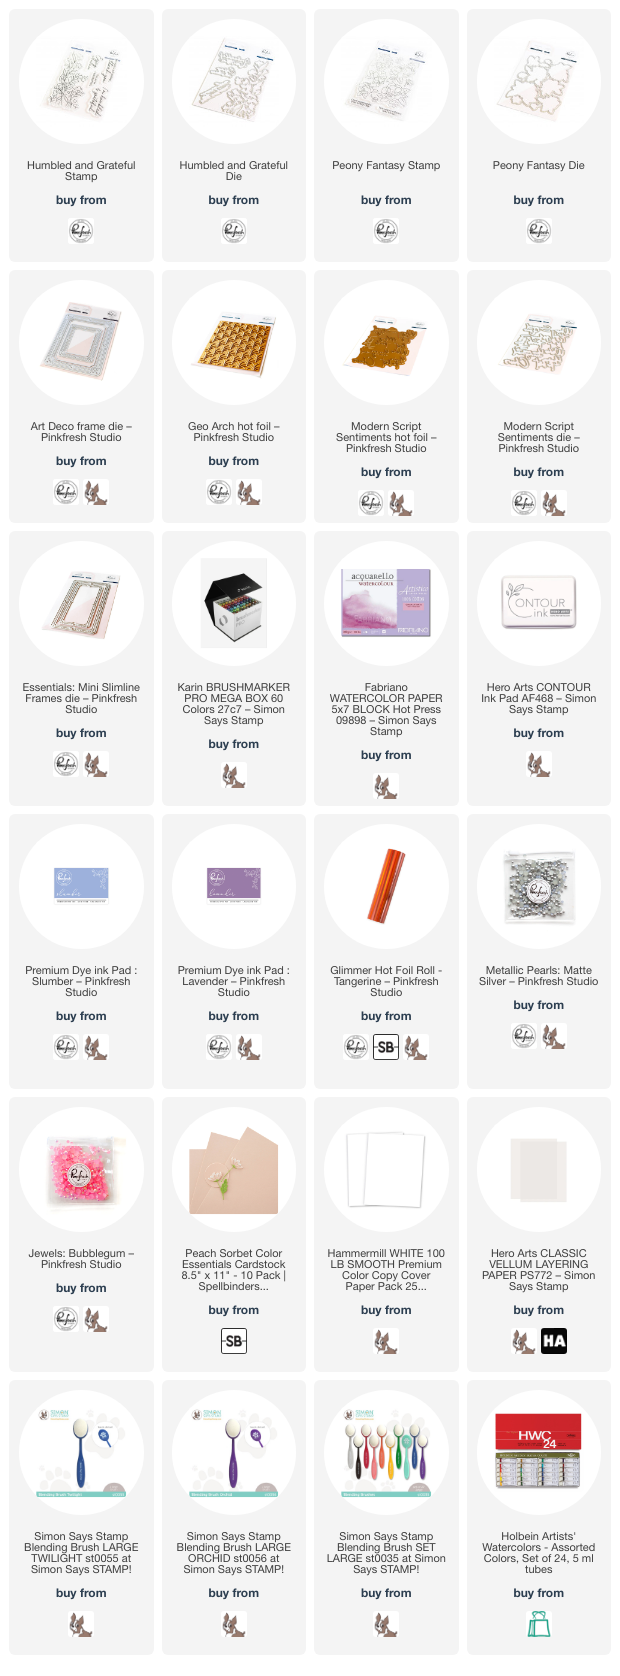
I began by stamping the Humbled and Grateful stamp set (PFS|SSS) twice on Fabriano Artistico Hot Press watercolor paper using no-line coloring ink. Using a finely tipped paintbrush and my Karin Brushmarker Pro watercolor markers, I added soothing blue and purple flowers with soft green foliage. I find that I get better results with the Karin markers when I scribble the color out onto my ceramic palette; I can better control the intensity of the color and the amount of water that gets onto my paper that way. I also find that the smooth hot press paper works beautifully with the transparent markers. (I have more tips on how to get good results with the Karin markers in my most recent video on the Pinkfresh Studio YouTube channel, which you can check out HERE.)

Once I had finished watercoloring the two floral clusters, I used the Humbled and Grateful dies (PFS|SSS) to cut the images out.

To create a coordinating, subtle, ethereal “sky” background, I very lightly blended Slumber and Lavender inks in a circular motion on my white A2 card base, starting with the Slumber in the center and then lightly tapering into Lavender around the edges. These two ink colors coordinated beautifully with my watercolored blurple floral sprays! I also die cut a white Art Deco Frame die and mounted it on the blended panel with some foam adhesive.

I snipped one of the watercolored Humbled and Grateful floral die cuts apart, then arranged the smaller pieces amongst the intact die cut of the floral pieces in a “meadow,” tucking the ends behind the white frame to hide them. I heat embossed a greeting from Humbled and Grateful onto some white cardstock using silver embossing powder, then added it to the card front with some more foam tape, creating a double layer of foam adhesive. Finally, I added some Matte Silver Pearls to add one last bit of shine!

My next project for today features the beautiful new Peony Fantasy Stamps (PFS|SSS). I can never get enough peonies, and because their growing season is so short, I am so happy to have access to beautiful gardens of peonies throughout the year with stamps! I stamped the tiny beauties from Peony Fantasy onto some Arches Cold Press watercolor paper with no-line coloring ink, then used my Holbein watercolors to add beautiful bubblegum pink to the images, adding light washes of coral on a few petals to provide some variation in color.

After I’d finished watercoloring, I die cut the finished flowers using the Peony Fantasy Dies (PFS|SSS).

For the background, I hot foiled the older Geo Arch Hot Foil Plate onto some peachy cardstock using orange hot foil. Monochromatic backgrounds are one of my most favorite ways to use hot foil. They provide subtle interest behind the focal point without overpowering it! I chose to highlight the coral washes in the peonies by keeping the background peachy. I also used the Modern Script Hot Foil Sentiments to hot foil a coordinating greeting using the same shades of cardstock and foil.

To ground my florals and sentiment, I die cut the smaller Essentials: Mini Slimline Frame die from some coordinating magenta cardstock to accent the pink peonies, also cutting the same small die from vellum to inlay inside the frame. I turned the frame 90*, oriented it to the right side of my card, and trimmed off the excess, making this mini-slimline product work beautifully for an A2 card front! I arranged the watercolored peonies and greeting around the frame and adhered them using foam tape, then added the frame to the card front using another layer of foam tape, creating tons of dimension. The final touch was to add some Bubblegum gems for some sparkle!

Well, that’s all for my projects today! Now for some fun giveaway information:

Pinkfresh Studio will be giving away the full release on the Pinkfresh blog & YouTube channel. 
They will also be giving away a total of TEN $25  gift cards along the hop. The winners will be selected from the comments, so be sure to leave a comment on each stop along the hop for maximum entries and chances to win! Winners will be announced on July 5, 2023 on our GIVEAWAY PAGE. Winners must check that page & claim their prize within 2 weeks.

Here’s the full hop list:

You are invited to the Inlinkz link party!

Click here to enter

Thanks so much for stopping by today, and happy hopping!

Filed Under: pinkfresh studio Tagged With: art deco frame, geo arch, hot foil, humbled and grateful, karin brushmarker pro, mini slimline, modern script sentiments, no line watercolor, peony fantasy, watercolor

VIDEO: Monet-Inspired Loose Watercoloring with Pinkfresh Studio Premium Dye Ink Pads

May 13, 2023

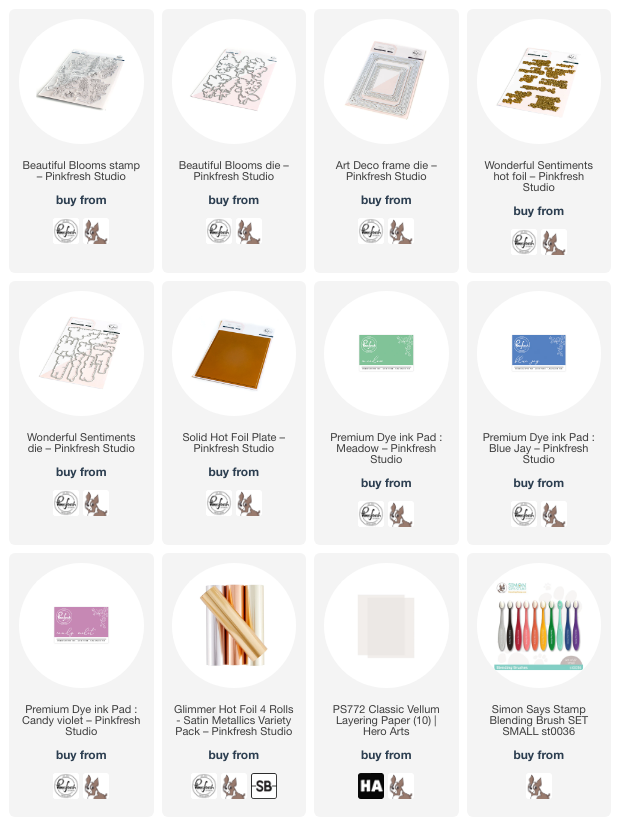
Today, I am over on the Pinkfresh Studio YouTube channel sharing a project inspired by that most classic of fine art pieces: Monet’s Water Lilies! Using ink blending, some loose watercoloring, a little vellum, and lots of watercolor “blooms,” I have created this ethereal watercolored card using the Beautiful Blooms stamps and some Pinkfresh Studio Premium Dye ink pads! Check out the video below:

Or you can click HERE to watch in HD on YouTube.

I have always loved Monet’s Water Lilies painting, with it’s ethereal, dreamlike aesthetic, and so I attempted to channel that look with my loose watercoloring for today’s project. I began by doing some very simple blending on some watercolor paper using Candy Violet (for the lilies), Meadow (for the lilypads), and Blue Jay inks, then spritzing the blended panel with water and moving the color around with my wet paintbrush. The water-based dye inks will still move on the watercolor paper, giving you another option for use!

Once I had finished my blending, I set aside the panel to dry and then heat embossed one of the floral trio stamps from Beautiful Blooms onto some more watercolor paper using white embossing powder. After heat embossing, I covered the panel in clean, clear water in order to do some wet-on-wet watercoloring. I tapped out the three shades of ink used on my blended background panel onto my glass mat, then diluted them and dropped them onto my very wet panel of watercolor paper, paying very little attention to where they were supposed to go and spilling the colors over the edges of the images, which allows me to avoid the pesky white edge on the finished die cuts!

After my initial layer of diluted color had dried, I went back in with more concentrated color to enhance the colors of the individual images, again employing the wet-on-wet technique by wetting only the image that I wanted to enhance and dropping in the color, allowing the pigment to bloom on the wet watercolor paper. I die cut the finished images with the handy dandy one-piece coordinating die.

With my blooms complete, I turned my attention back to the background, now dry. The blended background colors were a bit more intense than I initially had envisioned, so to help soften the background, I placed a full size A2 panel of heavyweight vellum over the top, which immediately softened the colors and made the blending even more ethereal than before! I added an iridescent white shimmer die cut frame over the top, cut using the larger frame from the Art Deco Frame die. For the greeting, I searched my stash of hot foiled sentiments to find one that tucked into my watercolored bouquet nicely, finally settling on a sentiment created using the Wonderful Sentiments Hot Foil Plate and Coordinating Die set and the Solid Hot Foil Plate. I adhered everything over the top of the blended, vellum background with some foam tape, then added a few iridescent drops for some more sparkle!

Well, that’s all for my project today! Thanks so much for stopping by today, and have a marvelous day!

Filed Under: pinkfresh studio, video Tagged With: art deco frame, beautiful blooms, ink blending, monet, solid hot foil plate, wonderful sentiments

Primary Sidebar

  • Facebook
  • Instagram
  • Pinterest
  • YouTube

Favorite Shops

Secondary Sidebar

Subscribe

Enter your email address to subscribe to this blog and receive notifications of new posts by email.

Instagram
Something is wrong.
Instagram token error.
Follow
Load More

Archives

Tags

3D embossing folder alcohol markers better press birthday birthday card blog hop card kit christmas christmas card christmas tag colored pencil copic copic coloring Daniel Smith die cutting embossing folder embroidery felt giveaway holiday holiday card hot foil ink blending karin brushmarker pro layered stencil masculine my monthly hero new release no line coloring no line watercolor OLO marker olo markers original illustration pawsitively saturated rainbow shaker card slimline stamping stamptember stencil thank you thinking of you valentine's day video watercolor

Popular Posts

Simon Says Stamp Sending Cheer Blog Hop- Day 2 + Freebie + Giveaway!
Altenew October 2026 Release Blog Hop + Giveaway!
Simon Says Stamp Sending Cheer Release: Now Available!
Simon Says Stamp October 2026 Card Kit of the Month: Homespun Gratitude!
A Double Leftovers Card Set with New Simon Says Stamp Stencils and Dies!
Simon Says Stamp November 2025 Card Kit: Give Thanks!
Joyful Snowman with New Simon Says Stamp Sending Cheer Release!
Hero Arts Partners Blog Hop: Lawn Fawn!
Altenew Paint A Flower: Carnation Blog Hop+Giveaway!
Simon Says Stamp October 2025 Card Kit of the Month!

Disclosure

Some affiliate links are used in my posts. This means that, should you click on one of my links and purchase something from that company, I will receive a small portion of the sale at no extra cost to you. I use the money earned from these sales to help maintain my blog. I so appreciate you visiting and, if you do choose to use one of my affiliate links, thank you so much for your support!
Copyright © 2026 ·Brunch Pro Theme · Genesis Framework by StudioPress · WordPress · Log in
Loading Comments...