• Skip to main content
  • Skip to primary sidebar
  • Skip to secondary sidebar

Sixth Street Sundries

Emily Midgett

  • Home
  • About Me
  • Contact
  • OLO Marker Color Swatch Chart
  • Shop

video

VIDEO: Monet-Inspired Loose Watercoloring with Pinkfresh Studio Premium Dye Ink Pads

May 13, 2023

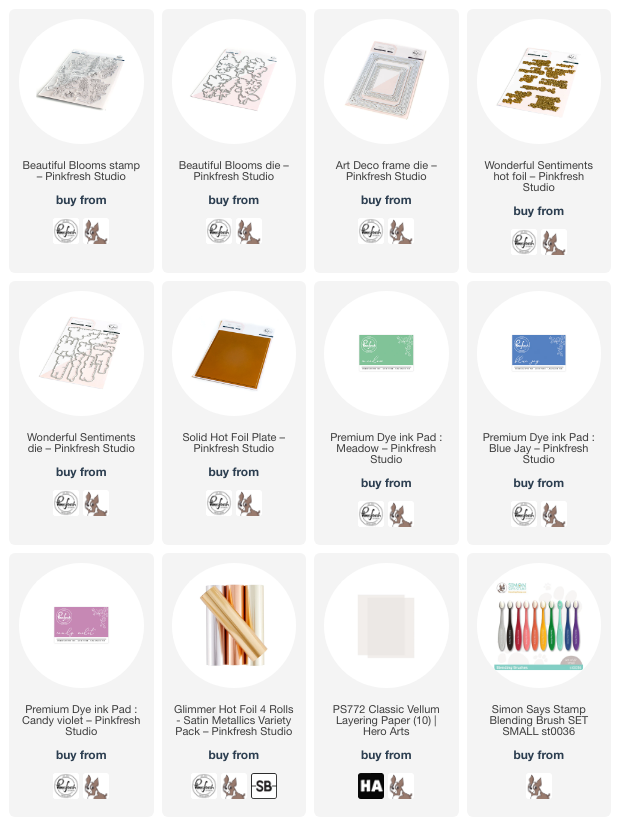
Today, I am over on the Pinkfresh Studio YouTube channel sharing a project inspired by that most classic of fine art pieces: Monet’s Water Lilies! Using ink blending, some loose watercoloring, a little vellum, and lots of watercolor “blooms,” I have created this ethereal watercolored card using the Beautiful Blooms stamps and some Pinkfresh Studio Premium Dye ink pads! Check out the video below:

Or you can click HERE to watch in HD on YouTube.

I have always loved Monet’s Water Lilies painting, with it’s ethereal, dreamlike aesthetic, and so I attempted to channel that look with my loose watercoloring for today’s project. I began by doing some very simple blending on some watercolor paper using Candy Violet (for the lilies), Meadow (for the lilypads), and Blue Jay inks, then spritzing the blended panel with water and moving the color around with my wet paintbrush. The water-based dye inks will still move on the watercolor paper, giving you another option for use!

Once I had finished my blending, I set aside the panel to dry and then heat embossed one of the floral trio stamps from Beautiful Blooms onto some more watercolor paper using white embossing powder. After heat embossing, I covered the panel in clean, clear water in order to do some wet-on-wet watercoloring. I tapped out the three shades of ink used on my blended background panel onto my glass mat, then diluted them and dropped them onto my very wet panel of watercolor paper, paying very little attention to where they were supposed to go and spilling the colors over the edges of the images, which allows me to avoid the pesky white edge on the finished die cuts!

After my initial layer of diluted color had dried, I went back in with more concentrated color to enhance the colors of the individual images, again employing the wet-on-wet technique by wetting only the image that I wanted to enhance and dropping in the color, allowing the pigment to bloom on the wet watercolor paper. I die cut the finished images with the handy dandy one-piece coordinating die.

With my blooms complete, I turned my attention back to the background, now dry. The blended background colors were a bit more intense than I initially had envisioned, so to help soften the background, I placed a full size A2 panel of heavyweight vellum over the top, which immediately softened the colors and made the blending even more ethereal than before! I added an iridescent white shimmer die cut frame over the top, cut using the larger frame from the Art Deco Frame die. For the greeting, I searched my stash of hot foiled sentiments to find one that tucked into my watercolored bouquet nicely, finally settling on a sentiment created using the Wonderful Sentiments Hot Foil Plate and Coordinating Die set and the Solid Hot Foil Plate. I adhered everything over the top of the blended, vellum background with some foam tape, then added a few iridescent drops for some more sparkle!

Well, that’s all for my project today! Thanks so much for stopping by today, and have a marvelous day!
Filed Under: pinkfresh studio, video Tagged With: art deco frame, beautiful blooms, ink blending, monet, solid hot foil plate, wonderful sentiments

Video: Adding Tons of Sparkle to your Holiday Cards!

November 30, 2022

Hi there! Today, I am over on the Pinkfresh Studio YouTube channel with this holiday card that has so much sparkle, you might need some sunglasses to look at it! Sparkle is one of my favorite ways to differentiate my holiday cards from the cards that I make the rest of the year. If you can’t add sparkle on Christmas cards, when can you add sparkle? It just makes them so terribly festive!! Here’s the video:

Or you can click HERE to watch it on YouTube in HD.

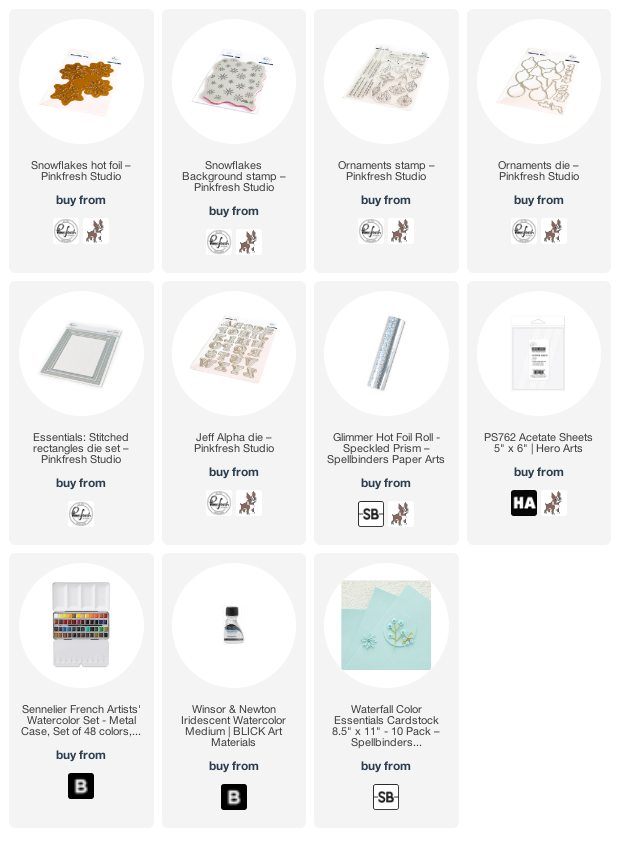
This entire card began when I was experimenting with the new-ish Snowflakes Hot Foil Plate. I love the look of hot foiling on vellum, but I get mixed results, and I read somewhere that you could heat emboss on Hero Arts’s acetate. I thought to myself “if you can heat emboss on it, can you hot foil on it?” I feared that it would melt and ruin my plate, but it was a risk I was willing to take… and just look at the result!! I am so in love with this new-to-me technique, and I can’t wait to apply it to other projects. I hot foiled the Snowflakes Hot Foil Plate on some acetate using Speckled Prism hot foil from Spellbinders, which creates a beautiful, iridescent effect, which is particularly striking on the clear acetate!

Once I had my snowflake acetate panel, I knew that I wanted to create a snowy scene with snowflakes in various sizes, so I heat embossed the Snowflakes Background stamp on some watercolor paper using White Satin Pearl embossing powder. I taped the panel down to my watercolor board, spritzed the entire panel with some clean water using a fingertip sprayer, then used Sennelier watercolors to add some diagonal color. I started with a few stripes of blue, blended that into some minty turquoise, then created a custom purple by mixing the same blue with some bright magenta. The already-damp watercolor paper helped the colors to meld together beautifully and seamlessly. I hit the very wet panel with my heat gun and added some Winsor & Newton Iridescent Medium along the blue areas to create a sparkly, wintry, almost Aurora Borealis effect on my background. Once that had dried, I added some Payne’s Grey around the edges, pulling the color out to a nice fade using a clean damp brush, which created a halo effect around my sparkly AB background.

While my panel was drying, I created a frame using some pure white glitter cardstock and the Stitched Rectangles Essentials Dies. I used some super strong tape to adhere my clear snowflake panel to the sparkling frame. Once my watercolor panel had dried, I used some thin foam squares to adhere the framed acetate panel to my watercolored piece. I love how the foiled snowflakes look as though they’re floating on the watercolored background!

For the greeting, I heat embossed two different sentiments from the Ornaments Stamp set onto some Spellbinders Waterfall cardstock using white embossing powder. I used the Ornaments Dies to die cut the cursive greeting, which I think makes it look so incredibly clean and polished. I die cut the solid halo piece from the Jeff Alpha dies from some more Waterfall cardstock, then die cut the detail layer using the same white glitter cardstock, adhering them together with liquid adhesive. I added them to the clear snowflake panel with small dots of liquid adhesive to keep everything nice and clean, orienting them in the bottom right corner to allow the hot foiled snowflakes and watercoloring to take center stage!

Well, that’s all for this project and video! I can’t wait to try this hot foil-on-acetate technique out on more projects, and I hope you’ll try it out too. Thanks so much for stopping by today, and have a marvelous day!

Filed Under: pinkfresh studio, video Tagged With: acetate, christmas card, holiday card, hot foil, snowflakes, video, watercolor

New Video: Adding “Iridescent” Details to your No-Line Watercoloring!

May 18, 2022

Hi there! I am up on the Pinkfresh Studio YouTube channel today with this video featuring my new Magnolia stamps and some “iridescent” watercoloring. Take a peek at the video here on my blog or watch HERE on YouTube to see how I created this iridescent look!

If you can’t watch the video, I’ll give a quick rundown of how I created this pretty card!

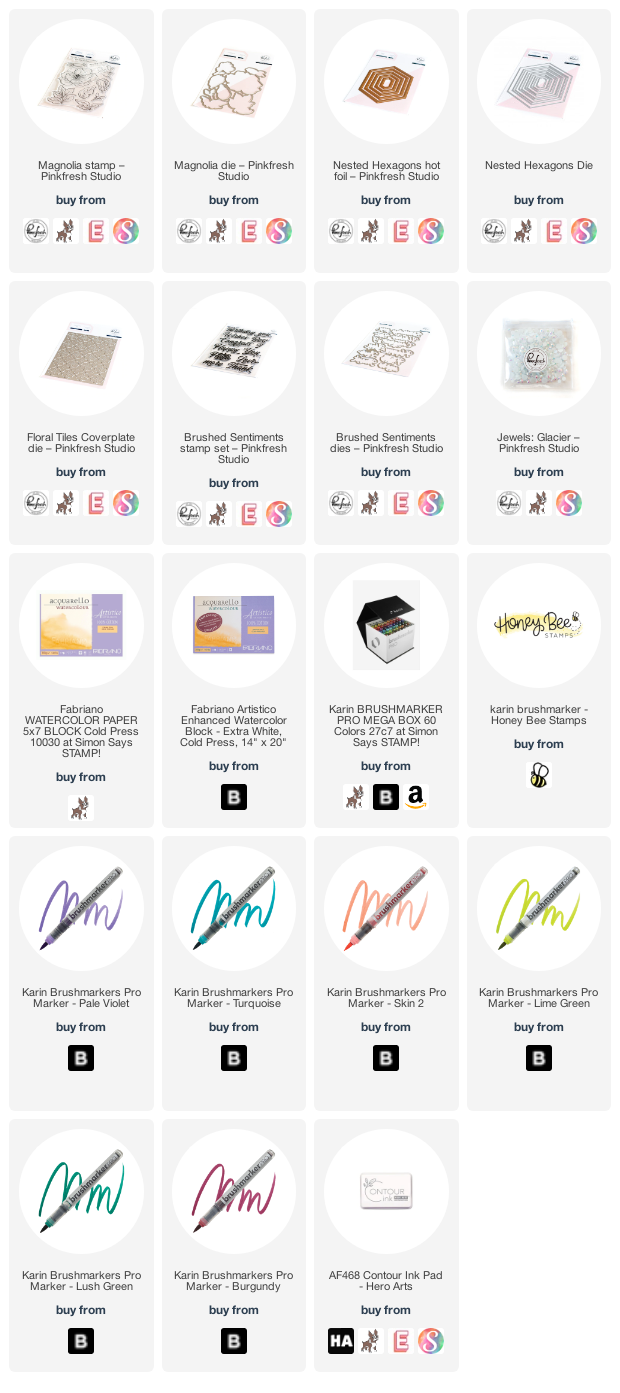
When I’ve got all of the stuff out for hot foiling, I will hot foil a bunch of different pieces to use at a later date for projects. I hot foiled the super versatile new Nested Hexagons hot foil frames using Aura foil, which is an absolutely stunning iridescent gold foil from Spellbinders, and I thought that the new Magnolia stamps would be perfect to do a video with some more no-line watercolor tricks, as well as showing how I create an “iridescent” look to my watercolored images!

I began by stamping the Magnolia images onto some Fabriano Artistico watercolor paper using Contour Ink from Hero Arts. I used my Karin Brushmarker watercolor markers to add some light pink color to the images, keeping the pinks and lavender shadows concentrated towards the center of the flower, making sure to keep the edges nice and crisp by keeping the wet sections separate, as well as using plenty of water to allow the pink to smoothly fade into white around the edges of the petals.

After I’d added the main color to the pink flowers, I added some very diluted washes of coral, lime green, and aqua blue Karin markers to the edges of the petals, mirroring the iridescent shine on the Nested Hexagon foiled frame. I was able to make the colors super pale and translucent by scribbling them onto my ceramic palette and adding lots of clean water to create the subtle wash. I die cut the finished watercolored images using the coordinating Magnolia Dies.

To create the background for my watercolored images, I die cut a Nested Hexagon die the same size as my foiled frame from the center of a Floral Tiles cover plate die, cut from some white cardstock. I nested the foiled frame inside of the die cut opening, then added both pieces to a solid white card base using foam adhesive. I arranged the watercolored magnolia flowers to the front of the card in a bouquet, then adhered them with more foam adhesive, creating a double layer of foam adhesive. For the greeting, I added a sentiment from Brushed Sentiments, which I heat embossed in white on some heavyweight vellum and die cut using the coordinating dies. The final touch was to add a few iridescent white gems for some sparkle!

Well, that’s all for this project! It was so fun picking up the rainbow colors in the iridescent foil in my watercoloring. It’s subtle, but I think it adds so much interest to the finished painting. Thanks so much for stopping by, and have a marvelous day!

Filed Under: karin, pinkfresh studio, video Tagged With: birthday card, hot foil, magnolia, nested hexagon, no line watercolor

New Exploring With Emily+Mother’s Day Sales!

May 11, 2019

Hi there! I just wanted to pop in really quickly and share my latest Exploring With Emily video!

In this month’s installment of Exploring With Emily, I am working with Distress Oxide reinkers again… but this time, I’ve added a little twist: Daniel Smith Mars Black watercolor grounds. I hope you’ll take a peek. The combination of Distress Oxide reinkers and the black watercolor grounds creates a very unique project! I can’t wait to try this out with other stamps, as well! I gave this card to my kiddos’ preschool teacher with a hanging basket for her porch. Isn’t that sentiment just the cutest?

Now for some fun sales to celebrate all of the fabulous mommas!

Ellen Hutson is having a 20% off sale… yes, 20% off of nearly EVERYTHING… no minimum purchase required!! Happy Mother’s Day, indeed! Just enter code momsday19 at checkout.

Honey Bee Stamps is also having a Mother’s Day Sale… $20 off your order of $100 or more!! Use code MDAY2019 at checkout…. Bonus: a free enamel Honeybee pin included with orders over $100! (They just added a few more enamel pin designs to the shop, and they. are. so. cute. Check them out here and here!)

Happy shopping!! 🙂

Filed Under: Ellen Hutson, video, watercolor Tagged With: distress oxide watercolor, exploring with emily, mother's day, sales, watercolor grounds

Wplus9 Guest Post and Sneak Peek!

December 12, 2018

Good morning! Happy Wednesday to you! I have some exciting news to share… I’m over on the Wplus9 blog today sharing a video on how I created this watercolored card! Eek!

You can also head to the YouTube channel to see the video in HD! 

I hope you’ll stop by and check it out! 🙂 Have a marvelous day, friends! 

Filed Under: video, watercolor, Wplus9 Tagged With: floral, guest post, holiday, video, watercolor

  • Page 1
  • Page 2
  • Page 3
  • Page 4
  • Go to Next Page »

Primary Sidebar

  • Facebook
  • Instagram
  • Pinterest
  • YouTube

Favorite Shops

Secondary Sidebar

Subscribe

Enter your email address to subscribe to this blog and receive notifications of new posts by email.

Instagram
Something is wrong.
Instagram token error.
Follow
Load More

Archives

Tags

3D embossing folder alcohol markers better press birthday birthday card blog hop card kit christmas christmas card christmas tag colored pencil copic copic coloring Daniel Smith die cutting embossing folder embroidery felt giveaway holiday holiday card hot foil ink blending karin brushmarker pro layered stencil masculine my monthly hero new release no line coloring no line watercolor OLO marker olo markers original illustration pawsitively saturated rainbow shaker card slimline stamping stamptember stencil thank you thinking of you valentine's day video watercolor

Popular Posts

Simon Says Stamp Sending Cheer Release: Now Available!
Joyful Snowman with New Simon Says Stamp Sending Cheer Release!
Autumn Legs with Colorado Craft Company and Catherine Pooler!
February 2018 My Monthly Hero Blog Hop!
Altenew Paint A Flower: Carnation Blog Hop+Giveaway!
Altenew March 2020 Release Blog Hop+Giveaway!
Special Release: Simon Says Stamp Limited Edition STAMPtember Christmas Card Kit!
Pinkfresh Studio 5th Birthday!
Pinkfresh Studios June Washi and Stamp Release Blog Hop!
Advent Calendar Extravaganza with Taheerah Atchia

Disclosure

Some affiliate links are used in my posts. This means that, should you click on one of my links and purchase something from that company, I will receive a small portion of the sale at no extra cost to you. I use the money earned from these sales to help maintain my blog. I so appreciate you visiting and, if you do choose to use one of my affiliate links, thank you so much for your support!
Copyright © 2026 ·Brunch Pro Theme · Genesis Framework by StudioPress · WordPress · Log in
Loading Comments...