• Skip to main content
  • Skip to primary sidebar
  • Skip to secondary sidebar

Sixth Street Sundries

Emily Midgett

  • Home
  • About Me
  • Contact
  • OLO Marker Color Swatch Chart
  • Shop

easy christmas card

Elegant Christmas Cards in 20 Minutes or Less: Volume 5 with Hero Arts!

December 19, 2020

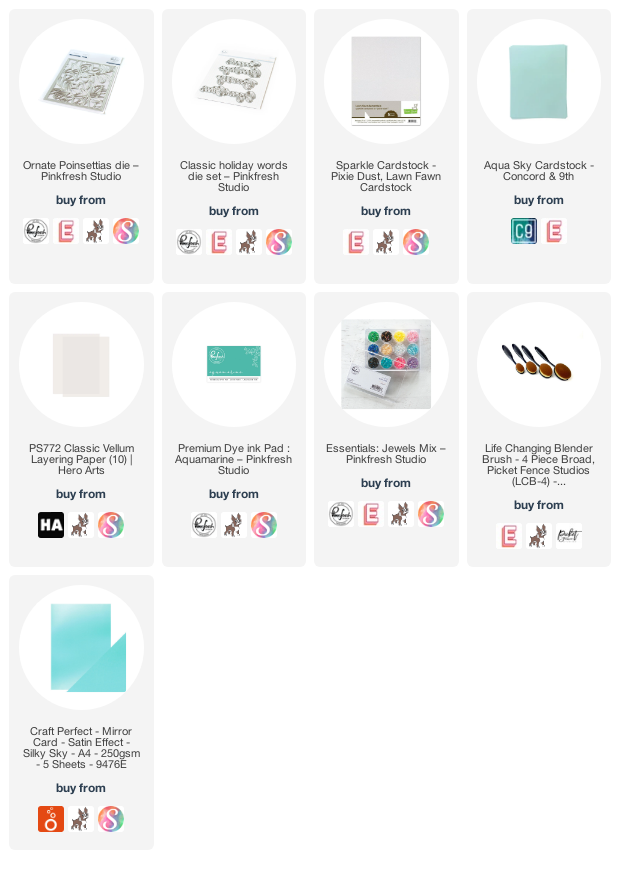
Hi there! I’m back again with the final installment of my “Christmas Cards in 20 Minutes or Less” video series. I hope you’ve gotten a tip or two on how to make elegant Christmas cards without having to make a huge time investment! For my final card today, I’m utilizing a gorgeous fancy die from Hero Arts called Floral Holiday Tree and some shiny gold foil cardstock. Here’s the video:

Or you can watch in HD here.

Shiny foil cardstock is one of the easiest ways to make an impact on your card front. Adding different textures, such as foil or glitter, makes a quick impact on your card front. The vivid background coupled with the ink blending and metallic splatters to help spotlight the die cut also add to the dramatic impact of the shiny die cut.

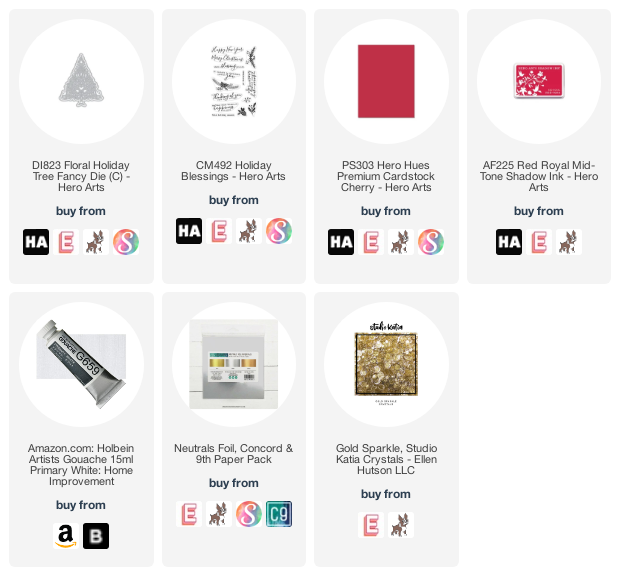
For this card, I began by die cutting the Floral Holiday Tree from some shiny gold foil cardstock. I then blended some Red Royal ink on a deep red cardstock and added some gold splatters with gold gouache. I heat embossed a greeting from Christmas Blessings on another strip of red cardstock, then added both the die cut and the sentiment strip using foam adhesive. The final touch was some glittery gems from Studio Katia!

I hope you’ve enjoyed this series and perhaps found it useful for your holiday cardmaking. I certainly am feeling the last minute crunch to get everything done! Thanks so much for stopping by today, and have a marvelous day!
Filed Under: Hero Arts Tagged With: christmas card, easy christmas card, floral holiday tree, gouache, holiday card, ink blending, video

Elegant Christmas Cards in 20 Minutes or Less: Volume 4 with Wplus9!

December 18, 2020

Hi there! I’m back again today with another project for my “Christmas Cards in 20 Minutes or Less” series, this time featuring a truly stunning stamp set from Wplus9’s latest release, called Joyful Poinsettia. I’ve paired this beautifully detailed background stamp with some vibrant teal cardstock and sparkling embossing powder.

Here’s the video:

Or you can watch in HD here.

One of my favorite ways to make quick, elegant cards is to add lots of bling, bold color, and sparkling glitter, and what better time of year to have a little extra sparkle than at Christmas? Combining a beautiful background stamp with lots of color and glitter makes for a perfectly festive base for your card, and in one fell swoop! Adding a large sentiment die cut in a vivid color makes a huge impact with minimal effort, as well.

I started by heat embossing the Joyful Poinsettia on some Peacock cardstock from Concord and 9th using sparkling red embossing powder. This combination results in a beautiful holiday toile that can almost stand alone as the card front in and of itself! Next, I die cut a bright red Merry using the Oversized Merry from Waffleflower and popped it up using foam adhesive. I also added a white embossed “Christmas” from the Wplus9 All the Cheer stamp set on a strip of some more cheery red cardstock. I added a few iridescent white pearls to tie in the white embossing and add a bit of extra shine and texture to the card front.

Well, that’s all for my “Christmas Cards in 20 Minutes or Less” project today. I hope these videos are giving you some useful tips for your last minute holiday cardmaking. We all are so busy this time of year that any little tricks to simplify things a bit helps! Thanks so much for stopping by today, and have a marvelous day!

Filed Under: Wplus9 Tagged With: christmas toile, easy christmas card, glitter, joyful poinsettia, oversized merry

ELEGANT CHRISTMAS CARDS IN 20 MINUTES OR LESS-VOLUME 3 with Pinkfresh Studio!

December 17, 2020

Hi there! I’m back with day 3 of my “Christmas Cards in 20 Minutes or Less” series, this time featuring some sparkling poinsettias from Pinkfresh Studio! In today’s video, we let the beautiful Ornate Poinsettia cover plate die from Pinkfresh Studio do the heavy lifting for us to create a simple and very elegant Christmas card in less than 15 minutes!

Here’s the video:

You can also watch it in HD here.

One of the quickest ways that I’ve found to make a huge impact on a card front with minimal effort on my part is to use a detailed cover plate background die. These cover plates are workhorses; you can use them to create subtle texture by using tone-on-tone color scheme; you can watercolor, ink blend, or Copic color on them to add lots of intricate detail and bright color; or, as I’ve done here, you can utilize some sparkling cardstock and a pretty base layer to create a simple but stunning card base that only needs a sentiment to finish it off.

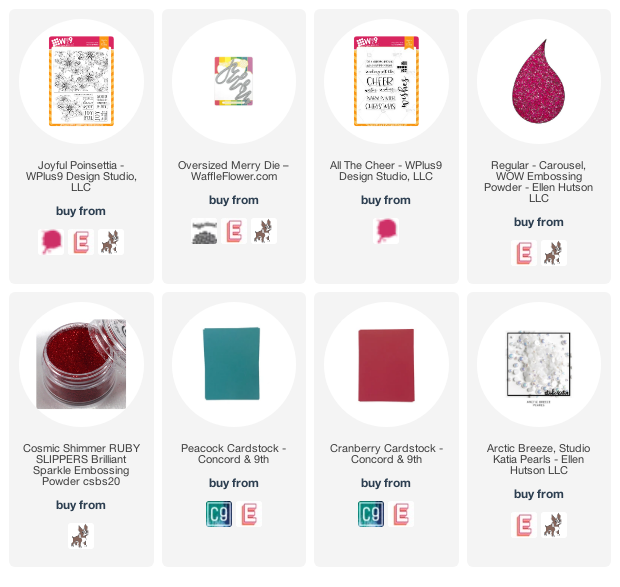
For this card, I’ve die cut the Ornate Poinsettia from some sparkling white glitter cardstock. The beautiful die cut details in this cover plate die cut don’t need much help to create a beautiful card front! I adhered it to a pale aqua card base upon which I lightly blended some Aquamarine ink around the edges to add a bit of extra interest to the background. I added a die cut greeting from Classic Holiday Words dies, which I die cut from some heavyweight vellum and matte teal foil, popped up with clear foam adhesive. The final step was to add some turquoise gems to the center of the poinsettia die cuts, which add a bit more bling and some extra texture to the card front!

Well, that’s all for my “Christmas Cards in 20 Minutes or Less” project today. I hope these videos are giving you some useful tips for your last minute holiday cardmaking! We all are so busy this time of year that any little tricks to simplify things a bit helps! Thanks so much for stopping by today, and have a marvelous day!
Filed Under: pinkfresh studio Tagged With: christmas card, cover plate die, easy christmas card, ink blending, ornate poinsettia, video

Elegant Christmas Cards in 20 Minutes or Less: Volume 2 with Simon Says Stamp!

December 16, 2020

Hi there! I’m back again today with another idea for my “Christmas Cards in 20 Minutes or Less” series, this time featuring a gorgeous stamp from Simon Says Stamp called Center Cut Holiday Floral and a fun chalkboard technique that is super easy and quick but adds that extra special touch to create a beautiful Christmas card!

Here’s the video:

Or you can watch in HD here.

One of my favorite quick-but-high-impact techniques is to create a “chalkboard” card. It’s basically some heat embossing with a few extra additions of white. In the video, I talk about adding different values of white, basically meaning different intensities of white to create that white halo left behind on a chalkboard. To achieve this, I utilize a white pencil, white gouache splatters, and some white ink blending around the edges, which totally reminds me of when I was in grade school and the erasers needed to be taken out back (ha) and beaten together to clean them! These different intensities of white help to add to that overall chalkboard look and are quite quick to pop on your card front!

I began by heat embossing the gorgeous Center Cut Holiday Floral with white embossing powder on some Charcoal cardstock cut to 5×7. (Such a large, beautiful stamp deserves to be shown off in it’s entirety!) I then used my white pencil to add some light shading on the larger poinsettia leaves and added a few splatters of watered down white gouache. After the gouache had dried, I added some white blending around the edge using Simon Says Stamp White Pigment Ink and a foam blending tool. After I’d finished all of my chalkboard additions, I die cut the Simon Says Stamp’s Season’s Greetings die twice from white cardstock, then adhered it to the center with some liquid adhesive. The final touch was to add some red “berries” using the Studio Katia Scarlet Red gems to add some extra sparkle!

Well, that’s all for my “Christmas Cards in 20 Minutes or Less” project today. I hope these videos are giving you some useful tips for your last minute holiday cardmaking! We all are so busy this time of year that any little tricks to simplify things a bit helps! Thanks so much for stopping by today, and have a marvelous day!

Filed Under: simon says stamp Tagged With: center cut holiday floral, chalkboard, easy christmas card, season's greeting

Elegant Christmas Cards in 20 Minutes or Less-volume 1 with Colorado Craft Company!

December 15, 2020

Hi there! Today marks the start of a series that I’ve been hoping to do for several weeks, but just finally found the time to devote to getting it done. As most of you know, I have four little ones- a set of 7 year old twins and a set of 8 month old twins. The older kids are remote learning this year, so sometimes my time in my craft room has been severely curtailed. I’m sure I’m not the only crafter lacking in time to create all of the Christmas cards that I need, so I thought it might be fun to devote a special video series to how I create elegantly crafted Christmas cards in 20 minutes or less! This first video is dedicated to the beautiful Slimline Poinsettia stamp set from Colorado Craft Company.

Here’s the video:

You can also watch in HD here.

One of the best ways that I’ve found to make a quick but elegant Christmas card is to utilize detailed stamps, colored cardstock, and sparkling embossing powder. The detailed stamps don’t require coloring (even though they are super fun to color if you have the time!), the colored card stock helps give it some extra oomph, and who doesn’t love glitter for Christmas?

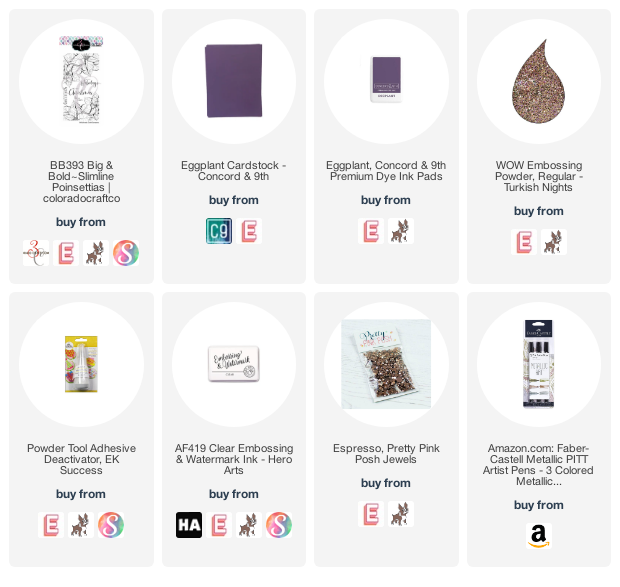
This particular card is a slimline design, featuring a 3.5″x8.5″ card base cut from Concord and 9th’s Eggplant cardstock, upon which I heat embossed the beautifully detailed poinsettias from Slimline Poinsettia using Turkish Nights embossing powder from WOW. The lavender and rose gold sparkles in this embossing powder pop perfectly on the dark purple background. I embossed the greeting from Slimline Poinsettia in the center, then lightly blended a bit of Eggplant ink over the top to make it pop a bit more. Some Espresso gems and a rose gold metallic frame (created using my T-square) finished it off!

Well, I hope you’ve enjoyed this first installment of my 20 Minute Christmas Card series! I have several more videos featuring more ideas on how to maximize your Christmas cardmaking time! Thanks so much for stopping by, and have a marvelous day!
Filed Under: colorado craft company Tagged With: christmas card, easy christmas card, heat embossing, holiday card

Primary Sidebar

  • Facebook
  • Instagram
  • Pinterest
  • YouTube

Favorite Shops

Secondary Sidebar

Subscribe

Enter your email address to subscribe to this blog and receive notifications of new posts by email.

Instagram
Something is wrong.
Instagram token error.
Follow
Load More

Archives

Tags

3D embossing folder alcohol markers better press birthday birthday card blog hop card kit christmas christmas card christmas tag colored pencil copic copic coloring Daniel Smith die cutting embossing folder embroidery felt giveaway holiday holiday card hot foil ink blending karin brushmarker pro layered stencil masculine my monthly hero new release no line coloring no line watercolor OLO marker olo markers original illustration pawsitively saturated rainbow shaker card slimline stamping stamptember stencil thank you thinking of you valentine's day video watercolor

Popular Posts

Simon Says Stamp Joy For You Blog Hop- Day 1!
Simon Says Stamp Joy For You Release-Now Available!
Frozen Fractals All Around with New Simon Says Stamp Joy For You Release!
Shaped Holiday Shaker Card with New Simon Says Stamp Jolly Season Card Kit of the Month!
Holiday Postage with New Simon Says Stamp!
Simon Says Stamp Glory to the Newborn King Holiday Kit-Part II!
Pinkfresh Studio 5th Birthday!
Altenew Build A Flower: Fuchsia Blog Hop+Giveway!
Holiday Joy in Pink and Green with New Simon Says Stamp DieCember!
Honey Bee Stamps September Release Blog Hop!

Disclosure

Some affiliate links are used in my posts. This means that, should you click on one of my links and purchase something from that company, I will receive a small portion of the sale at no extra cost to you. I use the money earned from these sales to help maintain my blog. I so appreciate you visiting and, if you do choose to use one of my affiliate links, thank you so much for your support!
Copyright © 2026 ·Brunch Pro Theme · Genesis Framework by StudioPress · WordPress · Log in
Loading Comments...