• Skip to main content
  • Skip to primary sidebar
  • Skip to secondary sidebar

Sixth Street Sundries

Emily Midgett

  • Home
  • About Me
  • Contact
  • OLO Marker Color Swatch Chart
  • Shop

graceful flowers

Navy and Rose Gold with Simon Says Stamp and More Lisa Horton Crafts!

August 26, 2024

This post was sponsored by Simon Says Stamp. Thanks, Simon!

Hi friends! I have one more project to share with you using some of the super sparkly Interference Inks from Lisa Horton Crafts that I just purchased. I am in love with how unique these inks are; they can look completely different depending on what color of cardstock used! I have been experimenting with different ink color combinations, and I loved the metallic rose gold effects of the Galaxy Dream on navy blue cardstock. Let’s get started on the details!

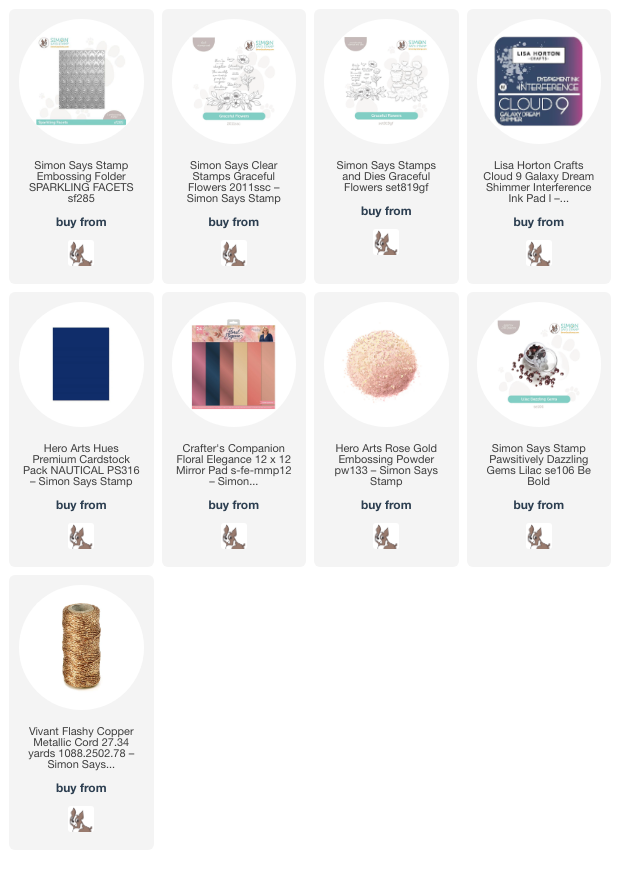
To start, I embossed a panel of Nautical cardstock using the Sparkling Facets Embossing Folder. I swiped the raised areas on the resulting patterned, textured panel with the Lisa Horton Crafts Galaxy Dream Interference Ink. These fabulous dye/pigment ink hybrids look incredible on colored cardstock; they change depending on the background cardstock color or the angle at which you are viewing it! So unique and so many was to use them. To add to the “mixed media” feel of the card, I splattered the background with some super sparkly handmade glitter watercolors in a coordinating shade of rose gold.

Once I had created the background, I decided to create some bold, heat embossed flowers for the focal point, embossing the large bouquet from Graceful Flowers onto more Nautical cardstock using rose gold embossing powder. I die cut the image and trimmed it so that it was hanging off of the edge of the card. I also heat embossed a greeting from the Graceful Flowers set and used the coordinating die (love that there are dies for the sentiments, as well!) to cut it out. To ground my focal point and sentiment, I cut a thicker strip of Nautical cardstock as well as a thinner strip of rose gold foil cardstock and popped them up on the embossed, inky card front with some thin foam adhesive squares.

I adhered the sentiment and floral die cuts to the card front with a double layer of foam adhesive to help add multiple layers of height to the card. To add a bit more sparkle and texture to the card, I tucked a few Lilac Pawsitively Dazzling Gems on the card front. The Lilac gems are almost a “neutral” gemstone color, working nicely with muted shades of mauve, purple, and rose gold, depending on the colors with which they are paired! Finally, I tucked a bow made from some sparkly copper twine beneath the flowers for one last touch of sparkly texture.

Well, that’s all for my project today! I can’t wait to play with these shimmery  Lisa Horton Crafts inks for holiday cards… I definitely think they’re going to add an element of luxury with their metallic shine. Thanks so much for stopping by today, and have a marvelous day!
Filed Under: simon says stamp Tagged With: 3D embossing folder, graceful flowers, lisa horton crafts, sparkling facets

Teal and Lavender with Simon Says Stamp and Interference Ink!

August 19, 2024

This post was sponsored by Simon Says Stamp. Thanks, Simon!

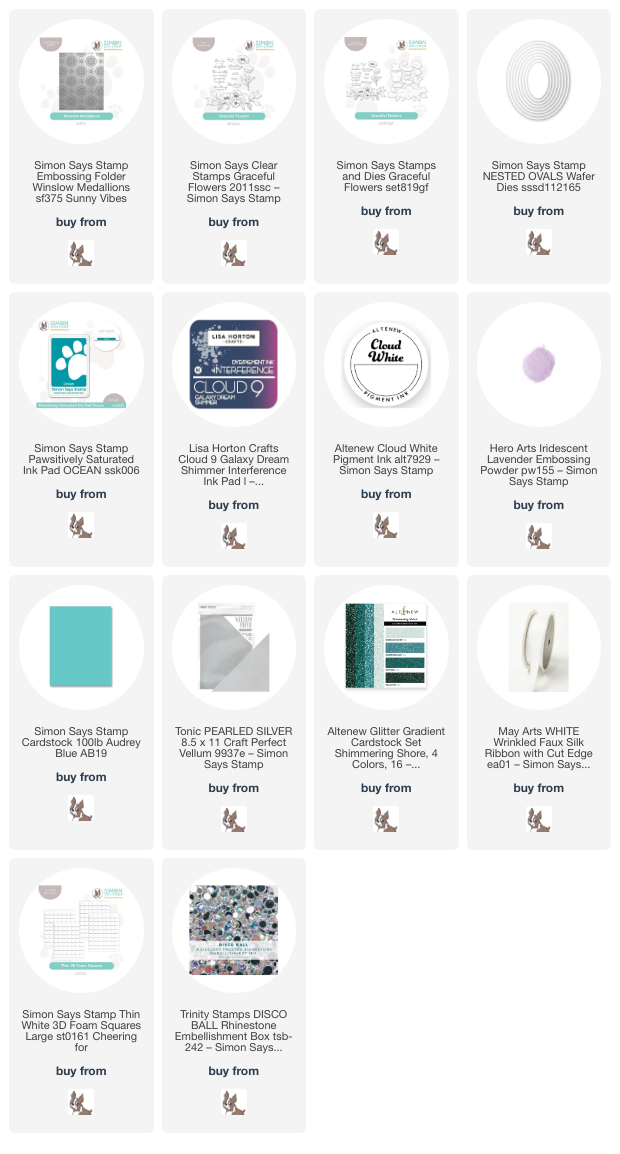
Hi friends! I have another project to share with you using another color of the absolutely spectacular Interference Ink from  Lisa Horton Crafts. I recently purchased many of the colors of these beautiful, shimmery pigment/dye ink combos, and I wasted no time playing with them. They add one of my most favorite embellishments to my cards: shimmer. I love incorporating multiple textures into my monochromatic cards, so having lots of options for colorful shimmer (rather than the typical metallic shimmery inks) helps expand my monochromatic horizons even further. I have paired an unusual color palette for my project today, inspired by the Galaxy Dream Shimmer Interference Ink: teal and lavender. Let’s get started with the details on my project!

I began by running an A2 panel of Simon Says Stamp Audrey Blue cardstock through my die cutting machine using the Winslow Medallions Embossing Folder. After I had embossed the beautifully detailed texture into the vibrant cardstock, I used a blending brush to blend Ocean Pawsitively Saturated Ink around the edges of the embossed panel, which helps to highlight some of the details in the embossed images and add extra depth to the background. I grabbed my Galaxy Dream Shimmer Interference Ink pad and put it directly to the raised areas of the embossed panel; the shimmer helps to highlight those incredible textural details! I also splattered the background with some metallic watercolors for even more shine.

While my background was drying, I stamped some of the individual floral images from the new Graceful Flowers set onto some more Audrey Blue cardstock, first using white pigment ink and then again with sticky embossing ink. I covered the stamped images with Hero Arts Iridescent Lavender embossing powder and heated it. The initial layer of white pigment ink helps the highlight the embossed image on the vibrant cardstock. After embossing, I die cut the images and sentiment with their coordinating dies and added some more sparkling metallic watercolors to the flower and stem.

Before adhering my embossed images to my sparkling, textured background, I trimmed a strip of teal glitter cardstock and adhered it to the background with some foam adhesive strips to ground my focal point a bit on the card front. Next, I die cut a small oval using the Nested Ovals dies and some pearlescent vellum, onto which I adhered the flower and stem die cuts with some thin foam adhesive squares. I flipped the vellum oval over and hid some more foam adhesive behind the solid die cuts, then added it over the glittery cardstock strip. I tucked the embossed, die cut greeting next to the glittering flower and added a bow created by dying some 1/2″ silk ribbon with an alcohol marker in a coordinating color. Finally, I added a few sparkling Trinity Stamps Disco Ball gems, which have a perfectly coordinating teal and lavender iridescent shine!

Well, that’s all for my project today. If you haven’t checked out the  Lisa Horton Crafts Interference Inks, you’re missing out. I am absolutely loving the additional shimmer that they add to my cards, and I can’t wait to play with them even more. Thanks so much for stopping by today, and have a marvelous day!

Filed Under: simon says stamp Tagged With: 3D embossing folder, graceful flowers, interference ink, monochromatic, nested ovals, shimmer, watercolor, winslow medallions

The World Needs More People Like You in Blue and Green!

August 14, 2024

This post was sponsored by Simon Says Stamp. Thanks, Simon!

Hi friends! I have another ink swiped embossing folder project to share with you today, similar to the project that I shared yesterday with the video. (Click HERE to see that post!) This ink swiping technique is so popular right now, and I am having such fun playing around with different color palettes. I used some gorgeous new products from the Simon Says Stamp Cheering For You release to create this serene teal card. Let’s get started with the details!

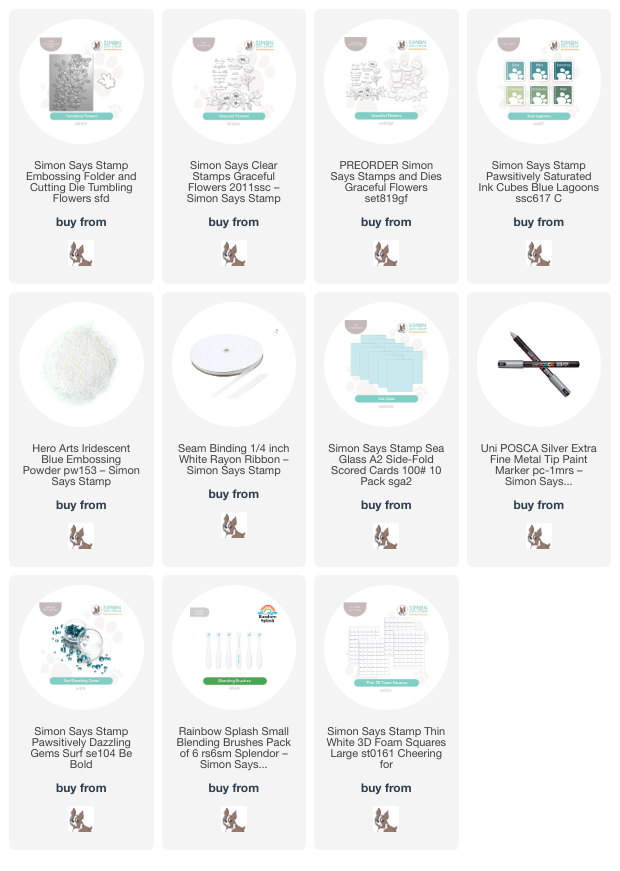
To begin, I ran a panel of white cardstock through my die cutting machine using the new Tumbling Flowers Embossing Folder. To do the “swiping” method, I flipped the embossed panel over so that the pattern was impressed down into the cardstock rather than raised up, then used small blending brushes to blend colors from the new Blue Lagoons Cubes on the flowers and foliage.

After I had finished adding color to the individual images, I used the darkest teal inkpad to swipe directly on the raised areas of the debossed panel. Because the ink blended areas were impressed down into the cardstock, the raised areas picked up the dark ink and help to enhance the details of the debossed image! Using the super dark ink also helps to cover up any ink blending outside of the intended areas; it’s important to select lighter inks for the images and darker inks for the swiping. Once I had finished ink swiping, I used a silver paint pen to add details to the center of the flowers, as well as some metallic watercolor splatters around the edges of the panel. I trimmed the debossed panel down slightly and mounted it in the center of a Sea Glass card base, leaving a light blue mat around the edges.

For the greeting, I stamped a sentiment from the new Graceful Flowers stamp set using deep teal ink, then again directly over the top with sticky embossing ink and covered it with Iridescent Blue embossing powder. I love using this technique to make sentiments a little extra special to help them stand out a bit more! Using residual ink left over on my blending brush, I lightly blended some pale aqua ink on the edges of the die cut sentiment to help it better coordinate with the color palette. I popped up the greeting with some foam adhesive squares, then tucked a bow made with 1/4″ white seam binding beneath the sentiment. Finally, I added a few Pawsitively Dazzling Surf Gems for a bit more sparkle and texture!

Well, that’s all for my project today. Simon Says Stamp has such an incredible array of embossing folders, featuring so many designs with absolutely exquisite details, and the fact that you have so many potential techniques available to use with them is just the icing on the cake! If you haven’t tried playing with embossing folders, you totally should, because it’s an absolute blast. Thanks so much for stopping by today, and have a marvelous day!

Filed Under: simon says stamp Tagged With: blue lagoons, embossing folder, graceful flowers, ink blending, ink swiping, pawsitively saturated, tumbling flowers

Primary Sidebar

  • Facebook
  • Instagram
  • Pinterest
  • YouTube

Favorite Shops

Secondary Sidebar

Subscribe

Enter your email address to subscribe to this blog and receive notifications of new posts by email.

Instagram
Something is wrong.
Instagram token error.
Follow
Load More

Archives

Tags

3D embossing folder alcohol markers better press birthday birthday card blog hop card kit christmas christmas card christmas tag colored pencil copic copic coloring Daniel Smith die cutting embossing folder embroidery felt giveaway holiday holiday card hot foil ink blending karin brushmarker pro layered stencil masculine my monthly hero new release no line coloring no line watercolor OLO marker olo markers original illustration pawsitively saturated rainbow shaker card slimline stamping stamptember stencil thank you thinking of you valentine's day video watercolor

Popular Posts

Simon Says Stamp Joy For You Blog Hop- Day 1!
Simon Says Stamp Joy For You Release-Now Available!
Frozen Fractals All Around with New Simon Says Stamp Joy For You Release!
Shaped Holiday Shaker Card with New Simon Says Stamp Jolly Season Card Kit of the Month!
Holiday Postage with New Simon Says Stamp!
Simon Says Stamp Glory to the Newborn King Holiday Kit-Part II!
Altenew Build A Flower: Fuchsia Blog Hop+Giveway!
Holiday Joy in Pink and Green with New Simon Says Stamp DieCember!
Pinkfresh Studio 5th Birthday!
Honey Bee Stamps September Release Blog Hop!

Disclosure

Some affiliate links are used in my posts. This means that, should you click on one of my links and purchase something from that company, I will receive a small portion of the sale at no extra cost to you. I use the money earned from these sales to help maintain my blog. I so appreciate you visiting and, if you do choose to use one of my affiliate links, thank you so much for your support!
Copyright © 2026 ·Brunch Pro Theme · Genesis Framework by StudioPress · WordPress · Log in
Loading Comments...