• Skip to main content
  • Skip to primary sidebar
  • Skip to secondary sidebar

Sixth Street Sundries

Emily Midgett

  • Home
  • About Me
  • Contact
  • OLO Marker Color Swatch Chart
  • Shop

stained glass

Stained Glass Dahlias with New Simon Says Stamp!

June 28, 2025

This post was sponsored by Simon Says Stamp. Thanks, Simon!

Hi friends! I have a fun project today that is perfect for people who maybe are still working on perfecting their coloring skills: stained glass! I used my new Dahlia Background illustration that was released with the new Friend Like You release to create this elegant and colorful card. When I created this background, I wanted to make something that was fun for people who enjoy coloring but also add enough details to allow it to stand alone as a subtle and elegant background. This project mixes those two concepts with some simple coloring and a vellum overlay. Let’s get started with the details on my project!

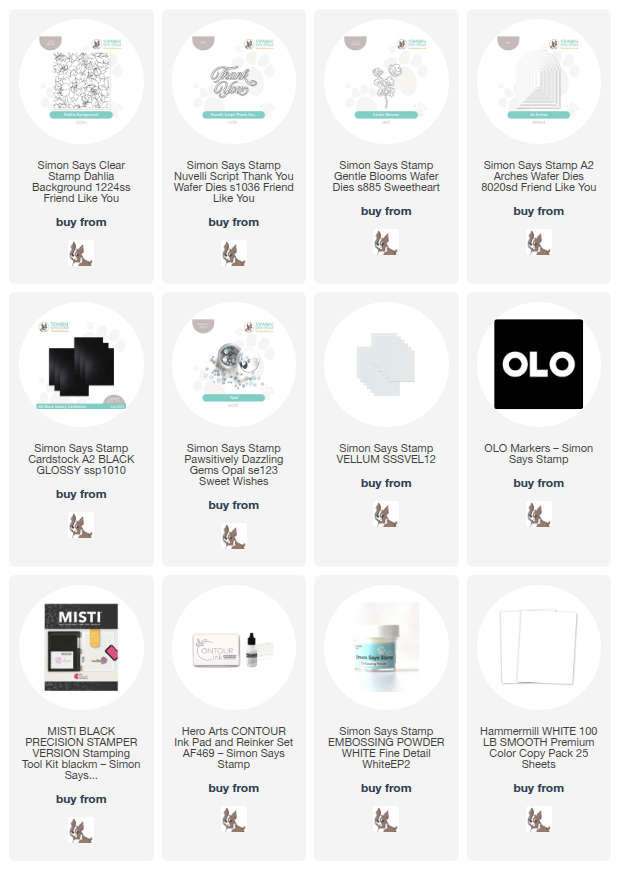
*I have gathered links to all of the products used at the bottom of the post for your convenience, using affiliate links. Thank you for shopping with my links! I truly appreciate your support for my work!*

To begin, I used my MISTI to stamp the new Dahlia Background on two panels of cardstock: once on plain white cardstock with Contour Ink, then again on a panel of vellum cardstock with embossing ink, to which I added white embossing powder. I used a half sheet of both vellum and the white cardstock, making sure to place them in the corner of my MISTI so that I stamped the image on exactly the same spot on the cardstock.

After I had stamped and embossed both panels, I used my OLO Markers to do some (very) simple coloring on the stamped panel of white cardstock. I didn’t do anything fancy, as you can see in the photo above, using just one marker color on each individual image without trying to do any shading. I made sure to select colors that were super vibrant that would shine through the vellum overlay, selecting a bright fuchsia, coral, and lilac color palette, adding black in the background of the colorful floral images.

After I had finished coloring, I worked on the focal point die cuts before adhering the vellum overlay to the colorful background to make sure that I could cleanly adhere the vellum to the background. I die cut the new Nuvelli Script Thank You die from some black glitter cardstock, as well as some Gentle Blooms dies cut from some Simon Says Stamp Black Glossy Cardstock. I also die cut an arched frame using the new A2 Arches, nesting two of the dies together to create a delicate frame upon which I could build the focal point. I arranged the die cuts on the vellum panel, adhering them wiht a combination of liquid and foam adhesive. I flipped the vellum panel over and added dots of liquid adhesive to the areas behind the solid die cuts to hide the adhesive and keep the vellum clean, then lined up the embossed panel with the proper spot over the colored background!

After I had adhered the vellum to the colorful card front, I trimmed the edges of the panel down slightly and tucked some thin strips of Simon Says Stamp Black Glossy Cardstock on either side. For some added embellishment, I added a few Opal Pawsitively Dazzling Gems and a thin white silk bow, tucked beneath the dimensional die cut sentiment.

Well, that’s all for my project today! I hope this project shows you that even if coloring isn’t your thing, you can still create a vibrant, colorful background with some very simple coloring and a heat embossed vellum overlay.

Don’t forget to check out the Simon Says Stamp Friend Like You blog hop, happening now! I shared THIS watercolored project during yesterday’s hop for Day 1, and you can get linked up to Day 2 of the hop HERE. Lots of inspiration, prizes, and a freebie are up for grabs!!

Thanks so much for stopping by today, and have a marvelous day!
Filed Under: simon says stamp Tagged With: a2 arches, dahlia background, die cutting, gentle blooms, nuvelli script thank you, olo markers, original illustration, stained glass, vellum

NEW Limited Edition Stained Glass Holiday Card Kit from Simon Says Stamp!

October 17, 2024

This post was sponsored by Simon Says Stamp. Thanks, Simon!

Hi friends! Simon Says Stamp shared a brand new, Limited Edition Stained Glass Holiday Card Kit (available NOW for preorder to be shipped later in October or early November!) late last night that is absolutely jam-packed with goodies perfect for making your holiday cards! The value in the monthly card kits is always incredible, but I am continually impressed at the amazing value the standalone card kits. You can view all of the specific contents of the kit HERE, but you’ll receive plenty of components to create a huge variety of unique designs, including a large stamp set, stencil, standalone die, shimmer spray, many types of papers, and all sorts of embellishments to make beautiful and serene holiday cards. I have created three different cards to share with you, but I will start today with my super colorful projects inspired by stained glass windows at my church. Let’s get started with the details!

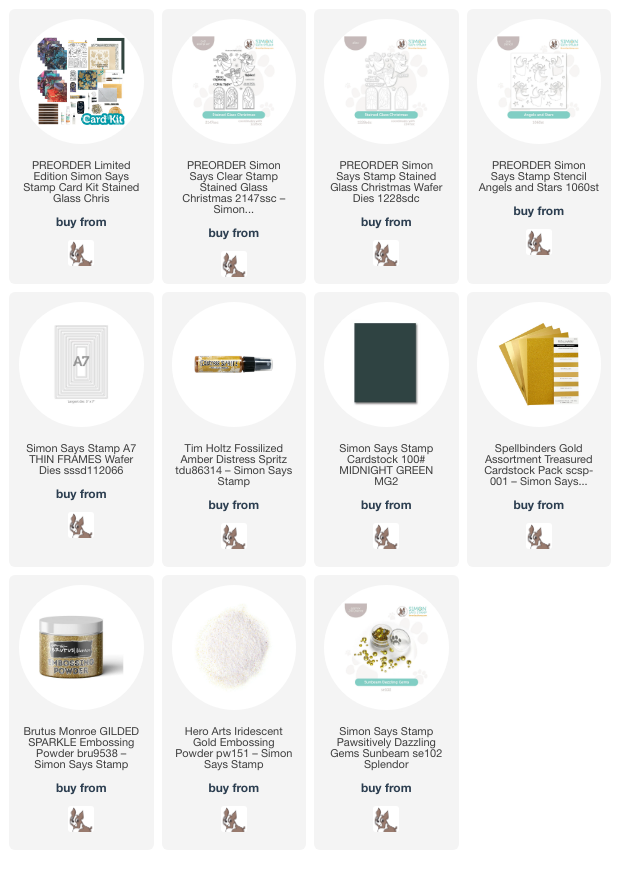
*I have linked all of the products used at the bottom of the post for your convenience using affiliate links. Thank you for shopping with my links! I truly appreciate your support for my work!*

Our church unfortunately had a very damaging fire (on Christmas Eve, no less 🙁 so heartbreaking!) before we moved to our town, and we began attending church there after the entire sanctuary had been rebuilt. It is a beautiful sanctuary, at once large and airy but still somewhat cozy and inviting. One of my favorite parts about our church is the absolutely breathtaking stained glass windows that take up a huge portion of the wall behind the pulpit. On sunny days, particularly, the effect of the sunshine illuminating the jewel-bright glass is absolutely awe-inspiring and provides an incredible spiritual lift. It makes me so grateful that the parishioners paid such attention to these kinds of details during the rebuilding process!

I knew that I wanted to pair my OLO markers with vellum to create a unique stained glass effect using the window images from the stamp set included with the Stained Glass Holiday Card Kit. To do this, I heat embossed the window images onto vellum using gold glitter embossing powder, die cut them, then flipped the die cuts over to add vibrant color on the back side of the die cuts. That last bit is important; adding the color to the back of the die cuts helps to create that stained glass “glow” through the semi-opaque vellum when you flip the colored images over! It was a technique that I learned long ago from a video by Nichole Heady, so I can’t take credit for it, but isn’t the effect just so beautiful?

After I had completed the stained glass windows, I trimmed 1/4″ off of the top and bottom of the long side of an A2 card front and added some strips of coordinating gold glitter cardstock to peek out from behind. I used some tiny dots of liquid adhesive behind the solid embossed areas to adhere the windows to the card front (you could use vellum adhesive if you have some, too!) and added a gold glitter-embossed greeting beneath the dove. Finally, I added some of the gold mirror pearls included in the kit on either side of the dimensional greeting to help draw the eye to the “Rejoice” sentiment. So much sparkle and vivid color, which I think is a perfect representation of a church at Christmas!

For my second project, I utilized the stencil, stamps, and shimmer spray included with the Stained Glass Holiday Card Kit. I began my placing the beautiful Angels and Stars stencil over a panel of Midnight Green cardstock, both included with the kit, then generously spritzing the entire panel with Fossilized Amber Distress Spritz (also included with the kit!!) to create a gorgeous, golden sheen. After the panel had dried completely, I used the included gold paint marker to add dots between the images, filling in any gaps, so that my solid embossed angel die cut would be a bit more visible amongst the textured and patterned background. I think the background looks like high-end Christmas wrapping paper!

After completing the background, I used Hero Arts’s Iridescent Gold embossing powder to emboss the angel and two sentiments from the Stained Glass Christmas stamp set onto some more of the Midnight Green cardstock. The shimmer on these embossed images is unreal and matches the golden background perfectly. I die cut the angel and large sentiment using the coordinating Stained Glass Christmas die (sold separately). To help draw the eye to the angel and sentiment die cuts, I added two different sizes of gold foil frame cut using the A7 Thin Frames die set, which I’ve kept wired together to be able to cut two different frame widths in a wide variety of sizes. I offset the frames to the right side of the card, then added the embossed die cuts with some foam adhesive. Finally, I tucked a shimmering gold twine bow beneath the greeting and added a few Sunbeam Pawsitively Dazzling Gems for one last touch of sparkle!

Well, that’s all for my projects today. I have one more project to share with you using items from the Stained Glass Holiday Card Kit tomorrow. I also wanted to share that if you would prefer to purchase individual elements of this card kit (and nearly every Simon card kit!), you can always do that! The biggest advantage to purchasing the kit is the incredible value; the folks at Simon have jam-packed the kit so that the individual items included add up to well over $100, but they are selling the kit as a bargain for only $59.99. You can pre-order the entire kit, or you can pre-order the individual items, which I’ve linked below as well; they anticipate shipping to begin at the end of the month or early in November. But, as usual, the kits are limited edition, so if you want to take advantage of the excellent value, don’t hesistate!

Thanks so much for stopping by today, and have a marvelous day!

Filed Under: simon says stamp Tagged With: A7 thin frames, angels and stars, christmas, christmas card, holiday, holiday card, religious, stained glass, vellum

Merry Christmas with Shimmering Vellum and Holiday Blossoms!

December 22, 2023

This post was sponsored by Simon Says Stamp. Thanks, Simon!

Hi friends, and Merry Christmas! I can’t believe it’s finally here. I could easily make Christmas cards all year long, and I’m not quite ready to put my holiday supplies away yet. Traditionally, Christmas lasts until Epiphany, so I still have a bit more time, right? I have been experimenting with coloring on different textures and specialty papers using some of my holiday stamp sets that I illustrated for Simon Says Stamp. I used my Joyful Anemone stamp HERE with OLO markers and Neenah Desert Storm cardstock to create a unique red-on-kraft holiday card, and today I have paired my Holiday Blossoms stamp set with some new-to-me specialty vellum papers from Tonic. I have two cards to share with you today, so let’s get started with the details!

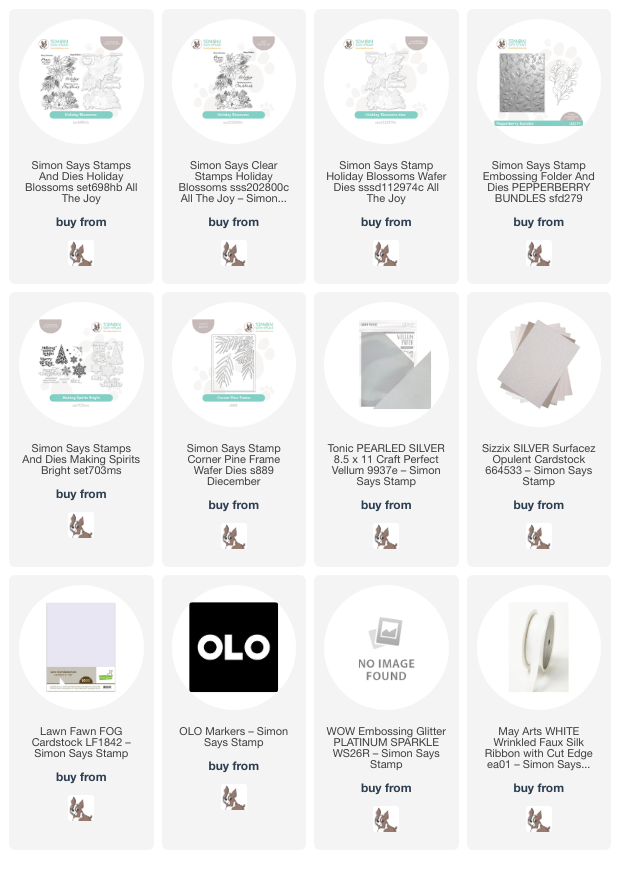
For both of my projects today, I began by embossing the two large floral arrangements from my Holiday Blossoms stamp set onto Tonic Silver Pearl cardstock using Platinum Sparkle Embossing Powder. This combination looks marvelous on it’s own, but I wanted to add some vibrant color with my OLO markers. Coloring on special papers can sometimes be a little tricky, but I was able to get a beautiful pearlescent stained glass effect by flipping my embossed images over and coloring on the back of the pages! Because of the pearlescent coating on the paper, I had to do only minimal blending, because the streaks will be visible once you flip the paper over. I am totally in love with the finished product. The pearlescent coating can make the colors a bit dull, so if you decide to try this technique, be sure to choose bright colors so that they’re visible!

For this first card, I chose to use the magnolia image from my Holiday Blossoms. When I was drawing the illustrations for this stamp set, I was super inspired by the addition of magnolia flowers to holiday arrangements. I wouldn’t have thought this springtime flower would be a typical addition to a holiday floral arrangement, but I was surprised at how many images I saw of magnolias paired with berries and holiday greenery! Because magnolias are traditionally white, I used the colorful greenery and berries to do some reverse psychology to create a “white” magnolia. I colored the areas around the magnolia with bright colors, then colored very minimal shadows with a light gray OLO marker and blended out the edges with the colorless blender marker. The contrast between the colorful foliage and the lack of color on the magnolia makes you think it’s a crisp white!

To accent the large floral arrangement, I used the Pepperberry Embossing Folder to add some texture to 3/4 of my pale gray cardstock card front. I simply left part of the card front out of the embossing folder as I ran it through my machine, which adds the embossed texture to part of the panel and leaves the bottom portion clean! I added a strip of silver pearl cardstock beneath the seam to help make a clean transition between the patterned embossed area and the plain section. I popped up the colored magnolia arrangement using foam adhesive, then added a greeting from Holiday Blossoms, which I heat embossed onto pale gray cardstock using Platinum Sparkle Embossing Powder, adorning the open area with a double twine bow. Finally, I added a few sparkling gems for one last hint of shine!

My second card is a large A7 card. The poinsettia arrangement from Holiday Blossoms is very generously-sized; I wanted to make an image that could easily stand alone as a focal point on the card while also offering options to create a detailed floral background, colored or not! I colored the detailed arrangement using the same technique as the first card, flipping the embossed image over and coloring the back with vibrant OLO markers. After I’d colored the entire image, I used the coordinating die to cut the flowers out super quickly (so nice to have the dies available… my wrists were very grateful to not have to fussy cut this super detailed image!).

I wanted to create a simple background that still had the feel of the detailed botanical floral arrangement but wouldn’t overpower it, so I die cut the Corner Pine Frame twice from some more silver pearl cardstock and trimmed off the frame edges, leaving only the pine boughs that fit conveniently in the corner of my pale gray 5×7 card base. I adhered them on one side of my card front using liquid adhesive; there was some slight overlap, but the floral bouquet will cover it up!

For the greeting, I heat embossed one of the large sentiments from Making Spirits Bright using Platinum Sparkle Embossing Powder on some more of the pale gray cardstock. I trimmed out the sentiment strip using my trimmer, then die cut the large sentiment using the coordinating dies from the Making Spirits Bright set. (Can I just say how much I love the level of detail included on these sentiment dies?) I popped up the die cut greeting with a double layer of foam adhesive and added the strip with a single layer of foam tape and liquid adhesive. To accent the floral bouquet, I colored a strip of faux silk ribbon using one of the same OLO markers that I used to color the image so that it coordinated perfectly! This is a great way to make sure that your ribbon coordinates perfectly to your project without having to have an endless supply of different ribbons. I tucked the cool reddish pink bow amongst the floral bouquet, then added a few more shimmering gems for some more sparkle!

Well, that’s all for my projects today. We are nearing the finish line for Christmas. I hope you’re all caught up on your holiday crafting, wrapping, and baking! I have been baking like a madwoman the last couple of days: gingersnap molasses cookies, Grinch cookies, orange chocolate truffles, two different flavors of biscotti, buckeyes, and iced sugar cookies to give out as gifts for friends. I love this time of year! Thanks so much for stopping by today, and happiest of holidays to you!

Filed Under: simon says stamp Tagged With: alcohol markers, christmas card, embossing folder, holiday blossoms, holiday card, making spirits bright, olo markers, pearl vellum, pepperberry, stained glass, vellum

Pinkfresh Studio May 2022 Stamp and Die Release Hop + Giveaway!

May 26, 2022

Good morning! Today is the Pinkfresh Studio May 2022 Stamp and Die release, and we have a fabulous blog hop to inspire you with all of these amazing new goodies! You can see the full link list down at the bottom of this post in case you get lost. This release is full of all of the beautiful, innovative products that you’ve come to associate with Pinkfresh Studio, and I have two projects to share with you today, so let’s get started with the details!

I seem to always gravitate towards pink, coral, or plum these days, so I thought it would be fun to really switch it up and do some gorgeous cool tones with periwinkle blue, lilac, and a few pops of pink. Both of my cards feature the stunning new Stained Glass cover plate die, which is a perfect background for the gorgeous new floral sets: Painted Daisies and Grant Yourself Grace!

For the Painted Daisies project, I began by stamping the main image onto some watercolor paper using no-line coloring ink. I then used my Sennelier watercolors to add lots of cool lilac, periwinkle, and jade, with a few pops of bright fuchsia to add extra interest. Once I’d finished watercoloring, I die cut the image using the coordinating die.

I trimmed down a periwinkle blue A2 card base, then die cut the stunning new Stained Glass cover plate die from some holographic blue cardstock. The gorgeous holographic cardstock picks up the beautiful variety of colors in the painting, but also is tone-on-tone enough to create subtle texture for the background, allowing the flowers to be the star of the show.

I arranged the flower bouquet in the corner of the card, trimming off the excess and arranging the leftovers to create a cascade down the card front. I popped all of the pieces up using foam adhesive, then added a greeting from Modern Sentiments, heat embossed in white on some more periwinkle cardstock and die cut with the coordinating (one piece!) die. The final touch was to add a few Sapphire jewels!

My second project features the same color palette, this time focusing on the gorgeous individual flowers from the Grant Yourself Grace product suite. I stamped the outline stamps for Grant Yourself Grace on some white cardstock using Stargazer ink, a bit more subtle than typical black ink, then used the Grant Yourself Grace Stencils with Sapphire, Blue Jay, and Slumber inks for the roses, Candy Violet and Lavender for the pops of lilac, and Meadow and Emerald City for the greenery. I die cut all of the finished stenciled images with the coordinating one-piece die (love how convenient that is! So clever!) and turned to my card base.

For the card base, I again die cut the fantastic Stained Glass cover plate die from some periwinkle cardstock and layered it over a full size A2 periwinkle card base. This tone-on-tone texture is absolutely marvelous! I had reserved the negative die cuts from my holographic blue Stained Glass die cut from the previous card, so I adhered those in some of the spaces to help add even more subtle, but gorgeous, interest to the background.

Once I’d finished creating the different components to the card front, I began to assemble the card. I die cut a circle from some more periwinkle cardstock, then began to arrange the roses around it as a ground for my flowers. I adhered the circle and flowers using foam adhesive, then added a greeting (leftover from the previous card) from Modern Sentiments with another layer of foam adhesive, giving it a double layer of foam adhesive in total to help it really stand out. Some more Sapphire gems help bring out those iridescent blue foil accents on the die cut background!

Well, that’s all for my projects today. Pinkfresh is hosting a giveaway to celebrate their new release! They will be giving away the full release on the Pinkfresh blog & YouTube channel. They also will be giving away a total of TEN $25  gift cards along the hop. The winners will be selected from the comments. The more comments you leave along the hop, the more chances you have to win! Winners will be announced on June 3, 2022 on our GIVEAWAY PAGE. Winners must check that page & claim your prize within 2 weeks.

The full hop list is included below, and you can check out the full May 2022 Release HERE. Thanks so much for reading, and happy hopping!

You are invited to the Inlinkz link party!

Click here to enter

Filed Under: pinkfresh studio Tagged With: grant yourself grace, layered stencils, no line watercolor, painted daisies, stained glass, watercolor

Primary Sidebar

  • Facebook
  • Instagram
  • Pinterest
  • YouTube

Favorite Shops

Secondary Sidebar

Subscribe

Enter your email address to subscribe to this blog and receive notifications of new posts by email.

Instagram
Something is wrong.
Instagram token error.
Follow
Load More

Archives

Tags

3D embossing folder alcohol markers better press birthday birthday card blog hop card kit christmas christmas card christmas tag colored pencil copic copic coloring Daniel Smith die cutting embossing folder embroidery felt giveaway holiday holiday card hot foil ink blending karin brushmarker pro layered stencil masculine my monthly hero new release no line coloring no line watercolor OLO marker olo markers original illustration pawsitively saturated rainbow shaker card slimline stamping stamptember stencil thank you thinking of you valentine's day video watercolor

Popular Posts

Simon Says Stamp Joy For You Blog Hop- Day 1!
Simon Says Stamp Joy For You Release-Now Available!
Frozen Fractals All Around with New Simon Says Stamp Joy For You Release!
Shaped Holiday Shaker Card with New Simon Says Stamp Jolly Season Card Kit of the Month!
Holiday Postage with New Simon Says Stamp!
Simon Says Stamp Glory to the Newborn King Holiday Kit-Part II!
Altenew Build A Flower: Fuchsia Blog Hop+Giveway!
Holiday Joy in Pink and Green with New Simon Says Stamp DieCember!
Pinkfresh Studio 5th Birthday!
Honey Bee Stamps September Release Blog Hop!

Disclosure

Some affiliate links are used in my posts. This means that, should you click on one of my links and purchase something from that company, I will receive a small portion of the sale at no extra cost to you. I use the money earned from these sales to help maintain my blog. I so appreciate you visiting and, if you do choose to use one of my affiliate links, thank you so much for your support!
Copyright © 2026 ·Brunch Pro Theme · Genesis Framework by StudioPress · WordPress · Log in
Loading Comments...