• Skip to main content
  • Skip to primary sidebar
  • Skip to secondary sidebar

Sixth Street Sundries

Emily Midgett

  • Home
  • About Me
  • Contact
  • OLO Marker Color Swatch Chart
  • Shop

fresh dye inks

Altenew July 2024 Release Blog Hop + Giveaway 

July 10, 2024

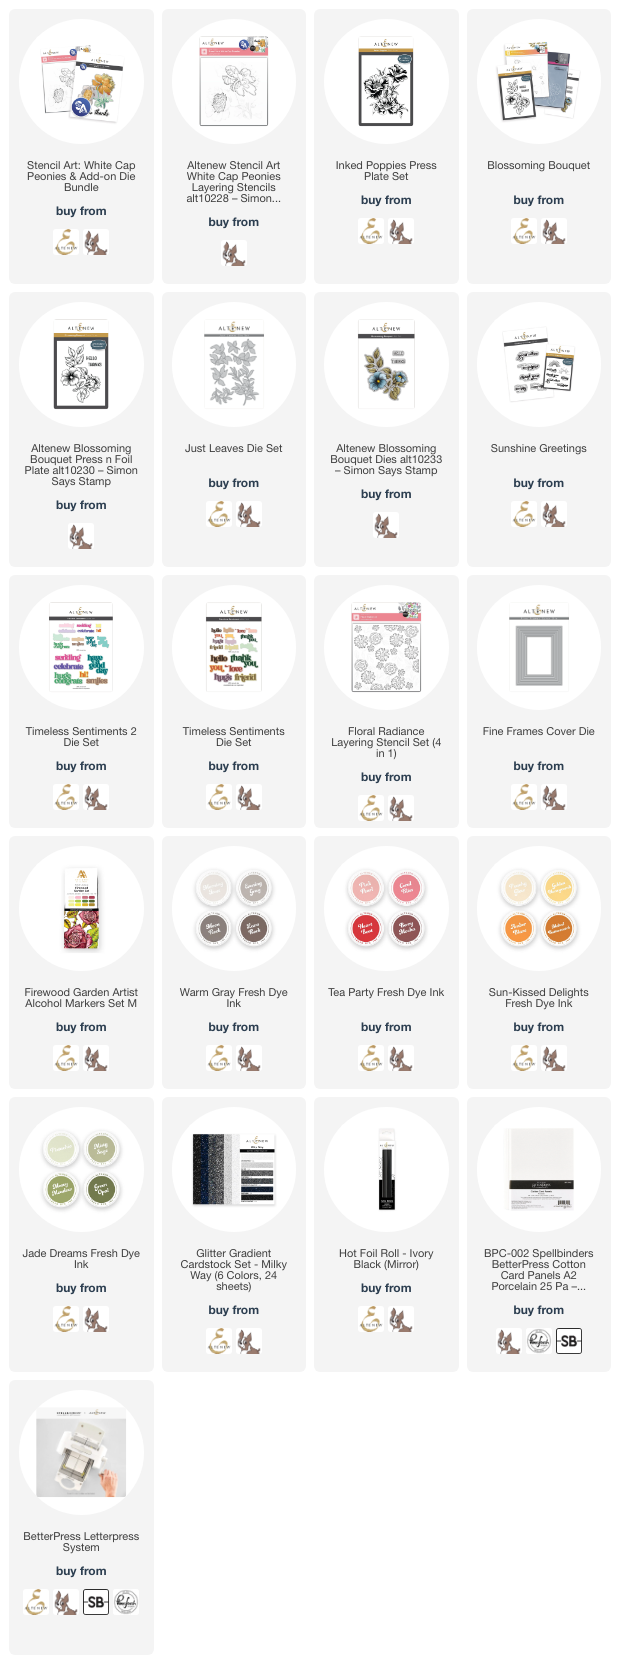
Hi friends! I am hopping along with Altenew today to share lots of inspiration using their newest release. You should have arrived here from the Altenew Blog, and your next stop is Jaycee Gaspar. This new release is absolutely smashing, with so many beautiful new stamps, dies, press and hot foil plates, and even more additions to the marvelous Fresh Dye Ink line! I have four (yes, four!) cards to share with you today, so let’s get started with the details!

I love creating coordinating card sets, so before working with any of the new products, I selected my color palette to keep everything cohesive. I try to keep things fresh by switching up my color palettes, and as I’ve been using a lot of pink (pink is always in style with me!) and purple, I decided that I would go bold and bright with a warm yellow, black, and white color palette.

For my first project, I used the utterly luscious new Inked Poppies press plate set as the focal point for my A7 card. I inked up the press plate with black ink, then ran it through my machine using the Better Press system on a panel of Porcelain A7 Letterpress cardstock. The details on this press plate are unbelievable!! Once I had finished the letterpress, I used a blending brush to blend some Vanilla Cream Crisp Dye Ink around the edges of the panel, creating a lovely warm glow and highlighting my bold black floral image. I also used a pale yellow alcohol marker to add some details to the centers of the poppy flowers, which is not necessary but I thought really elevated the look of the background!

Once I had finished my background, I cut a simple “thank you” sentiment using the Timeless Sentiments dies, cutting the detail layer from black glitter cardstock and the shadow layer from heavyweight vellum. The vellum adds just enough softness around the edges of the black glitter sentiment to help highlight it on the busy and bold background. I popped up the greeting with some foam adhesive, then added several black gems for some lovely sparkle! I love when one image does the majority of the work for you… these cards would be gorgeous as thank you notes, and super easy to create in multiples and in a different color palette!!!

For my second card, I used the amazing Blossoming Bouquet product suite, this time as a hot foil plate rather than a press plate. I hot foiled the main floral bouquet onto some white cardstock using the new Ivory Black hot foil roll, then used the beautiful yellows and greens in the Firewood Garden Alcohol Marker set to add some vibrant color to the blooms. They reminded me of sweet little buttercups, so I thought that the yellow was the perfect color choice! I knew that I wanted those sweet yellow blooms to pop from a stark black background, so I colored around the edges of the die cut and colored flowers with a black alcohol ink marker to keep the white edges of the die cut from detracting from the overall color palette.

*You might be wondering why I didn’t just use this plate as a letter press plate if I was going to hot foil in black; I wanted to use alcohol markers, and they don’t play very nicely with the super absorbent cotton letterpress paper.*

After I had finished coloring and cutting the main floral focal point, I die cut some solid foliage using the Just Leaves dies and some black glitter cardstock. I arranged the die cuts on a solid black A2 card front, using liquid adhesive for the glittery die cuts and some foam adhesive for the colorful bouquet to add different heights and textures to my card front. I had also hot foiled a greeting from the Blossoming Bouquet product suite using some more of the black hot foil, then used some residual Vanilla Cream ink left over on my blending brush from the first card to add some warmth to my white sentiment die cut. I popped it up with some more foam adhesive and added a few gems to finish it off!

For the last card in my coordinating card set, I used the spectacular new White Cap Peonies stencil set with some yummy yellow and green inks to create this incredibly sunny card! I blended the different layers of the stencils using the older Vanilla Cream ink with the newer Sunkissed Delights Fresh Dye Ink, lessening or intensifying my blending pressure to create several values of yellow amongst all of the layers. Once I had finished blending the images, I blended some more of the Vanilla Cream ink around the edges of my card front, creating that same gorgeous, warm glow on my background. It almost looks like the sun is shining out from the card!!

For the greeting, I pressed a sentiment from the recently released Sunshine Greetings Press Plate set and coordinating dies using black ink. I thought that this particular greeting worked a treat with the sunny color palette on this card! I used a yellow alcohol marker to dye some thin white silk ribbon, which I tied in a bow and tucked beneath the popped up sentiment die cut. Finally, I added a few shimmering yellow gems for some added sparkle. I am absolutely in love with the color palette for these cards, and need to remind myself to use yellow more frequently!

For my last card, I used the new Warm Gray Fresh Dye Ink and Tea Party Fresh Dye Ink quartets with the Floral Radiance Stencil set to create this pretty floral card. I ink blended the flowers with the Tea Party inks, adding details to the flower centers with the Warm Gray and finishing the foliage off with some muted green inks. I die cut a Timeless Sentiments greeting using the Milky Way Glitter cardstock and some vellum, then added some coordinating deep gray frames from the Fine Frames Cover Die set, finishing this simple card off with a white silk bow and some sparkly gems! I love how beautifully these new Fresh Dye Inks work together!

Well, that’s all for my projects today. Now for some fun giveaway information!

$300 in total prizes! To celebrate this release, Altenew is giving away a $100 gift certificate to 1 lucky winner and a $50 gift certificate to 4 winners! Please leave a comment on the Altenew Card Blog and/or each designer’s blog post on the blog hop list below by July 16, 2024 for a chance to win. Altenew will draw 5 random winners from the comments left on each stop of this blog hop and announce the winners on the Altenew Winners Page on July 18, 2024.*The winner of the $100 gift certificate will be chosen from comments left on the Altenew blog. 

Here’s the full hop list in case you get lost:

You are invited to the Inlinkz link party!

Click here to enter

Thanks so much for stopping by today, and happy hopping!
Filed Under: altenew Tagged With: alcohol markers, better press, blossoming bouquet, fine frames cover die, floral radiance, fresh dye inks, inked poppies, just leaves, letterpress, press plates, sunshine greetings, timeless sentiments, timeless sentiments 2, white cap peonies

 Altenew June 2024 Release Blog Hop + Giveaway

June 6, 2024

Hi friends! I am taking part in Altenew’s June 2024 Release Blog Hop. You should have arrived here from Michelle Short, and your next stop is Svitlana Shayevich. You can find the full hop list at the bottom of this post, or you can go to the Altenew Blog. This month’s new release (check out the full release HERE) is filled with beautiful new florals (of course), fabulous textures and Press Plates, and some truly stunning new Fresh Dye Ink families! I have two sweet and delicate cards to share with you today, so let’s get started with the details!

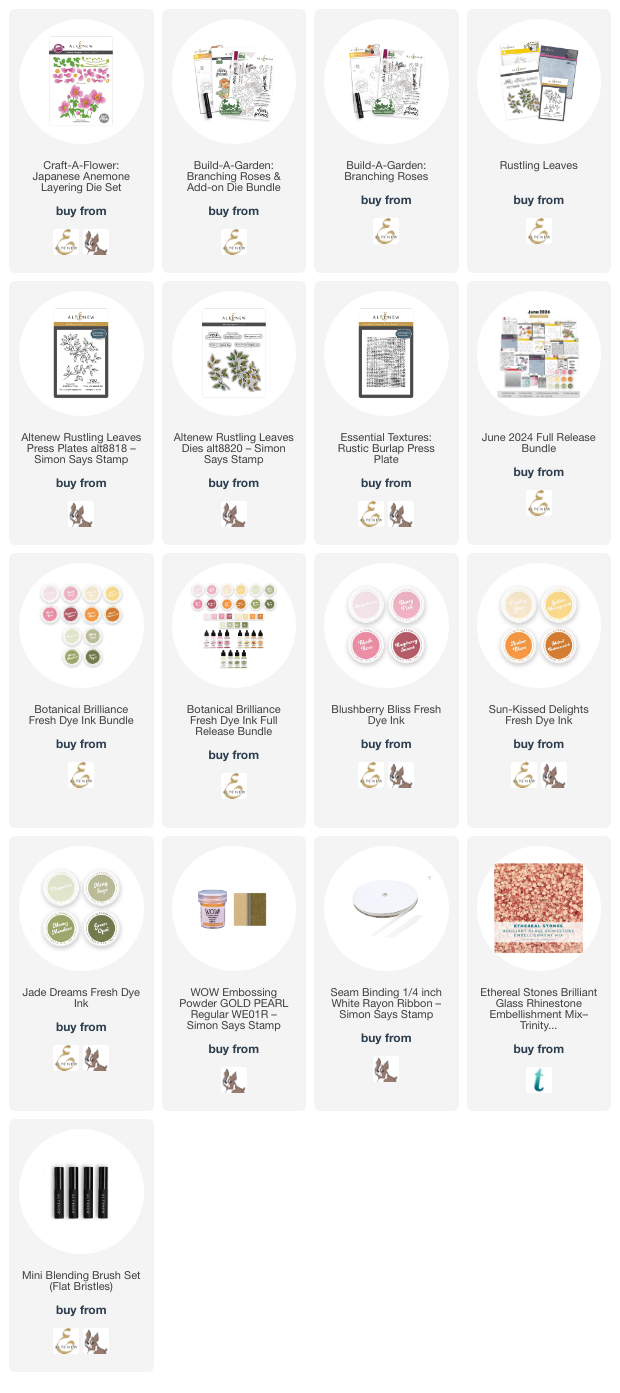
The new Botanical Brilliance Fresh Dye Ink families are some of my most favorite that have been released so far. The soft blush, buttery yellow, and fresh greens work so perfectly together as well as with other color families. I used all three color families for both of my cards today to create these very soft, ethereal, dreamy cards.

For my first card, I began by heat embossing the exceptionally beautiful and meandering floral arrangement from the new Build-A-Garden: Branching Roses onto a white, A2 card front using some gold pearl embossing powder. I then used the included coordinating layering stencils to blend Peachy Glow, Golden Honeycomb, Strawberry, Dusty Pink, Blush Rose, Pistachio, Misty Sage, and Mossy Meadow Fresh Dye Inks from the new Blushberry Bliss, Sun-Kissed Delights, and Jade Dreams Fresh Dye Ink families. I love these gentle colors, made even more subtle with a light hand while blending. After I had finished blending the images with the stencils, I used a larger blending brush to lightly blend Strawberry and Dusty Pink inks from the Blushberry Bliss ink quartet around the edges of the panel. The resulting panel is so soft and dreamy!

After I had finished creating the panel, I stamped some of the sentiments from the Build-A-Garden: Branching Roses stamp set onto some white cardstock using Raspberry Sunset ink from the Blushberry Bliss ink quartet, then stamped directly over the top with embossing ink, then added some more gold pearl embossing powder to create custom colored embossed sentiments. I fussy cut the larger sentiment with my sharp scissors, then used my trimmer to trim down the sentiment strip. I adhered the sentiment strip to a slightly larger piece of gold pearl cardstock, which coordinated nicely with the pretty gold pearl embossing. I popped up the greeting pieces with some foam adhesive, then added a smattering of Ethereal Stones Rhinestones from Trinity Stamps and a white silk ribbon to truly complete the feminine aesthetic of this card.

For my second project, I continued this airy feminine theme with the Craft-A-Flower: Japanese Anemone and older Rustling Leaves Press Plate and coordinating die. I began by die cutting all of the elements of the new Craft-A-Flower: Japanese Anemone from white cardstock, then used blending brushes to blend Strawberry, Dusty Pink, Pistachio, and Misty Sage inks from the new Blushberry Bliss, Sun-Kissed Delights, and Jade Dreams Fresh Dye Ink families to “color” them. The lovely soft colors of the inks were made even softer with the light ink blending, creating the prettiest pale pink anemones! I also used the Mossy Meadow ink from Jade Dreams to impress the leaf images from the Rustling Leaves Press Plate and die cut them with the coordinating die.

For the background, I wanted to keep the softness of the flowers but still add some minimal texture behind my floral bouquet, so I inked up the Rustic Burlap Press Plate with Strawberry ink and ran it through my Better Press system. The soft pink helps make the textured pattern a bit more visible than simply running the plate through without inking. I arranged the florals on the textured background and adhered them with both liquid and foam adhesive for lots of different textures and heights, then added a letter press greeting from the Rustling Leaves product suite, inked up with darker Green Opal ink from the Jade Dreams ink family to help it stand out amongst the florals. Finally, I added a few shimmering iridescent gems for a bit of sparkle!

Well, that’s all for my projects today. Now for some fun giveaway information!

$300 in total prizes! To celebrate this release, Altenew is giving away a $100 gift certificate to 1 lucky winner and a $50 gift certificate to 4 winners! Please leave a comment on the Altenew Card Blog and/or each designer’s blog post on the blog hop list below by June 12, 2024 for a chance to win. Altenew will draw 5 random winners from the comments left on each stop of this blog hop and announce the winners on the Altenew Winners Page on June 14, 2024.
*The winner of the $100 gift certificate will be chosen from comments left on the Altenew blog. 

Here’s the full hop list:

You are invited to the Inlinkz link party!

Click here to enter

Thanks so much for stopping by, and happy hopping!

Filed Under: altenew Tagged With: better press, build a garden, build a garden branching roses, craft a flower, craft a flower japanese anemone, fresh dye inks, ink blending, layering stencils, letter press, press plate, rustic burlap press plate, rustling leaves

Altenew April 2024 Release Blog Hop + Giveaway!

April 11, 2024

Hi friends! Altenew is hosting a blog hop to celebrate their latest release of fabulous stamps, dies, Press Plates, stencils, supplies, and more! You should have arrived here from Agnieszka, and your next stop is Jaycee. You can also start back at the beginning of the hop at the Altenew Blog. The April 2024 release is filled with more of the beautiful florals, textures, sentiments, and design elements that you’ve come to expect from Altenew each month; I find the new Press Plates to be particularly thrilling! I have been really leaning into blue lately, in lots of different intensities and in different color combinations. I have a pair of crisp blue and white cards using the new goodies to share with you today, so let’s get started with the details!

My color combination was inspired by the beautiful blues in the newer Woodland Garden alcohol markers set. I find myself reaching for blues frequently in the springtime; I find something about their crispness and vivid colors to be so clean and a great palate cleanser for the intense and rich colors to which I’ve been drawn during the fall and winter months.

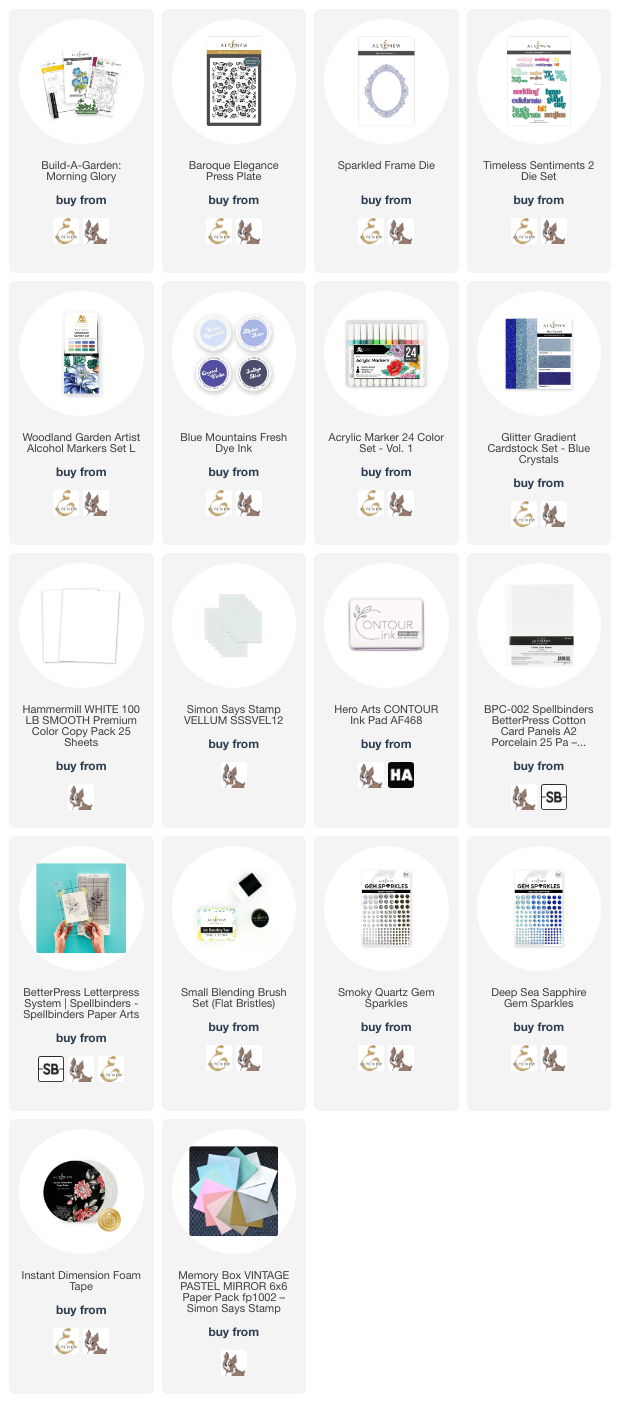
For this first project, I used the newer Woodland Garden alcohol markers to do some no-line coloring with the Build-A-Garden: Morning Glory set. I stamped the image on some alcohol marker-friendly white cardstock using a very pale gray ink, then colored the image with the blues and greens in the Woodland Garden alcohol marker set. I always struggle getting the details of the flower centers perfect, but I used the yellow and tan Acrylic Markers after I had finished my alcohol marker coloring to add those tiny details. The opacity of the Acrylic Markers worked perfectly for the flower centers! I die cut the finished image with the coordinating die, included in the Build-A-Garden: Morning Glory set.

After I had finished my floral focal point, I used the Blue Mountains Fresh Dye Ink quartet with the background stencil included in the Build-A-Garden: Morning Glory set. This background image reminds me of a fence along which the morning glory vines can creep! I kept my color palette crisp and clean, adding some blue “sky” by lightly blending the lightest blue from the Blue Mountains set on the opposite corner of the panel. I trimmed off the edge of the stenciled and blended panel and added a strip of coordinating blue glitter paper from the Blue Crystals glitter cardstock pack to add some glitz to my card front. I popped up the floral die cut with some foam adhesive, allowing it to spill over the side and onto the “fence,” then heat embossed a greeting from Build-A-Garden: Morning Glory using white embossing powder onto some vellum, popping it up with a double layer of clear foam adhesive. Finally, I added some extra sparkle using some iridescent clear gems from the new Smokey Quartz Gems pack!

My second card features the beautiful new Baroque Elegance Press Plate. The Fresh Dye Ink line has one other fabulous facet besides its vibrant color palette: its thicker viscosity works beautifully with the Better Press! I used the Alpine Aster ink from the Blue Mountains Fresh Dye Ink quartet to press the Baroque Elegance image onto some letter press paper, then trimmed the panel down to slightly smaller than A2 size and blended Crystal Violet around the edges of the background. I mounted it on a panel of coordinating blue A2 cardstock, leaving a thin darker blue frame around the edge.

After I had created my background, I die cut the new Sparkled Frame die from some creamy white foil cardstock. The warmth of this foil cardstock worked very nicely with the creamy letter press paper! I also die cut a greeting from the new Timeless Sentiments 2 die, cutting the detail layer from some Blue Crystals glitter cardstock pack and the coordinating shadow from some lightweight vellum to allow that pretty letter press pattern to show through. I oriented the frame so that it was hanging off the side of the card front and trimmed the excess, then popped the frame up with some foam adhesive. I adhered the greeting within the confines of the frame, then embellished the frame with some new Deep Sea Sapphire gems. Such a simple, crisp, clean card!

Well, that’s all for my projects today! Now for some fun giveaway information:

$300 in total prizes! To celebrate this release, Altenew is giving away a $100 gift certificate to 1 lucky winner and a $50 gift certificate to 4 winners! Please leave a comment on the Altenew Card Blog and/or each designer’s blog post on the blog hop list below by 04/17/2024 for a chance to win. Altenew will draw 5 random winners from the comments left on each stop of this blog hop and announce the winners on the Altenew Winners Page on 04/19/2024.
*The winner of the $100 gift certificate will be chosen from comments left on the Altenew blog.

Here’s the full hop list in case you get lost:

You are invited to the Inlinkz link party!

Click here to enter

Thanks so much for stopping by today, and happy hopping!

Filed Under: altenew Tagged With: acrylic markers, baroque elegance, better press, build-a-garden: morning glory, fresh dye inks, layering stencil, no line coloring, sparkled frame, timeless sentiments 2, woodland garden alcohol markers

Altenew 10th Anniversary Blog Hop Day 1 + Giveaway (over $3,500 in Total Prizes)

April 1, 2024

Hi friends! I am so excited to be part of Day 1 for Altenew’s Tenth Anniversary Blog Hop!! How thrilling is that? What a fantastic milestone! I have loved Altenew’s designs for almost as long as they’ve been around, and so being a part of their design team for the last three years has been nothing short of a dream come true. You should have arrived here from the Scrapbook & Cards Today blog, and your next stop is Svitlana Shayevich. You can also start at the beginning over at the Altenew Blog. (I highly encourage you to start at the beginning, because there are masses upon masses of prizes to be had throughout the hop!!) I have two projects to share with you today, so let’s get started with the details!

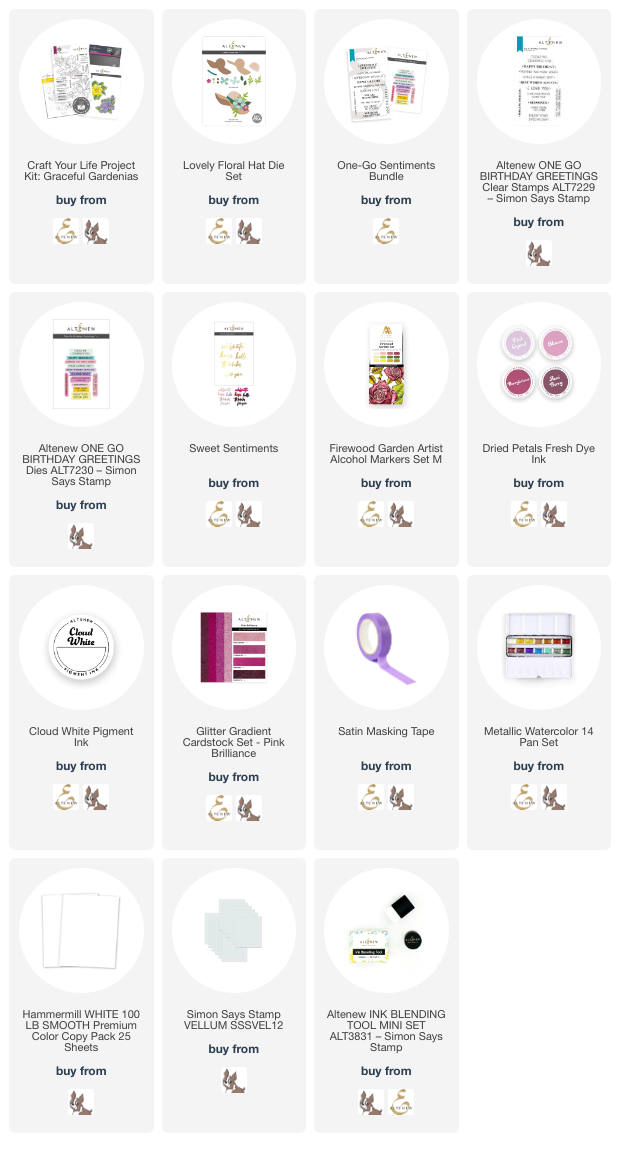
When I was perusing my Altenew bins to figure out which products to use for today’s hop, I realized that I had not put the incredibly lovely Craft Your Life Project Kit: Graceful Gardenia to use yet. These kits come with such wonderful coordinating products, from traditional stamps and dies to embossing folders and coordinating stencils that work with both the stamps and the embossing folder images. I employed some of my most favorite of the new Fresh Dye Inks and the new Firewood Garden alcohol markers to create these pretty pink cards. The embossing folders are great to use as a focal point or to add texture to the background!

For my first project, I started by embossing a panel of white cardstock using the embossing folder from the Craft Your Life Project Kit: Graceful Gardenia kit. I then used some of the colors from the Dried Petals Fresh Dye Ink set to blend around the edge of the card front. Embossing the panel first and then ink blending over the top enhances the incredible embossed details. To further enhance the details, I swiped the Cloud White pigment ink pad over the raised areas to help them stand out even more.

On top of my embossed background, I die cut a large scale sentiment from the new Timeless Sentiments 2 die set using the Rhodolite Garnet glitter paper from the Pink Brilliance Glitter Gradient cardstock set. I enhanced the die cut sentiment with some sparkly, shimmery flowers from the Lovely Floral Hat die set, which I cut with some specialty papers, including more Rhodolite Garnet glitter paper and some iridescent white mirror paper, paired with vellum foliage. I tucked a greeting from the One Go Sentiments Bundle around the glitter die cut sentiment and arranged the flowers and foliage around the sentiment. Finally, I added a few shimmering gems for sparkle!

For my second project, I used one of my favorite techniques with embossing folders: alcohol marker coloring! The Craft Your Life Project Kit: Graceful Gardenia kit comes complete with dies that coordinate with both the stamped image as well as the embossed image. I die cut the floral image that coordinated with the embossing folder using the correct die, then lined it up on the embossing folder and ran it through my die cutting machine. I then used the Firewood Garden alcohol markers to add lots of vibrant color to the embossed image. I am always amazed at how much dimension you can achieve when you combine coloring with the embossed images!!

Because this embossed, colored image was on such a large scale, I decided to create an A7 card. I trimmed down an A7 card front, then masked the edges with Satin Masking Tape and blended some mauve inks around the edges using inks from the Dried Petals Fresh Dye Ink set. While the masking tape was still in place on my card front, I used the stamps included in the Graceful Gardenia kit to stamp a tone-on-tone background around the corner of my masked area. I also splattered the blended and stamped background with some metallic watercolors for added texture and shimmer. I removed the masking tape around the edges, revealing a crisp white frame around my blended background. I popped up the embossed colored sentiment with some foam adhesive, then added a glittery greeting cut from the Sweet Sentiments set and an ethereal vellum sentiment from the new One Go: Words & Banners set. I finished the project off with a few sparkling gems!!

Well, that’s all for my projects today! Now for tons of fun giveaway information:

Over $3,500 in total prizes! We are giving away a $50 Altenew gift certificate to 10 winners, a $20 ArtistrybyAltenew gift certificate to 5 winners, and an online papercrafting class($39.99 value) from Altenew Academy Online Class to 14 winners. There are also 28 awesome companies/crafty friends who are celebrating with us, and they are offering the following prizes:

  • Altenew: 10 x $50 Altenew Gift Certificates
  • ArtistrybyAltenew: 5 x $20 ArtistrybyAltenew Gift Certificates
  • Altenew Academy: 14 x Online Papercrafting Classes($39.99 value each)
  • Crafter’s Companion: 1 x Gemini II Die Cutting and Embossing Machine ($329 value)
  • LDRS Creative: 4 x $50 LDRS Creative Gift Certificates
  • Online Card Classes: 5 x Online Card Classes ($25 value each)
  • Jennifer McGuire Ink: 1 Share Handmade Kindness goodies bag ($100 value)
  • Honey Bee Stamps: $100 Gift Certificate
  • Hero Arts: $100 Gift Certificate
  • Lawn Fawn: $100 Gift Certificate
  • Pink and Main: $100 Gift Certificate
  • Scrapbook & Cards Today: $100 Gift Certificate
  • Taylored Expressions: $100 Gift Certificate
  • Gina K. Designs: $100 Gift Certificate
  • CraftStash: $100 Gift Certificate
  • Brutus Monroe: $100 Gift Certificate
  • Picket Fence Studios: $50 Gift Certificate
  • Pelletier Craft Studio: 3 x $25 Gift Certificates
  • Michelle’s Cards and Stamps: AUD $100 Gift Certificate
  • Spellbinders Paper Arts: 2 x $25 Gift Certificates
  • Scrapbook.com: $50 Gift Certificate
  • My Craft Room: $50 Gift Certificate
  • Krafters Cart: $50 Gift Certificate
  • A Cherry on Top: $50 Gift Certificate
  • Simon Says Stamp: $50 Gift Certificate
  • My Favorite Things: $50 Gift Certificate
  • Pinkfresh Studio: $50 Gift Certificate
  • Bumbleberry Papercrafts: £25 Gift Certificate
  • Seize the Stamp: CHF 25 Gift Certificate
  • MarkerPop: $25 Gift Certificate
  • Auzz Trinklets N Krafts: AUD $25 Gift Certificate

Be sure to leave comments by 04/16/2024 for a chance to win one of 68 prizes! To make the hop more exciting, start your comment with “Hi from (city or country where you’re from)!” 68 winners will be chosen at random from the comments left on any of the blogs listed below and will be announced on the Altenew Card Blog on 04/19/2024.

Anniversary Special Offers

  • 20% Off Crafter’s Must-Have: Stampwheel on 04/01/2024 from 12:01 am EDT until 11:59 pm EDT. Shop here: https://altenew.com/products/stampwheel
  • Receive a FREE Zip ‘n’ Stash – Teal (1/pack) ($6.99 value) on orders over $69 on 04/01/2024 from 12:01 am EDT until 11:59 pm EDT. While supplies last, the free gift will be added to your cart automatically. Shop here → https://altenew.com/
  • Plus, get FREE U.S. shipping on orders over $29 (no code needed) or $10 OFF international shipping on orders over $129 with code HAPPY10TH at checkout. Valid from 04/01/2024 at 12:01 am EDT until 04/05/2024 at 11:59 pm EDT. Not valid on prior purchases. Shop here → https://altenew.com/

Here’s the full hop list in case you get lost:

You are invited to the Inlinkz link party!

Click here to enter

Filed Under: altenew Tagged With: A7 card, alcohol markers, craft your life, craft your life graceful gardenia, fresh dye inks, lovely floral hat, masking, one-go sentiments, sweet sentiments

Altenew January 2024 Release Blog Hop + Giveaway ($300 in Total Prizes!)

January 10, 2024

Hi friends! I am hopping along with Altenew today to help introduce their scrumptious new collection of products for January, 2024. You should have arrived here from Caly Person, and your next stop is Mindy Eggen. You can also see the full hop list over on the Altenew Blog. I have three different cards to share with you today using some of the beautiful new stencils and dies from this month’s release. Stencils are one of the unsung heroes of the craft room, in my opinion; they are very cost effective for the sheer volume of techniques for which they can be used! The new Stencil Art: Playful Watercolor Flowers features layering stencils to create two different floral arrangements, one large and bold, one smaller and more delicate, and very easily customizable.

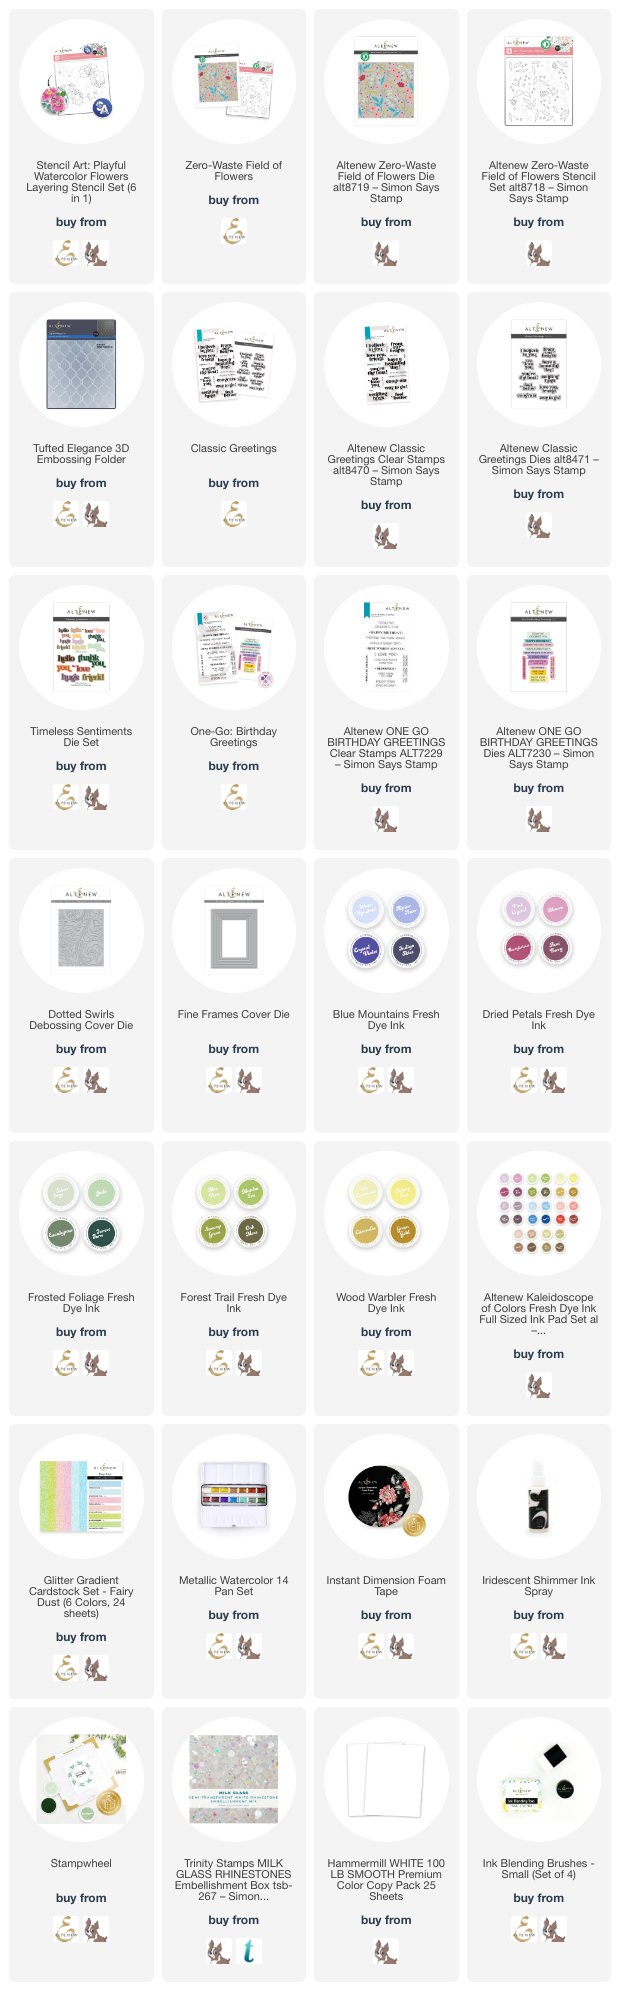
I used the new Stencil Art: Playful Watercolor Flowers to create two different cards that allow the stencils to be the stars of the show. For both projects, I used the new Forest Trail Fresh Dye Inks, Dried Petals Fresh Dye Inks, and Wood Warbler Fresh Dye Inks to create soft and feminine cards.

For my first project, I used the large floral arrangement in the Stencil Art: Playful Watercolor Flowers set, orienting it in the center of my A2 card front, allowing it to spill over the edges. (Tip: the sticky mat in the Stampwheel makes layered stenciling an absolute breeze!) After I had finished blending the main image, I blended some light and medium pink inks from the Dried Petals Fresh Dye Inks around the edge, then splattered the entire panel with some Metallic Watercolor for some added artistic flair!

To accent the stenciled pattern on the background, I die cut some glittering rose gold frames using the Fine Frames Cover Die and framed the center of the card, drawing the eye to the lovely stenciled floral image. For the greeting, I die cut the bold, chunky “friend” from the Timeless Sentiment Dies and some coordinating deep maroon cardstock. I also used a leftover embossed and die cut sentiment from the One Go Birthday Greetings, popping both sentiment elements up with Instant Dimension Foam Tape. As a final sparkling touch, I added a smattering of iridescent white gems!

For my second card, I used the smaller floral images and delicate foliage from the Stencil Art: Playful Watercolor Flowers. I arranged the smaller bouquet in the center of my white A2 card front and blended the flowers and foliage using the Dried Petals and Wood Warbler Fresh Dye Inks, adding some additional sprigs of foliage by carefully blending some individual branches. I kept the arrangement nice and clean by making good use of a Post-It Note to prevent ink from going where I didn’t want it! I trimmed down the panel to 3.75 x 5.5″ and ran it through my die cutting machine with the Dotted Swirls Debossing Die. This pierced die cut adds the subtlest texture; it reminds me a bit of paper towels that have designs printed on them, teehee!

After I had finished my background panel, I mounted it on a full size white A2 card front, allowing the solid background to peek out from either side of the pierced and stenciled panel to add extra interest. I die cut another greeting from the Timeless Sentiment Dies, this time from white cardstock. The white cardstock stands out nicely when placed over the colorful stenciled area, but still allows the overall card to remain crisp and clean. I added another embossed greeting from the One Go Birthday Greetings, tucking it beneath the edges of the die cut “hello.” Finally, I added a few more iridescent white gems for sparkle!

My final card features the brand new Zero Waste Field of Flowers die and stencil set. I began by blending the layered stencils on a 6″ x 6″ panel of white cardstock using Blue Mountains Fresh Dye Ink, Dried Petals Fresh Dye Ink, and Frosted Foliage Fresh Dye Ink. I added a bit of sparkle by spritzing the images with Iridescent White Shimmer Spray. While the stenciled floral pattern was lovely on it’s own, I wanted to create a delicate spray of flowers, so I used the coordinating die to cut the stenciled flowers in one pass through my die cutting machine! This die cuts a ton of delicate little flowers, foliage, and buds so easily… definitely a must-have, in my opinion.

Next, I ran a panel of A2 sized white cardstock through my die cutting machine using the new Tufted Elegance 3D Embossing Folder. This new folder creates such lovely, simplistic texture, the perfect foil for the delicate stenciled and die cut flowers. I trimmed the panel down lengthwise, then added a strip of pink glitter from the Fairy Dust glitter cardstock along one of the long edges and adhered both to a full size panel of white A2 cardstock, orienting it to the left so that the solid white cardstock peeked out on the right.

After I had created the background panel, I stamped and die cut two sentiments from the Classic Greetings Stamps and Dies set, stamping first with dark blue ink and then again with embossing ink, sprinkling iridescent blue embossing powder over the top to create a gorgeous customized iridescent greeting. I arranged the floral die cuts in a pretty swag along the edge of the embossed panel, adhering with both liquid and foam adhesive, then popped up the greeting over the top of the center. Finally, I added a few shimmering gems for one last bit of sparkle!

Well, that’s all for my projects today! Now for some fun giveaway information:

$300 in total prizes! To celebrate this release, Altenew is giving away a $100 gift certificate to 1 lucky winner and a $50 gift certificate to 4 winners! Please leave a comment on the Altenew Card Blog and/or each designer’s blog post on the blog hop list below by 01/17/2024 for a chance to win. Altenew will draw 5 random winners from the comments left on each stop of this blog hop and announce the winners on the Altenew Winners Page on 01/19/2024.
*The winner of the $100 gift certificate will be chosen from comments left on the Altenew blog. 

Here’s the full hop list:

You are invited to the Inlinkz link party!

Click here to enter

Thanks so much for stopping by today, and happy hopping!

Filed Under: altenew Tagged With: dotted swirls debossing die, fresh dye inks, layered stencil, one go birthday greetings, stencil art playful watercolor flowers, timeless sentiments, zero waste field of flowers

  • Page 1
  • Page 2
  • Go to Next Page »

Primary Sidebar

  • Facebook
  • Instagram
  • Pinterest
  • YouTube

Favorite Shops

Secondary Sidebar

Subscribe

Enter your email address to subscribe to this blog and receive notifications of new posts by email.

Instagram
Something is wrong.
Instagram token error.
Follow
Load More

Archives

Tags

3D embossing folder alcohol markers better press birthday birthday card blog hop card kit christmas christmas card christmas tag colored pencil copic copic coloring Daniel Smith die cutting embossing folder embroidery felt giveaway holiday holiday card hot foil ink blending karin brushmarker pro layered stencil masculine my monthly hero new release no line coloring no line watercolor OLO marker olo markers original illustration pawsitively saturated rainbow shaker card slimline stamping stamptember stencil thank you thinking of you valentine's day video watercolor

Popular Posts

Simon Says Stamp Sending Cheer Blog Hop- Day 2 + Freebie + Giveaway!
Altenew October 2026 Release Blog Hop + Giveaway!
Rustic Monochromatic Stars for Christmas with Rainbow Splash!
December 2018 My Monthly Hero Blog Hop + Giveaway!
March 2020 Essentials By Ellen Blog Hop+Giveaway!
The Ton Stamps Summer Release: Day 1
Hero Arts Partners Blog Hop: Lawn Fawn!
Waffleflower July Release Blog Hop!
Simon Says Stamp STAMPtember Tim Holtz Collaboration: Festive Holidays!
The Ton Anniversary Release: Day 1!

Disclosure

Some affiliate links are used in my posts. This means that, should you click on one of my links and purchase something from that company, I will receive a small portion of the sale at no extra cost to you. I use the money earned from these sales to help maintain my blog. I so appreciate you visiting and, if you do choose to use one of my affiliate links, thank you so much for your support!
Copyright © 2026 ·Brunch Pro Theme · Genesis Framework by StudioPress · WordPress · Log in
Loading Comments...