• Skip to main content
  • Skip to primary sidebar
  • Skip to secondary sidebar

Sixth Street Sundries

Emily Midgett

  • Home
  • About Me
  • Contact
  • OLO Marker Color Swatch Chart
  • Shop

Ph Martins

Pinkfresh Studio July 2021 Stamp, Die, Stencil, and Hot Foil Release

July 26, 2021

Hi friends! Happy Monday! Today, I’m super excited to be taking part in the Pinkfresh Studio July Stamp, Die, Stencil, and Hot Foil Release Blog Hop. I’m even more thrilled to be taking part in today’s hop, because I get the opportunity to help introduce two new stamp sets that I’ve designed for Pinkfresh Studio:

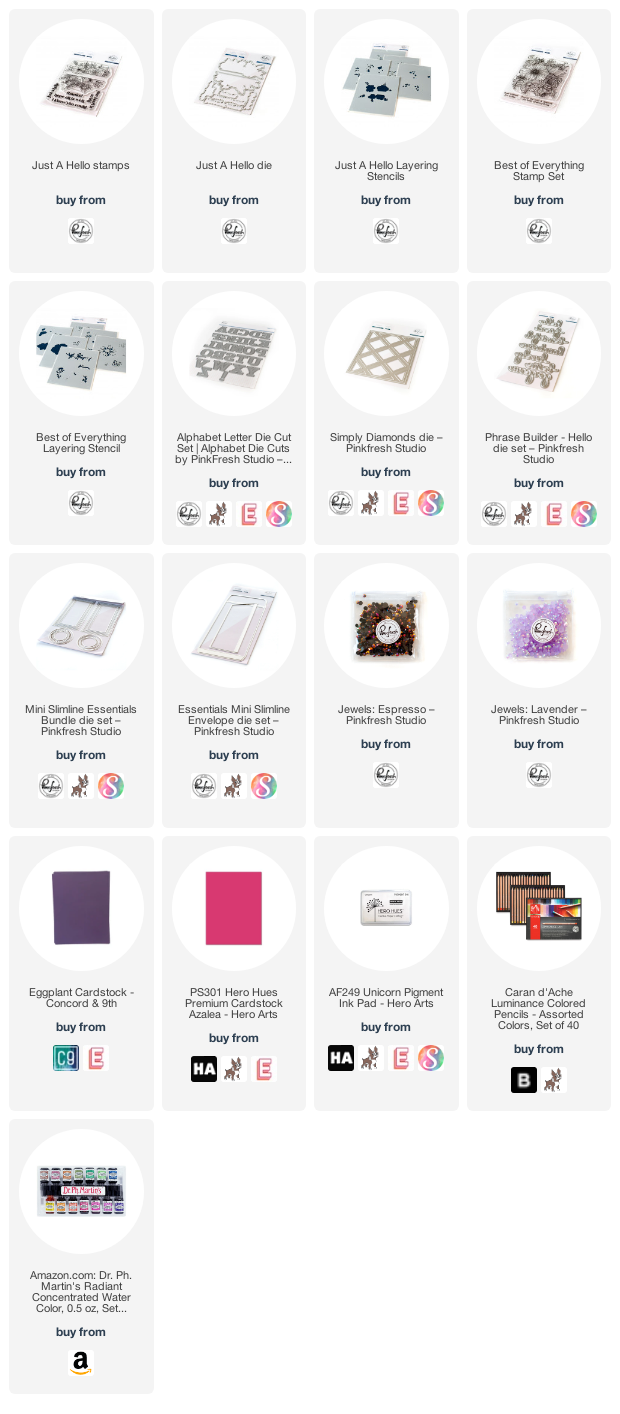
Just A Hello-features a pretty floral image that can be used stamped in it’s entirety, or die cut with the coordinating dies to create two floral edges that you can use in a variety of ways. The set also has coordinating layering stencils so that you can add color to the images in a variety of ways, even if coloring isn’t your favorite thing to do!

Best of Everything is a detailed floral background stamp featuring a variety of flowers-anemones, daffodil, roses, ranunculus, tulips, and several different types of foliage. This set also has coordinating layering stencils! I love that these sets offer such a variety of ways to add color. So fun!

I have three projects to share with you today using my new sets, so let’s get started with the details!

My first two projects are a pair that are an homage to pink and purple! I love vibrant, saturated color, and I wanted to showcase the Just A Hello and Best of Everything sets on super saturated, vivid colored cardstock.

For this first project, I combined the Best of Everything stamp set with the coordinating layering stencils on some shocking magenta cardstock. I began by heat embossing the main floral background image using some pearlescent white embossing powder, then used a variety of inks from Pinkfresh Studio’s line to add color to the individual images using the coordinating layering stencils. I love the subtle (if one can call a hot pink card “subtle” haha!) addition of color and shading the stencils add over the vivid cardstock base.

For the greeting, I wanted to add a stacked alphabet die cut greeting to the front without covering up the entirety of my super detailed, stenciled background, so I used the outline die cuts from the Adore Alpha Die Set, cut from some royal purple cardstock. I adhered them directly to the card front using liquid adhesive, then added a greeting from the Best of Everything stamp set that I’d white embossed on some strips of the same royal purple cardstock. I trimmed the card base down a bit, then mounted it on a full A2 panel of that deep, plummy purple cardstock using foam adhesive. The final touch was to add some sparkling Lavender jewels.

My second project features a similar color scheme, but with my new Just A Hello stamp set. I absolutely adore the look of colored pencils on colored cardstock, and the pretty flowers in the Just A Hello set were just the right size to use with my Luminance colored pencils-not too small, but big enough that you could add some fun details and shading. I stamped the main floral frame image from Just A Hello using white pigment ink on some more of that gorgeous plummy purple cardstock, then used the incredibly vibrant Caran d’Ache Luminance colored pencils to add lots of color to the floral images, berries, and foliage. I die cut the colored images using the coordinating dies, and I love that the dies cut two separate floral swags, so that you can use them together or separated! (I have a couple of fun ideas that I didn’t get time to finish, so keep your eyes open for another project or two in the coming weeks using this set!)

Once I’d finished coloring and die cutting the floral swags, I die cut the Simply Diamonds die from a full panel of the same purple cardstock, then mounted it on another A2 panel of the same purple cardstock using foam adhesive for a subtle, but dimensional and interesting, background. I heat embossed the greeting from Just A Hello on another snippet of purple cardstock (side note-the sentiments all stamp and die cut in one fell swoop, so you just stamp once, die cut once, and you have a variety of sentiments at your disposal! So freaking handy!), then added the sentiment and floral die cuts to the tone-on-tone background with even more foam tape. So much dimension to this card… I love it! A few more Lavender jewels finished it off.

My final project uses the Best of Everything set to adorn the top and bottom of a mini-slimline card. I began by gold heat embossing the main floral image on some hot press watercolor paper (the smooth surface of the hot press paper allowed the details in this image to stamp perfectly), then used my long-neglected Ph Martin’s liquid watercolors. These colors are so incredibly vibrant and mix so easily. So fun to use! Once I’d finished watercoloring the entire image, I fussy cut it using some sharp scissors.

Next, I trimmed a mini-slimline card base (3.5″x6″) from some creamy linen cardstock and die cut a mat using the Mini Slimline Essentials Dies from some more of the creamy linen cardstock. I mounted it on the card base using some foam adhesive.

I die cut a gold “friend” using the Phrase Builder Hello die set, adding the shadow die cut from some heavyweight vellum. I heat embossed one of the greetings from Best of Everything, then added the greetings to the card front. I cut the watercolored floral bouquet in half, adhering it to the card front with a double layer of foam adhesive. Finally, I added a few Espresso gems for some sparkle!

Well, that’s all for my projects today! I am so thrilled to help introduce these new sets that I’ve designed. Such a joy (and still somewhat surreal) to be designing stamps for Pinkfresh Studio!

We have some fun giveaways for you to celebrate this new release!

-We will be giving away the full release on the Pinkfresh blog & YouTube channel (there will also be a separate giveaway on the Instagram page at a later date, so keep your eyes peeled!)

-We will be giving away a total of TEN $25  gift cards along the hop. The winners will be chosen from the comments along the hop. The more comments you leave, the more chances you have to win!
The winners will be announce don on August 3 , 2021 on the GIVEAWAY PAGE. You must check that page & claim your prize within 2 weeks if your name is selected!

***To leave a comment on this post: click on the title of the blog post itself, then scroll down to the comment form! ***
You are invited to the Inlinkz link party!

Click here to enter

Filed Under: pinkfresh studio Tagged With: alphabet dies, best of everything, colored pencil, just a hello, layered stencils, liquid watercolor, mini slimline, no line coloring, original illustrations, Ph Martins, watercolor

Altenew Build A Flower: Hawaiian Coral Blog Hop+Giveaway!

November 1, 2020

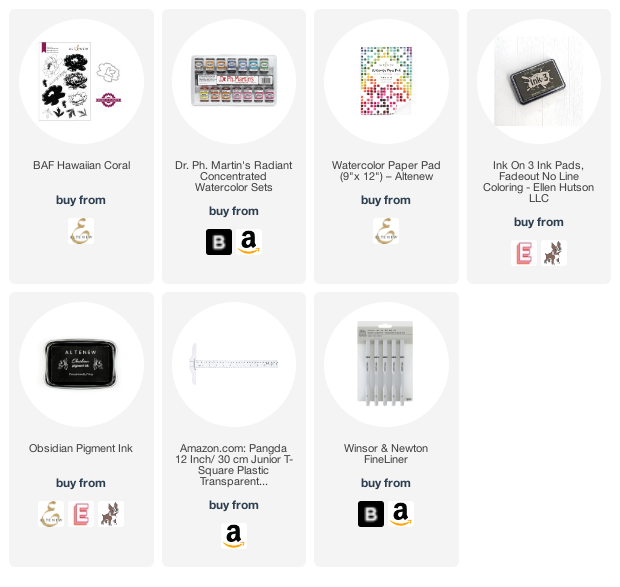
Hi there! The first of the month always means a new Build A Flower from Altenew, and this month’s flower is absolutely gorgeous- Hawaiian Coral. Not only are the layering stamps available in this set, but these big fluffy blooms are super fun to color like I’ve done here. Altenew features a different bloom each month, and you can subscribe to receive the kit automatically each month (and at a discount!). I’m super excited to be taking part in the blog hop today. You should have arrived here from Amber Rain Davis and your next stop is Jaycee Gaspar. You can also head back to the Altenew Card Blog to start at the beginning.

I love watercoloring the floral images from Altenew, and this beautiful fluffy Hawaiian Coral stamp is the perfect size for some no-line watercolor. I recently acquired some Ph Martin’s liquid watercolors, and I wanted to play with them for my project today. Let’s get started with the details!

I stamped the blooms and foliage on some Altenew watercolor paper using fadeout ink, then did some watercoloring with Ph Martin’s Radiant watercolors. I used several different layers of color to achieve lots of vibrance and dimension.

Once I had finished watercoloring, I used my trusty T-square to add a black frame around the edge to make the flowers the focal point of the card. I stamped a greeting on a strip of white cardstock using black ink. I try to stick to the rule of threes when adding embellishments and pops of accent colors to my cards, like the black frame, so I added a black cardstock mat around the edge of the sentiment strip.

I also added some black gems to the card front to help balance out the bouquet and add the third and final black element to complete my “rule of three.” I love adding these little pops of black to help make a project look more finished.

Well, that’s all for my project today! Now, for some fun giveaway information.

To celebrate this release, Altenew is giving away a $30 gift certificate to 2 lucky winners! Please leave a comment on the Altenew Card Blog by 11/09/2020 for a chance to win. Altenew will also draw a winner to receive a $15 gift certificate from the comments left on each designer’s blog on the blog hop list below. All winners will be announced on the Altenew Winners Page on 10/09/2020.

Thanks so much for stopping by today! Your next stop on the hop is Jaycee Gaspar.

Filed Under: altenew Tagged With: build a flower, fadeout ink, hawaiian coral, no line watercolor, Ph Martins, rule of threes, watercolor

One background, two ways

May 24, 2017

Good morning! I have a pair of cards today using a new favorite stamp set of mine: Sweet Perfume from Penny Black. It’s a cling stamp, so it isn’t something that I would have had on my radar PM (pre-Misti), but the ability to stamp the same image multiple times totally sold me on this gorgeous stamp, and I’m so glad it did! I’ve been playing around with my different watercolor mediums because, frankly, I’m a little tired of my Zig markers. (lol! Who would ever have thought I’d say that?!) I have, in my arsenal of mediums, both Dr Ph Martins and Daniel Smith watercolor pans, so I’ve been making an effort to put them to use more frequently. The projects today put both to use.

For this first project, I used my Dr. Ph Martin’s set of watercolors. These watercolors are fun, but they definitely have a learning curve. I started by heat embossing my Sweet Perfume stamp using gold embossing powder onto Canson Montval watercolor paper. Next, I used my Ph Martin watercolors to color these beautiful flowers. The key with the Ph Martin watercolors, at least what I’ve found, is that you can’t start out with a huge amount of pigment like you do the Zigs and then blend it out with the wet paintbrush. It just requires layers upon layers of watered down color to get the amount of depth and shadow that you want to achieve. Let it dry between layers so that you don’t get too much “bloom” and the pigment doesn’t get diluted by the damp watercolor paper. I do love that mixing the Ph Martin colors is just about as easy as one could hope for. Simply use that handy dropper from a few different bottles of color to create a totally custom color.

Once I had spent so much time building up the color on the floral panel, I didn’t particularly want to cover it up or cut into it, so I chose a pretty frame die from Papertrey Ink: Mix and Mat Flourishes. I used another rectangle die from my stash to make it into an actual frame. I love how ornate it is! I die cut it from some somewhat dark gold shimmer card stock that I found in my stash. For the greeting, I used another Papertrey Ink die: Big Basics Thinking of You, die cut three times, then adhered together and layered with Glossy Accents over the top. A simple finish, but that detailed backdrop doesn’t need a lot of help to be noticed, I think. 🙂 As you can see, the Ph Martins, because they are liquid, are a fairly translucent medium, but one can still achieve a great deal of depth and dimension within that parameter. If you lay down too much pigmented color at the start, it’s difficult to move it and manipulate it, so I found it easiest to lay down a light wash of very diluted color, then gradually come back in with more and more layers of light color.

My other card uses the same Sweet Perfume stamp, but was created with my Daniel Smith watercolors. I started by heat embossing the same floral background stamp using silver embossing powder onto some Arches cold press watercolor paper. I wanted to try practicing my white flowers. I haven’t ever really tried creating a white flower, even with the (somewhat ridiculous) amount of flowers I’ve colored over the last few years. I wanted to see if I could do it. I used a pretty gray-ish purple color from Daniel Smith called Shadow Violet to add shadows and details, as well as a touch of Naples Yellow to the lighter parts of each petal, just to add a touch of color. White isn’t just the absence of color, I’ve found… Subtle shadows are just as important. It also helps to surround the white flower with lots of bright colors to make the contrast even more stark.

After I had finished adding color to the background, I decided that I wanted to make it into a shaker card. (Has anybody else noticed that it seems like shaker cards are kind of giving way for super flat, one layered cards? It makes me sad. Such an awesome excuse for having containers full of sparklies.) I cut some charcoal glitter card stock from DCWV using my Mama Elephant Park Avenue frame die. I added a bunch of sequins from Cartwright’s inside my frame, then added a magenta foil “Birthday Wishes” die cut (another die from the PTI Big Basics line). I find that, in contrast to the Ph Martins, the Daniel Smith colors are a bit more opaque and concentrated. They don’t immediately sink down into the paper, so you can manipulate and move a great deal of color without having to worry about it creating harsh lines.

Again, a fairly simple finish (apart from the pretty, sparkly sequins), but I wanted to let the watercoloring shine through.

Well, what do you think of the two different watercolor mediums? After working with both, I think that I prefer the Daniel Smith to the Ph Martins, simply because you can lay down a decent amount of pigment and it will move beautifully, particularly if you use the right kind of watercolor paper. It reminds me of Zigs in that way, because you start with Zigs by laying down your pigment and then moving it with the damp paintbrush. One of the nicest things about using these more artist-grade watercolors is that they’re more lightfast than the Zigs (so many of my Zig projects are faded into an ugly mess!), and you have so many more color options, not just in the sheer volume of individual colors available to purchase, but the mixing opportunities. I’m beginning to find that my Zigs are becoming my “quick” medium, what I use if I just want to play around at my desk for a bit, while my more “legitimate” watercolors are what I make if I want to really put effort and mental energy into what I’m creating.

I hope you’ve enjoyed my minor “study” into this beautiful background from Penny Black, as well as a short comparison of some different watercoloring mediums. It never hurts to branch out and try something different. Thanks so much for stopping by!!

Filed Under: Papertrey Ink, Uncategorized Tagged With: Daniel Smith, papertrey ink, penny black, Ph Martins, watercolor

Primary Sidebar

  • Facebook
  • Instagram
  • Pinterest
  • YouTube

Favorite Shops

Secondary Sidebar

Subscribe

Enter your email address to subscribe to this blog and receive notifications of new posts by email.

Instagram
Something is wrong.
Instagram token error.
Follow
Load More

Archives

Tags

3D embossing folder alcohol markers better press birthday birthday card blog hop card kit christmas christmas card christmas tag colored pencil copic copic coloring Daniel Smith die cutting embossing folder embroidery felt giveaway holiday holiday card hot foil ink blending karin brushmarker pro layered stencil masculine my monthly hero new release no line coloring no line watercolor OLO marker olo markers original illustration pawsitively saturated rainbow shaker card slimline stamping stamptember stencil thank you thinking of you valentine's day video watercolor

Popular Posts

Simon Says Stamp Sending Cheer Blog Hop- Day 2 + Freebie + Giveaway!
Altenew October 2026 Release Blog Hop + Giveaway!
Simon Says Stamp Sending Cheer Release: Now Available!
Simon Says Stamp October 2026 Card Kit of the Month: Homespun Gratitude!
A Double Leftovers Card Set with New Simon Says Stamp Stencils and Dies!
Joyful Snowman with New Simon Says Stamp Sending Cheer Release!
Simon Says Stamp November 2025 Card Kit: Give Thanks!
Hero Arts Partners Blog Hop: Lawn Fawn!
Altenew Standalone Die Blog Hop+Giveaway!
March 2020 My Monthly Hero Blog Hop+Giveaway!

Disclosure

Some affiliate links are used in my posts. This means that, should you click on one of my links and purchase something from that company, I will receive a small portion of the sale at no extra cost to you. I use the money earned from these sales to help maintain my blog. I so appreciate you visiting and, if you do choose to use one of my affiliate links, thank you so much for your support!
Copyright © 2026 ·Brunch Pro Theme · Genesis Framework by StudioPress · WordPress · Log in
Loading Comments...