• Skip to main content
  • Skip to primary sidebar
  • Skip to secondary sidebar

Sixth Street Sundries

Emily Midgett

  • Home
  • About Me
  • Contact
  • OLO Marker Color Swatch Chart
  • Shop

A7 nesting frames

Golden Birthday with Simon Says Stamp!

June 23, 2025

This post was sponsored by Simon Says Stamp. Thanks, Simon!

Hi friends! It’s sunny and super hot here. I hope you’re staying cool! I have a golden birthday card to share with you today. I am always looking to stretch my creativity with my color palettes, and I seem to always gravitate towards cool pinks, purples, and blues. I thought that for today’s card, I would use an oft-neglected color in my craft room: golden yellow! Let’s get started with the details.

*I have gathered links to all of the products used at the bottom of the post for your convenience, using affiliate links. Thank you for shopping with my links! I truly appreciate your support for my work!*

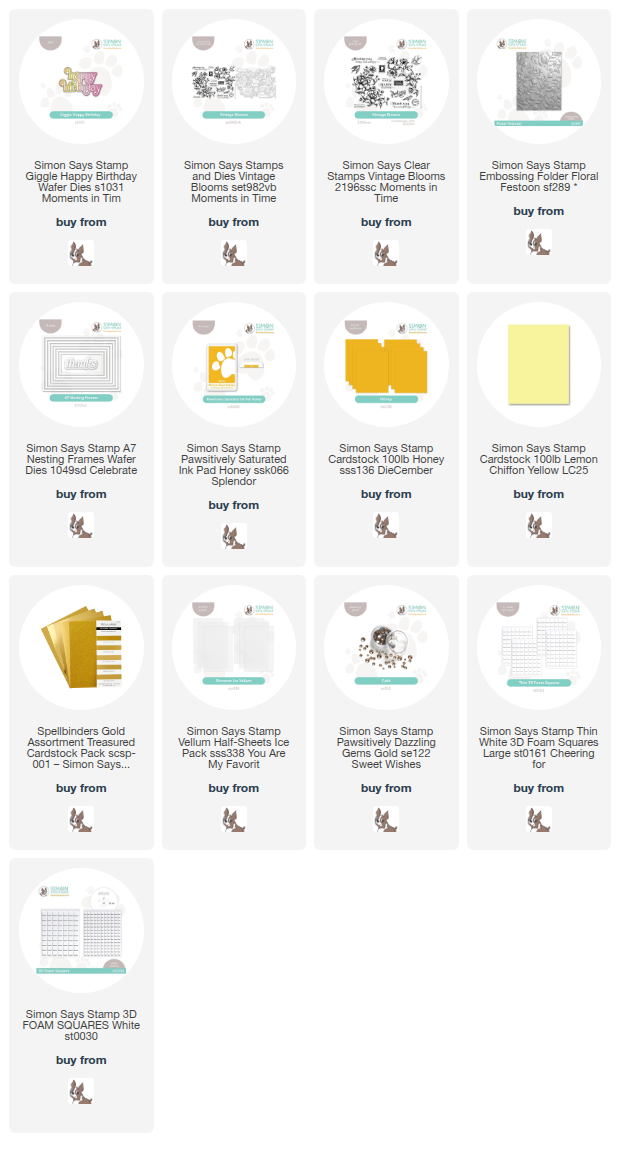
To start, I stamped one of the large bouquets from Vintage Blooms on Simon Says Stamp’s Lemon Chiffon cardstock using Honey Pawsitively Saturated ink. The dark Honey ink on the pale yellow cardstock creates an elegant tone-on-tone effect! I used the coordinating, super detailed die to cut the image out. I love how closely these new dies cut to the stamped image; the resulting die cut is so intricate and professional-looking!

For the background, I ran a panel of Simon Says Stamp Honey cardstock through my die cutting machine using the Floral Festoon Embossing Folder, creating a detailed and beautifully textured background that perfectly matched the deep golden yellow stamped image. I also die cut a set of frames using the A7 Nesting Frames from some pearlescent golden yellow cardstock and adhered it to the textured card front using thin foam adhesive squares.

For the greeting, I die cut the detail layer of the new Giggle Happy Birthday die set from some coordinating deep gold pearlescent cardstock and the shadow layer from some Simon Says Stamp Shimmer Ice Vellum, adhering the two with liquid adhesive. I arranged the stamped floral bouquet around the edges of the die cut frame, adhering the die cut with thick foam adhesive squares, then nestled the die cut sentiment amongst the floral arrangement. For a final sparkling touch, I added a few Gold Pawsitively Dazzling Gems.

Well, that’s all for my project today! I start all of my projects with my color palette, so it was fun stretching my creativity with a unique-to-me color palette. Thanks so much for stopping by today, and have a marvelous day!
Filed Under: simon says stamp Tagged With: A7 nesting frames, birthday card, die cutting, floral festoon, giggle happy birthday, honey, vintage blooms

Simple Happy Easter with New Simon Says Stamp Favorite Things!

March 17, 2025

This post was sponsored by Simon Says Stamp. Thanks, Simon!

Hi friends! I have another sweet Easter project to share with you using some new goodies from the Simon Says Stamp Favorite Things release! With four kids, caring for my mom, two cats, a grumpy old man dog, and a new Bernedoodle puppy (Lord help me with that one), plus remodeling a house…. sometimes a girl just needs a quick refresher with some lightning fast crafty time. This project went lickety split with a few new goodies from Simon Says Stamp, some texture, some pops of sparkling color, and my OLO Markers. Let’s get started with the details!

*I have gathered links to all of the products used at the bottom of the post for your convenience, using affiliate links. Thank you for shopping with my links! I truly appreciate your support for my work!*

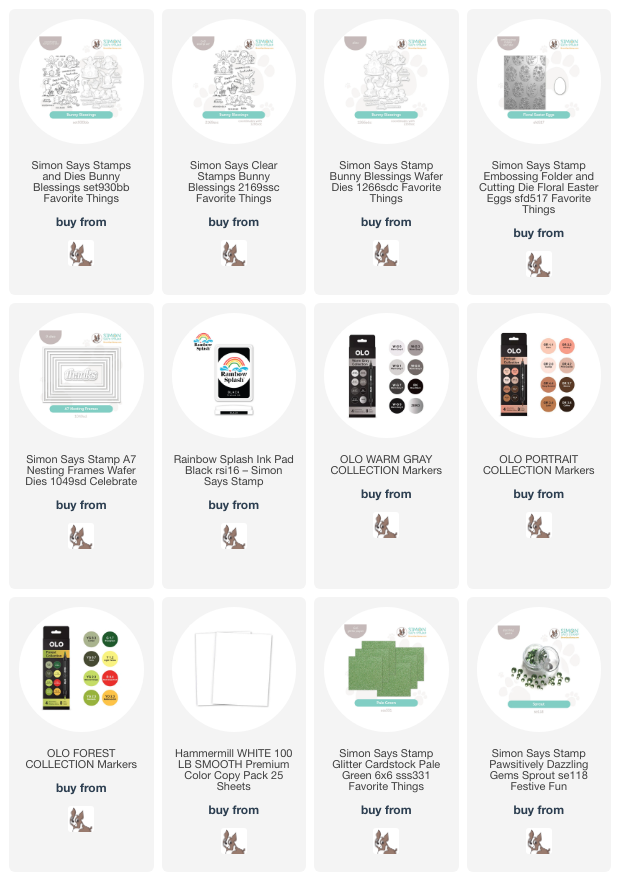
I began by stamping the basket-toting bunny from the new Bunny Blessings stamp set from the Simon Says Stamp Favorite Things release using some alcohol ink-friendly black ink. I used my OLO Markers to add color to the image, keeping the bunny a warm gray and adding pops of color to the carrots, tulip, and polka dotted Easter egg. Once I had finished coloring all of the images, I used their coordinating dies to cut them out, along with a stamped Happy Easter greeting from the stamp set. I can’t tell you how delightful it is to see the level of detail on these coordinating dies. Having a thick white edge around my stamped image drives me a little batty, so these close-cropped die cuts are just perfection, in my opinion!

For the background, I wanted to keep things fairly simple while still adding some fun texture and pattern, so I ran a panel of white cardstock through my die cutting machine using the new Floral Easter Eggs embossing folder. I trimmed the panel down on top and bottom, then allowed strips of the new Pale Green Glitter Cardstock to peek out on the edges, creating a full A2 background upon which I could build my Easter scene.

To add create some visual focus and shrink the size of my canvas to fit the small scene that I’d created, I first placed a white A7 Nesting Frames die cut on my textured background using some foam adhesive. I arranged the stamped and colored die cuts within the frame using more foam adhesive to adhere the pieces to the card front. Finally, I added a smattering of coordinating Sprout Pawsitively Dazzling Gems to add just a touch more sparkle to the project!

Well, that’s all for my project today. When you pair a few colored die cuts with a frame and some background texture, even a seemingly-small scene can become a focal point. Thanks so much for stopping by today, and have a marvelous day!


Filed Under: simon says stamp Tagged With: A7 nesting frames, bunny blessings, copic coloring, die cutting, easter, easter card, floral easter eggs, olo markers

Christmas Card for Guys with Old Fashioned Christmas from Simon Says Stamp!

November 17, 2024

This post was sponsored by Simon Says Stamp. Thanks, Simon!

Hi friends! I am back with another project using one of my illustrations from the Festive Fun release from Simon Says Stamp: Old Fashioned Christmas. I designed this set with my husband in mind; he loves bourbon, and so I wanted to create something that I could use for birthday, anniversary, or Father’s Day cards for him. This set doesn’t have to just be for Christmas, though the sentiments are just too cute for Christmas! I decided to make a super simple and elegant card that would be perfect for that elusive masculine holiday card. What guy wouldn’t love getting a bottle of craft bourbon with a big bow on top as a Christmas gift? Let’s get started with the details on my project!

I began by stamping only the decanter and the bow from my Old Fashioned Christmas set onto some white cardstock using Permanent Gray Mist no-line coloring ink. I then used OLO Markers to color the images, using my colorless blender marker liberally to create the highlights in the shiny glass. For the bow, I saturated the image with red markers and then added some black colored pencil to the areas with the deepest shadows, creating an almost velvety visual texture. If you haven’t tried adding colored pencil to your alcohol marker-colored images, I highly encourage you to try it. I am a recent convert, and that simple step of adding very minimal touch ups with colored pencil makes an immense difference!

After die cutting the finished colored images, I layered them together with some liquid adhesive, placing the festive red bow over the neck of the bottle to make it perfect for gift-giving! I wanted to add another festive holiday accent to the card, so I die cut the A7 Nesting Frame dies from some shimmering Crimson glitter cardstock. I centered one of the frames on my white A2 card front, adhering it with some liquid adhesive, then popped up the finished decanter with some adhesive foam squares for a bit of extra height.

For the greeting, I used one of the sentiments from the Old Fashioned Christmas set, stamping the simple “Cheers to the New Year” sentiment with Simon Says Stamp’s Nocturne black pigment ink and clear embossing over the top to make the sentiment even more crisp. I die cut the greeting with its coordinating die, then popped it up with some more foam adhesive squares and bookended it with a couple of small Black Pawsitively Dazzling Gems for added sparkle.

Well, that’s all for my project today! The simplicity (and subject matter) of this card make it perfect for a masculine holiday card, don’t you think? I think that the detailed coloring take the card up a notch, despite it’s simplicity, making it even more special. This set makes perfect cards for those bourbon- and cocktail-lovers in your life! Thanks so much for stopping by today, and have a marvelous day!

Filed Under: simon says stamp Tagged With: A7 nesting frames, bourbon, christmas card, copic coloring, die cutting, holiday card, no line coloring, old fashioned christmas, olo markers, original illustration

Creating a Baby Card with Old Fashioned Christmas from Simon Says Stamp!

November 9, 2024

This post was sponsored by Simon Says Stamp. Thanks, Simon!

Hi friends! I have another card to share with you using one of my newest illustrations for Simon Says Stamp: Old Fashioned Christmas featured in the Festive Fun release! When I was illustrating this set, I wanted to make sure to include a big, fluffy bow. I love a good multipurpose stamp, and this large bow works so nicely with lots of different themes. I have seen tons of images lately of watercolored bow backgrounds for wallpaper, and so I thought that I would create my own custom patterned paper using only the pretty bow stamp and some Tombow markers. Let’s get started with the details!

*I have linked all of the products used at the bottom of the post using affiliate links for your convenience. Thank you for shopping with my links! I truly appreciate your support for my work!*

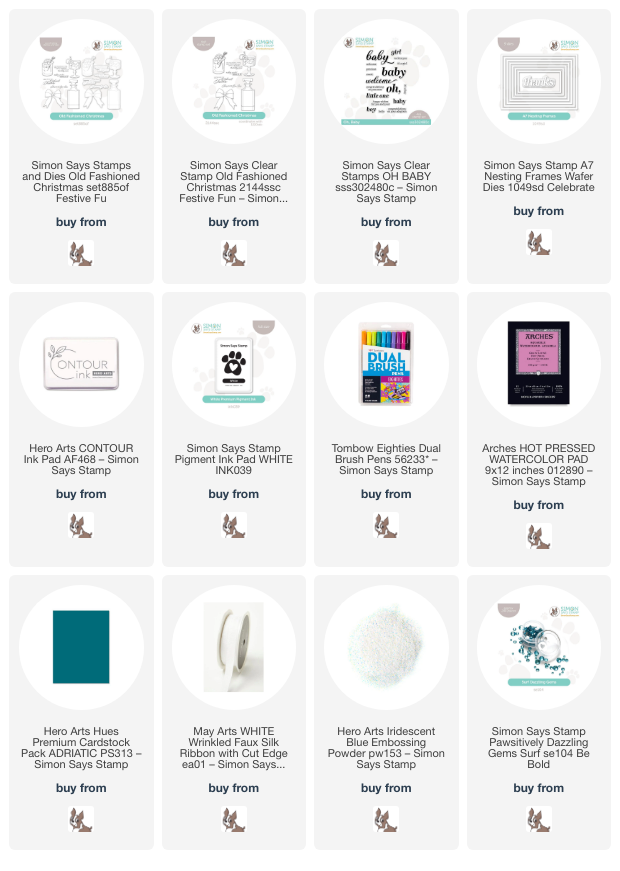
I started by stamping the large bow from Old Fashioned Christmas repeatedly on a panel of Arches Hot Press Paper using Hero Arts Contour Ink. After I had stamped the pattern over the entire panel, I used Tombow watercolor markers to paint the bows. I used two different shades of teal, beginning with one layer of a lighter turquoise and plenty of water to allow for distinct contrast between highlights and shading, then adding a second layer of a darker teal to intensify the shadows. When working with watercolor markers like this, I like to scribble the color out onto my glass work surface and pick it up with a damp paintbrush, apply the color to the image, then clean my brush and use that clean brush to move the color. This allows me more control over the intensity of the color and therefore greater control over the contrasting highlights and shadows.

After I had finished watercoloring, I used the older Oh, Baby stamps and coordinating dies to create the perfect sentiment for my bow patterned paper. I stamped the greetings on deep teal cardstock using white pigment ink from Simon Says Stamp, then added some Iridescent Blue embossing powder from Hero Arts to make it stand out a bit more and add some beautiful shimmer. I die cut the sentiment with the coordinating dies. I love how beautifully they stand out on the patterned background with that dark teal cardstock!

For the card base, I trimmed down the bow panel 1/4″ on each side, then mounted it in the center of a full size A7 panel of the same deep teal cardstock that I used for the sentiment, creating a teal border mat. I used an iridescent white frame cut using the A7 Nesting Frame Dies to frame my offset sentiment, then created a custom super pale aqua bow using some May Arts faux silk ribbon and an alcohol marker. Such fun to create custom colored ribbons that perfectly coordinate with the color palette of the card! A few Surf Pawsitively Dazzling Gems was the final touch of sparkle for this sweet baby card.

Well, that’s all for my project today! I love when I can get tons of different and unexpected uses out of a stamp set, and the bow in my new Old Fashioned Christmas set is sure to become a staple on my desk. I want to pair it with some flowers, for sure! Also-FYI: if you haven’t checked out the Simon Says Stamp blog hop celebrating the new Festive Fun release, you’re missing out. Go to the Simon Says Stamp Blog to see both days or click HERE to see my post from yesterday’s Day 1 hop! Thanks so much for stopping by today, and have a marvelous day!
Filed Under: simon says stamp Tagged With: A7 nesting frames, baby card, contour ink, no line coloring, oh baby, old fashioned christmas, tombow markers, watercolor

Simon Says Stamp Festive Fun Blog Hop-Day 1!

November 8, 2024

This post was sponsored by Simon Says Stamp. Thanks, Simon!

Hi friends! I am hopping along with Simon Says Stamp today to celebrate their new Festive Fun release! You should have arrived here from Amy Rysavy, and your next stop is Debby Hughes. You can also find the full hop list on the Simon Says Stamp Blog. I am always excited for a new release and all of the creative possibilities that it brings, but the opportunity to play with my own illustrations always makes the creative process even more thrilling. I have two new sets that debuted with the Festive Fun release: Old Fashioned Christmas and Poinsettia Swag. I shared some inspiration using the Old Fashioned Christmas in THIS blog post on release night, but I thought I’d share a video for today’s hop using the new Poinsettia Swag set. I am a sucker for a good floral arrangement, and what flower is more iconic for the holidays than the poinsettia? You can watch the video below or click HERE to watch it on YouTube.

*I have linked all of the products used at the bottom of the post using affiliate links for your convenience. Thank you for shopping with my links! I truly appreciate your support for my work!*

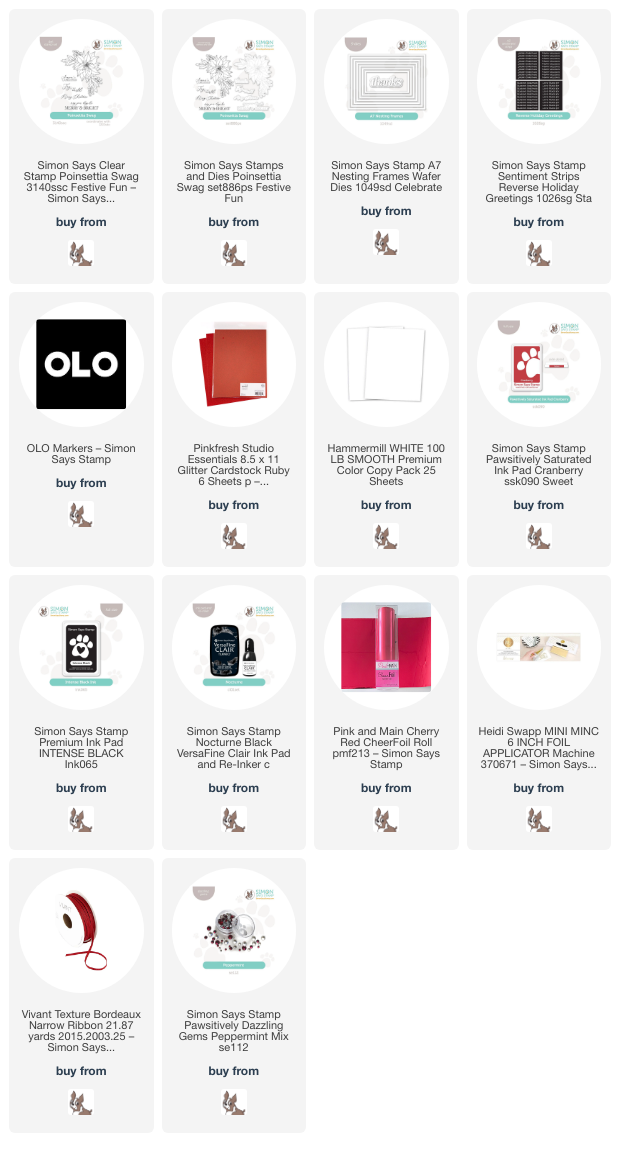
If you can’t watch the video, I’ll give a quick rundown of my process! I began by stamping my new Poinsettia Swag illustration in the corners of an A2 panel of Hammermill cardstock using Simon Says Stamp’s Intense Black Ink, then used OLO markers to add vibrant color to the images in traditional shades of vivid ruby red and jade green. I used the coordinating die to die cut the images, and because they were stamped in the corners of the A2 card front, they each have some straight edges. I didn’t mind the straight edges, because I knew that I wanted to frame them with some glittery cardstock!

To create the background for the vibrant floral arrangements, I wanted to add a very subtle pattern and colorful glow behind the floral die cuts. I used the stamping off method to add some a subtle floral pattern on the edges of my A7 card front, inking up the Poinsettia Swag stamp as normal with Cranberry Pawsitively Saturated Ink, pressing the stamp once onto a piece of scratch paper, then using the residual ink to stamp the image again on the card front. This technique creates a light pattern on the background that does not overpower the colorful floral bouquets. After I had finished stamping, I toned the pattern down even further by adding some tone-on-tone ink blending over the stamped areas.

After I had completed my background, I die cut the A7 Nesting Frames from some gorgeous Ruby Glitter Cardstock from Pinkfresh Studio. I like to leave my frame dies wired together so that I can cut a huge variety of sizes from one pass through my die cut machine! I saved the rest of the frames for a rainy day and adhered one to my stamped and blended background using liquid adhesive. I arranged the poinsettia swag die cuts around the frame, using the straight edges of the frame as a guide for where to place my florals. I popped up the flowers with some thin foam adhesive squares, then added two different greeting components. I stamped, heat embossed, and die cut a greeting from Poinsettia Swag, pairing it with a sentiment from the Reverse Holiday Greetings sentiment card set that I had foiled with some gorgeous red toner foil and my Minc machine. I tucked the greetings amongst the florals with some foam adhesive, then added a festive red bow and some Peppermint Pawsitively Dazzling Gems. Definitely a special card meant for an important person!

Well, that’s all for my project today. Now for some fun giveaway information:

Simon Says Stamp is giving away a $25 coupon to every stop on the hop! The winners will be selected from each blog comment section and posted on the Simon Says Stamp blog on Wednesday the 13th of November. Winners can email Simon Says Stamp to claim his/her prize!!

Simon Says Stamp is also offering a fabulous Free Gift With Purchase. Simply add $100 or more from the Festive Fun release to receive the adorable Cozy Together stamp and die set totally free, added to your cart automatically! What a great gift, right??

Your next stop is Debby Hughes. Thanks so much for stopping by today, and happy hopping!

Filed Under: simon says stamp Tagged With: A7 nesting frames, christmas card, copic coloring, die cutting, giveaway, holiday card, ink blending, olo markers, poinsettia swag, reverse holiday greetings, toner foil

  • Page 1
  • Page 2
  • Go to Next Page »

Primary Sidebar

  • Facebook
  • Instagram
  • Pinterest
  • YouTube

Favorite Shops

Secondary Sidebar

Subscribe

Enter your email address to subscribe to this blog and receive notifications of new posts by email.

Instagram
Something is wrong.
Instagram token error.
Follow
Load More

Archives

Tags

3D embossing folder alcohol markers better press birthday birthday card blog hop card kit christmas christmas card christmas tag colored pencil copic copic coloring Daniel Smith die cutting embossing folder embroidery felt giveaway holiday holiday card hot foil ink blending karin brushmarker pro layered stencil masculine my monthly hero new release no line coloring no line watercolor OLO marker olo markers original illustration pawsitively saturated rainbow shaker card slimline stamping stamptember stencil thank you thinking of you valentine's day video watercolor

Popular Posts

Simon Says Stamp Sending Cheer Blog Hop- Day 2 + Freebie + Giveaway!
Altenew October 2026 Release Blog Hop + Giveaway!
Rustic Monochromatic Stars for Christmas with Rainbow Splash!
March 2020 Essentials By Ellen Blog Hop+Giveaway!
December 2018 My Monthly Hero Blog Hop + Giveaway!
The Ton Stamps Summer Release: Day 1
Waffleflower July Release Blog Hop!
Hero Arts Partners Blog Hop: Lawn Fawn!
Simon Says Stamp STAMPtember Tim Holtz Collaboration: Festive Holidays!
Simon Says Stamp August 2026 Card Kit of the Month: Made to Flourish!

Disclosure

Some affiliate links are used in my posts. This means that, should you click on one of my links and purchase something from that company, I will receive a small portion of the sale at no extra cost to you. I use the money earned from these sales to help maintain my blog. I so appreciate you visiting and, if you do choose to use one of my affiliate links, thank you so much for your support!
Copyright © 2026 ·Brunch Pro Theme · Genesis Framework by StudioPress · WordPress · Log in
Loading Comments...