• Skip to main content
  • Skip to primary sidebar
  • Skip to secondary sidebar

Sixth Street Sundries

Emily Midgett

  • Home
  • About Me
  • Contact
  • OLO Marker Color Swatch Chart
  • Shop

detail bohemian plate

A Special Shaker for a Special Occasion with New Simon Says Stamp!

April 28, 2024

This post was sponsored by Simon Says Stamp. Thanks, Simon!

Hi friends! I am back with another special occasion card featuring new products from the Simon Says Stamp Celebrate release! I absolutely adored the new Daisy Oval Frame die; something about the tremendous impact of these intricate dies always makes them irresistible to me. I love that you not only get the intricate daisy frame itself, but also an additional delicate scalloped frame and extra individual detail dies to customize this fun frame in tons of different ways! I created a celebratory shaker card today using some of my favorite specialty papers, so let’s get started with the details!

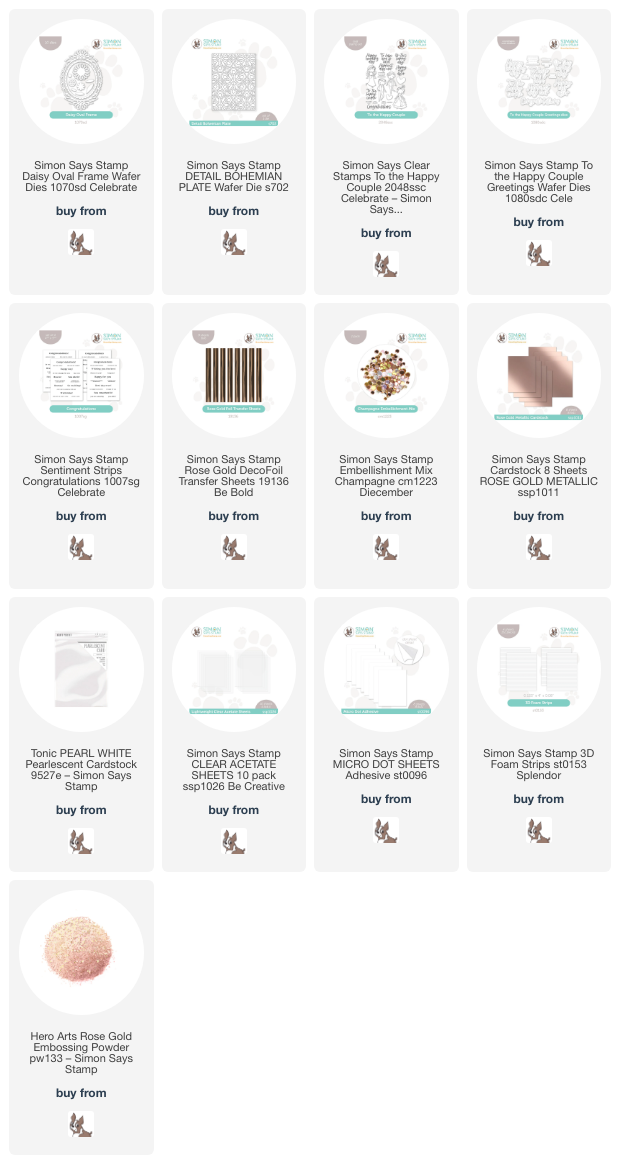
I started my card by die cutting the Daisy Oval Frame die a few times, first from Rose Gold Metallic foil cardstock, then from the center of an A2 panel of pearlescent white cardstock. I reserved that pearlescent white die cut for another project and used the negative frame for this project. I backed that open window on the pearlescent white cardstock piece with some acetate, which will become my shaker window. Because the Daisy Oval Frame die cut is so very delicate, and because I was working with super shiny metallic mirror cardstock and shiny clear acetate, I wanted to keep everything as clean as possible, so I pulled out the Micro Dot Adhesive Sheets from Simon Says Stamp. To use these tiny dots of adhesive, simply remove the release paper from part of your adhesive sheet, place the die cut with the back side touching the adhesive dots, then replace your release paper over the top. I like to flip the entire thing over and then use my bone folder to burnish the back of the die cut to make sure that the adhesive is really stuck on my intricate die cut. Then I flip it back over, remove the release paper, and pull off my new “sticker” die cut. It is so much easier and cleaner to add adhesive to delicate, detailed die cuts than trying to manage globs of glue, especially when dealing with super shiny cardstock!

After I had added adhesive to the back of my daisy frame die cut, I nestled it into the open window of my shaker card front. I flipped the window over and added a long line of continuous foam adhesive around my window using Foam Strips from Simon Says Stamp. To add a bit of texture behind my open shaker window, I ran a panel of white cardstock through my die cut machine using the Detail Bohemian Plate die, which adds a lovely pierced pattern onto your cardstock without actually cutting any shapes. These pierced plates are some of my favorite ways to add texture to my cards! I filled my shaker with some Champagne Sequins, which have lovely shades of metallic sequins that coordinate beautifully with the Rose Gold Metallic foil cardstock.

For the greeting, I heat embossed the Congratulations sentiment from the To the Happy Couple stamps with rose gold embossing powder onto some more white cardstock, then used the coordinating sentiment dies to cut it out. (I love having the option to use dies to cut out sentiments; it makes the stamp set so much more versatile to have dies to cut each piece!) I used some Simon Says Stamp Rose Gold DecoFoil with my Minc machine to add some coordinating shiny rose gold foil to one of the greetings included in the Congratulations toner foil cards. These cards are great on their own, but pairing them with foil just kicks them up a notch and raises the elegance level of the card! I popped up the greeting pieces in the center of the shaker window, leaving plenty of space around the sentiment to see the festive sequins floating about.

Well, that’s all for my project today! This card would work beautifully for a wedding shower or wedding, or even just a congratulatory card for a special occasion! I love multi-purpose sentiments. Thanks so much for stopping by today, and have a marvelous day!
Filed Under: simon says stamp Tagged With: congratulations, congratulations sentiment strips, daisy oval frame, decofoil, detail bohemian plate, sentiment strips, shaker card, to the happy couple, wedding card

Simon Says Stamp Beautiful Days Blog Hop- Day 2!

April 8, 2023

Good morning! Today is Day 2 of the Simon Says Stamp Beautiful Days release blog hop, and I am so excited to be a stop on the hop! You should have arrived here from Amy Rysavy, and your next stop is Maura Hibbitts. You can also start at the beginning at the Simon Says Stamp Blog. The new Beautiful Days collection is filled with gorgeous, springy products, many of which are utterly perfect for creating handmade Mother’s Day cards. Nobody appreciates a handmade card like a momma appreciates a handmade card, right? I am extra excited to have one of my own illustrations included in this release: Mother’s Day Dogwood. I designed this set to feature a simple dogwood branch (which you can see in action HERE) and a detailed dogwood heart, featuring large dogwood blooms, lush foliage, and sweet filler flowers. I also included a wide variety of sentiment-building stamps, so that you can create unique, heartfelt sentiments for your Mother’s Day cards, but they aren’t limited only to Mother’s Day! I have two projects to share with you today using new goodies from the Beautiful Days collection, so let’s get started with the details.

My first card features the large heart illustration in my Mother’s Day Dogwood stamp set. I began by stamping the image on some Hammermill cardstock using Intens-ified Black ink from Hero Arts. After ample drying time to ensure that the ink was set completely, I used OLO markers to add delicate pink, lilac, and turquoise color to the images, also coloring the edge of the die cut a super pale shade of aqua to coordinate with the colorful background. I wanted to keep the color palette light and feminine, and the lovely pale pink dogwoods shine amongst the bright accent images. I die cut the finished image with the coordinating die, which doesn’t just cut the outline, but also the interior of the heart, which I think adds such a polished look.

To accent the detailed image, I wanted to add some subtle texture to the background, but didn’t want to overwhelm the main focal point. Enter the Detail Bohemian Plate! I ran this beautifully pierced background through my machine using some of the new Color Blend Pastel cardstock, using the lovely aqua ombré piece that coordinated beautifully with my dogwood heart wreath. I also die cut another heart wreath from a scrap of vellum, making sure that just the center was intact. I wanted to draw the eye towards the floral wreath and accent it even further, so adding the vellum center softens the pattern behind that center area.

I designed the sentiments in the Mother’s Day Dogwood set to be individual elements that would work together or to complement other stamps and dies. Versatility is important! I paired the “for believing in me” sentiment with the previously-released Bold Thanks die. I die cut it three times from some Pitch Black cardstock and layered them together, creating a dimensional die cut sentiment. I adhered the colorful wreath to the pierced, textured background using foam tape, then added the two sentiment pieces with a double layer of foam tape to add extra height. A few black jewels finished it off and added one last black accent (completing my “rule of three” for black accents!).

My second card features the new Delicate Florals, using it to create a shaker window! I die cut the Delicate Florals from some Simon Says Stamp Rose Gold Metallic cardstock, as well as from a panel of pale blush cardstock, reserving the negative space to create a shaker window by backing the panel with some clear acetate! I added the detailed rose gold die cut over the top of the acetate window, avoiding clumps of glue splurting out the sides of this super delicate die cut by adding Micro Dot Adhesive to the back. I love the textural contrast between the shiny foil die cut and the matte blush background.

For the greeting, I die cut the detail layer of the Simple Mother’s Day from some Pencil Eraser cardstock three times and layered them together. The darker shade of warm pink pops beautifully from the blush cardstock. I filled the shaker portion with some rose gold confetti from Pretty Pink Posh and backed it with some more of the warm pink cardstock to add a little contrast behind the shiny rose gold die cut.

Once I had the shaker card assembled, I added a bit of textural accent to the bouquet with a warm pink twine bow. (This is why I save everything! I bought that twine probably 10 years ago haha, and the color worked perfectly with the overall color scheme of the card!) As an afterthought, I added a super thin rose gold frame, cut using the A2 Thin Frames, around the edge. It helps to frame the images and adds a bit of interest to that wide expanse of open space around the floral focal point.

Well, that’s all for my projects today! To celebrate the new Beautiful Days collection, Simon Says Stamp is offering a Gift With Purchase! Simply use code: BUD at checkout to receive the Flower Garden emboss and cut folder FREE with a purchase of $30 or more!

Simon Says Stamp is also giving away a $25 coupon to every stop on the hop from your blog comment section. Winners will be selected and posted on the Simon Says Stamp blog on Wednesday the 12th of April. Winners can email Simon Says Stamp to claim your prize, so be sure to check out the Simon Says Stamp blog next week to see if you’re the winner!

Your next stop is Maura Hibbitts. Here’s the full hop list:

Simon Says Stamp Blog  

Nina-Marie Trapani

Caly Person

Debby Hughes

Suzy Plantamura

Bibi Cameron

Yana Smakula

Lisa Addesa

Amy Rysavy

Emily Midgett

Maura Hibbitts

Jean Doeringsfeld

Thanks so much for stopping by today, and happy hopping!

Filed Under: simon says stamp Tagged With: A2 thin frames, bold thanks, delicate florals, detail bohemian plate, mother's day, mother's day dogwood, OLO marker, pastel color blend, rose gold metallic cardstock, shaker card, simple mother's day, thank you

Primary Sidebar

  • Facebook
  • Instagram
  • Pinterest
  • YouTube

Favorite Shops

Secondary Sidebar

Subscribe

Enter your email address to subscribe to this blog and receive notifications of new posts by email.

Instagram
Something is wrong.
Instagram token error.
Follow
Load More

Archives

Tags

3D embossing folder alcohol markers better press birthday birthday card blog hop card kit christmas christmas card christmas tag colored pencil copic copic coloring Daniel Smith die cutting embossing folder embroidery felt giveaway holiday holiday card hot foil ink blending karin brushmarker pro layered stencil masculine my monthly hero new release no line coloring no line watercolor OLO marker olo markers original illustration pawsitively saturated rainbow shaker card slimline stamping stamptember stencil thank you thinking of you valentine's day video watercolor

Popular Posts

Simon Says Stamp Joy For You Blog Hop- Day 1!
Simon Says Stamp Joy For You Release-Now Available!
Frozen Fractals All Around with New Simon Says Stamp Joy For You Release!
Shaped Holiday Shaker Card with New Simon Says Stamp Jolly Season Card Kit of the Month!
Holiday Postage with New Simon Says Stamp!
Simon Says Stamp Glory to the Newborn King Holiday Kit-Part II!
Altenew Build A Flower: Fuchsia Blog Hop+Giveway!
Holiday Joy in Pink and Green with New Simon Says Stamp DieCember!
Pinkfresh Studio 5th Birthday!
Honey Bee Stamps September Release Blog Hop!

Disclosure

Some affiliate links are used in my posts. This means that, should you click on one of my links and purchase something from that company, I will receive a small portion of the sale at no extra cost to you. I use the money earned from these sales to help maintain my blog. I so appreciate you visiting and, if you do choose to use one of my affiliate links, thank you so much for your support!
Copyright © 2026 ·Brunch Pro Theme · Genesis Framework by StudioPress · WordPress · Log in
Loading Comments...