• Skip to main content
  • Skip to primary sidebar
  • Skip to secondary sidebar

Sixth Street Sundries

Emily Midgett

  • Home
  • About Me
  • Contact
  • OLO Marker Color Swatch Chart
  • Shop

rustic sprigs

Simon Says Stamp Happy Camper Release Blog Hop-Day 2!

August 2, 2025

This post was sponsored by Simon Says Stamp. Thanks, Simon!

Hi friends! I am hopping along with Simon Says Stamp to share some inspiration using the new Happy Camper release. You should have arrived here from Lisa Addesa, and your next stop is Heather Ruwe. You can also start at the beginning at the Simon Says Stamp Blog! I was so inspired by my Christmas in July series from last month that I couldn’t resist adding some festive flair to my card for today’s hop, pulling in an ombré holiday color palette to work perfectly with the new Dual Diamonds Cover Plate. Let’s get started on the details of my project!

*I have gathered links to all of the products used at the bottom of the post for your convenience, using affiliate links. Thank you for shopping with my links! I truly appreciate your support for my work!*

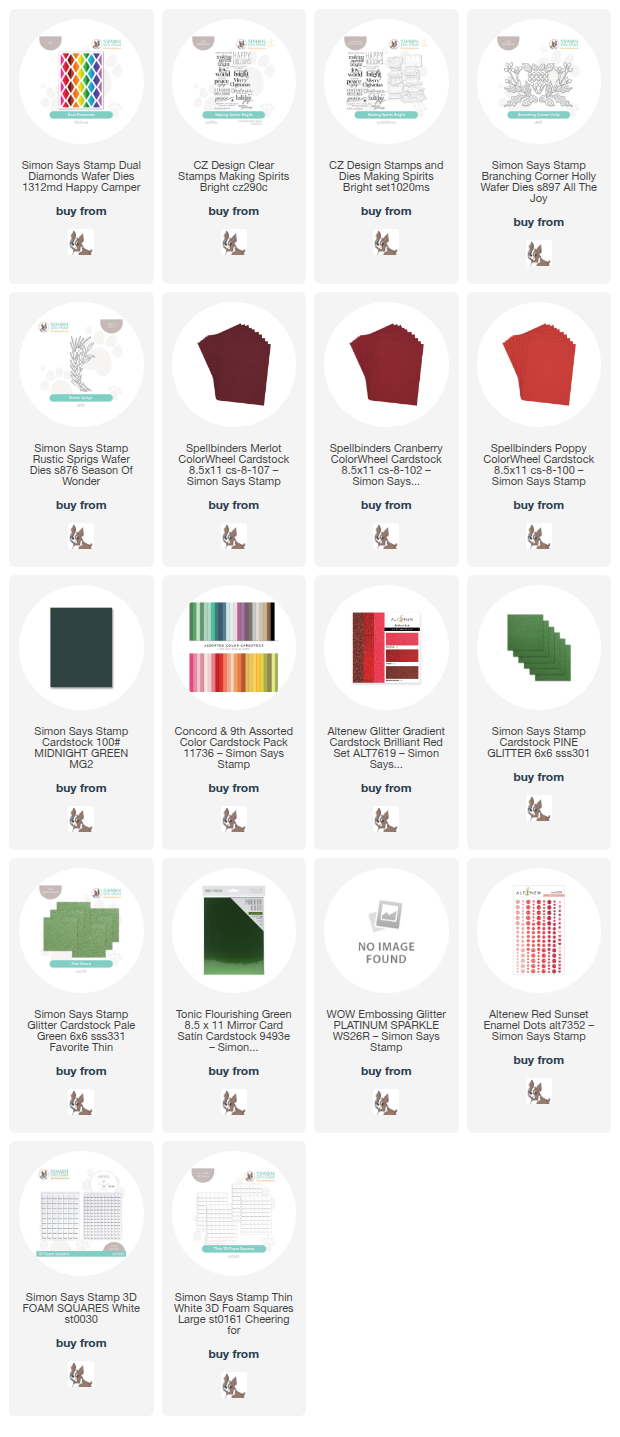
To begin, I selected sixteen (yes, sixteen!!) different shades of red and green cardstock to create my ombré color palette, bridging the gap between the complementary colors with a deep maroon glitter cardstock and equally intense Midnight Green cardstock, which I think work so nicely next to one another! I pulled out my scrap envelopes, which I have organized by color family, and selected strips about 1/2″ wide, working from a light coral-red to vibrant peridot green. I first die cut the black diamond outlines from the Dual Diamonds Cover Plate and adhered it to my card front, then die cut the individual strips of colored cardstock with the cover plate, adhering each row to the card base as I went to make sure that none of the pieces were lost. This definitely was a bit fiddly and required me to pay strict attention to my project, but I think it was totally worth it in the end!

I selected a holiday color palette so that I had an excuse to use the marvelous new Making Spirits Bright sentiment set. These sentiments are absolute perfection; the font pairings and generous size of the sentiments, as well as the delicate sentiment strips, make this set so versatile and useful for holiday cards! I heat embossed the two greetings on some deep wine cardstock using Platinum Sparkle embossing powder, then used the coordinating die cut and my trimmer to cut the sentiments out. I popped them up on the ombré card front with some foam adhesive, staggering them slightly.

To accent my sentiment focal point, I die cut the older Branching Corner Holly and Rustic Sprigs dies from some green cardstock, the same green that I used on two of the ombré strips. I adhered them to the card front with liquid and foam adhesive, creating a holiday foliage “bouquet” around my sentiment. I accented the greenery with some red enamel dots for berries, adding another element of texture and dimension to the card.

Well, that’s all for my project today! Now for some fun giveaway information:

Simon Says Stamp is giving away a $25 coupon to every stop on the hop from each blog’s comment section. Winners will be selected and posted on the Simon Says Stamp blog on Wednesday the 6th of August. Winners can email us to claim his/her prize! The more comments you leave along the hop, the more chances you have to win!

Simon Says Stamp is also offering a fabulous freebie with each purchase from the new Happy Camper release! You don’t need to do anything special; the lovely (and not-yet-released) Sunflower Dance stamp set will be automatically added to your order with any purchase from the Happy Camper release. Click HERE to see the entire release!

Don’t forget to check out Day 1 of this two-day blog hop for even more inspiration and prizes! Click HERE to start at the beginning on the Simon Says Stamp Blog.

Your next stop on the hop is Heather Ruwe. Thanks so much for stopping by today, and happy hopping!
Filed Under: simon says stamp Tagged With: branching corner holly, christmas, christmas card, die cutting, dual diamonds, holiday, holiday card, rustic sprigs

Rich Red Ink Blending with New Simon Says Stamp Pawsitively Saturated Inks!

October 25, 2024

This post was sponsored by Simon Says Stamp. Thanks, Simon!

Hi friends! The new Sweet Wishes release from Simon Says Stamp contains a gorgeous new ink trio of luscious, vibrant reds that I used as the inspiration point for my projects today. I always love new ink colors, as color is frequently the first element that I decide when mentally designing my project, and these vibrant, cool reds are absolutely perfect for the holiday season. I used two different techniques with the same embossing folder for today’s projects, so let’s get started with the details!

*I have linked all of the products used at the bottom of the post for your convenience using affiliate links. Thank you for shopping with my links! I truly appreciate your support for my work!*

For both of my projects today, I put the new Ink Trio 30 to use with the beautifully intricate new Poinsettia Field Embossing Folder. The 3D embossing folders from Simon Says Stamp are amongst my most favorite products from every release, because there are so many ways to use them, and so many mediums with which to pair them. I’ve used two different techniques for my projects today, creating two completely different looks with almost identical supplies.

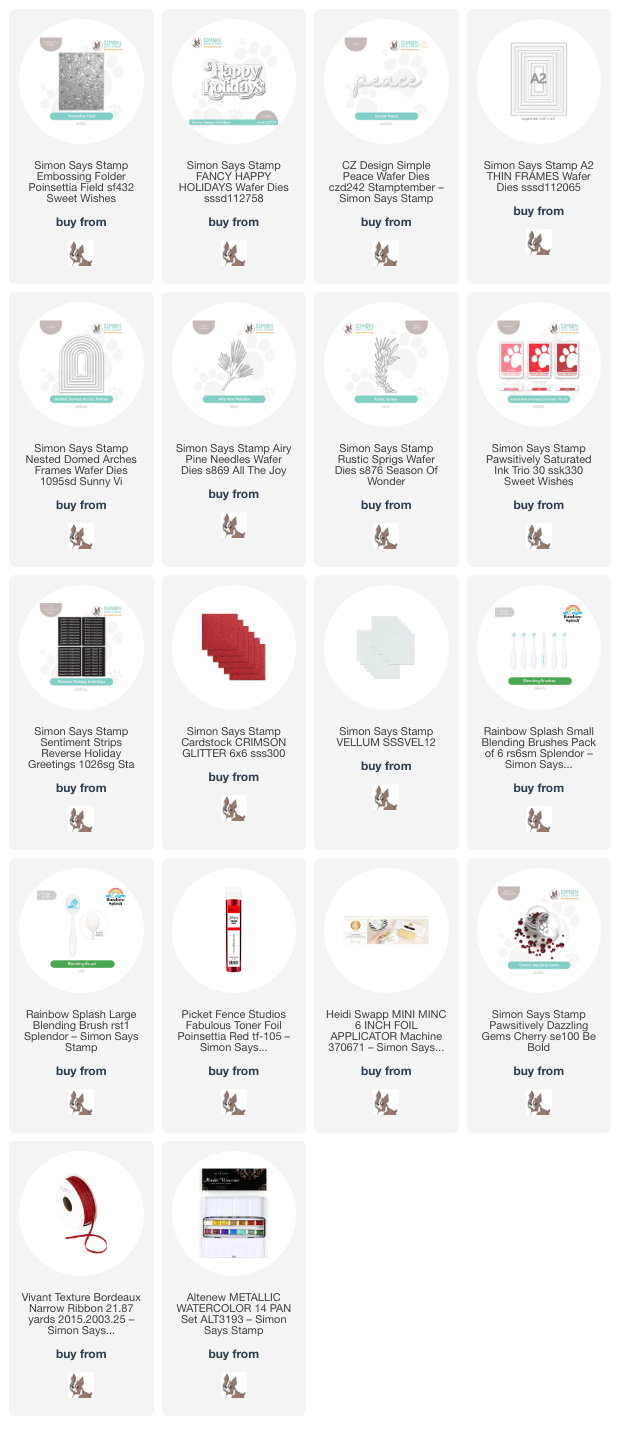
For my first project, I ran a panel of white cardstock through my die cutting machine using the new Poinsettia Field Embossing Folder. To add color to the panel, I flipped the embossed image over to reveal the debossed background, with the images impressed into the cardstock rather than popped up. I then used small blending brushes to blend the two lighter inks in the new Ink Trio 30 in the center of each flower, blending the lightest over most of each flower and enhancing the center of each flower with a small amount of the middle shade from the trio. After I had finished blending on each flower (which sounds time consuming, but actually went quite quickly!), I swiped the darkest shade from the Ink Trio 30 over the raised areas, putting the ink pad directly onto the cardstock, which enhances the pattern and creates such unique texture! I blended that same deeper red around the edges, creating a halo, and splattered the entire panel with metallic red watercolor.

After I had finished creating the background, I die cut a frame from some glittery red cardstock using the Nested Domed Arches Frames and adhered it to the card front using liquid adhesive. I used the same glittery red cardstock to die cut the detail layer of the Fancy Happy Holidays die set and added a vellum shadow behind it. To enhance the sentiment, I die cut some foliage using the Airy Pine Needles die and Rustic Sprigs die, tucking the monochromatic die cuts behind the sparkling dimensional sentiment. Finally, I added a few Cherry Pawsitively Dazzling Gems for added sparkle!

For my second card, I did some simple ink blending using the new Ink Trio 30, using blending brushes to blend a smooth ombré horizontally across a white A2 card front. After ink blending, I made sure that the cardstock was completely dry with my heat tool and ran the panel through my die cutting machine with the Poinsettia Field Embossing Folder. The color saturated panel enhances the incredibly detailed background so beautifully, adding texture and pattern to the panel.

After I had finished the background, I die cut another glittering frame, this time using the A2 Thin Frames and the same Crimson glitter cardstock from Simon Says Stamp. I adhered the frame around the edges of the blended, embossed background. The frames help to draw the eye towards the focal point in the center of the card, as well as add texture to the monochromatic card. I die cut the detail layer of the Simple Peace die from some coordinating red cardstock and the shadow layer from more red glitter cardstock, adhering the two layers together with liquid adhesive. I popped the sentiment die cut up with some foam adhesive squares, then tucked a sentiment strip from the Reverse Holiday Greetings sentiment card set, to which I had added some red toner foil using my Minc machine. To accent the sentiment pieces and add a bit more botanical softness to the card, I die cut a deep red Airy Pine Needles sprig and tucked it beneath the sentiment pieces. Finally, I added a Bordeaux ribbon bow and some shimmering gems.

Well, that’s all for my projects today! Each of these cards is so different while still being exactly the same color palette. It’s amazing what a difference technique makes for the color saturation with these embossing folders! Thanks so much for stopping by today, and have a marvelous day!

Filed Under: simon says stamp Tagged With: A2 thin frames, airy pine needles, christmas card, die cutting, fancy happy holidays, holiday card, ink blending, ink swiping, minc, nested domed arches frames, pawsitively saturated, poinsettia field, reverse holiday greetings, rustic sprigs, simple peace, toner foil

Primary Sidebar

  • Facebook
  • Instagram
  • Pinterest
  • YouTube

Favorite Shops

Secondary Sidebar

Subscribe

Enter your email address to subscribe to this blog and receive notifications of new posts by email.

Instagram
Something is wrong.
Instagram token error.
Follow
Load More

Archives

Tags

3D embossing folder alcohol markers better press birthday birthday card blog hop card kit christmas christmas card christmas tag colored pencil copic copic coloring Daniel Smith die cutting embossing folder embroidery felt giveaway holiday holiday card hot foil ink blending karin brushmarker pro layered stencil masculine my monthly hero new release no line coloring no line watercolor OLO marker olo markers original illustration pawsitively saturated rainbow shaker card slimline stamping stamptember stencil thank you thinking of you valentine's day video watercolor

Popular Posts

Simon Says Stamp Sending Cheer Blog Hop- Day 2 + Freebie + Giveaway!
Joyful Snowman with New Simon Says Stamp Sending Cheer Release!
Simon Says Stamp Sending Cheer Release: Now Available!
Altenew October 2026 Release Blog Hop + Giveaway!
Special Release: Simon Says Stamp Limited Edition STAMPtember Christmas Card Kit!
February 2018 My Monthly Hero Blog Hop!
Altenew March 2020 Release Blog Hop+Giveaway!
Simon Says Stamp Cozy & Bright Inspiration, Part Two!
Essentials By Ellen September Blog Hop!
Waffleflower December Release Blog Hop!

Disclosure

Some affiliate links are used in my posts. This means that, should you click on one of my links and purchase something from that company, I will receive a small portion of the sale at no extra cost to you. I use the money earned from these sales to help maintain my blog. I so appreciate you visiting and, if you do choose to use one of my affiliate links, thank you so much for your support!
Copyright © 2026 ·Brunch Pro Theme · Genesis Framework by StudioPress · WordPress · Log in
Loading Comments...