• Skip to main content
  • Skip to primary sidebar
  • Skip to secondary sidebar

Sixth Street Sundries

Emily Midgett

  • Home
  • About Me
  • Contact
  • OLO Marker Color Swatch Chart
  • Shop

glimmer hot foil

VIDEO: Better Press Plates Used for More than Just Letterpress!

January 24, 2024

Hi friends! I am up on the Pinkfresh Studio YouTube channel using one of my new illustrations for Pinkfresh Studio’s Better Press Plate line: Beautiful Roses! I used the plate to create this card without inking it up at all. Watch below or check it out HERE on YouTube!

One of my favorite attributes of the Better Press system and plates is that they don’t just have to be used for the letter press technique. Not only do they imprint gloriously detailed images into your paper, but they also can be used for hot foiling and adding delicious texture to your letter press paper. In today’s video, I use my new Beautiful Roses Press Plate illustration from Pinkfresh Studio (PFS | SSS) to both deboss a floral background pattern and hot foil the detailed floral image onto some super smooth vellum. Let’s get started with the details!

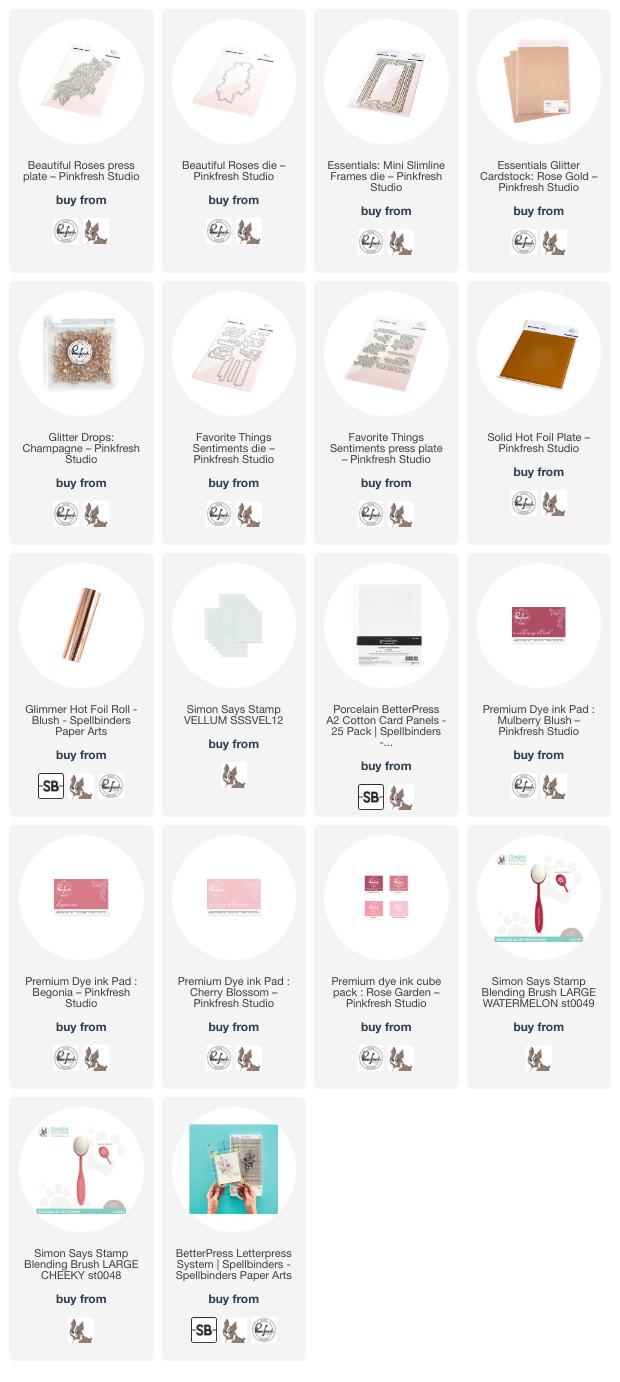
To start, I hot foiled the Beautiful Roses Press Plate (PFS | SSS) onto some vellum from Simon Says Stamp using the Glimmer Hot Foil machine from Spellbinders (SB | SSS | PFS). I have had good luck using delicate images on this super smooth vellum, and the Blush foil from Spellbinders (PFS | SSS | SB) worked beautifully with the Beautiful Roses plate! After hot foiling, I die cut the image using the coordinating die (PFS | SSS).

Next, I used the Beautiful Roses Press Plate (PFS | SSS) without ink to create this textured, debossed pattern on the background of my Porcelain Better Press paper (SB | SSS). Using the grid guides on the magnetic plate and clear platen from the Better Press system (SB | SSS), I was able to arrange the Beautiful Roses Press Plate (PFS | SSS) around the edge of my A2 panel of Porcelain Better Press paper (SB | SSS), rotating it to make the pattern as cohesive and natural as possible. In the video, I also show how I took advantage of the magnetic attributes of the system to ensure perfect placement on my paper! Debossing the pattern into the paper creates a beautifully subtle texture, which I enhanced by blending Cherry Blossom, Begonia, and Mulberry Blush inks using blending brushes. The ink concentrates in the debossed lines, making the pattern pop a bit from the background. After I had finished blending, I splattered the entire panel with some rose gold glitter watercolors.

To ground my foiled vellum image, I die cut the smaller Mini Slimline Frame (PFS | SSS) using Rose Gold Glitter Cardstock (PFS | SSS). This pinky metallic gold glitter paper coordinates beautifully with the Blush foil! I popped up the frame with foam adhesive, offsetting it to the left and trimming off the excess. For the greeting, I hot foiled a few sentiments from the Favorite Things Sentiments Press Plates (PFS | SSS) set using more Blush foil, then hot foiled the leftover negative images with the Solid Hot Foil Plate (PFS | SSS). I die cut the greetings with the Coordinating Dies (PFS | SSS), then adhered the solid die cut to the transparent vellum, flipping it over to add foam adhesive behind the solid die cut so as to keep the vellum clean of unsightly adhesive. I added a melon twine bow and some Champagne Glitter Drops (PFS | SSS) for extra sparkle and texture!

Well, that’s all for my project today! I love experimenting with the Better Press plates and machine. It’s such fun to find new ways to get more uses out of your supplies, and it’s so surreal to see and use my own illustrations as a Press Plate! Thanks so much for stopping by today, and have a marvelous day.
Filed Under: pinkfresh studio Tagged With: beautiful roses, better press, favorite things, glimmer hot foil, letterpress, original illustration

Foil and Better Press with New Flower Stems from Pressed Posies by Spellbinders!

January 18, 2024

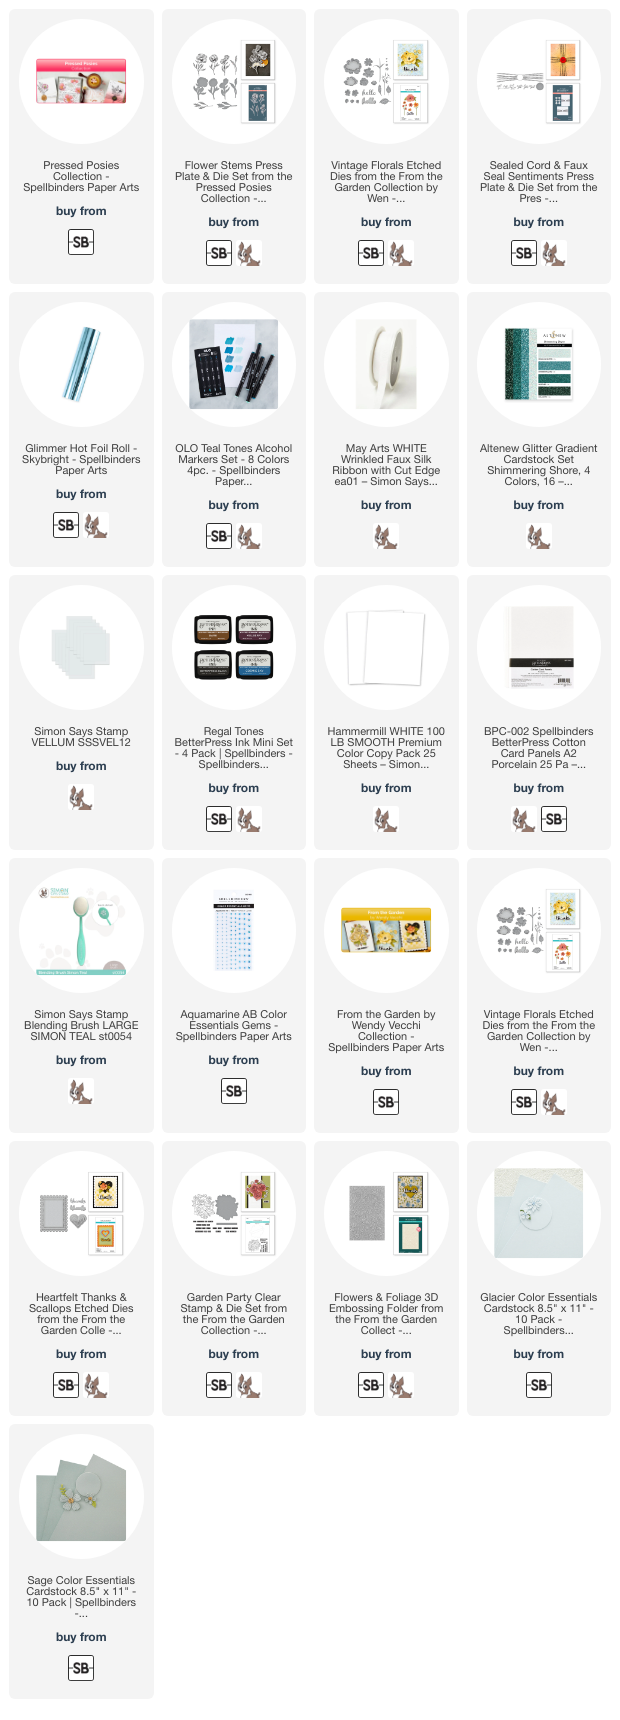
Hi friends! I have a serene project to share with you today using some of the new goodies from the new Spellbinders Pressed Posies Collection. You probably know of my flower obsession by this point, and adding Better Press plates and the marvelous techniques they bring into the my repertoire has been such a joy! Spellbinders generously sent the Flower Stems Better Press Plates + Coordinating Dies (SB | SSS) for me to play with, and I am absolutely in love with these delicate, feminine floral images. Let’s get started with the details on my project!

One of my favorite properties of the Better Press plates is their versatility; you can use them for both letter press and foiling techniques. I’ve combined both of these techniques to create this delicate, super textured card today!

To start, I used the delicate, detailed images from the Flower Stems Better Press Plates + Coordinating Dies (SB | SSS) without ink to emboss a floral pattern around the edge of my Porcelain Better Press A2 Panels (SB | SSS). Using these plates on their own creates the loveliest, subtle texture, and the exceptional detail and fine lines on the Flower Stems Better Press Plates (SB | SSS) picks up beautifully on the super thick letterpress paper.

After I had pressed the floral pattern into the paper, I used Blending Brushes to blend Mist, Dew, Raindrop Pawsitively Saturated Ink from Simon Says Stamp around the edges of the cardstock starting with the lightest shade, gradually decreasing how close I went to the center of the card front with each subsequent color. The debossed pattern on the letterpress panel picks up the ink, making it more concentrated in those debossed lines and allowing the pattern to be more visible. For an extra touch of shimmer, I splattered the blended background with some handmade, sparkling glitter watercolors.

After I had created my background, I used Skybright Glimmer Hot Foil (SB | SSS) to hot foil a few of the images from Flower Stems Better Press Plates (SB | SSS) onto Hammermill white cardstock. I used the coordinating dies to cut them out, then used my OLO Markers (SB | SSS) in lovely coordinating shades of aqua to add some subtle color to the foiled images. Alcohol marker coloring on hot foiled images is such a fun way to get more mileage out of your hot foil and Better Press plates! I also used one of the OLO markers to add some deep teal to a length of faux silk ribbon, which I used to “tie” my bouquet of flowers and foliage.

After I popped up my colored bouquet with foam adhesive, I die cut the “hello” using one of the Vintage Florals dies (SB | SSS), cutting the detail layer from turquoise glitter paper and the shadow layer from vellum. I also used one of the Better Press sentiments from the Sealed Cord and Faux Seal Sentiments Press Plate + Coordinating Die (SB | SSS) set, pressing the greeting with Cosmic Sky Better Press ink (SB | SSS) onto Porcelain Better Press paper (SB | SSS). I tucked the greeting pieces amongst the hot foiled floral arrangement and adhered them with foam adhesive. The final touch was to add a few Aquamarine Gems for sparkle!

Well, that’s all for my project today! Have you jumped on the Better Press bandwagon? The plates are so versatile, and even if you don’t have a Better Press System (what are you waiting for?), you can still use the plates with your hot foil machine!

Just FYI: I was honored to be invited to be a guest designer over on the Spellbinders blog last week using the new From the Garden Collection designed by Wendy Vecchi. Here’s a sneak peek of one of my projects:

This project is just one of three projects in a coordinating card set. I hope you’ll stop by and take a look!! Click HERE to see the post.

Thanks so much for stopping by today, and have a marvelous day!

Filed Under: spellbinders Tagged With: better press, flower stems, flowers & foliage 3D embossing folder, garden party, glimmer hot foil, heartfelt thanks & scallops, olo markers, pressed posies, sealed cord & faux seal sentiments, vintage florals

Using Foil Leftovers with Spellbinders Solid Shaped Hot Foil!

November 30, 2022

Hi there! Today, I have a couple of projects for you using some beautiful new products from Spellbinders’s November Release. I will admit, sometimes the amount of waste that can be created with this hobby hurts my heart thinking of how quickly my trash can (and subsequently, the landfill) can be filled. It helps to alleviate my guilt a tiny bit when I am able to get double duty from products, like using tiny scraps of colored cardstock for those tiny layering dies, saving the interior die cuts from die cut frames, and…. using a solid hot foil plate with my hot foil scraps! Spellbinders has released several super useful shaped solid hot foil plates, which are great on their own, but also work so beautifully with your foil scraps to get double duty and make that little scrap of plastic waste from your original hot foiled piece go an extra step further! I have two cards to share with you today, using the original hot foiled image and the negative. Let’s get started with the details!

The main focal points for my projects today started with some Champagne Hot Foil and the Glimmering Just For You hot foil plate and die. (I love that this hot foil plate comes with the coordinating die-makes things so easy!) I hot foiled that beautiful floral swag from Glimmering Just For You onto some Hammermill white cardstock. I find that detailed images hot foil superbly on this super smooth cardstock, and it also works a treat with your OLO markers!

After hot foiling this beautiful peony swag from the Glimmering Just For You set and die cutting it using the coordinating die, I used several pinks and some lime green OLO markers (use my link to receive 10% off your OLO marker order!) to add lots of vibrant color to the image. The combination of the vibrant marker coloring and the super shiny hot foil make this such a striking image!

The size of the peony image worked beautifully for a mini-slimline card, so I used the Mini Slimline Precision Layering dies to create a super thin and delicate frame. I used the rubber embossing mat from the Universal Plate System with the Dazzling Diamonds Hot Foil Plate to add some beautiful texture to the interior die cut. I popped both the frame and the embossed center piece up on a mini-slimline (3.5″x6″) card front using some thin foam tape.

For the greeting, I wanted something simple and classy so that the focus was entirely on that vibrant floral swag, so I die cut the large sentiment (which appears to be discontinued, but you can still find it HERE at Simon Says Stamp) once from some glittery white cardstock and twice from some plain white cardstock to add extra stability. I adhered the floral swag with a double layer of foam tape for extra height and added the dimensional die cut greeting, finally adding a few iridescsent white gems for one last touch of sparkle!

For this second card, I paired the leftover floral panel from the Glimmering Just For You project with the Glimmer Essential Solid Heart to do some “reverse foiling.” I placed the heart in the center of my white A2 card front, and when I pulled back the hot foil piece I was left with this beautiful patterned heart!

I decided to continue with the bright bubblegum pink-and-champagne color scheme, so I paired the Sealed Bouquet dies with Fruit Punch, Pink Sand, and Fern cardstocks with some pops of super hot pink for the berries (one of those tiny cardstock scraps I mentioned earlier to get extra mileage from my colored cardstock and reduce waste!). I adhered them all together using tiny dots of liquid adhesive. I recently purchased the Spellbinders Reverse Tweezers, and I have to say… I’m in love. They are so handy for assembling tiny die cuts like these! I am going to purchase another pair as soon as I’m done writing this post just so that I have a backup!

I arranged the flowers into a Valentine’s Day bouquet, wrapping the stems with some champagne colored twine and tying a fat bow. I adhered the bouquet to the card front with foam adhesive, allowing the shiny patterned-foil heart to peek out from behind, then added another white glitter greeting from the Notecard Sentiments die set. A trio of sparkling iridescent white gems helped to finish it off!

Well, that’s all for my projects today! The November release is full of beautiful new products-including that Pastel Satin variety pack of hot foil rolls. I hope you’ll go take a peek! And if you’re still shopping for Cyber Monday, those deals end at midnight tonight, so don’t miss out. 😉 Thanks so much for stopping by today, and have a marvelous day!

Filed Under: OLO markers, spellbinders Tagged With: glimmer hot foil, glimmer solid heart, glimmering just for you, mini slimline, olo markers, reverse foiling, valentine's day

Non-Traditional Holiday Colors with New Honey Bee Stamps Make It Merry!

October 27, 2022

Hi there! I’m back again today with another pair of projects featuring some of the beautiful new products from the Honey Bee Stamps Make It Merry release! While my projects yesterday felt fairly traditional, today’s projects change up the color schemes a bit, with lots of neutrals, metallics, and a pop of muted pink. I love traditional color schemes for holiday cards, but I love unique holiday color palettes just as much. The beautiful new products lend themselves so well to both!

I have two projects today, both of which feature the gorgeous Lovely Layers Winter Greenery to help accent the focal points on the cards. I also used more greetings from the Foil Script: Holiday Hot Foil Plate and Dies. I like to sit down with my foil machine and foil lots of greetings in different shades of foil and on different colors of cardstock so that I have tons of options when I start creating. Let’s get started with the details!

For my first card, I started by creating the finch from the sweet little birds in the Lovely Layers Winter Birds Honey Cuts set. I kept the colors traditional, with creamy and crisp white, grays, and black. It was super simple to put together! I also matched the shades of gray to the warm gray foil that I used for the greeting, foiled using the Foil Script: Holiday Hot Foil Plate and Dies, the Pinkfresh Studio Solid Hot Foil Plate, and some matte pewter foil. I used those two elements as the basis for the rest of my color scheme!

Because I wanted to create a little scene with the fairly large Bird House A2 Card Base Honey Cuts, I cut a 5×7 card front from some plain white cardstock, then masked the edges to create a 1″ white frame around the edge. This 4×6 inch opening created the perfect space for the Nordic Winter Stencil. Using a blending brush, I blended some medium gray ink over the stencil to create the subtle pattern, then removed the stencil and lightly blended around the edge of the opening with the same shade of gray to create a framed area to ground the rest of my images. I find that creating a smaller blended area as a focal point on my card fronts helps to keep the large clean card front from being intimidating when building a scene!

I created a little bird house using similar colors from the Bird House A2 Card Base Honey Cuts, adding a little pop of pale blush pink to the scallops on the roof. I die cut a few elements from the Lovely Layers Winter Greenery, with super dark green pine boughs and some muted melon pink berries. The foliage is the perfect spot to rest my little bird! I adhered the bird house using foam adhesive, then arranged my foliage and berries beneath it, finally nestling my little finch on top and adhering with another layer of foam adhesive to create lots of height and dimension.

I popped up the greeting from the Foil Script: Holiday Hot Foil Plate and Dies and added a heat embossed sentiment strip using a greeting from Bitty Buzzwords: Holiday, both with a double layer of foam tape. Finally, I accented the project with a few sparkling Winter Wonder Gem Stickers! Lots of dimension in this card. Definitely saving this for a super special friend!

My second project uses the same blush pink cardstock that I used in the first project as an accent, but this time it’s the focal point! I had creating some greetings using the Foil Script: Holiday Hot Foil Plate and Dies on this blush pink cardstock using some matte rose gold foil and decided to use that as my starting point for the color scheme for this card.

I die cut the layers from the Lovely Layers: Anemone from the blush cardstock, then used some slightly darker pink ink to lightly blend around the edges and add a bit of extra dimension to the die cuts. I adhered them all together, adding a black and gray center, using liquid adheisve. I also die cut several elements from the Lovely Layers Winter Greenery in a few shades of deep green, as well as some more of the muted melon colored berries, the shade of which coordinated beautifully with the ink on the edge of the anemone.

For the card base, I ran the Winter Gems Cover Plate through my die cut machine with some crisp white cardstock. I love the subtle texture that this cover plate adds to the background; I can’t wait to try this plate with hot foil! I adhered a glittery rose gold frame cut from the Sentiment Frames Honey Cuts die set in the bottom corner of the debossed card front, then arranged my holiday flora in a swag, adhering the components with liquid and dimensional foam adhesive for tons of dimension. I added the foiled blush and gold greeting with a double layer of foam tape, then finished the project with a few iridescent hunter green gems from the Make It Merry Sticker Gem set.

Well, that’s all for these projects. These non-traditional color schemes are some of my favorites, but the images themselves are undeniably holiday! Thanks so much for reading today, and have a marvelous day!

Filed Under: Honey Bee Stamps Tagged With: bird house, bitty buzzwords, christmas card, die cutting, floral, glimmer hot foil, holiday card, hot foil, lovely layers anemone, lovely layers winter birds, lovely layers winter greenery, nordic winter, stencil, winter gems

Simon Says Stamp Yay You Release!

May 10, 2022

Hi there! My friends over at Simon Says Stamp are releasing a brand new collection of products tonight, and I was lucky enough to get to play with them last week! The new Yay You collection has a wide variety of products and styles, but I particularly fell in love with several of the new hot foil plates. I have a card to share with you featuring one these gorgeous new floral hot foil plates, so let’s get started with the details!

My first project features the absolutely stunning new Sketched Peony Blossom Hot Foil Plate + Die. I love that these hot foil plates come bundled with the coordinating die so that you can use them with or without the dies! I used my Glimmer hot foil machine with some Pewter Foil to hot foil the beautiful Sketched Peony Blossom Hot Foil Plate. I used the OLO Markers to add lots of intense color to the large bloom. It’s big enough to really get down into the nooks and crannies to create lots of dimension.

I hot foil the Sketched Leaf Branches Hot Foil Plate + Dies using the same Pewter foil. I also used the Pinkfresh Studio Solid Hot Foil Plate to use the leftover foil to create some solid foliage, which I die cut with the coordinating die.

I arranged the flower and greenery on a white A2 card front, adhering the pieces with some foam adhesive. I added a greeting from the CZ Sentiment Strips Wedding, which I popped up using a double layer of foam tape to make it really stand out. I added a few Graphite gems to coordinate with the charcoal foil.

Well, that’s all for me today! I will be back later this week with some more inspiration using the new goodies from the Yay You collection from Simon Says Stamp. Thanks so much for reading, and have a marvelous evening!

Filed Under: simon says stamp Tagged With: glimmer hot foil, hot foil, sketched peony, solid hot foil plate

Primary Sidebar

  • Facebook
  • Instagram
  • Pinterest
  • YouTube

Favorite Shops

Secondary Sidebar

Subscribe

Enter your email address to subscribe to this blog and receive notifications of new posts by email.

Instagram
Something is wrong.
Instagram token error.
Follow
Load More

Archives

Tags

3D embossing folder alcohol markers better press birthday birthday card blog hop card kit christmas christmas card christmas tag colored pencil copic copic coloring Daniel Smith die cutting embossing folder embroidery felt giveaway holiday holiday card hot foil ink blending karin brushmarker pro layered stencil masculine my monthly hero new release no line coloring no line watercolor OLO marker olo markers original illustration pawsitively saturated rainbow shaker card slimline stamping stamptember stencil thank you thinking of you valentine's day video watercolor

Popular Posts

Simon Says Stamp Joy For You Blog Hop- Day 1!
Simon Says Stamp Joy For You Release-Now Available!
Frozen Fractals All Around with New Simon Says Stamp Joy For You Release!
Shaped Holiday Shaker Card with New Simon Says Stamp Jolly Season Card Kit of the Month!
Holiday Postage with New Simon Says Stamp!
Simon Says Stamp Glory to the Newborn King Holiday Kit-Part II!
Pinkfresh Studio 5th Birthday!
Altenew Build A Flower: Fuchsia Blog Hop+Giveway!
Holiday Joy in Pink and Green with New Simon Says Stamp DieCember!
Honey Bee Stamps September Release Blog Hop!

Disclosure

Some affiliate links are used in my posts. This means that, should you click on one of my links and purchase something from that company, I will receive a small portion of the sale at no extra cost to you. I use the money earned from these sales to help maintain my blog. I so appreciate you visiting and, if you do choose to use one of my affiliate links, thank you so much for your support!
Copyright © 2026 ·Brunch Pro Theme · Genesis Framework by StudioPress · WordPress · Log in
Loading Comments...